Previously, I already published detailed instructions for setting up a local network in Windows 10. But for the setup I used a home group, which was removed from Windows 10 (in version 1803 and higher). This means that the old instructions are no longer relevant, since there is no homegroup in Windows 10 1803. But all the functionality, of course, has been preserved, and in the top ten you can still provide shared access to folders and printers, open shared access to a specific folder, gain network access to other computers, etc. It’s even simpler and better, unnecessary settings have been removed. HomeGroup was used to simplify setting up a local network and sharing files and printers. But in fact, it only complicated the process of setting up a local network with its confusing settings. It's easier to manually share and share a folder over the network than to mess around with setting up a homegroup.
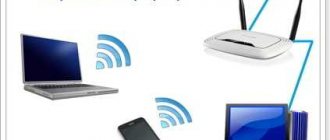
Typically, a local network is set up between computers that are connected to each other via a router (via Wi-Fi, network cable) or a switch. If necessary, you can connect two computers directly using a network cable, but hardly anyone else uses this method now. You can share folders in Windows 10 not only with other computers, but also with mobile devices. For example, folders on a computer shared over the network can be accessed from mobile devices, TV set-top boxes and other devices that run Android. But most often, a local network is configured specifically for exchanging files between several computers. If there are computers on the network running Windows 7 and Windows 8, then the sharing settings on them are configured in almost the same way as in Windows 10. A folder that is shared on a computer with Windows 10 will be displayed without problems in the network environment on the computer with Windows 7 and vice versa. The main thing is that network discovery is enabled on both computers.
How to share a folder in Windows 10
At the first stage, we will create a directory and give it access rights to all devices connected to the local network, and at the same time we will get an idea of the concept of “permissions”.
- Create a folder with a suitable name in a convenient place and open its properties;
- Go to the “ Access
” tab and click the “
Sharing
” button; - In the drop-down list of the window that appears, select “ All
” and click the “
Add
” button; - By default, the permissions for an added object are set to “ Read Only
”.
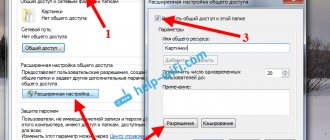
If you want other people to be able to write their files to the share, select Everyone
the Read & Write
menu ; - Click " Share
" and select "
Make network private
" in the network discovery window; - Once the path to the shared folder appears in the settings window, click " Done
".
Now you can check access to your shared folder by going to the network path specified in the properties window. Also, if you click on the “ Net
"and expand the icon with the name of your computer in the navigation area of Explorer, you will see the
Users
, in which shared resources will be located. Please note that when network access is opened, the desktop and library directories will become shared by default. What to do with this will be shown below.
Troubleshoot setting up sharing
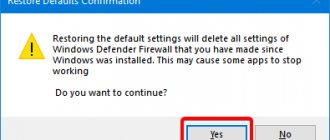
If the system issues a warning about the unavailability of a network resource and “swears” at the settings, you need to check the sharing settings for various network profiles on the computer whose network resource you are trying to access.
Follow the chain: “Start” - “Settings” - “Network and Internet” - “Ethernet” or “Wi-Fi” (depending on the local network connection protocol) - “Changes advanced sharing settings.” Set the parameters as in the pictures below.
How to share a folder in Windows 10 without a password
By default, access to shared directories is carried out using the login and password of the user who shared access to the directory, but on a trusted home network you can share a folder without a password.
- Open with the command given below, Network and Sharing Center;
control /name Microsoft.NetworkAndSharingCenter - On the left side of the menu, click “ Change sharing settings
”; - Expand the “ All networks
” block and disable password-protected sharing (the option is at the very bottom).
Setting up a workgroup
The first step is to ensure that all computers on the network have the same workgroup. Press the Win+Pause keys and look at the workgroup in the system properties just below the computer name. In all current versions of Windows, it is configured by default and is called “Workgroup” . Its name can be left as it is, or you can change it if necessary. But then you need to change the name of the workgroup on all computers on the network. To change the name, click “Change settings” .
In the new window, click the “Change” and, in fact, change the name - remove the preset “Workgroup” and enter your own. The name must contain only Latin characters.
How to connect to a Windows 10 shared folder
The shared folder has been created, but this is still not enough. In order for other computers to be able to see it, network device detection must be enabled in their settings.
- On the client computer, click the “ Network
” icon in the Explorer navigation bar; - A blue bar will prompt you to change the sharing settings, right-click on the message and select “ Enable network discovery…
” from the menu; - In the window that opens, select “ No, make this network private
”; - Open the Network folder in the Explorer navigation bar
. In it you will see all detected network devices, including the computer with the shared folder.
When you log in, you will be asked to enter the username and password of the owner of the computer with the shared directory, unless he has disabled the authorization request. The password will need to be entered each time you turn on the client computer; if you want to simplify the next access, we recommend checking the “ Remember credentials”
" After this, you will be able to view the contents of the shared folder, edit the files in it and copy your own files into it if the owner has set write permission.
And now I would like to touch on one nuance. If you create a shared folder on your desktop, the path to it will be longer. For example, we created another shared folder called " Photos
", but already in the root of drive D. Pay attention to the length of the paths of the shared folders in the screenshots - it is clear that it will be more convenient to enter the shared folders located at the root of the partition.
How to view shared folders using File Explorer
Use these steps to view all network shares from your device using File Explorer:
- Open File Explorer.
- Click on Network.
- Under Computer, double-click your device name.
- View all folders that are currently available on the network.
By following these steps, you will have a clear picture of the folders currently accessible from the network.
Can't share folder in Windows 10
Removing the Home Group has made sharing resources more convenient and simpler, but this does not eliminate the appearance of errors due to which Windows 10 does not see shared folders or cannot access them. The reasons can be very different, ranging from user error to bugs in system updates. If you have lost directory sharing in Windows 10, check the following settings.
- If the problem occurs after updating, check your sharing settings. How to access them, see the section “ Removing an access password for a shared folder
.” The network must be private and network discovery and sharing enabled, as shown in the screenshot. - Open the system properties with the command systempropertiescomputername, click “ Identification
” and in the window that opens, make sure that the PC is part of the corporate network.
Click “ Next
”, select “...network without domains”, “
Next
” again and look at the workgroup name.
It should be WORKGROUP
, the same name should be on all other PCs on the local network. - Your updated third-party antivirus or its built-in firewall may have caused the problem. Try disabling the latter; we do the same with the antivirus. If the problem is in the firewall, disable it and use the standard Windows firewall; if the problem is in the antivirus itself, add the network to the exception.
- Try enabling sharing for the All Networks
.
With some risk, you can try changing the network type to “ Public
” on a computer that does not see shared folders. - Using the services.msc command, open the services window and make sure that you have the following services enabled and active:
- If all else fails, try resetting your network settings under "State
» applications
Options
. This will reinstall the network adapters and restart the computer.
Possible problems
If the setting does not turn on, try performing the operation via the Command Line. To do this, enter the request “netsh advfirewall firewall set rule group=”File and Printer Sharing” new enable=Yes” in the appropriate interface and press the “Enter” key.
If the setting is activated, but you cannot open the folder of interest on your computer, then you need to check a few things. The first is whether the devices are actually connected to the same Wi-Fi or Ethernet network. Secondly, whether the user is part of the selected group. Finally, is the “Allow anonymous access to shared resources” policy set to “Share”.
How to remove shared access to a folder in Windows 10
As the owner of a folder, you can disable access to it at any time without disabling network discovery itself. This can be done in two ways - simple and advanced. Let's start with something simple.
Right-click on the directory and select " Give access to
»
→
«
Make inaccessible
».
The advanced method involves using the built-in fsmgmt.msc snap-in. This tool is good because it allows you to open and close access only to the folders you need. It is known that when you enable sharing, Windows 10 automatically shares library folders, and using fsmgmt.msc you can deny access to them by closing the Users
.
- Open the snap-in with the command of the same name in the “ Run
” window; - Double-click “ Shared Resources
” in the list on the left; - Right-click on the shared folder in the column on the right and select “ Stop sharing
”, after which users will not see this folder in their “
Network
” section; - You can also leave the folder visible, but limit its rights by selecting Properties → Share Permissions → Required Rights
.
Thus, completely denying access will result in the user receiving an error when opening a shared folder.
Local and global networks
Today there is only one global computer network, the Internet. Local computer networks differ from global ones in the following factors:
- The number of computers connected in this network.
- The quantity and quality of resources shared (available) in this network.
The global Internet connects hundreds of millions (possibly more than a billion) computers. These computers provide a large number of different types of resources. The most common of which are text and graphic information. In addition to the information itself on the Internet, it is also possible to process this information - there are services for working with images and documents. Also available on the Internet are services that are not related to computer topics, for example, the sale of goods and services (for example, the sale of tickets for various transport).
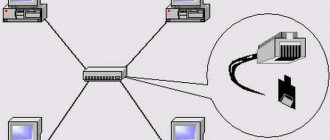
A local computer network most often combines from two to several computers. Much less often, the number of computers on a local network can be several tens or hundreds (in large commercial or government organizations). As a rule, only a few resources are distributed on local networks - files, printers, scanners and Internet access.
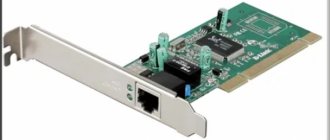
Computers are physically connected to a network either using a cable or via a radio signal (WiFi). But in any case, setting up a local network is done the same way.
So, what, and in what order, needs to be done in order to configure the Windows 10 network?
Shared folder Windows 10 Android Total Commander
You can set up a shared folder over Wi-Fi not only between Windows, but also between Windows and Android. Since the special folder " Network
"Most Android firmwares do not, you should use the mobile version of Total Commander.
- Install
Total Commander
application Google Play ; - On the main tab of the running file manager, click "Download plugins
»; - Follow the link that opens to the developer's page and select the plugin there "Lan (Windows network)
»; - Click the link that will redirect you to the Google Store and install the plugin from there;
- A corresponding icon will appear in the main section of Total Commander, click it;
- Next, click "New server
" and enter the computer name; - In the next window, specify its local IP address. You don't have to specify a username and password if you open access to everyone. Save the settings by pressing " OK
»; - Go to the directory with your username and log in if you have set a password for access.
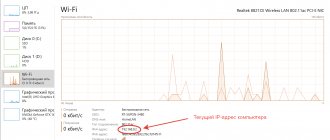
Note: The local IP address can be found in the network properties, you need an IPv4 address.
But if, nevertheless, Windows requires a network password
Despite the fact that the settings described above have been made, when you log into this computer, another computer may request a network password. This is possible in two cases.
Local users with the same name (login)
Both computers have local users with the same name but different passwords.
Example
. There are Comp1 and Comp2. Each of them has a user named User. But on Comp1 the user's password is 123, and on Comp2 his password is 456. When trying to log in to the network, the system will ask for a password.
Solution
. Or remove matching user logins. Or for users with the same login, specify the same password. An empty password is also considered the same.
There are no local users on Windows 10
On Windows 10, you can log in and work with a Microsoft account if you have Internet access. At the same time, it is possible that when installing Windows 10, a local user was not created at all (the login was via a Microsoft account). In this case, Windows will also require a password when logging in via the local network.
Solution
. Create a local user on your Windows 10 computer.
Share Windows 10 folder for TV
Most modern TVs run on the same Android, but the firmware they use can be completely different, so the procedure for sharing Windows 10 folders for a TV may differ. To connect devices, a DLNA server is usually used, here is the algorithm for setting it up:
- IN Network and Sharing Center
(the network must be of home type) click on the link on the left “
Media Streaming Options
»; - Enable media transfer in the next window;
- Select your TV from the list of devices connected to the router that appears and save the settings
- After this, the “Video”, “Music” and “Images” library folders should become available in the TV explorer;
- To add your directory, launch Windows Media Player, open the context menu of any of the folders, for example, "Videos" and click "Video library management
»; - In the window that opens, click “Add” and specify the path to any public folder.
Second way to share
There is another way to share a folder over a local network in Windows 7/10. In the “Properties” window, on the “Access” tab, click the “Advanced settings” button.
Next, check the box next to the “Share this folder” option and go to “Permissions.”
As we can see, the list already contains the “Everyone” group. We can configure access rights for it or click the “Add…” button and select another user.
In the “Enter names of selected objects” field, enter the desired user and click “Check names”.
If such a user is not found, a warning message window will appear.
To select a user from the list of all available users and groups, click the “Advanced” button and then “Search”.
For example, let’s select the “Guest” account, confirm the selection with the “OK” button, and then “OK” again. The corresponding entry appears in the list. Let's set the necessary permissions and apply the changes. The fact that the folder has become publicly available will be indicated by the appearance of a network path next to the “Sharing...” button.
In Windows Explorer, you can define shared folders without going to Properties. Just select the directory you are interested in and check if there is a corresponding inscription on the bottom panel.
How to quickly share folders in Windows 7/10
In Windows 7, you can open shared access in just a couple of clicks. Mark the desired folder and click on the corresponding button in the top horizontal menu.
Let's select users and distribute permissions to them according to the already familiar scheme.
In Windows 10, there is a Share menu for this purpose.
Opening public folders on network computers
In order to get to the shared directory from another PC, you need to select the target computer in the “Network” section of Windows Explorer.
If you plan to use the folder constantly, you can map it as a network drive. To do this, right-click on the icon and select “Map network drive...”
Next, specify the drive letter, check the required boxes, and click “Finish.”
The created drive will appear in the Explorer directory tree and in the Network Locations area.
Home groups
The functionality of Windows 7/10 systems includes the ability to create so-called home groups, with the help of which you can also provide shared access to files and folders. To create a group, go to Control Panel - Home Group.
Click the “Create a home group” button, then check the boxes for those elements that we want to share, and at the end set a password for connecting to the group of PCs located on the local network.
Now let's try to join the created group. To do this, on another computer, go to the same section Control Panel - Home Group. Here we will find information about the already created group. Click the “Join” button, and then “Next”.
Set the sharing settings and enter the password in the next window.
We complete the procedure by clicking the “Finish” button.
Now in the Explorer tree, select the “Home Group” branch and click on the name of the group (it will be assigned a user name).
The Videos, Pictures, and Music folders will appear on the right. The composition and number of folders will depend on the settings specified when creating the group.
Now you can easily add folders to a group. In Windows 7, after selecting the desired folder, click on the “Sharing” button at the top and set “Homegroup (read)” or “Homegroup (read and write)”.
In Windows 10, the same thing is done using the Share menu.
We perform the necessary actions, and then log in from another PC and make sure that the folder has been shared.
Ways to open folder options
There are enough methods to find folder properties. Choose one of the methods that is convenient for you:
1. Near the “Start” button, click on the search image (magnifying glass icon). In the search bar, enter “Explorer Options” and click this found item.
2. Press the Win + X button to open the additional Start menu. Launch the Control Panel and click Appearance and Personalization. Next, go to “Explorer Options.”
3. Open File Explorer and go to the View tab. Click the “Parameters” object.
4. Open the Run window by holding Win + R. Place the command below in the input line and click OK:
control.exe folders
5. In Explorer, LMB select “File”. In the menu that appears, click the item responsible for changing Windows 10 folder settings.
6. To open directory properties using the keyboard, follow these steps. Press Win + E, Explorer will launch. Switch the keyboard to the Russian layout (Shift + Alt). Hold Alt until the letters appear. Next, press “F”, after opening the menu, press “I”.
Using one of the methods above will open the directory options. Below we describe the functionality of these settings.
Enable folder options
As a result of virus activity or the actions of another user, the folder properties window may not open. Do one of the steps below.
1. Use the Win + R keys to open Run, use the regedit command, click OK. In the UAC window, click “Yes”. In the registry, navigate to each Explorer section of the branches shown below.
In the right area of the registry, delete the NoFolderOptions parameter. Right-click on it, click “Delete” in the menu, and “Yes” in confirmation. Restart your PC.
Note: malware often disables the registry, so a message appears stating that editing the registry is prohibited by the administrator, read the link for information to fix the problem.
2. If you have Windows 10 Pro, Enterprise, then you can use the Group Policy Editor (gpedit.msc). Type gpedit.msc into the taskbar search bar, then left-click the found item. By going to the “Explorer” section (full path in the screenshot below), double-click LMB to open the state that prohibits opening folder options on Windows 10.
Set the radio button to Not Configured and click OK. The folder properties should now be available.