Creating a local network is recommended in circumstances where several computer devices and mobile devices are used simultaneously in a room. Using this function, you can view any file or folder from all gadgets in a single node.
The main advantage of a home network is that you do not need to use network cables to activate it. All you need to do is use the router settings. How to create a local network between two computers via any Wi-Fi router will be discussed in this article.
Why is a home network created?
Any local group is a network node designed to store data. This approach allows you to view information that is on a laptop, computer or other device from one device. Also, in addition to data exchange, you can communicate with other users using a local network.
For example, many play games in a similar way or use a single application. Another advantage is the ability to create a server at home. The user will need to connect a printer or other similar device to all devices that are connected to a single network.
Create a network for both devices
Setting up a home network using a router is carried out in the same way for any software. Whether it is Windows, Mac or Linux, the sequence of actions is considered unchanged.
Let's look at how to make a local network. You can activate it in several ways: through wired channels or a Wi-Fi connection. The only condition for adjusting the local network is the mandatory connection of all devices to a single router.
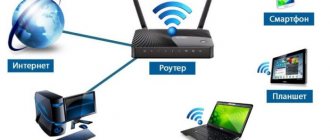
An example of such a home network (Wi-Fi and Ethernet) without a guest segment is shown in the figure below.
Despite the simplicity of the procedure, the user will not be able to immediately enjoy all the functions of the home group. First of all, you need to pay attention to the state of folders that will be closed for viewing on other gadgets. Therefore, in order to use all the tools, you will need to obtain permission to read the information.
As for activating and adjusting the local network, the procedure is carried out according to a single method:
- First of all, you will need to go to the “Network Center”.
- Find the block with connections and click on it.
- At the next stage, a list of groups will follow, among which it is worth indicating the required option. Afterwards, you will be redirected to the subsection with your home network.
- Upon completion, you need to check the boxes next to the data for which you will need to obtain a permit.
If the procedure is completed correctly, a message about the created group will appear on the new page and a security code will be displayed that must be entered each time you connect to the server.
Background
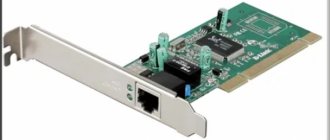
Connecting two computers and allowing communication between them previously occurred using wired (Ethernet) cables or using other network devices such as hubs, switches or routers. This is an effective method, but it requires some additional work (configuring a firewall, etc.).
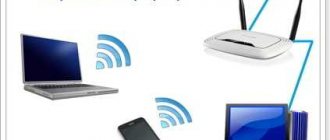
But what to do if there is no router or wired Ethernet cable and you need to connect two computers via WiFi connection to collaborate or share files? Connecting a peer-to-peer network is an effective way to solve this issue. The procedure allows you to synchronize two Windows computers if they have the necessary Wi-Fi hardware.
A special ad hoc technology known as computer-to-computer or peer-to-peer mode allows direct communication between two or more devices without a router. It allows you to synchronize 2 PCs via Homegroup - an effective file sharing tool. How to connect two computers to each other via WiFi and set up synchronization? The process is carried out in several stages.
How to share a disk or folder
After creating a home network through a wireless Wi-Fi router, you need permission to read files and folders. Admission organizations use the following instructions:
- On the first device, the user needs to go to the Start menu.
- Click on the shared section.
- Open Control Center.
- Select to change auxiliary parameters.
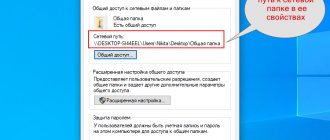
- When the control center settings open, you will need to decide on the following blocks: open general access, allowing users on this network to read and write information. You also need to activate permission to work with printers and files, and then enable network discovery. To ensure security during communication on a common channel, you should use 128-bit encryption. Once completed, you should deactivate access for everyone using password protection. Select the save command.
- Adjust access for everyone on a specific volume (local drive “C” or “D”). It will also be possible to obtain permission for any folders or files. The task is carried out using a context list in the properties block.
- Specify the block with permission.
- Open advanced settings.
- Next, you need to check the box next to the function that opens sharing access to a specific file or folder.
- Click on the permission tab and on the new page specify the permission for all necessary elements. Click on the confirmation button.
- Go to the security section and click on the button to change settings.
- Click on the add button.
- In the next window, select all objects and click on the confirm button.
- When the list with groups opens, click on the “OK” button.
- Go to the Start menu and select the network section.
- After creating an open server, several computers will be displayed. Choose the first one.
- Upon completion, the volume for which the permit was issued will appear.
- After clicking on the drive (“C” or “D”), the volume of another PC will open.
- Next, you can combine the equipment and begin exchanging information.
Changing the PC name
An optional step—the computer name does not need to be changed. It will be automatically determined in the form of letters and numbers.
To change the name:
- Go to “My Computer”.
- Right-click (RMB) on an empty space and select: System Properties - Advanced System Settings - Computer Name - Edit.
- Enter the desired name and confirm the changes.
- Reboot the PC.
- If necessary, we change the names on each device.
It is recommended to change names if several computers are connected to the network in order to recognize them.
How to set up a router
Before you start creating a local network through any Wi-Fi router, you need to configure some parameters of the router itself. The methodology for carrying out the procedure is considered using the example of TP-Link equipment. You can set up a local network through a router in Windows 7 as follows:
- Connect the network to computer equipment.
- Next, you will need to expand your web browser and enter the router's URL-Link in the search bar. You can find IP devices in the instruction manual or on the back of the case.
- On the page that appears, log in. The user will need to enter a security code and username. By default, TP-Link routers indicate “admin” and “admin”. Click on the confirmation button.
- The administrative panel of the device will open, where you need to find a section with auxiliary settings. To do this, you need to activate the “Advanced Settings” configuration.
- On the left side of the screen, find the wireless mode block.
- A context menu will open in which you need to specify the wireless mode setting. This is where the necessary parameters will be set.
- First, you need to activate wireless notification. To do this, you need to check the corresponding line.
- In the “SSID” field, enter the new network name that will be used for the home group. It is recommended to use Latin characters.
- Set a security code. If necessary, the local network can be left open, but in this case any user will be able to connect to it.
- Click on the save button and reboot the router.
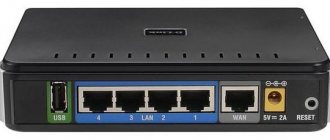
Equipment preparation
Methods for dividing an Internet cable into 2 computers
You should start one of the computers, open a browser and enter the router’s IP address in the address bar (it is indicated on a sticker attached to the side or back panel of the device) to enter its administration panel through the web interface. A combination of username and password is used for this.
- You need to click on the WAN (Wide Area Network) link and select PPP over Ethernet (PPPoE), and then enter the username and password provided by your Internet service provider in the appropriate fields. The authentication method should be set to Auto.
- Next, click “Enable WAN service”, select the “Obtain an IP address automatically” option and save the new settings. Reboot the router to launch the updated settings.
- Once the settings are set, both computers will be automatically connected to the Internet.
Note! To make sure that the router supports the entered configurations, it is advisable to view its properties on the command line using administrator access.
Connecting devices to a single network
Next, you will set up a local network through a router and connect 2 or more devices to an open server. In other words, you can find out how to set up a home network below.
For computers
After creating a home network via a wireless Wi-Fi router on computers with Windows 7, you can start connecting other devices. The connection procedure takes two minutes, but first you will need to familiarize yourself with existing networks.
First, you need to make sure that the synchronization option appears in the window with the name of the home group.
The user will need to click on the address that appears, after which the connection will occur. When there is no sign with the name, it means you need to switch to your home network.
How to set up a local network:
- Go to the public network section.
- Click on the inscription with the name of the home group.
After setting the required parameters, you should connect. To do this you need to do the following:
- Find a section that provides shared access to other home gadgets.
- Click on the join button.
- Select the files for which you want to grant access.
- Press the continue key.
- Enter the security code in the new field.
- Click on the “Continue” button.
- Press the confirmation key.
When connecting several devices, this manipulation is carried out on each of them in turn.
For mobile phones
When a network has been created through a router for 2 or more devices, both computer and mobile equipment can be connected to the open server. However, in this case you will need to acquire special software. The best option would be ES Explorer (application), which makes it easier to control your smartphone. How to connect a smartphone to a local network:
- Enable ES Explorer.
- Go to the network section.
- Click on the “LAN” connection button.
- Click on the scan function.
When the procedure is completed, the user will be able to reach the selected elements. To exchange information via a wireless channel, it is recommended to use the Link Asus Share utility. You can install the software in question on any phone running Android. Unlike Windows devices, information is exchanged according to these instructions:
- Download and install the utility on your laptop or computer.
- Restart the device and router system.
- Next, you need to download and install the utility on your mobile phone.
- Launch Share Link Asus and get started.
Similar to the case with a PC, synchronization in a single node is required to transfer information. You can organize this by following these instructions:
- Simultaneously activate the utility on your computer and mobile devices.
- Using the mouse on your PC, select the required element, drag it to the root of your smartphone and click on the send button.
- Go to the second device and touch the data reception key.
To save time, you can use the power of attorney function. To do this, you need to add the gadget to the appropriate list, after which the files will be downloaded without confirmation.
Is it possible to connect two computers?
The easiest way to connect computers locally is to lay a cable (twisted pair) between them. Everything is simple here, insert the cord into the network card and set the settings. With this connection, it will not be possible to add more than two systems, and it is also inconvenient to use wires.
Modern computers have Wi-Fi enabled cards, and the same technology is used in all laptops. Setting up a network wirelessly is also easy. With just a few steps, you can set up file sharing, transfer internet, or even play games over LAN.
You may also find our instructions useful on how to assemble a computer yourself.
The connections differ technically. To establish a connection, there must be some equipment. At a minimum, these are network cards and a special cable. In addition, you can use a router and other additional modules (for example, Wi-Fi).
Main problems and methods for solving them
How to create a home network if problems arise? Often, when organizing a network for several devices, various errors appear. This may be due to the activity of the anti-virus database or other security utilities. In addition, the following problems may occur:
- No access to shared folders or files. Sometimes, even after correct settings and granting read permission, some elements do not open on one of the devices. As a result, a message appears stating that it is impossible to open a network file, there are no rights to perform the procedure, or there is no access to the folders at all. Also, for unification, the system may request a security code and user name. To resolve the issue, you should check the status of your public access settings. The network owner will need to use the properties of the desired element.
- There is no display of computers from the shared server in the networks block. To troubleshoot, you will need to check the public access settings and workgroup on all devices. To do this, go to the network tab and use the mouse to call up the context menu. Next, the update tool will appear. If this option does not help, it is recommended to disable your antivirus and firewall. Another method to solve the problem is to check the status of the router.
- A gadget connected to an open server cannot detect third-party devices. A problem with a certain connection can only occur in circumstances where computer devices are connected to the server via a provider cable or Wi-Fi channel. In this case, you need to decide which profile is used for network discovery.
If none of the above methods help, you should re-create the local network and connect home devices to it.
Opening a port on the TP-LINK TL-WR841N router
For example, let's look at setting up a router of this model.
Sequencing:
- We go to the device management menu: enter 192.168.1.1, 192.168.0.1 or 192.168.0.0 in the browser. The exact address and login information are indicated in the instructions.
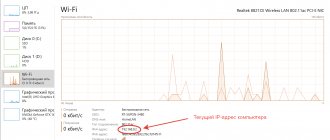
- When you log in, the main page will already indicate your current IP address.
- Go to the “Forwarding” tab, then to “Virtual Servers” (if the control panel is in English - Forwarding - Virtual Servers).
- Click “Add new”. Here you can enter “Service Port”, “Internal Port” and “IP Address”.
When the settings are entered, click “Save”.