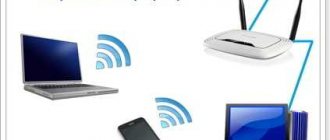
The number of office equipment and other gadgets in ordinary apartments and houses is already growing exponentially. In this regard, novice users are often interested in the question of how to make a home local network and set up communication between two computers or laptops. Despite the fact that from the outside it all seems complicated, in fact everything is very easy and simple to do. and now I will tell you how. First, let's look at all the possible options for creating a small home network. There are two main methods - cable and using wireless equipment.
Local networks and network equipment
A local network (LAN, LAN) is designed to work in one building or room (office).
Questions to help you plan your LAN:
- availability of network infrastructure on site;
- how many PCs
and network devices are there; - do the premises allow for laying network cables;
- the applications you use and what their network requirements are;
- Are there plans to connect new users and install software?
Selection of network equipment:
- to build a LAN, an Ethernet cable of at least category 5 is used;
- The fastest wireless standard for Wi-Fi networks today is 802.11n.
Other network equipment must be compatible with your choice of cable or wireless connection.
PC network card – has an RJ-45 network connector or a Wi-Fi antenna and is configured to operate using the TCP/IP network protocol.
When creating a local network, the equipment used must be compatible with the computer's network card
Router (router) - has several RJ-45 network connectors and a Wi-Fi antenna, monitors the addresses of network devices, working using the TCP/IP protocol.
The router must be compatible with the equipment used to connect a local network between computers
Twisted pair Ethernet cable
A twisted pair cable consists of eight copper conductors woven in pairs, enclosed in a plastic sheath, sometimes with shielding in the form of aluminum foil or braid. On the outside, the cable has an outer sheath made of PVC.
Twisted pair Ethernet cable with aluminum foil shielding
Twisted pair Ethernet cable with braided shielding
Interlocking and shielding of pairs is used to reduce the amount of noise on the cable and increase the data transfer rate. The cable is designated UTP (unshielded) and FTP (shielded twisted pair).
There are seven categories of cable that determine its capacity. To build local networks used to transfer data between PCs, a cable of at least category 5 is used.
To connect two PCs, use a cable of at least category 5
Options for building a home local network
Ways to build a home network:
- If you need to create a network of two PCs, you can connect them directly with an Ethernet cable.
To connect such a network to the Internet, one of the PCs must have 2 network cards - the first to connect another PC, and the second to connect to the Internet from the provider. Option to connect a network of two PCs directly with an Ethernet cable - A more flexible option for a home network is to connect several PCs to a router. In this case, the number of connected PCs is limited by the number of ports on the router. The Internet cable is connected to the same device.
Scheme for connecting a home network via a router
Creating a home network between two PCs
When connecting a local network via an Ethernet (LAN) cable, the first question is whether a straight cable or a crossover cable should be used.
The answer to this question depends on what type of devices it connects:
- devices of the same type - two PCs or network switches;
When connecting two computers of the same type, you need a specific Ethernet cable
- devices of different types - PC and router or Ethernet hub.
Connecting devices of different types requires the use of a certain type of cable
The "crossed" conductors in a crossover cable are used to transmit signals from one end of the cable and receive them at the other end and vice versa, making it suitable for exchanging information between devices of the same type.
The "crossed" conductors in a crossover cable make it suitable for connecting and exchanging information between devices of the same type
Today, many network devices have an Auto-MDI(X) feature that adjusts transmission over different types of cables.
Reference! If at least one of the devices connected by the cable has built-in Auto-MDI(X), any type of Ethernet cable can be used for this connection.
If the device has the Auto-MDI(X) function, you can use any type of cable
Network convenience
The need for a local network is due to the transmission of an Internet signal to a number of personal PCs. You can, of course, install two Internet provider cables with different IP addresses into your house, but this will not be economically feasible. Establishing a network connection between computers, laptops or other equipment (tablets, smartphones, TVs with Smart TV function) provides a number of advantages for their users:
- Quickly transfer files (photos, music, movies, text) over a local network between devices without using a USB flash drive.
- Use one printer when working on any computer.
- Combining computers into one gaming space if the family plays online games.
How to connect two PCs with an Ethernet cable
Step 1. Connect two PCs (laptops) with a crossover cable, inserting it into the RJ-45 connectors of the PC network cards.
We connect the crossover cable to the RJ-45 connectors of the computer network cards
Step 2. Press the “Win+R” keyboard keys simultaneously (“Win” is located to the right of “Ctrl”).
Press the “Win+R” keys simultaneously
Step 3. Type “ncpa.cpl” in the window and click “OK”.
We print in the “ncpa.cpl” window, click “OK”
Step 4. Right-click on the Ethernet connection icon and select “Properties” with the left mouse button.
Right-click on the Ethernet connection icon and select “Properties” with the left mouse button.
Step 5. In the LAN connection properties window, click on TCP/IPv4 and click “Properties”.
Click on TCP/IPv4, click “Properties”
Step 6. Set the IP address 192.168.0.1 and subnet mask 225.225.225.0 for the first PC and click “OK”.
Check the box “Use...”, set the IP address and subnet mask, as in the photo, click “OK”
Step 7. Repeat “Steps 2-6” for the second PC, setting the IP address to 192.168.0.2 and the subnet mask to 225.225.225.0.
Scheme and data for connecting two PCs on a home network
Networks for the beginning IT specialist. Mandatory base
Approximately 80% of us who graduate from university with some kind of IT specialty do not end up becoming a programmer. Many people get jobs as technical support, system administrators, computer device adjusters, consultants-sellers of digital equipment, managers in the IT field, and so on.
This article is just for those 80% who have just graduated from university with some IT specialty and have already started monitoring vacancies, for example, for the position of a system administrator or his assistant, or a field engineer for an outsourcing company, or for technical support of the 1st /2nd line.
And also for self-study or for training new employees.
During my career in the IT field, I encountered a problem that universities do not provide the most basic knowledge about networks. I first encountered this myself when, after graduating from university, I went for interviews in 2016 and could not answer simple (as it seems to me now) questions. Then, of course, it seemed to me that I had messed up and didn’t finish my studies at the university. But as it turned out, the problem was in the educational program. Since now, I also face this knowledge gap when training new employees.
And that then, I had to study many articles on the Internet before I understood the basic points, and that now, when asking young specialists topics to study, they have difficulty finding and assimilating what they need. This is due to the fact that there are a huge number of articles on the Internet and they are all scattered by topic or written in too complex a language. Plus, most of the information at the beginning of their articles contains mainly just scientific definitions, and then immediately complex technologies of use. The result is a lot of things that are still completely incomprehensible to a beginner.
That is why I decided to collect the main topics in one article and explain them as simply as possible “on fingers”.
I warn you right away that there will be no in-depth information in the article, only the very basics and the most basic.
Topics covered:
- Global and local networks
- White and gray IP addresses
- NAT
- DHCP server and subnets
- Network routing devices (router, switch, switch, hub)
- Basic Network Analysis Commands
- Transport protocols UDP and TCP
Global and Local Networks
The entire Internet network is divided into global (WAN) and local (LAN) .
All user devices within one apartment or office or even building (computers, smartphones, printers/MFPs, TVs, etc.) are connected to a router, which connects them into a local network .
Participants in the same local network can exchange data between their devices without connecting to an Internet provider. But to go online (for example, go to the Yandex or Google search engine, go to VK, Instagram, YouTube or AmoCRM) you need access to the global network .
Access to the global network is provided by the Internet provider, for which we pay him a subscription fee. The provider sets the speed level on its routers for each connection in accordance with the tariff. The provider sends us twisted pair cable or fiber to our router (our local network) and after that any device on our local network can access the global network .
As an analogy, networks can be compared to roads. For example, the roads in your city N are a local network . These roads connect you to shops, businesses, parks and other places in your city. To get to another city N you need to go onto the federal highway and drive a certain number of kilometers. That is, access the global network .
For a more visual representation of what a global and local network , I drew a schematic diagram.
White and gray IP addresses
Each device on the network has its own unique IP address . It is needed so that network devices understand where to send the request and response. This is just like our houses and apartments have their exact address (zip code, city, street, house number, apartment number).
Within your local network (apartment, office or building) there is a range of unique addresses. I think many people have noticed that the computer’s IP address, for example, begins with the numbers 192.168.XX
So this is the local address of your device.
There are allowed local network ranges :
I think from the table presented it immediately becomes clear why the most common range is 192.168.XX
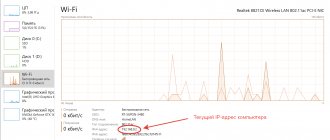
To find out, for example, the IP address of your computer (based on Windows OS), type the ipconfig
As you can see, the IP address of my computer on my home local network is 192.168.88.251 To access global networks, your local IP address is replaced by the router with the global one given to you by your provider. Global IP addresses do not fall within the ranges listed above.
So local IP addresses are gray IP addresses, and global IP addresses are white ones .
For more understanding, consider the diagram below. On it I signed each device with its IP address.
The diagram shows that the provider releases us to global networks (the Internet) from the white IP address 91.132.25.108
For our router, the provider issued a gray IP address 172.17.135.11 And on our local network, all devices, respectively, also have gray IP addresses 192.168.Х.Х
You can find out under what IP address you access the global network on the website 2ip.ru
But from all this it is worth remembering one very important factor! Currently, the problem of a shortage of white IP addresses has worsened, since the number of network devices has long exceeded the number of available IPs. And for this reason, Internet providers issue gray IP addresses (within the provider’s local network, for example, within several apartment buildings) and release them to the global network under one common white IP address .
To find out whether your provider gives you a gray IP address or a white one, you can go to your router and see what IP address your router receives from your provider.
For example, on my home router I see a gray IP address 172.17.132.2 (see range of local addresses). To connect a white IP address, providers usually provide additional services. service with subscriber fee.
In fact, for home Internet this is not at all critical. But for company offices, it is recommended to buy a white IP address from the provider , since using a gray IP address entails problems with the operation of IP telephony, and it will also not be possible to set up a remote connection via VPN. That is, a gray IP address will not allow you to connect your configured server to the Internet and will not allow you to set up a remote connection to a server from another network.
NAT
In the previous section, I noted that “the problem of shortage of white IP addresses has now worsened” and therefore a common connection scheme among Internet providers now is to connect many clients with gray IP addresses, and release them to the global Internet under one common white IP.
But this was not always the case, initially everyone was given white IP addresses, and soon, in order to avoid the problem of a shortage of white IP addresses, NAT (Network Address Translation) was invented - a mechanism for converting IP addresses .
NAT works on all routers and allows us to access the global network from the local network.
For a better understanding, let's look at two examples:
1. First case: you purchased a white IP address 91.105.8.10 and several devices are connected to the local network.
Each local device has its own gray IP address. But access to the Internet is only possible from a white IP address.
Therefore, when, for example, PC1 with the IP address 192.168.1.3 decided to go to the Yandex search engine, the router, releasing PC1’s request to the global network, connects the NAT , which converts the IP address of PC1 into a white global IP address 91.105.8.10
Also in the opposite direction, when the router receives a response from the Yandex server, it will use the NAT to forward this response to the IP address 192.168.1.3 to which PC1 is connected.
2. Second case: you also have several devices connected to your local network, but you did not buy a white IP address from your Internet provider.
In this case, the local address of PC1 (192.168.1.3) is first converted the NAT of your router and turns into the gray IP address 172.17.115.3 , which was given to you by the Internet provider, and then your gray IP address is converted by the NAT of the provider's router into white IP address 91.105.108.10 , and only after this is access to the Internet (global network).
That is, in this case it turns out that your devices are behind double NAT .
This scheme has a higher degree of security for your devices, but also has a number of big disadvantages. For example, unstable sip registration of VoIP equipment or one-way audibility when calling over IP telephony.
in more detail about the operation of the NAT , its pros and cons, the allocation of ports, sockets and types of NAT .
DHCP - server and subnets
To connect a device, for example, a computer to the Internet, you usually simply connect a wire (twisted pair) to the computer and then to a free port on the router, after which the computer automatically receives an IP address and access to the Internet appears.
Also with Wi-Fi, for example from a smartphone or laptop, you connect to the network you need, enter a password, the device receives an IP address and you have the Internet.
What allows a device to obtain a local IP address automatically? This function is performed by a DHCP server .
Each router is equipped with a DHCP server . IP addresses obtained automatically are dynamic IP addresses .
Why dynamic?
Because, with each new connection or reboot of the router, the DHCP server also reboots and can issue different IP addresses to devices.
That is, for example, now your computer has an IP address of 192.168.1.10 , after rebooting the router, the computer’s IP address may become 192.168.1.35
To prevent the IP address from changing, it can be set statically . This can be done both on the computer in the network settings and on the router itself.
also the DHCP server on the router and set IP addresses manually.
You can configure several DHCP servers on one router. Then the local network will be divided into subnets .
For example, we will connect computers to the zero subnet in the range 192.168.0.2-192.168.0.255, printers to the first subnet in the range 192.168.1.2-192.168.1.255, and Wi-Fi will be distributed to the fifth subnet with the range 192.168.5.2-192.168.5.255 ( see diagram below)
Typically, there is no need to differentiate between subnets. This is done when the company has a large number of devices connected to the network and when setting up network security.
But such a scheme occurs quite often in companies. Therefore, you definitely need to know a very important point.
Attention! If you need to access the web interface of, for example, a printer or IP phone from a PC, and your PC is located on a different subnet, then you will not be able to connect.
To understand, let's look at an example:
Let's say you are working on PC1 with a local IP address 10.10.5.2 and want to go to the web interface of an IP phone with a local IP address 192.168.1.3 , then you will not be able to connect. Since the devices are on different subnets. IP phones located in the 192.168.1.X can only be connected to from PC3 (192.168.1.5) .
Also, you can only connect the MFP (172.17.17.10) PC4 (172.17.17.12) .
Therefore, when you connect remotely to a user on a PC to access the web interface of an IP phone, be sure to first check their local IP addresses to make sure that both devices are connected to the same subnet.
Network routing devices (router, switch, switch, hub)
Oddly enough, there is a fact that newcomers to IT (sometimes already existing system administrators) do not know or confuse such concepts as router, switch, switch, network gateway and hub .
I think the reason for such confusion arose due to the proliferation of synonyms and jargon in the names of network equipment, and this now misleads many novice engineers.
Let's figure it out.
a) Router, router and network gateway
Everyone knows what a router . That this is exactly the device that distributes the Internet indoors, connected from the Internet provider.
So a router and a network gateway are a router .
This equipment is the main device in organizing a network. In engineering, the most commonly used name is “ router ”.
By the way, a router can be not only a set-top box, but also a computer system unit, if you install another network card there and install, for example, RouterOS Mikrotik. Next, distribute the network to many devices using a switch.
b) What is a Switch and how does it differ from a Switch and a Hub
Switch and Switch are also synonyms . But the hub is a slightly different device. About it in the next paragraph (c).
A switch (switch) serves to branch a local network. Like a tee or surge protector where we connect our devices to power them with electricity from one outlet.
The switch cannot route the network like a router . It will not give your device an IP address and will not be able to connect you to the Internet without the help of a router.
A standard router usually has 4-5 ports for connecting devices. Accordingly, if your devices are connected by wires and there are more of them than there are ports on the router, then you need a switch. You can connect a switch with 24 ports to one port of the router and easily organize a local network for 24 devices.
And if you have another router lying around, you can enable switch mode in its web interface and also use it as a switch.
c) Hub
The hub performs the same functions as a switch. But its distribution technology is very wooden and already outdated.
The hub distributes packets coming from the router to all connected devices indiscriminately, and the devices themselves must understand whether it is their packet or not.
And the switch has a MAC table and therefore distributes incoming packets to one specific device, which requested this packet. Therefore, data transmission by the switch is faster and more efficient .
Nowadays you rarely see the use of a hub , but they still come across them, you need to be prepared for this and be sure to recommend to the user that the hub be replaced with a switch.
Basic commands for network analysis
a) Ping command
To understand whether the IP address or the device itself is active, you can “ping” it. To do this, write the command ping “ ip-address ” on the command line.
Here we “pinged” the Google dns server and, as we see, the server is active (there is a response to pings and is 83 ms).
If the destination is unavailable or this IP address does not exist, then we will see the following picture:
That is, we do not receive a response to pings.
But Ping is much more useful to use with the following switches: -t - “ping” continuously (to stop, press Ctrl+C) -a -display the name of the “pinged” node (site/device/server)
Accordingly, the “ -a ” switch showed us that the name of the pinged node is “dns.google”. And thanks to the “ -t ” switch, ping went on without stopping, I stopped it by pressing Ctrl+C.
With continuous ping, you can see whether the pinged node is behaving adequately and the approximate quality of the Internet channel.
As we can see from the screenshot, packet reception delays of up to 418 ms periodically occur; this is a rather critical value, since a jump from 83 ms to 418 ms would affect video communications by slowing down/freezing of the image or in IP telephony by degradation of voice quality.
In my case, most likely my home Internet is experiencing a storm. But to establish the cause in more detail, you need to run a dump. And this is a topic for a whole article.
Attention! ICMP is disabled on routers (some disable it on purpose, but in others it is not enabled by default), in this case such a node will not respond to pings, although it itself will be active and function normally on the network.
Another possibility of “ping” is to find out what IP address is hidden behind the site’s domain . Namely, on what server the site host is installed.
To do this, simply write the website instead of the IP address:
As you can see, the hub has an IP address 178.248.237.68
b) Trace
Sometimes it is very important to see which way a packet goes to a certain device. Perhaps there is a hole somewhere and the package does not reach the recipient. So the tracing utility helps determine at what stage this package gets stuck .
On Windows OS, this utility is called with the command “tracert” ip-address or domain:
Here we saw which nodes our request goes through before it reaches the ya.ru server
On Linux OS, this utility is called with the traceroute .
Some devices, routers or VoIP voice gateways also have a tracing utility.
c) Whois utility
This utility allows you to find out all the information about the IP address or domain registrar .
For example, let's check the IP address 145.255.1.71 . whois 145.255.1.71 in the terminal
We received information about the IP address provider, country, city, address, range, etc.
I only use it on Linux. The utility can be easily downloaded and installed from the standard operating system repository.
But I also read that there is a similar solution on Windows.
Transport protocols TCP and UDP
All transmission of requests and reception of responses between devices on the network are carried out using the TCP and UDP .
The TCP protocol guarantees delivery of the request and the integrity of its transmission. It proactively checks the host's availability before sending the packet. And if along the way the integrity of the packet is violated, then TCP will supplement the missing components.
In general, this is a protocol that will do everything to ensure that your request reaches the addressee correctly.
Therefore, TCP is the most common transport protocol. It is used when the user surfs the Internet, climbs sites, services, social networks. networks, etc.
The UDP protocol does not have the same guaranteed data transfer as TCP . It does not check the availability of the end node before sending it and does not replenish the packet if it is degraded. If some packet or several packets are lost along the way, the message will reach the recipient in such an incomplete form.
Why then do you need UDP?
The fact is that this transport protocol has a huge advantage over TCP in data transfer speed. Therefore, UDP is widely used to forward voice and video packets in real time . Namely, in IP telephony and video calls. For example, any call via WhatsApp or Viber uses the UDP . Also with video calls, for example, via Skype or the same instant messengers WhatsApp and Viber.
It is precisely because UDP does not guarantee absolute data transfer and the integrity of the transmitted packet that problems often arise when making calls over the Internet. These are voice interruptions, delays, echoes, or robovoices.
This problem occurs due to a loaded Internet channel, double NAT or radio channel.
TCP in such cases , but alas, voice transmission requires instant transmission of complete packets, and UDP .
To avoid problems using the UDP protocol, you just need to organize a high-quality Internet channel. And also configure a dedicated UDP so that the load from other devices that use TCP UDP transport protocol .
That's all.
I did not pile up the article and copy-paste scientific definitions of all the terms used here; for those who need it, just Google it.
I tried to put together the 7 most important, in my opinion, points, the knowledge of which will help a young “IT specialist” pass the first stages of an interview for “IT” positions, or at least just let the employer know that you clearly know more than an ordinary user.
Study, take notes. I hope that the article will be useful to many.
Placing computers on a shared network
Step 1. Hold down the “Win+R” keys, type “sysdm.cpl” and click “OK”.
Type the command “sysdm.cpl” in the “Open” field and click “OK”
Step 2. Click on the “Computer Name” tab and click “Change”.
Click on the “Computer name” tab and click “Change”
Step 3. Type the name of the network group in the “workgroup” line and click “OK”.
Note! It is necessary that the workgroup name be typed in English characters.
Type the name of the network group in the “workgroup” line and click “OK”
Step 4. Restart your PC.
In the “Start” menu, click on the “Restart” option
Step 5. Repeat “ Steps 1-4” on another PC, specifying the same workgroup name.
Sharing folders
Step 1. Right-click on the network at the bottom right of the desktop and select “Network Settings...” with the left mouse button.
Right-click on the network icon on the taskbar and select “Network Settings...” with the left mouse button.
Step 2. Click on “Status” and select “Control Center...”.
Click on “Status”, select “Control Center...”
Step 3. Open all network profiles sequentially and in each of them check the dots opposite “Enable” and “Allow”.
We expand all network profiles, place dots everywhere opposite the “Enable” and “Allow” options
Step 4. Scroll down the list and in the last item “...with password protection” select “Disable”. Click “Save Changes”.
Oh, click “Save changes”
Step 5. Repeat “Steps 1-4” on another PC.
Setting up a local network on a desktop computer (No. 1)
To start using the local network, you must follow the following instructions:
- Go to “Start” - Control Panel - Network and Sharing Center;
- Next, on the left side of the screen select “Change advanced settings...”
; - In this window you need to check the boxes next to the following:
"Enable network discovery" "Enable file and printer sharing""Enable sharing so network users can..."
"Use 128-bit encryption..."
"Enable password protected sharing"
"Allow Windows to manage homegroup connections"
- Click “Save changes” (it is important that you are logged in with “Administrator” rights);
- At this step, you need to join a home group, but we will create it on a laptop, so scroll through the article to the “Setting up a local network on a laptop” item, and then return here;
- When the password is received, you need to enter it in the required window. To do this, go to “Explorer”
, and then
“Home Group”
; - Click “Join”
, check the boxes next to all components for which shared access is provided and enter the password that was generated earlier (you should have written it down on the piece of paper); - The password will be checked and the connection will begin. Here you need to wait until everything is configured as needed;
- When the joining is completed, you will receive a message as in the window below, and also, if you repeat step 6, you will see the message “This computer has joined a homegroup.”
Now we return to setting up the laptop (computer No. 2).
Setting up access to folders
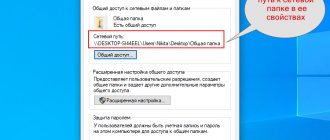
Step 1: Right-click on the folder being shared online and left-click on Properties.
Right-click on the folder that opens for access on the network, left-click on “Properties”
Step 2. Click on the “Access” tab and select “Sharing”.
Click on the “Access” tab and select “Sharing”
Step 3. Open the drop-down list, select “All” and click “Add”.
Open the drop-down list, select “All”, click “Add”
Step 4. Select your preferred “Level...” in the list (drop-down) for “All”: “Reading”, “Editing”, “Deleting”. Click the "Share" button.
Select the preferred “Level...” from the list for the “All” group, click “Share”
Step 5. Click "Done".
Click “Finish”
Step 6. If required, perform “ Steps 1-5” on another PC.
Transferring data over a network using a network drive
Step 1 . Open the Computer folder by double-clicking its shortcut.
Open the “Computer” folder by double-clicking on its shortcut
Step 2. Click on the words “Map network drive” at the top of the folder window.
Click on the words “Map network drive” at the top of the folder window
Step 3. Select the letter of the drive to be connected and specify the path in the “Folder” line, including the PC name and the folder name in the format () shown in “Example”. Click "Done".
Select the letter of the drive to be connected, indicate the path in the “Folder” line, click “Finish”
Note! For the PC name (“server”) specified in the example, see “Step 3” “Placing computers on a shared network,” and “shared resource” is the name of the folder that is open to access. Instead of the PC name, you can specify its IP address.
The network drive can be used to transfer files like a regular drive, opening it in the “Computer” folder.
The network drive will be displayed in the Computer folder
Step 4. Repeat “Steps 1-3” on other PCs if you need to open access to their folders.
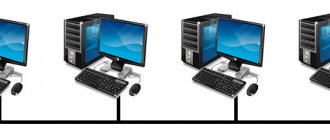
Creating a network using a router
To create a LAN using a router (router, switch), you need to connect several PCs to the router with a direct Ethernet cable.
We connect several PCs to the router with a direct Ethernet cable
Step 1. Connect the cables from the PC to the router connectors labeled as Ethernet or LAN.
We connect cables from the PC to the router connectors labeled as Ethernet or LAN
Note! The cable coming from the Internet provider is connected to the WAN or Internet connector on the router.
Step 2. Apply power to the router.
Turn on the router by clicking on the special button to turn it on if available
Step 3. Follow “Steps 2-6” of the section “How to connect two computers with an Ethernet cable”, checking the box for automatically obtaining addresses instead of the IP address.
Check the boxes to automatically receive addresses
Reference! By default, routers are configured to automatically distribute IP addresses (DHCP) and do not require additional settings. The Internet must also be connected immediately, because... ISPs usually use DHCP connections.
Step 4. To transfer files between PCs, complete the settings given in the sections above, starting from “Placing computers on a shared network” to the current section.
This completes the setup of the local network for transferring files using the router.
What is needed for this
- Several computers that we will connect.
- Several meters of cable. If you plan to create a local network using Wi-Fi, you will need appropriate adapters for each desktop computer. For laptops such adapters are not needed.
- A crimping tool that allows you to install connectors onto the ends of wires.
- The connectors themselves, which are called RJ45. You will need 2 pieces for each connecting wire. That is, if you plan to connect 3 computers, then 6 connectors are required. If the Internet cable is bare, then there is another connector for it. The total in this particular case is 7 connectors.
- A router or Wi-Fi router that will serve as a connecting point for each device.
Changing the LAN password
To ensure the connection of external devices to the local network, as well as to protect the data in the folder, you can set an additional password on the PC with the shared folder.
Step 1 . Press “Win+R”, type “control” and click “OK”.
Type “control”, click “OK”
Step 2. Select “Large Icons” at the top and click on the “User Accounts” link.
Select “Large icons” at the top, click on the “User Accounts” link
Step 3. Click “Manage Recording...”.
Click on the link “Manage recording...”
Step 4. Click “Create Entry...”.
Click on the option “Create an account”
Step 5. Enter the “Name...” of the record, select normal access and click the “Create...” button at the bottom of the window.
Enter the “New name..” entry, select “Normal access”, click the “Create...” button
Step 6: Click on the entry you just created.
Click on the icon of the newly created entry
Step 7. Click “Create Password”.
Click on the link “Create a password”
Step 8. Enter the password, confirmation and hint. Click the “Create password” button.
Enter the password, confirm it, enter a hint, click the “Create password” button
Note! When you create a new account, you can continue to use your main user account.
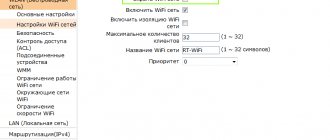
WiFi network
This method is much younger than the good old cable network, but it is simpler and more convenient, provided that you have a WiFi adapter on both PCs.
No additional cables or tools required. Moreover, you can create not just a computer-to-computer network, but an entire hotspot, to which you can also connect tablets, phones or Smart TVs, and also distribute the Internet to them if it is connected to the main device.
The wireless network is organized as follows. We select one computer to be the main one. We will create a virtual access point on it. To do this, launch the command line with administrator rights. You need to write two commands in it. The first command sets the parameters of the Wi-Fi being created, namely the name (ssid) and password. Example:
netsh wlan set hostednetwork mode=allow ssid=»moi-wifi» key=»wifipassword» keyUsage=persistent
Here the parameter “SSID” is the name of the grid that other devices will see in the list of available ones, and KEY is the password for connection. After entering, press the “Enter” button.
The second command is:
netsh wlan start hostednetwork
It launches the created virtual WiFi hotspot into operation:
After that, you can try connecting other gadgets to this Wi-Fi. If you suddenly need to turn off the virtual access point, type the command:
netsh wlan stop hostednetwork
Perhaps the only inconvenient point is that you will have to start WiFi distribution every time you turn on this computer.
Connecting an Android device to a local Wi-Fi network
Step 1. On your Android device, go to the Google Play Store and download ES File Explorer File Manager software.
Find the ES File Explorer File Manager application in the Google Play Store, click “Install”
Step 2. Launch the software and go to the LAN connections tab. Select "Create".
Go to the LAN connections tab, select “Create”
Step 3. Specify the path to the folder, entering its IP address instead of the PC name, and also enter the user name and password for the account of this PC. Click "OK".
Enter the details of the computer to which we are connecting, click “OK”
Folders that can be accessed on the local network from this PC will open.
Folders open for access on the local network from the PC to which you connected
You can now open files you use on your PC on your Android device.
Removing LAN in Windows 10
Despite the fact that in most cases it is enough to disable device detection on the local network using the method indicated above in this article, there is no need to keep local connections on the computer that are not used.
Therefore, we will consider how to delete an already created local network that we do not need.
This can be done in Windows 10 through the registry. To call it, press Win+R and enter the regedit command in the window that appears.
Attention, any incorrect change to the registry can harm your computer. You perform these actions at your own peril and risk.
In the registry, follow this path:
HKEY_LOCAL_MACHINE\SOFTWARE\Microsoft\Windows NT\CurrentVersion\NetworkList\Profiles
There you will find many traces of past network connections with specific names. Just delete those subsections that point you to network connections that you no longer need.