At some point in time, no matter what, you wanted to install/reinstall an operating system on your computer. We got the distribution kit, set the settings in the Bios and, most importantly, mentally prepared for the boot and installation process. But it was not there. When installing Windows 7, the computer suddenly freezes without showing the slightest sign of life. Miracles, and that's all. However, before you grab your head, run for validol, or rush to write an angry letter to Bill Gates, you should think about why the problem happened in the system.
After the initial installation completed, several missing drivers appeared, including any form of networking. And for a while it seemed like everything was fine. After about two hours - about four people - I had to leave the house for family work. After another reboot and another check, there were 8 important updates and 1 optional update.
Install, reboot and it was 11pm and there was only 1 important update. This week, an example of this. On Monday we upgraded to a mid-range laptop hard drive because it was broken. We left with homework Monday night and finished Tuesday at the last minute. Download more information.
In this case, the reasons will directly tell us the consequence and, accordingly, all possible ways to solve the problem, why it takes so long 7.
How to solve Windows 7 freezing problem during installation
The reason the system freezes on the logo is that it was not installed through the BIOS.
Installing via BIOS is also called a “clean” installation because you format all data on the computer and accordingly delete information about the previous system. How to install OS via BIOS? Step 1. Insert the boot disk with the system (or flash drive) into the computer. Turn on or restart the PC.
Step 2. When the first inscriptions appear, quickly press the “Delete” key. The appearance of your BIOS varies by manufacturer.
Step 3. If you managed to click “Delete” when booting the computer, the BIOS window appears.
Step 4. Move through the items using the arrows on the keyboard. Press the right arrow until the “Boot” item opens.
Step 5. “Boot” is responsible for booting the computer from a specific device. By default, the computer boots from the hard drive. But now we need to install the system, which is located on a flash drive (or CD). Press the down arrow and select “Boot Device Priority” - press “Enter”.
Step 6. A small menu opens where we will select the device from which the computer will boot. In our example, this is a DVD.
In your case, it may be the name of the flash drive or CD media. Select the device - press “Enter”.
Step 7. Exit the “Boot” tab – Esc key. This way the changes will be saved and take effect after a reboot. In the window that pops up, select “OK” and press “Enter.”
The computer will automatically restart. The problem is solved - the Windows system will begin a “clean installation” without freezing or crashing errors. It is by working with the BIOS that problems like “Win 7 won’t install!! hangs when starting installation."
How to start Windows without a bootloader: use a Live disk by Sergei Strelec
Naturally, for such a launch to take place, the system partition (C:\) must not be damaged. And there should be no problems within Windows itself that make it impossible to function. Problems with the bootloader are not the only reason for the system being unable to boot. An additional condition for EFI systems on GPT disks is that both the system partition (C:\) and the MSR partition must remain intact. If the latter, of course, is present in the EFI system partition scheme.
So, Windows 7, 8.1 or 10 does not boot due to a damaged bootloader, what should we do? We borrow their computer from our loved ones, download the latest ISO image of the Live disk from Sagittarius on its official website:
https://sergeistrelec.ru
We burn the image to a flash drive or DVD. We connect the recorded media to a computer with a damaged Windows bootloader and enter the BIOS. If it is BIOS UEFI, disable Secure Boot. The UEFI interface does not need to be disabled. And we set the download from the Sagittarius Live-disk. When the disk starts, in conventional systems on MBR disks, select the “Search & Start Windows 7/8” disk item, this one.
With BIOS UEFI active, select “Search & Start Windows 7/8/8.1/10 (EFI x64)”, this one.
Next will be loading Windows. This will not happen instantly in every case; you may need to wait a little while the selected Live Disk tool scans your computer for systems to start.
After this operation, our Windows will start. And with the help of such a crutch we will be able to survive for some time - every time we start the system in this way, until the opportunity presents itself to radically resolve the issue with the bootloader. Well, or reinstall Windows, if it’s high time to do this for other reasons.
“Search & Start Windows...” is a tool for starting Windows by bypassing its bootloader. Instead of the bootmgr boot manager, it searches the computer and launches the files winload.exe and winload.efi - files directly responsible for starting Windows, respectively, on MBR and GPT disks. The tool does not solve the issue of restoring the bootloader, but can only serve as its role for some time. This method of starting the system in some cases may be accompanied by an activation meeting. But after restoring the bootloader, activation returns.
If we talk about a thorough solution to the problem, then on board the Sagittarius Live disk itself there is everything necessary to directly resuscitate the system boot. Here, for example, is a selection of tools for restoring the bootloader of EFI systems, recently reviewed in one of the articles on the site. You can restore the system bootloader on an MBR disk using the articles of my friend Vladimir: • For Windows 7; • For Windows 8.1 and 10
Articles on this topic:
- How to restore booting of one of the two EFI Windows systems, if there is no bootloader menu, using a Live disk by Sergei Strelec
- Programs on LiveDisk won't launch
About Windows operating systems
The Windows family of operating systems is the most popular. Microsoft has held a monopoly on the market for more than twenty years. For ordinary users, the window interface has become familiar and convenient. But the main advantage of the Microsoft software product is its support for a huge amount of software. Professionals, from graphic designers to programmers, prefer Windows, since the programs they need for their work simply do not exist on other operating systems. The vast majority of video games are supported by Windows, something neither Linux nor Mac OS can boast of. The abundance of drivers for any components makes the system universal and makes it easier to use. When purchasing a device, you will always be sure that it will work on Windows without problems. Let's look at the history of significant versions of the popular OS.
The most popular versions of Windows
- Windows 95. Served as the starting point for the development of window systems. Combining the operating principles of MS-DOS and the Windows family, the 1995 system became a staple for desktop computers. Thanks to the simplicity of the window interface, Microsoft managed to occupy the niche of graphical operating systems and gain a foothold in the market. The Start menu, long file names, and Plug and Play drag-and-drop functionality became the foundation and signature style of all subsequent Windows systems;
- Windows XP. Released in 2001, the system created a real sensation among PC users. Before the release of the "seven", XP remained the main operating system. Simple, easy to install and use. Occupies a minimum of disk space. Today, Windows XP is not supported by the company, which affects its resistance to virus attacks. However, owners of low-power PCs and laptops install the system on their devices: it is not demanding on technology and works properly without taking up a lot of RAM or loading the processor. The only significant disadvantage of the system is its vulnerability to viruses due to the lack of updates. However, the problem can be solved by installing the latest version of any reliable antivirus (Avast, Avira, Dr.Web);
- Windows Vista. Released in 2007. Was received coolly by the community. Visually beautiful, but requiring a powerful computer and weak in terms of security, the system turned out to be a failure. Performance problems, poor driver support, and reduced capabilities turned out to be the main shortcomings of the OS. A pleasant graphical interface, as one of the few advantages, will be transferred to the company's next OS - Windows 7;
- Windows 7. The product was released at the end of 2009. “Seven” remained at the top in terms of installations for 8 years. The most reliable, simple and convenient system of all. It took the best of XP and became more productive. After the unsuccessful Vista, the "seven" was greeted warmly. Great personalization capabilities, support for a huge number of drivers, ease and speed of installation contributed to the system capturing the market. In 2022, it is still installed on computers, despite the end of official support and the lack of updates from Microsoft;
- Windows 8. It so happens that Microsoft succeeds “every time.” Metro's revolutionary flat interface was met with disbelief and criticism. It was the appearance that affected the failure of the system. Ordinary functions: personalization, uninstalling programs, shutting down and restarting have changed significantly compared to Windows 7. It became difficult for an inexperienced user to find them, and therefore, in order to get started, it took a long time to delve into and study the new interface. But the company made the right conclusions, modernizing the stability and appearance of the system, preparing an excellent release - Windows 10;
- Windows 10. Essentially, the system takes the best from Windows 7 and 8. Decent performance, additional settings for gamers to improve performance, a free application store and extremely simple settings settings are the main advantages highlighted by users. After release, the system remained free for several months - for the first time in the history of Windows. Windows 10 is installed on new laptops by default. So, when buying a new device, you won’t have to pay extra money to purchase a license. An additional advantage of the system is its versatility. Windows 10 can be installed both on a computer and on mobile devices: smartphones, tablets, and even Xbox. Multiplatform ensures synchronization of settings and data for a single user account. All the innovations and improvements helped the “ten” overtake Windows 7 in popularity and become a universal operating system for personal computers.
Booting the system in safe mode
Using safe mode is useful for diagnosing dysfunction, allowing you to use the OS with a minimum of working drivers and services. In our case, this will relieve the system of conflicting programs and install all the necessary updates in the system.
- When you turn on the system and start loading Windows, quickly periodically press the F8 key.
- When the system menu appears, select the "Safe Mode" option and wait until the system boots.
- After the download is complete, restart your PC in standard mode. This will help fix the stuck “Do not turn off your computer” message in Windows 10.
Boot the system in safe mode
RAM errors
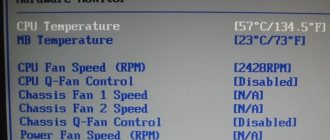
Since the Windows boot process, and any other computer processes, are loaded into RAM, its failure can cause the entire system to freeze. To check the RAM we will use the Memtest86 program.
Memtest86 runs an infinite number of memory test cycles. The Pass value shows how many cycles have passed. Two check cycles are quite enough and if the value of Errors = 0, then everything is fine with the RAM.
RAM errors in Memtest86
Perhaps you know some other reasons why Windows freezes at boot that I haven’t mentioned? Write comments.
System incommunicability - Windows 10 installation problems
Windows 10 is an operating system for the long haul. Microsoft has stated that no new versions (in the usual sense) will be released, and the system will be developed through permanent updates. Many Windows users want to be on the wave of progress, so they switch to the newest and most advanced operating system in the world. But those wishing to upgrade face many pitfalls, especially for owners of computers two or three years old: from incompatibility of motherboards and components to lack of support for some processors. As a result, the installation attempt fails or the process hangs.
What else could it be?
Above were only the most basic problems and methods for correcting them. However, on the Internet you can also find posts from users whose system has been installed for a very long time, but none of the above situations occur. What is the reason for this?
Quite often, it is recommended to check the graphics adapter to correct possible failures.
If there are two of them (integrated and discrete), it is better to switch to the basic one (the one built into the motherboard) during the installation of the system.
Sometimes problems are detected in the operation of network adapters when the process of downloading and installing updates freezes. In this case, you should check your Internet connection, as well as the network card itself.
Some users in their experiments go almost to the point of ridiculousness, recommending that you first install the XP version, and then install “seven” from under it. The solution looks clearly irrational, although there is some sense in it (especially when it is impossible to revive the installation process by any means).
Booting the system in safe mode
Using safe mode is useful for diagnosing dysfunction, allowing you to use the OS with a minimum of working drivers and services. In our case, this will relieve the system of conflicting programs and install all the necessary updates in the system.
- When you turn on the system and start loading Windows, quickly periodically press the F8 key.
- When the system menu appears, select the "Safe Mode" option and wait until the system boots.
- After the download is complete, restart your PC in standard mode. This will help fix the stuck “Do not turn off your computer” message in Windows 10.
Boot the system in safe mode
For other options for entering Safe Mode, read our material “How to Enter Safe Mode in Windows 10.”
What should be done in this case?
If you work with your computer like a typewriter, then you probably don't need Windows 10. And even more so, you shouldn't worry about how it freezes. Most users are simply “led” by advertising a super-new product that they do not need at all. So:
- The first option is to not install Ten at all and not cry that its installation freezes.
- The second option is to first study the “top ten”, and only then install it on your machine.
- The third option is to learn some other OS, like Linux, and install it on your computer.
In each of the proposed options, you can become a friend of your operating system. Become a creative user of system software offered to you either by a large corporation like Microsoft or by the free software community. There are options, and no one has canceled them. Use your head and read Misha Verbitsky - “Copyright”.
Be happy my friends
Thank you for your attention. Read us again!
https://youtube.com/watch?v=P-mSUc1Y-7M
Reason for the message “Preparing Windows. Don't turn off your computer"
As you know, the functionality of Windows 10 allows you to automatically install all the necessary updates. Typically, updates are downloaded to the system in the background, and then, when the PC is turned off and on, they are automatically installed on the system.
When installing these updates, the system may experience various types of problems - stops, freezes, crashes, glitches and other dysfunctions. One of these problems is the system freezing for an indefinite period of time, accompanied by the message “Preparing Windows. Don't turn off your computer."
The causes of dysfunction may be the following:
- Software conflict when installing updates;
- There is an issue on the user's system that is preventing specific updates from being installed;
- Unstable update from Microsoft;
- Unstable operation of the Windows update service;
- The presence of virus malware on the user’s PC;
- Problems with the PC hard drive (bad sectors, disk shedding, etc.)
Let's figure out what to do if such a message hangs on your screen on Windows 10 for a very long time.
ITcom service center Kharkov
The situation is as follows: when installing Windows7 Ultimate , at the “complete installation” stage the computer freezes completely. Tried different builds, same result. Windows 7 Home Basic, Premium install without problems. I tried everything, increasing the space on the C drive, changing partitions with the Windows 7 installer, it didn’t help. Although any build of Windows Vista installs without problems.
Windows is a mature operating system and, as a rule, installs without surprises, but if the installation process freezes. Listed below are five ways to solve this problem, relevant for solving problems with the installation of Windows XP, Vista and Windows 7 .
Reason: Cause
Typically this issue occurs when the server performs a final reboot after a configuration change. Usually this issue occurs when the server is doing the final reboot after the configuration was changed. Configuration changes can be triggered by Windows updates or changes to server roles or features. The configuration change might be initialized by Windows updates or by the changes on the roles/feature of the server. If the size of the update installed by Windows Update is large, the operating system will take longer to reconfigure the changes. For Windows Update, if the size of the updates was large, the operating system needs more time to reconfigure the changes.
Problem options and their causes
Symptoms of such a “disease” in the installation of an operating system can be different:
- After booting the PC from the installation disk (flash drive), the blank blue screen does not disappear for a very long time:
- The process freezes with the “Start installation” window appearing:
- The computer freezes while the OS installation is completing:
- The system freezes after the desktop appears on the screen.
Moreover, the reasons for the PC freezing in each of these cases are the same. In particular, the system may take a very long time to load due to:
- problems with the hard drive;
- problem with RAM or power supply;
- lack of contact with the motherboard;
- short circuit of the USB connector or malfunction of the drive;
- incorrect BIOS settings;
- errors in the OS image on the distribution;
- damage to the boot disk (flash drive).
Thus, the reasons that the computer freezes at the beginning, in the middle, or at the end of the installation of the operating system can be divided into internal (1-5), directly related to the operation of the PC, and external (6-7). Based on this, the options for solving the problem will also differ from each other.
Checking the hard drive
A problem with the mechanics of a hard drive is most often identified in the early stages of its occurrence, since it is difficult not to pay attention to the appearance of extraneous sounds such as clicks or uneven humming. In this case, as a rule, not only does the loading of Windows 7 freeze when starting the computer, but also micro-freezes and freezes are observed during operation
The problem may be loose contact between the power connectors (especially the SATA interface). A simple replacement of the four-wire power cable will help. But if this does not help, then it’s time to think about purchasing a new storage medium and creating a backup copy of the data as quickly as possible.
Logical errors in HDD operation are identified and corrected using special utilities, for example, free but effective Victoria or HDDScan. These programs are capable of not only identifying and correcting software disk failures, but also localizing and marking damaged sectors, isolating problem areas in the physical structure of the disk
Logical errors are correctable, physical damage is no longer present, so the first ones that appear on a BadBlock disk are a signal to the user that the disk should no longer be used as a storage facility for important information.
Rolling back Windows 10 to a stable earlier version
Rolling back the system to a stable version can serve as a convenient tool for solving the problem “Preparing Windows. Don't turn off your computer."
To do this, do the following:
- Boot into Safe Mode as above;
- Click on Win+R, and type rstrui in the box that appears and press enter;
- A system recovery window will appear;
- Among the list of early dates available for restoration, select the one in which there were no problems with the system (any early date will do);
- Perform the recovery procedure, after which restart your PC. The problem can be solved.
Restoring computer system files
System Restore is a good tool that allows you to fix the problem of the “Do not turn off your computer” message hanging in Windows 10. To do this, we need a flash drive with the installation version of the OS installed on it.
Procedure:
- Boot from this USB drive.
- Select your language and system from the basic screen.
- Then click on “System Restore” at the bottom left.
- Next, select the “Troubleshooting” option.
- Next “Advanced options” and then “Command line”.
Select "Command Prompt"
- Next type there:
- Press enter. Wait for the process to complete and restart your PC. The problem can be solved.
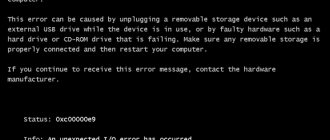
Find out how to fix "There's a problem with your PC" error on Windows 10.
Make sure your computer is really frozen
Some Windows OS updates may take quite a long time to install. Therefore, if you get the message “Do not turn off the computer,” do not rush to sound the alarm and try to fix something. Otherwise, instead of solving the problem, you will create another problem yourself.
We can talk about the presence of a problem no earlier than 3 hours from the moment the message we are considering appears. And this is provided that you do not observe the activity of your PC, and the hard drive indicator either does not light up at all, or lights up regularly, but for very short periods.
If the problem has been going on for more than three hours and no changes are observed, then we move on.
Specific errors when installing or updating Windows 10
Specific (code-signed) errors require closer attention. Before you take drastic action, find out what the code means. The general measures mentioned will help if a particular error (or series of errors) could not be resolved using the methods below.
Error c1900101–2000c
This error is Windows 7/8 to 10 upgrade failure. Do not use online update using Media Creation Tool, but do the following:
- Download the Windows 10 image from another trusted source.
- Re-write the Windows 10 installation flash drive using a third-party utility and reinstall the OS.
- Update the driver versions for your hardware.
- Install an antivirus (for example, Avast) and scan drive C: for viruses.
After this, the PC will most likely work normally. If another error occurs during the installation of Windows 10 from a flash drive, follow the instructions.
Error 0xc1900101 - 0x20017
Unlike error c1900101–2000c, which throws the user to the mercy of fate with an uninstalled “ten”, error 0xc1900101–0×20017 leaves the user the opportunity to undo the changes that began with the launch of the Windows 10 installation “on top” of version 7/8/8.1.
- Check whether the parameters of your hardware meet the minimum requirements of Windows 10. Remember which driver versions worked with Windows 7/8: perhaps the manufacturer indicated that they were compatible only with previous versions of Windows.
- Disconnect all unnecessary devices except the mouse and keyboard. If you are using any type of laptop or tablet, a mouse can replace the touchpad or display sensor, respectively.
- Turn off your antivirus before updating. This does not apply to Windows Defender and Windows Security Center settings - these services are unlikely to perceive an OS update as malicious.
- Turn off Wi-Fi/Bluetooth Internet access. Connect to the network via cable. If you don’t have home access, use a router with USB and a 4G modem, connecting to the router via LAN.
- Launch Command Prompt (right click - Start - Command Prompt (Admin)) and enter the command sfc /scannow.
SFC ScanNow command runs Windows 10 scan
Windows system files will be checked and fixed. Run the Windows 10 installation again - most likely, it will continue and be brought to its logical conclusion.
Changing BIOS settings
Depending on the motherboard and chipset, entering the Basic system is accomplished by repeatedly pressing a certain key immediately after turning on the device. The most commonly used keys or combinations thereof:
- Delete
- Esc
- F1, F2, F3, F10, F11
- Ctrl+Alt+Esc
- Ctrl+Alt+Ins
- Ctrl+Alt+Del
In modern computers, external drives are connected via the SATA serial interface (SerialATA). This standard supports the command queuing function and provides for hot plugging of devices. To use all the features of this interface, you must enable AHCI mode. When working with Windows 7, before enabling this mode in the BIOS, you need to activate the AHCI driver by changing the registry setting. Log in to the following address: HKEY_LOCAL_MACHINESystemCurrentControlSetServicesmsahci and change the value of the “start” parameter from 3 or 4 to 0. Then you need to enter the BIOS to perform further actions there.
By moving the arrows, you need to open the “INTEGRATEDPERIPHERALS” window. This window contains settings for the SATA controller with the ability to change them. The first line indicates that the controller is enabled, this is indicated by the value “Enabled”.
In some cases, if the disk is not detected, you can try setting the value to RAID (group connection). Then you should disable the floppy drive, which has not been used for a long time and is not part of the peripheral equipment of modern personal devices. This line looks like this: DriveAFloppy 3 modeSupport 1.44M 3.5″. Next, in parentheses you need to set the “none” parameter, indicating to the system that this device is missing.
The device is missing and in addition it is turned off. Pressing the F10 key saves the new settings. Now you need to go to the line “Save&ExitSetup”, which means “Save changes and exit”. After you restart your computer, the new settings will be installed. All of the above operations should be performed if your computer with Windows 7 freezes or your laptop freezes when installing Windows 7.
If Windows does not install, the reason may be that the device is infected with viruses. Some software downloaded from the Internet can be very slow, so when your Windows 7 computer is running slowly and you plan to reinstall the operating system, it is recommended to scan your device using antivirus utilities before starting the process. The new OS must be installed on a computer that is completely cleaned of various “dirt.”
What should be done in this case?
If you work with your computer like a typewriter, then you probably don't need Windows 10. And even more so, you shouldn't worry about how it freezes. Most users are simply “led” by advertising a super-new product that they do not need at all. So:
- The first option is to not install Ten at all and not cry that its installation freezes.
- The second option is to first study the “top ten”, and only then install it on your machine.
- The third option is to learn some other OS, like Linux, and install it on your computer.
In each of the proposed options, you can become a friend of your operating system. Become a creative user of system software offered to you either by a large corporation like Microsoft or by the free software community. There are options, and no one has canceled them. Use your head and read Misha Verbitsky - “Copyright”.
Be happy my friends
Thank you for your attention. Read us again!
https://youtube.com/watch?v=P-mSUc1Y-7M
Windows 7 installation does not complete
Installation of Windows 7 on SDD M2 does not complete. Good afternoon! I decided to build myself a new computer based on the ASUS Prime B360M D motherboard and processor.
The installation of win7 on Lenovo g50 fails. I decided to demolish win 8.1, there is an excellent build of win 7, which I have been using for 1.5 years, I launched it in.
The installation of updates does not complete when the laptop is turned off. I haven’t used the laptop for a long time, and I have accumulated a bunch of updates necessary for installation. .
installing windowshow often can you reinstall windows with formatting the disk? if I come every month.
valera545 you're a damn SHAMAN WITH A TAMMOMBER.
I installed Win 7, I think it was a long time ago. Didn't complete the installation either. I started installing it from the beginning several times. I switched the monitor to another one or to a TV, like, instead of a monitor. Or basically pulled out the wire
, I do not remember. Winda got in. Then he turned on the monitor. The wood was put in and everything worked. Something like this. That was a long time ago. Windows 7 just came out. Install Windows 8.1. She's better. Yes, and Win 10, they will finalize it in a few months.
Added after 4 minutes
How to get a license for free. My license worked with this system from Win 7, then Win 8, Win 8.1 I think there will be a dozen. It is told how and what + cinema https://www.mani-mani-net.ru/%D0%B2%D. D0%BE?start=23
Added after 9 hours 48 minutes
| Moderator's comment |
| Gentlemen! The topic is almost two years old. It was opened by an unregistered user. I don't think he's still interested. Topic closed |
Installing Windows 7 Hello dear forum members. I've encountered a problem that I haven't been able to solve for a long time.
Installing Windows The problem is this, the laptop froze every time after turning it on, I reset everything to factory settings.
installing windows from a flash drive In general, the problem is that the flash drive is not displayed in the BIOS! I do not know what to do.
source
Installation hangs - check RAM
Check that your PC's RAM is working correctly using any diagnostic programs. Replace the faulty memory module if found and try installing the updates again.
Is it possible to restart the computer if the update process is frozen? If there is no other choice, then yes. However, there is a possibility that the operating system will not be able to boot. Then use the system restore point service and use the Windows 10 boot disk to roll back the changes to a working state. Don't neglect this feature - it will help you save a lot of time and money on restoring Windows to working order.
Situations when Windows cannot update for a long time are annoying. While the “Please Wait” message is displayed on the screen, you are unable to work at the computer. Moreover, it is often impossible to update even on a freshly installed system.
They especially like to install for a long time and freeze during the process. If you encounter this problem, you can take the following steps.
This is the simplest and most obvious action, but in most cases it is enough. Download Windows Update Troubleshooter and run it. Then click Next and wait while Troubleshooter detects and fixes problems. If necessary, the utility will prompt you to reboot the system.
The main reasons for freezes or slow installations
The first reason for a long download or slow installation process can be considered an incorrectly recorded image.
or its damage. To check, you need to change the boot media, and you can also replace the image.
In the second case, the cause of the failure may be a damaged hard drive
. In this case, the installation may take a long time, or at normal speed, but be interrupted at the very end. You can write a special utility to check disks and test the hard drive.
Problems with RAM
or other computer hardware components. In this case, various oddities and failures should have accompanied the PC even before the installation process began.
Incorrect BIOS settings
. This item is the most common cause of crashes and freezes and should be checked first, before testing the rest of the equipment.
USB Hub Power Management (For Laptops)
Saving electricity and battery power forces the system to turn off temporarily unused devices. Unfortunately, this function does not always work correctly. Temporarily turning off the power to a USB hub can cause connected devices to malfunction and subsequently lead to a slow shutdown of the computer. If you can sacrifice some battery savings by increasing system stability, you can prevent Windows from turning off power to the hub.
- Click the “Start” on-screen button and find the “Computer” line in the right column.
Find the Computer menu item in the right column - Right-click on the “Computer” line and go to the bottom “Properties” item.
The right key opens the desired menu - In the composite window “All Control Panel Elements - System”, on the left side we find the “Device Manager” tab.
Top left "Device Manager" tab - We have reached the “Device Manager” window, where we can change the parameter we need.
Find the “USB Controllers” tab in the main part, open it and select “USB Root Hub”. By right-clicking on this item, select the “Properties” line in the pop-up window. Devices are grouped by type - Go to the “Power Management” tab, in which we uncheck the box next to “Allow the computer to turn off this device to save energy.”
We prohibit turning off the power
After pressing the "OK" screen button, the system will be prohibited from stopping power supply to this hub. You need to do the same for the rest of the USB root hubs in the list.
Troubleshooting options
Waiting for a response
No matter how trivial it may sound, first you can try just waiting for the Windows installation to finish. There are often cases when, after 10-45 minutes of waiting, the system responded and was subsequently installed without failures or freezes. How can this be explained? It is impossible to find an unambiguous, let alone official, answer to this question. However, as practice shows, very often such a problem occurs when installing Windows on a computer with an AMD processor and a Gigabyte motherboard.
Replacing Windows 7 distribution
If waiting for the system to respond does not help and the PC still freezes, you should try replacing the installation disk (flash drive) with Windows 7 or test it on another computer. If the reason was in it or in the image recorded on it, the problem with the computer slowing down, of course, will disappear with the replacement of the distribution kit.
Here we note that the problem may not be in the boot disk (flash drive) itself, but in the drive (USB connector) with which it is loaded. It is not difficult to identify such a problem in the operation of a PC. It is enough to test the drive (USB connector) for functionality using any other disk (flash drive).
Resetting the BIOS
There are definitely two settings in the BIOS that can affect the speed of your computer, namely:
- SATA Mode (OnChip SATA Type);
- Floppy Drive / Drive A.
It is best to adjust the work of each of them. In the first case, you will need to enter the Integrated Peripherals section and select AHCI for SATA Mode or OnChip SATA Type:
In the second case, you will have to completely deactivate the Floppy Drive (Drive A). You can do this by entering the Advanced section in the BIOS:
You can also try resetting your computer's boot settings that you set before starting the Windows 7 installation process.
External device evaluation
If none of the methods described above helped, it is very likely that the cause of the problem lies in the “stuffing” of the computer. First, it’s worth assessing the external condition of the devices. To do this, we take a screwdriver in our hands, unscrew the bolts from the system unit and check one by one for drips, a burning smell and other malfunctions:
- power supply;
- motherboard;
- hard drive;
- RAM, etc.
It is clear that if the result is positive, the solution will be very simple - we replace the damaged device and forget about the problem. If an external examination does not yield anything, we undertake to test the hard drive and the operation of RAM.
Testing the hard drive and RAM
You can test your hard drive for bad sectors and other faults using different programs, for example, utilities such as:
At the same time, to check RAM, it is more logical to recommend the time-tested MemTest program:
In any case, one of the methods will definitely work!
Windows 10 is an operating system for the long haul. Microsoft has stated that no new versions (in the usual sense) will be released, and the system will be developed through permanent updates. Many Windows users want to be on the wave of progress, so they switch to the newest and most advanced operating system in the world. But those wishing to upgrade face many pitfalls, especially for owners of computers two or three years old: from incompatibility of motherboards and components to lack of support for some processors. As a result, the installation attempt fails or the process hangs.
Ways to solve problems
- Cleaning programs
If your Windows 7 desktop freezes, perhaps the easiest solution is to clean up your computer. There are a number of programs for this. Among them is CCleaner. Using such an application, you can clean the registry, delete unnecessary files, programs, and cookies.
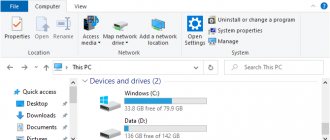
Windows 7, 10 freezes if there is not enough space on drive C. Remove unnecessary files from it, create archives. Windows 10 has a Compact OS feature that compresses files, thereby freeing up disk space. To enable compression, enter compact /compactos:always at the command prompt.
The size of drive C can be increased by creating an additional partition. To do this, use special software, for example, Aomei Partition Assistant.
Cleaning up the task manager
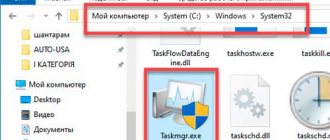
Perhaps your computer is slowing down due to the fact that there are a large number of programs in startup or some utility is not responding. In order to correct the situation, you need to go to the dispatcher and remove tasks.
The dispatcher is called by pressing the key combination Esc+shift+ctrl or Ctrl+Alt+Del. Next, you need to find the program that is not responding and click End task
Pay attention to the CPU column. You should remove the process that causes maximum CPU load at the time of freezing
You can also cancel those programs that automatically load when you start your computer, but you don’t need them.
Dust removal
Quite often, dust accumulated inside the device slows down the system and causes Windows 7, 10 to freeze at the logo. It prevents air circulation, interferes with the cooling of computer components and contributes to its overheating.
Disassemble the system unit and, using a special brush, clean it
Pay attention to the condition of the thermal paste. Perhaps it should be replaced
Removing viruses
Quite often, the reason why Windows freezes is due to viruses. Malicious programs can penetrate the system when downloading a file from an unverified source, when going to an infected page on the Internet, or when using removable media.
There are a number of antiviruses available to search for and remove malware. All you need to do is download the program and run an in-depth system scan. Once the process is complete, the detected files can be deleted.
Troubleshooting hard drive problems
Quite often, Windows 7, 10 freezes due to problems with the hard drive. To detect them, the Victoria 4.46b utility was developed. Download it to a flash drive.
Start the computer in safe mode (press F8 until the menu appears and select the appropriate item). After that, connect the flash card and run the program. In the window that opens, select the Tests tab. In the lower right corner, set the Remap indicator and click Start. The presence of red and green squares will indicate errors.
Solving problems with RAM
Windows 7, 10 freezes when loading in case of problems with the RAM. As a result, a blue screen may appear.
To check the status of RAM, you should use the memtest86 program. If you find errors, try cleaning your computer or using an eraser to go over the contacts. In extreme cases, you will have to buy new memory.