Windows operating systems
20.08.20195034
The decision to remove Windows 7 from a computer can come for a variety of reasons: the user is tired of the most aesthetically pleasing graphical interface in Microsoft history, the OS constantly produces error messages, or he simply wanted to try something new. But it cannot be ruled out that over time the computer owner will decide to return - and will unexpectedly encounter difficulties during installation. Let's try to figure it out what to do if Windows 7 won't install.
Technical reason
Quite often, Windows 7 cannot be installed from a bootable flash drive or disk due to internal problems with the computer. A user who is faced with a problem should check the main components: the connection of the cord to the power supply, the quality of the connection of the power wires and cables to the hard drive on which the operating system is installed, and also, if an optical disk is used for installation, to the drive.
In fact, performing a quick inspection of the system unit is no more difficult than changing the password on Windows 7. For a desktop computer, it is enough to remove the side wall, visually check, or better yet, remove and reconnect the listed elements. For a laptop, a simple external inspection is enough: if the user has not previously opened the case or subjected the device to mechanical overloads, there will be no problems with attaching the cables.
If broken wires and other faults are detected, it is necessary, depending on the degree and nature of the damage, to purchase and install a new cable to replace the damaged one, solder the “falling off” parts in place, isolate the “breakdowns” with electrical tape, or, if repairs at home are not possible, seek help to the service center.
Important: it is especially recommended to remove dust from the case, including the RAM dies - you can use a paint brush for this. Coping with the task is easier than restoring the Windows 7 bootloader, and even if it is not possible to eliminate the reason why the OS cannot be installed, the user will protect himself from unexpected computer shutdowns due to overheating.
Removing Connected Drives
Sometimes Windows fails to install the required files and this causes error 0x8007025D to appear. Basically, the error appears if several flash drives or disks are connected at the same time. This is why you should first disconnect all USB devices when installing the operating system.
There are also situations when the Wi-Fi module and Internet cable interfere. Therefore, it is worth interrupting the Internet connection in advance to avoid problems in the future.
Media problem
If the installation of Windows 7 starts, but suddenly breaks down, or does not start at all, it is also worth checking the condition of the optical disk, flash drive or external HDD - in a word, the media on which the distribution is recorded. As a rule, minor damage to the surface or microcircuit allows the installation to be completed, but if irreparable damage is caused to the device, the simplest solution is to re-write the Windows 7 bootable USB flash drive.
When using an optical disc as the installation source, you should:
- Carefully inspect the working surface of the media. If it is smooth, without specks of dust or scratches, proceed immediately to the second step. If there is micro-contamination or damage, clean the disc with a dry cloth or napkin. If the scratches are deep and/or extend across the entire recorded surface, your best bet would be to burn a new DVD and try installing Windows 7 again.
- Next, check the quality of recording to the disc using any suitable program. For example, CDCheck is a convenient, shareware tool: in a few minutes it will help you identify the problem that is causing Windows 7 to not install, or switch to the following solutions. After downloading and installing the program, the computer owner must click on the Check button.
- Select your optical drive from the drop-down list.
- Click on Continue in the lower right corner.
- And wait until the verification process is completed; Depending on the amount of recorded information (for Windows 7 this is usually about 5 gigabytes) and the characteristics of the equipment, the program can take from five minutes to half an hour or more.
- During the scan, information about detected errors and inconsistencies will be displayed in the lower information panel.
- And at the end the user will receive a detailed verification report.
If, as shown in the example, the only problem is a hash mismatch, the user may continue to look for reasons why Windows 7 won't install; if bad sectors are detected, you should, as already mentioned, rewrite the distribution onto a new optical disk.
Flash drives and removable hard drives can be checked using the lightweight, free software Check Flash. After downloading and installing it, a user whose Windows 7 installation does not start must:
- Launch the application and select the verification method “As a physical device”.
- Indicate in the drop-down list which USB flash drive with Windows 7 you want to check.
- Click on the “Start” button.
- And wait for the procedure to complete. The test results are color coded on the Legend tab in the left sidebar.
- Ideally, all memory sectors should be colored blue.
- Upon completion of the scan, the user will see information about the errors found on the “Log” tab.
If no errors are found, great - the flash drive is working properly, and you can move on to the next test option; otherwise, the owner of a computer who is unable to install or reinstall Windows 7 is recommended to write the bootable media again - for example, using the convenient UltraISO program.
Get to the point
So, when all the problems have been eliminated, we can begin our plan. Namely, to reinstall the operating system. To begin, go to the BIOS. Turn on the computer, then quickly press F8, Delete, F12 (depending on the device). In the startup settings, set the drive first (if you are installing from a disk) or USB (if from a flash drive). Next you will have to run the installer. Insert the disk into the drive or USB flash drive, and then restart the computer.
You will have an installer in which you will need to click “any button” to start the process. After that, select “Windows installation”, then “clean installation”. Format your hard drive, then click “next”. The process that we needed will start. That's it, you can wait. During this process, the computer will restart itself about 3 times.
When everything comes to an end, a window will appear in front of you with some settings - time, date, username, login password (optional), activation, and so on. Fill out the fields and then save your changes. That's all.
Problems with the distribution
Even if the Windows 7 installation image is perfectly recorded on a flash drive or optical disk, this does not guarantee the absence of errors, especially if we are not talking about an original product, but about an amateur modification. The easiest way to make sure that the image does not contain errors is to calculate the hash and compare it with the original one; however, as you might guess, it only works with unmodified content from Microsoft.
A truly universal solution is the freely distributed WimVerify program, which allows you to, if not identify all errors (this is only possible in full testing mode), then at least make sure that the WIM distribution, the main core of the installation image, is working. The owner of the computer on which Windows 7 is supposed to be installed will need:
- Download (link - blog.simplix.info) the executable file, saving it to any directory on your hard drive.
- Unzip the Windows 7 installation image and copy the newly downloaded program to the same folder.
- Run the program and wait for the WIM check to complete.
- As usual, the process can take from a couple of minutes to half an hour or more. As a result, the user will see a report - a notification that no problems were identified during the scan.
- Or that the WIM is damaged.
In the first case, the user who does not install Windows 7 should continue to search for possible reasons; in the second, look for another, working image of the operating system.
Option #3: RAM Problems
In order to check whether the reason for the appearance of the system window with error 0x80070570 is in the RAM, you can use the MemTest program. You can download it from the official website of the developer and, most importantly, absolutely free.
What does it give? Nothing at all: checks RAM for errors. As a result, the more of them there are, the less likely it is that the RAM will come to life and Windows 7 will install as it should.
True, the process of checking RAM with the MemTest program can take a long time: from 3 to 6 hours. Is it worth spending time on it? Yes, because with the help of the utility you will dispel all doubts about your RAM. If this is the problem, it will be enough to replace it so that error 0x80070570 no longer bothers you when you install Windows 7 on your PC.
Incorrect BIOS settings
Installing the relatively outdated Windows 7 operating system with the widespread introduction of UEFI instead of BIOS has become complicated. Nothing wrong with that; Following simple instructions, a user who is unable to install the OS on a hard drive with standard settings will solve the problem quickly. To allow the installation of Windows 7 in the BIOS, you should:
- Boot into the BIOS using a key or key combination suitable for a particular computer, and use the keyboard to go to the Boot or Startup section.
- Open the Boot Mode option.
- And set it to Legacy Support/Legacy Only instead of UEFI.
- If such an option is not provided, stop at the Auto value, and then go to the adjacent parameter - Boot Priority.
- And define the value of Legacy First.
- If, as a result of the actions taken or from the very beginning, the CSM parameter, which is responsible for compatibility with older versions of the operating system, was disabled, go to the corresponding heading.
- And activate it again by selecting Enabled.
- Next, open the Primary Boot Sequence section.
- And set as the first boot device the one from which you plan to install Windows 7: a flash drive, a removable HDD or a floppy drive.
- Go to the Exit tab, select the Save Changes option.
- And confirm exiting the BIOS.
Tip: If you are using older versions of the basic I/O system, you will not need to activate Legacy mode, but it is highly advisable to disable all other boot sources during installation to avoid unexpected failures.
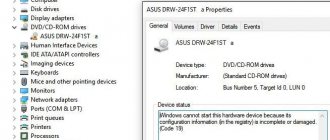
Error 0x80070570 "Windows cannot install required files"
Error 0x80070570 when installing Windows 7 appears at the very beginning - at the stage of copying distribution files into the computer's memory. Most often it is called:
- damage to the distribution media (scratched DVD, broken flash drive, etc.);
- damage to the system files themselves on the media;
- RAM malfunction.
The crash occurs because the system installer cannot access any important file due to its unreadability. As a result, the installation process is interrupted.
Diagnostic methods and solutions
- Try installing the system from another medium, if you have one, and, if possible, test the distribution on another computer.
- When burning a system image to DVD yourself, use the minimum speed (the quality of high-speed burning is often poor).
- When you are sure that the media is OK, but the error still appears, check your RAM. If your PC has multiple RAM modules, remove one of them and try installation again using the remaining ones. If the error occurs again, remove the next module, etc. Install them in different slots and in different combinations.
Check each strip in this way. The one that causes the failure must be removed or replaced. After this, this problem will no longer bother you.
The Windows operating system is considered fully automated, but most users encounter situations in which Windows 7 generates an error during the installation process.
It is worth noting that this state of affairs is observed not only during formatting of the hard drive, but also when the installation process is already running.
In what cases does Windows 7 display error 0x80070017 during installation?
It is worth immediately noting that the Windows 7 operating system in various versions and assemblies is universal, however, when installing it, most users may encounter various difficulties. Compared with the XP version, the presence of genuine media with the installer and all the necessary drivers cannot guarantee the successful installation of Windows 7. The thing is that in this case certain settings are initially provided. If they are absent, the operating system will not install on the hard drive. If during the installation process Windows 7 gives an error, you should find the reason for this. This will be discussed further.
Troubles with reading information from optical media
It is already known that the installation disk is placed on an optical distribution in the form of a DVD media. It is worth noting right away to avoid inaccuracies that it does not fit on an ordinary CD. Therefore, if you come across such media, all that remains is to throw it away, since it is devoid of most components, including the driver database. If during the installation process Windows 7 gives an error, you must immediately pay attention to the condition of the disk. It may have scratches, cracks, or other consequences of mechanical damage that make it impossible to recognize the installation files.
The problem may also arise due to problems with the drive itself. If it does not recognize the disk or an error is displayed during installation, the read head is most likely damaged. It is worth noting that drivers do not always work correctly. What to do in such cases? Everything is quite simple. You will need to replace the drive or create a bootable flash drive. You can also try installing from it. Today there are a large number of programs for installation USB media.
Hard drive operating modes
Sometimes situations are possible when an undamaged disk also causes various problems with the installation of Windows 7. As a result, the operating system generates an error even at the stage of formatting or copying information. This is due to the fact that during installation it is impossible to gain access to the hard drive. In this situation, you need to try to enter the BIOS and change the operating mode of the SATA controller. That is, switch it from AHCI to IDE. It also happens that the process is relatively successful, but an error is displayed when installing Windows 7.
It may occur due to incorrect boot records. There is no need to waste time and delve into all the details. You just need to note that it is recommended that you perform a bootloader recovery during the installation process using the bootrec /fixmbr combination, which must be entered at the command line. It opens by pressing the Shift + F10 key combination.
Update errors
When it comes to updating, things get a little worse. In this case, you have several options. One of them is to disable automatic updates completely, which can be done in the Update Center. There is also a more efficient way. To complete this you will need the following steps:
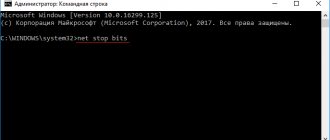
1. Open “All Programs”. 2. Go to the “Standard” section. 3. On the command line, enter the following combinations: first net stop wuauserv, then CD %systemroot%\SoftwareDistribution, then Ren Download Download.old and finally net start wuauserv.
After performing these steps, the update usually occurs without problems.
In the end, it is worth noting that during the installation process, Windows 7 may give an error not only for the reasons described above. In fact, there are many reasons for such failures. Perhaps during the installation process it is necessary not only to install the system, but also to additionally download and install device drivers.
As a rule, this refers to a fully Russified version, which is easy to find in a form where you do not need to enter license codes and subsequent activation. One way or another, there can be many problems, but the solution is always somewhere on the surface. True, not everyone realizes this. The article helps to understand the problem in which the Windows operating system, version seven, gives an error during installation. Perhaps it will be useful for someone.
Although it is believed that the installation of Windows OS is completely automated, unfortunately, many users are faced with situations where they receive an error when installing Windows 7. The saddest thing is that this can be observed both during a logical partition and during an already running installation process.
Hard drive partitioning
Modern hard drives, especially if the memory capacity exceeds 2 terabytes, have GPT partitioning, which is undoubtedly more reliable and functional, but does not support the installation of Windows 7 in normal mode. In this case, the operating system is identified, but is not installed at the disk selection stage, giving the user a message about the “incorrect” partitioning.
There are exactly two ways out of the situation: format the hard drive into a traditional MBR, losing all saved data and, if Windows 7 is installed as a second OS, already configured systems, or come to terms with minor restrictions and use the Windows 7 Professional version as the installation image "and with a bit depth of 64 bits. As practice shows, only this edition can be installed on a newly created partition on a GPT disk - and, most likely, the user will not find any significant difference from the “Maximum”.
DISKPART utility
In Windows Installer, press the key combination Shift+F10
, after which the command line opens. Let's try using the utility to delete and re-create partitions.
Enter the first command:
Diskpart
– launch the utility.
List disk
– displays connected drives, most importantly, there is one drive.
Sel disk 0
– here we select the desired disk, where 0 is the number, be careful here.
List part
– displays a list of partitions of the selected disk.
Clean
– deletes all partitions.
Exit
- exit.
The command line has closed, now click the update button in the installer to receive new information about the work done. In theory, there should now be one hard drive, from which we will now create a partition. Just select a disk, click the “Disk Setup”
, and then
“Create”
.
If, after you tried to start the installation, nothing happened again, but an error appeared, look at the type of partition; if it is different from the main one, for example, extended or additional, then you can use special utilities, for example, Acronis Disk Director. Boot from it and change the disk type.
Disk error
A hard drive on which Windows 7 is not installed may be partitioned correctly, but contain several problem sectors. If they end up in the area of file unpacking or OS installation, it will be impossible to continue the process. To check the hard drive and fix minor errors, the user must:
- Run the installation again and wait until the source data is copied to the disk.
- Go through the standard preparatory steps: select an interface.
- And the Windows 7 language.
- Then click on the “System Restore” link located at the bottom left.
- Regardless of whether other OSes are installed on the disk or whether it is completely clean, select the “Use recovery tools” option in the next window and click “Continue”.
- Launch command line.
- Enter and, pressing the Enter key, apply the command chkdsk / f - it will check and, if necessary, restore the problematic hard drive.
- Depending on the current usage of the HDD, the system may refuse to scan the hard drive in “full” mode.
- Then you should enter and apply the same command, but without the / f .
- The verification will take a few minutes. As a result, the computer owner will either find out that no failures in the file system have been detected (and then will be able to switch to any of the other described options), or will receive a notification about errors found.
If they are unimportant, the utility will correct them on its own; If the recovery is unsuccessful, you will most likely have to take the hard drive to a service center and use a working one to install Windows 7.
Windows 7 cannot be installed from a flash drive/disk
Here you should make sure that the information on the media is correct. This problem is very common, as it occurs due to the use of defective or inappropriate programs to create an installation flash drive. You need to use another application, here are the ones that should work: WinSetupFromUSB or UltraISO.
Usually, if there were any failures during the recording process, then you will not see the flash drive at all as a launch medium or various errors will arise during the process: the absence or malfunction of some files.
RAM error
Unfortunately, the RAM sticks worked and continue to work extremely unstable, and it happens that the installation of Windows 7 does not start or is interrupted precisely because of them. The easiest way to make sure that the problem is not in the RAM is to go to the “System Restore” menu again, and then:
- Click on the “Windows Memory Diagnostics” link.
- Select the “Reboot and check” option.
- Wait for the results of the RAM test.
Important: a message about the inability to check RAM, as shown in the example, may indicate not only problems with RAM, but also errors when writing the installation disk or flash drive. The owner of the computer should, as indicated in the advice, reboot and try to run the test from another medium - and only then draw conclusions.
Option #2: Outdated BIOS
One of the reasons that contributed to the appearance of error 0x80070570 when installing Windows 7 may be the BIOS. Finding out that the problem is quite easy: just answer honestly one question: has your computer seen the 90s and the millennium? If the answer is “yes,” ask yourself, has anyone ever updated the BIOS on a computer? If you don’t remember, don’t know, or are unsure of your memories, feel free to download the new BIOS version and start upgrading your PC.
What to do if this method did not help? Cry because you will either have to spend money on buying a new hard drive or motherboard, or look for new RAM.
Wrong disk type
A very rare, but no less unpleasant error associated with an incorrectly assigned attribute to the hard drive. It usually occurs when installing Windows 7 on a blank HDD and is due to the fact that the area for system files is marked as logical and not main.
Typically, in this case, the user sees an error notification 0x80300024 on the screen; to correct the situation you will need:
- Open the System Restore menu again and launch the Command Prompt, then enter and apply the first command diskpart .
- Next, after waiting for the system to respond, list disk .
- Select the “wrong” hard drive from the table that appears on the screen (you should focus primarily on the capacity) and identify it for further actions by using the select disk NN , where NN is the drive number from the first column.
- As soon as a notification appears about the activation of the desired HDD.
- Enter and apply the list part .
- If no partitions are found on the hard drive, a user who is not installing Windows 7 may skip the next step.
- And if they are, you should first run the clean .
- As a result, a notification will appear indicating that the hard drive has been completely cleared.
- Now - create the “correct” working partition for Windows 7 using the command create part primary size= SS , where SS is the desired area size in megabytes; The text should not contain any extra spaces or punctuation marks.
- When the "primary" partition is created.
- Format it using the following command: format fs = ntfs label = " NAME" , where NAME is any name for the system disk, very preferably written in Latin. Instead of NTFS, you can specify FAT32, but changing a modern convenient file system to an outdated one is not recommended. The section name must be enclosed in quotation marks.
- Wait for formatting to complete.
- When a message appears about the successful formation of the “primary” partition.
- active command to it .
- After a few more seconds have passed, you will receive a notification that the reassignment was successful.
- You need to assign a letter to the newly created partition using the command assign letter= AA , where AA is any letter of the computer owner’s choice, usually C.
- Almost all. All that remains is to read the notice.
- And leave the diskpart by entering the final exit .
- If all manipulations are performed correctly, after a reboot the user will be able to finally install Windows 7 in normal mode - and continue to use it without any difficulties.
Drive
So, retraining for installation is complete. That is, you recorded the desired image and, most importantly, checked the recorded data for errors. Now you can go to the computer hardware and its settings.
If you did all the above mentioned points correctly, then the first thing you need to check is the disk drive. Sometimes, when installing Windows, the drive may have difficulty reading data on the disk.
I want to say right away that it happens that the drive seems to be spinning the disk, but the installation is very slow and never finishes. To finish the installation or start, you need to connect another drive (from another computer). You can also ask your friends for a portable USB CD Rom - a very cool thing when there is no drive in netbooks and office computers.
More Information
Linked Entries
- bootcfg
- bootrec
- chkdsk
- sfc
- Fix MBR
Support Links
- Easy Recovery Essentials for Windows – our repair and recovery disk.
It's an easy-to-use and automated diagnostics disk. It's available for Windows 8, Windows 7 and Windows Vista. It's also available for Windows XP and Windows Server.
Read more at Windows Recovery Disks.
- The NeoSmart Support Forums, member-to-member technical support and troubleshooting.
- Get a discounted price on replacement setup and installation discs: Windows Vista, Windows 7, Windows 8, Windows 10.
Replacing a value in the registry
- after the error appears, press Shift + F10 (if you have a laptop, you may also need to press Fn), the command line will open;
- in the command line, type “regedit” (without quotes) and press enter, the registry editor will open;
- make a copy of the registry;
- in the registry editor, go to the HKEY_LOCAL_MACHINESYSTEMSetupStatusChildCompletion branch;
- in the right part of the window, double-click on setup.exe, change the value 1 to 3;
- close the registry editor, close the command line, click on the “OK” button in the error window;
- After rebooting, the installation should continue.
The method works with Windows 7, 8 and 10. Write in the comments whether the method helped, if not, I’ll try to help with advice.
By logging in, you consent to the processing of personal data.