06/11/2018 windows
This instruction tells you what to do if, during a clean installation of Windows 10 or 8 (8.1) from a flash drive or disk on a computer or laptop, the program reports that installation on this disk is impossible because the selected disk contains an MBR partition table. On EFI systems, Windows can only be installed on a GPT disk. In theory, this could happen when installing Windows 7 with EFI boot, but I haven’t encountered it myself. At the end of the manual there is also a video where all the ways to fix the problem are clearly shown.
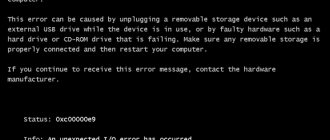
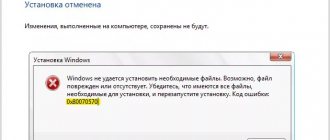
The error text tells us (if something in the explanation is not clear, it’s okay, we’ll look into it later) that you booted from an installation flash drive or disk in EFI mode (not Legacy), but on the current hard drive on which you want to install system, there is a partition table that does not correspond to this type of boot - MBR, not GPT (this may be because Windows 7 or XP was previously installed on this computer, or when the hard drive was replaced). Hence the error in the installer “Windows cannot be installed on the disk partition.” See also: Installing Windows 10 from a USB flash drive. You may also encounter the following error (follow the link for its solution): We were unable to create a new or find an existing partition when installing Windows 10
There are two ways to fix the problem and install Windows 10, 8 or Windows 7 on a computer or laptop:
- Convert the disk from MBR to GPT, and then install the system.
- Change the boot type from EFI to Legacy in the BIOS (UEFI) or by selecting it in the Boot Menu, as a result of which the error that there is an MBR partition table on the disk will not appear.
This instruction will cover both options, but in modern realities I would recommend using the first of them (although debates about which is better - GPT or MBR, or rather, the uselessness of GPT can be heard, however, this is already becoming standard partition structure for hard drives and SSDs).
What are MBR and GPT hard drive standards and what are their features?
Before you start working with a hard drive or solid-state drive, you need to format it, dividing it into several logical partitions. The sizes of the partitions depend on how much space needs to be allocated for the operating system and how much for other programs and other files. After dividing into sections, information is recorded in them according to a certain standard. Currently there are 2 standards in use - MBR and GPT.
Externally, MBR and GPT hard drives often look the same
Advantages and disadvantages of each standard
MBR (master boot record) - this standard appeared in the early 80s along with the DOS operating system. It includes special program code, a set of data with information about loading the operating system, and a hard disk partition table. The MBR standard is simple, but is now considered obsolete. Disks of this standard can work with both BIOS and UEFI. Its main disadvantages are as follows:
- The partition size cannot be larger than 2.2 TB;
- you can create no more than four main partitions on your hard drive;
- The boot record of the operating system is stored in one specific place, which is why it can be accidentally overwritten or damaged by a virus.
GPT (or GUID Partition Table) is a new partition table storage standard that was proposed by Intel for use with UEFI (Extensible Firmware Interface). A feature of the GPT standard is the duplication of the table of contents and section table. Compared to MBR, this standard has the following advantages:
- supports a maximum partition size unattainable for the MBR standard;
- You can create many partitions on one hard drive (for operating systems of the Windows family - up to 128);
- due to the fact that the master boot record is a duplicate, it is easy to restore if damaged and it is almost impossible to accidentally overwrite or introduce malicious code into it;
- loading operating systems of the Windows family of versions 8 and older is much faster.
How to find out the disk type in a laptop or computer
Let's look at ways to determine the type of disk in a laptop or personal computer.
Determining the disk type using the Disk Management utility
In Windows, the easiest way to determine the hard drive partition standard is to use the Disk Management utility.
The main window of the Disk Management utility contains basic information about the disks installed on the computer
In Windows 10, to launch the utility, you need to right-click on the Start menu and select “Disk Management” from the context menu.
In Windows 7, right-click on the Computer icon. Next, select the “Manage” context menu item, and in the “Computer Management” window, select the “Disk Management” section.
An alternative way to launch the Disk Management utility is to press the Win+R key combination, and then in the Run window, enter the command diskmgmt.msc and press Enter.
Enter the command diskmgmt.msc to launch the Disk Management utility
We wait until the Disk Management utility starts. Its main window will display all the disks and partitions that are currently on the computer. Right-click on the name of the disk you are interested in (it is located at the bottom of the “Disk Management” window), select “Properties” in the context menu and go to the “Volumes” tab.
Select the desired disk, right-click on it, open the context menu and select the “Properties” line in it
In the Disk Information section, you will see an option for Partition Style: Table with GUID Partitions (GUID) or Partition Style: Master Boot Record (MBR). The first option means that the disk has a GPT partitioning standard, and the second means that the disk has an MBR master boot record.
For a GPT disk, the information window looks like this:
For a GPT hard drive, the style is “Table with GUID partitions (GUID)”
And for an MBR disk - like this:
An MBR disk has a Master Boot Record (MBR) style.
Determining the disk type using the command line
The hard disk partition format (GPT or MBR) can be determined using the command line. To do this, you need to launch the command line console as an administrator, enter the command diskpart and press Enter. After downloading the utility, enter the list disk command and confirm the action with the Enter key.
To view a list of hard drives, run the command diskpart
Among the displayed hard drive parameters there is a GPT column. A disk that uses the GPT standard is marked with an asterisk. The remaining disks not marked with an asterisk have MBR partitioning.
Determining the disk type using the AOMEI Partition Assistant utility
AOMEI Partition Assistant Standard is a free utility for working with hard drives and solid-state drives in the Windows operating system. The program has extensive functionality and can convert GPT disk formats to MBR and vice versa.
After launch, the utility displays all disks and the logical partitions on them. At the bottom of the window, under the name of each disk, its type is shown: GPT or MBR.
At the bottom of the utility window, all hard drives on the computer are shown, indicating their types, as well as the logical partitions of each drive.
The methods described above will help you easily find out which standard a particular drive belongs to.
Installation problems
If you have problems installing the system, namely a notification appears that it cannot be installed on the selected hard drive, then the reason may be the following:
- The system bit size is incorrectly selected. Remember that a 32-bit OS is not suitable for GTP disks, and a 64-bit OS is not suitable for single-core processors;
- an error was made while creating the installation media, it is faulty, or the system image used to create the media contains errors;
- The system is installed for the wrong type of disk, convert it to the required format. How to do this is described in the paragraph “How to change the hard drive type” located above in the same article;
- an error was made in the download list, that is, the installation media in UEFI mode was not selected;
- installation is performed in IDE mode, it must be changed to ACHI. This is done in the BIOS or UEFI, in the SATA config section.
Installing to an MBR or GTP disk in UEFI or BIOS mode is not much different, the main thing is to correctly create the installation media and configure the boot order list. The remaining steps are no different from standard system installation.
Source
- https://public-pc.com/kak-preobrazovat-mbr-v-gpt-pri-ustanovke-windows-10/
- https://winda10.com/ustanovka-i-aktivatsiya-sistemy/mbr-v-gpt-pri-ustanovke-windows-10.html
- https://pomogaemkompu.temaretik.com/1202638145556318428/ustanovka-windows-10-na-disk-mbr-i-gtp-pri-nalichii-bios-ili-uefi-instruktsii-sovety-rekomendatsii/
How to install Windows 10 on a GPT or MBR disk
Before you start installing the Windows 10 operating system on your personal computer, you need to figure out which firmware interface is supported by its motherboard. This can be the UEFI Extensible Firmware Interface or the Basic BIOS Firmware Interface. Then you should decide on the partitioning standard for your hard drive or solid-state drive. Installing Windows 10 begins by copying files from the installation media, which can be either a flash drive or an optical disc (CD) .
Determining the motherboard type: UEFI or BIOS
Users often encounter the problem of determining the motherboard interface type. Let's look at how to recognize it correctly.
BIOS is easy to distinguish from UEFI: it looks like old software and uses a small number of colors. It's mostly blue, black and white. Also, the BIOS has few settings and does not have the ability to select a boot mode with UEFI and Legacy options.
Boot mode cannot be selected in BIOS settings
Another difference is that UEFI supports computer mouse control, which is not available in BIOS. The graphics quality of the UEFI interface is also significantly higher.
The UEFI system interface looks more modern compared to the BIOS
Choosing the most suitable standard for installing Windows 10
On new computers whose motherboard supports the UEFI system interface, it is recommended to install Windows 10 on a disk partitioned using the GPT standard. This will eliminate problems with data loss and ensure faster loading. Separately, it should be noted that if you need to install a second operating system, it can only be Windows version 8 and higher. Older systems will fail to boot.
If the computer is old or you need to install two or more operating systems younger than Windows 8 on it, then it is better to leave the MBR partitioning of the disk, but you will have to additionally configure UEFI (how exactly will be described below). Please note that 32-bit versions of Windows operating systems do not support the GPT standard.
Preparing installation media
Before installing the operating system on a computer, we must prepare media containing the necessary installation files. Let's say we have an operating system image in ISO format and an empty flash drive with a capacity of 8GB or more. To correctly write an image to a flash drive, it is recommended to use the Rufus program. It does not have unnecessary settings that can mislead the user, perfectly configures the bootable USB flash drive and allows you to avoid many errors when data is not readable or BIOS and UEFI cannot recognize it.
Before starting the process of burning a Windows image to a flash drive, configure the necessary settings in the program window
Creating installation media consists of the following steps:
- select the flash drive on which the installation image of the operating system will be written;
- in the “Partition scheme” drop-down menu, select the type of disk partition (GPT or MBR) and the type of system interface of the motherboard (BIOS or UEFI);
- in the “File system” menu, select FAT32, leave the “Cluster size” parameter as default;
- check the boxes “Quick format” and “Create boot disk”;
- select the system image iso file and click the “Start” button.
After finishing recording the image, we will receive media that can now be used to install Windows on computers with the appropriate partition layout and type of system interface.
Installing using classic BIOS on a disk with MBR partition style
Installing an operating system using the BIOS interface on a disk in MBR format will not cause any problems. You just need to follow the following instructions:
- turn off the computer and connect the installation media;
- When the computer boots, enter the BIOS, usually you need to hold down the F2 or Del key;
- find the Boot tab and select the installation media as the primary boot device;
- save the settings, reboot and follow the prompts for the classic Windows installation.
Select the device from which Windows will be installed.
No further manipulations are required. When installing the operating system, you can format the disk if there was any information on it before.
Installing using UEFI on a disk with MBR partition style
When installing Windows 10 using UEFI on a disk with MBR partition style, problems may arise. More fine-tuning of UEFI will be required, so if it is possible to convert the disk to GPT format, then it is better to do this right away. For those who still want to keep the MBR disk format, you need to switch the boot mode from EFI to Legacy. For this:
- in the BIOS Boot Menu, select the option to boot from a USB drive without UEFI in the name and move it to the first place in the boot settings;
- in UEFI, instead of EFI boot mode, set Legacy or CSM mode.
Select Legacy boot mode.
The installation media must have an MBR partitioning scheme. After completing these steps, the system will read it and the installation will begin.
Installing using UEFI on a disk with GPT partition style
Using UEFI, you can install only the 64-bit Windows 10 operating system on a GPT disk. The installation process using UEFI is not much different from the same process in BIOS. Let's look at the key points:
- when you boot the computer, go to UEFI, usually you need to hold down the F2 or Del key on the keyboard, and start setting up;
- in UEFI the UEFI Mode boot mode must be selected and Secure Boot mode must be enabled;
- In the Boot tab, the installation media should be in the first place.
Enable Secure Boot mode in the boot options settings.
The hard drive on which the operating system will be installed must have GPT partitioning, otherwise it will have to be converted to this format. We'll talk about the problems associated with converting hard drive layout below.
Guide to disabling Secure Boot
This is not a setting that belongs to any version of Windows, but rather a property of the operating system. It monitors the absence of third-party programs and systems when the computer starts.
That is, in general, this is a necessary detail, but sometimes it gets in the way. And the case where it is impossible to install another OS may be precisely because of the Secure Boot property. What you need to know to deactivate it:
In order to configure the operating system correctly, you need to go to the appropriate window.
So, in Windows 8, you can simply go to change settings through the left panel and find PC settings (UEFI) in additional options.
For each Windows OS number there is an individual path to these properties.
There is also a more universal way: during the process, when the PC turns on, simultaneously use the “delete” and F2 keys. It should be taken into account that Notebook can react to the combination of Fn and F2.
Disabling Asus Hardware from Secure Boot
To disable laptops or motherboards under this name, you need to go to the EFI options, where the boot tab will lead to secure boot, and then you need to select “other OS” in the “type OS”. F10 will help fix the settings.
Where is the position of OS Tye
It should be noted that in certain cases with Asus you should find the security or bot tab, and configure Security Boot there.
Disabling HP Hardware from Secure Boot
To disable secure boot on HP laptops and others, you need to press Esc during startup, after which a window should appear where a button will be provided to enter the BIOS; this decision can be supported by F10.
After these manipulations, you can go to the system configuration, where you need to click bot options. Then a transition to secure boot is expected to bring it into the disabled state.
Disabling Secure Boot – disabled
Disabling Lenovo, Toshiba equipment from Secure Boot
To disable such a function, you need to find software for this property. So when turning on the laptop, for example, you need to press F2 or a combination of F2 and Fn.
There is a security tab waiting, where it is important to set Secure Boot to the “disabled” state; to save the innovations, press F10 or a combination of this key with Fn
Disabling Acer Hardware from Secure Boot
Startup in Windows 7/8/10: where is it located, how to open it, how to add or remove a program
But in this system the shutdown principle is slightly different.
Here you will have to find the authentication section on the PC (sometimes it’s advanced), from there go to the Secure Boot tab, but here it’s not just switching from one state to another, but you need to use Set Supervisor Password, that is, a password.
Sometimes it requires enabling CSM or Legacy Mode to replace EFI.
Switch Acer's Secure Boot authentication to disabled
Well, Acer laptops provide BIOS or UEFI settings, where you can find a tab with Secure Boot. But entering a password is still required for Acert equipment when Secure Boot is disabled.
In any case, even if the device on which you need to disable these properties does not meet the criteria described here, you can try the proposed solutions to the situation, since often the essence of solving this issue is similar on different devices.
How to change the hard drive partition type
There are various methods for changing the hard drive standard, but it is worth remembering that conversion almost always leads to data loss, even if the program promises to leave the data safe and sound. Therefore, before starting the operation, save all important information on another drive or copy it to external devices.
Problems installing Windows on a specific type of disk
The main problem with installing the Windows 10 operating system is receiving notifications that it is impossible to continue or start the installation.
Error message when converting from MBR to GPT appears before Windows installation begins
When installing Windows, the following typical errors are possible:
- errors related to the system bit size: the 32-bit operating system is not suitable for installation on a GPT disk;
- a malfunction of the installation media or incorrect recording of information on it: you need to use another media or overwrite the current one;
- for UEFI mode, a media with a name containing UEFI is not selected, and vice versa - for BIOS, a media with UEFI in the name is selected;
- The installation media loader is formatted in the wrong format: the format must match the type of hard drive or solid state drive.
Changing disk format via command line
One of the fastest options for converting a disk from one format to another is conversion using command line utilities. Let's say you need to convert an MBR disk to GPT. Attention: all information contained on the disk will be deleted. This option can be successfully performed already during installation of the operating system. After loading the Windows installer, press the key combination Shift+F10, which opens a command line in which you need to sequentially enter and execute the following commands:
- diskpart (disk management utility will start);
- list disk (a list of disks will be displayed on the screen; you need to remember the disk number (N) where the operating system will be installed);
- select disk N (select disk N);
- clean (clean the selected disk);
- convert gpt (convert the disk to GPT format);
- exit (exits the Disk Management utility).
Enter the commands sequentially to convert the disk format, waiting for each of them to complete.
Then you can continue installing the operating system on a disk in GPT format. If the installation program does not see the disk, you must restart the computer and repeat the installation.
Changing the format using Windows Disk Management utility
This type of conversion requires an installed and running Windows operating system version 7 or later. Let's say you need to convert a disk from GPT to MBR format. To do this, you will need the Disk Management utility, which we discussed above. Do the following:
- Launch Disk Management.
- Select the hard drive you want to convert and remove all partitions from it. To do this, right-click on the partition and select “Delete volume” in the context menu that opens.
Delete all partitions from the disk one by one by selecting “Delete volume” in the context menu - Right-click on the disk name and select “Convert to MBR disk” from the context menu. After the operation is completed, you can re-create the necessary partition structure on your hard drive or solid-state drive.
Select and run the “Convert to MBR Disk” function
Programs for converting between GPT and MBR formats
In addition to the standard tools built into the Windows operating system, there are various third-party programs for converting disk formats. Among them are the Acronis Disk Director and Minitool Partition Wizard utilities. They allow you to convert the format without losing data. Let's take a closer look at the Minitool Partition Wizard program.
Select the boot mode of the Minitool Partition Wizard utility
We create a bootable drive with the image of the Minitool Partition Wizard utility and boot from it. Please note that in UEFI Secure Boot mode must be disabled. After the download is complete, select the desired hard drive and click on the Convert MBR Disk to GPT Disk line, which is located on the left in the Operations tab. Then click the Apply button and wait for the operation to complete, which can take quite a long time.
Select the disk and start the conversion with the Convert MBR Disk to GPT Disk command
Sometimes the program fails to convert the system disk, and a corresponding warning is displayed. To solve this problem you need:
- select the partition in which the operating system loader is located (usually it is located at the very beginning of the list and takes up to 500MB);
- delete it and create the same partition in the FAT32 file system in its place;
- repeat the conversion steps described above.
Third-party programs open up additional opportunities for working with hard and solid-state drives. In particular, they allow you to convert them to MBR and GPT formats without data loss if the standard functionality of the operating system does not work or is unavailable.
Disabling SecurBoot mode
When installing legacy, the computer may stop booting; in this case, you need to disable secure boot. For different manufacturers, it may be hidden in different places. For example, for Asus: Boot - Secure Boot - OS Type, you need to select “Other OS”,
For HP products: System Configuration - Boot Options - "Secure Boot" - "Disabled".
For Dell devices: “Boot” - “UEFI Boot”.
For Acer laptops: Advanced - System Configuration or in the section indicated in the image.
For Gigabyte motherboards you will have to go to BIOS Features.
After disabling the mode, the device should start booting from the flash drive.
Preparing installation media
To create the media you will need:
- an image of a system that suits you, which you need to choose based on the processor bit (32 or 64-bit), the type of hard drive (GTP or MBR) and the version of the system most suitable for you (home, extended, etc.);
- a blank disk or flash drive with a size of at least 4 GB;
- third-party program Rufus, with which the media will be formatted and configured.
Download and open the Rufus application and, having the data obtained above in the article, select one of the settings packages: for BIOS and MBR disk, for UEFI and MBR disk, or for UEFI and GPT disk. For an MBR disk, change the file system to NTFS format, and for a GPR disk, change to FAT32. Don’t forget to specify the path to the file with the system image, and then click the “Start” button and wait for the process to complete.
Setting the correct parameters for media creation
The essence of the error
This notification appears at the stage of selecting a hard drive for Windows. The message mentions that this hard drive has MBR partitioning, but the operating system is only suitable for GPT. Often this problem occurs when you want to install a new Windows 8 or 10 on media that previously contained Windows 7 or an older OS.
MBR is a separate sector of the hard disk with information for system installation and partition information. Designed for disks with a capacity of up to 2 TB and works with classic BIOS.
Expert opinion
Daria Stupnikova
WEB programming and computer systems specialist. Editor of PHP/HTML/CSS site os-helper.ru .
Ask Daria
GPT is a new standard with no size limitation. It is part of UEFI - an updated version of the BIOS with a user-friendly interface and mouse support.
Therefore, you need to change the partition scheme. This can be done using one of the methods described below.
Burning a new flash drive
In some cases, the problem is not the hard drive partitioning, but the wrong installer. You need to create a drive with certain conditions that will allow you to install Windows without completely formatting the hard drive. For example, you can use the Rufus utility. Through it you can select the partition scheme and target system. If you want to install Windows 8 or 10, then specify GPT. For older Windows operating systems, specify MBR.