Almost every person uses a personal computer for entertainment or work. In addition to the PC, many computer devices have been developed that complement or expand its capabilities. The computer's hard drive stores information that the user can use when needed. Today there are quite a large number of ways to store data not only on the hard drive of a computer or laptop, but also on memory cards, flash drives, and external SSD drives.
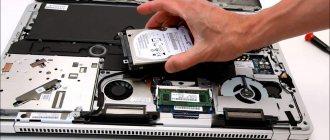
Thanks to portable storage devices, information important to the user will be stored in a safe place and can be used if necessary. External HDDs and SSDs have been especially popular lately. They are convenient and easy to use. But often unforeseen situations occur and users are faced with the fact that the laptop does not see the connected drive via USB or through the so-called “sled”. What to do in this case? What are the ways to solve the problem?
By the way, on wifika.ru we have already discussed the problem when Smart TV does not see USB flash drives, you can read it too.
The main reasons why a laptop does not see a USB drive
Sometimes you may find that when you connect an external device to USB, the laptop does not see the disk. There may be several reasons for this, but the main ones are: faulty drive partitions, incorrect file system, non-working USB port, lack of necessary drivers in the system. The most unpleasant moment is when the disk is physically faulty. In this case, nothing will help except replacing it with a working analogue.
Before you begin solving the problem, you must do the following:
- Make sure it is the external drive that is faulty and not the USB port. To do this, connect it to different connectors.
- reconnect the hard drive.
- Inspect the casing of the external device for damage.
- When the HDD or SSD is visible in the "Devices and Printers" section, but not in the Device Manager, reinstall the driver by removing the device and restarting the computer.
The connection may not be established due to a damaged cable. Replace it and try
If you have completed these steps, but the laptop does not see the Windows disk as before, you should understand the reasons in more detail. If you have a second laptop or desktop computer, try connecting an external drive to it. This activity will take very little time, but the result will be reliable. By connecting an HDD or SSD via USB to another computer, you can understand whether it is working or not.
Checking the connection
Before delving into the system settings and taking the drive in for repair, check whether you have connected the drive correctly.
I wouldn't talk about such a banality if I hadn't somehow inserted a USB cable into the Ethernet connector. It’s not that I don’t know how they differ: it’s just that on a laptop the ports are located next to each other, and when you insert cables without looking at the case, you can miss. But understanding this didn’t stop me from spending a couple of minutes painfully wondering why the mouse wasn’t working. Even if you insert the drive into the correct port, it may not have enough power. This especially applies to external hard drives: some older models have two connectors on the case, for data transfer and power. Do not use hubs - only direct connection to the system unit/laptop.
Disconnect unnecessary equipment from your computer, leaving only the essentials: the keyboard and mouse. Try connecting the drive again, it may now have enough power.
Also pay attention to the type of port: it can be USB 2.0 or USB 3.0. The connector for version 3.0 is usually painted blue. Compatibility with USB 2.0 is complete, but if you connect a device that supports 3.0 transfer to 2.0, you will noticeably reduce performance.
This is interesting: Running Windows programs on Mac: an overview of the most popular methods
To make sure the port works at all, connect any other device to it. The simplest thing is a computer mouse. The drivers for it are already installed on the system, so switching ports should not change anything. If the mouse stops working in another connector, then the problem is definitely in that connector.
Disk Management on Windows
Make sure that the external SSD you are connecting is detected by the operating system. If it is an HDD, check that after connecting it to the laptop, the button on its case was turned to the “On” position. Windows provides a standard tool for managing all disks. The program opens in different ways, but the easiest way is to launch it through “Run”. Press Win+R, then enter the command “diskmgmt.msc” and press Enter.
A program window will open on the screen, displaying all the main elements. On the left side, you need to go to the following path: “Computer Management (local)” – “Storage Devices” – “Disk Management”.
On the right side of the screen you should see a connected external drive. It must be displayed here, even if it is not in Explorer. All that remains is to format it so that the operating system can recognize it. But when the laptop does not see the hard drive via USB in this section, you need to go further through the check points.
Other utilities
- Download the Automatic Diagnosis of USB Problems utility from support.microsoft.com. To do this, enter its name in the search bar.
- Run this program.
- In the window that opens, click “Next”.
- The service will prompt you to remove the device you are checking. Mark it and click on “Next” again.
- The utility will display a list of errors associated with USB devices. She will fix some of them. If you see what the problem is, it is easier to solve it.
USBOblivion
After updating Windows, entries may remain in the registry that relate to previous connections of the drive. Because of this “extra” data, the system cannot obtain up-to-date information about the hard drive. The USBOblivion program is suitable here. It's free.
- Find it online, download and run.
- O and “Save undo file.”
- Remove all USB devices.
- In the utility, click on the “Cleanup” button.
- Restart your PC.
- Connect all gadgets.
If the hard drive does not appear in Explorer, this does not mean that it is broken. Update the drivers and assign a volume label to the hard drive. Or download a USB troubleshooter.
Checking the BIOS
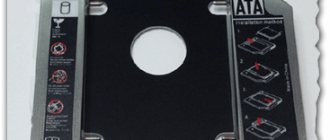
Typically, the BIOS does not see disks on a laptop connected via the SATA interface - for example, when you want to install a second hard drive in your laptop. The reason is that the controller is disabled. Its main purpose is to ensure switching between IDE and SATA in a computer with peripheral devices connected to the motherboard via the corresponding ports.
To activate the CAT controller, follow these steps:
- Before turning on or while rebooting the laptop, still during the first screen, press the BIOS start button. It could be F2, F12, Escape - it all depends on the BIOS version.
- Find the SATA Controller section and set it to the required value, namely Enabled. If the default is Disabled, simply highlight it and press Enter.
- Next, go to the Advanced section and set the SATA Operation (Mode) attribute to ACHI.
After that, restart the device again and wait for Windows to load. If the external drive stubbornly refuses to work, go into the BIOS again and reset the settings by selecting the Reset and Save Settings function.
How to fix: External USB drive not showing up in Windows 10 File Explorer.
When you connect an external USB drive, the drive immediately appears in Explorer. However, sometimes the drive may not appear in Explorer.
If your external drive is not showing up in Windows 10 File Explorer, you can try the solutions below to access your portable drive.
Before using these solutions, we recommend disconnecting the drive, restarting your computer, and plugging the drive back in to see if it shows up in File Explorer.
Solution 1 of 2
Adding a drive letter.
Step 1: Open Disk Management . To do this, right-click on the “Start” button on the taskbar and select “Disk Management”.
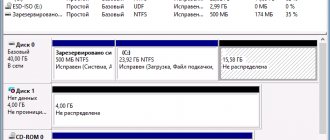
Step 2: Under Disk Management, check if your external drive has a drive letter. If it has a drive letter, it is displayed next to the drive name, as shown in the image below. If there is no drive letter, you will need to follow the next two steps to fix it.
Step 3: Right-click the external drive that is not showing up in File Explorer, and then click “ Change drive letter or drive path... ”.
Step 4: Click the Add . Clicking the button will open the Add Drive Letter or Path . As you can see in the image below, Windows 10 automatically assigns a drive letter to the selected drive, but you can choose your own drive letter (one of the available letters) by clicking the down arrow next to the drive letter.
Click OK to add the drive letter.
Now check that the drive is visible in Windows Explorer.
Solution 2 of 2
Allow empty drives to be displayed in Explorer.
There is an Option that is used to hide empty drives in Explorer. Thus, use this solution only if the external drive is empty.
Step 1: Open File Explorer. Click the File and then select Change folder and search options .
Step 2: Go to the View .
Step 3: Under Advanced Options, uncheck the “ Hide empty drives ” option.
Step 4: Click the Apply . All!
If the external drive does not appear even after trying the above solutions, try connecting the drive to another computer and check if it appears there.
Update laptop drivers
It is important to make sure that the necessary drivers are available in the system. If you find that the external drive is detected by another computer, but does not work via any USB on an Asus, Lenovo or other brand laptop, check the control programs that are necessary for the proper functioning of the storage device. To do this, you will need to launch Device Manager again.
Press Win+R and enter devmgmt.msc in the “Run” line
What is your opinion: is WiFi harmful?
Yes
22.91%
No
77.09%
Voted: 36474
After going to the program, carefully review the entire list and try to find devices that have a yellow exclamation mark next to them.
There may not be any, but if you manage to find an external drive with an exclamation mark, open its properties and look at the error details.
You can find a solution to the problem on the Internet, remove or reinstall the driver. If you are good with computers, find and download the driver for the HDD or SSD from the official website of the device manufacturer and install it manually.
We separately check the USB controller driver, since the interaction between the external drive and the laptop occurs through a connector, the operation of which also requires a control program.
It’s even better if you update the control utility – the driver – for each position. It won’t take too much time if you right-click on the name of the USB controller, select “Properties” and click the driver update button.
Where to begin?
If you are sure that the drive is working properly and there is no hardware failure, try the following:
- Connect the hard drive to another USB port.
- Sometimes Explorer “does not see” the hard drive due to malicious software. Check if there are viruses on the media. But how to do this, since the device is not displayed? Connect it to another computer (for example, at a friend's or at work).
- Format your hard drive. If you store important data on it, first copy it to another location.
Checking the volume label
Another reason why the laptop does not see the new SSD drive is the wrong volume label. This is especially worth doing when you hear a buzzing sound characteristic of the disk operation, all the indicators are flashing, but the system does not detect it.
The order is as follows:
- Press Win+R again.
- Enter the command compmgmt.msc into the line and click “OK”.
- On the left side of the program we find “Disk Management”, click on the name.
- In the right window we find our external drive.
- Now press RMB and select “Change letter...”
- Then “Change” and instead of the original letter, select another one.
- Reboot the laptop (Acer, HP, Huawei, Asus, Lenovo, etc.).
If the problem was an incorrect volume label, the disk will be recognized after the computer boots.
Enable hidden or empty drives
In some configurations, Windows does not see removable media because an option is enabled that hides all empty drives from Explorer. To disable it, follow the instructions.
Open Command Prompt as Administrator using System Search.
In the console, run the command:
Minimize the window and go to Device Manager using the devmgmt.msc command from the Win + R window.
In the View menu. If possible, use hidden equipment.
If your external hard drive is not visible in File Explorer, follow these steps:
In Explorer, click on the View tab and go to Options - Change folder and search options.
Uncheck the option to hide empty drives. Apply the changes and exit.
Format the disk
This must be done when the HDD or SSD is visible in Disk Management, but not in the My Computer window. As in the previous case, open the window by entering the compmgmt.msc command in the Run program. Next, we find the disk we need, right-click and select “Format”.
Give the volume any name, set “Quick Format” and be sure to select the NTFS file system. It is compatible with most versions of the Windows operating system.
The formatting process may take several hours, but do not interrupt this operation under any circumstances, as you will have to solve new problems with the connected storage device in the future.
Simple fix method
First, about the most common cause and an easy method for novice users to fix the problem. It is suitable if the problem appeared suddenly, without action on your part: not after you changed the case, or disassembled the PC and cleaned it of dust or something like that.
So, if you encounter an error USB device over current status detected, most often (but not always) it comes down to the following points
- Problems with connected USB devices - this is usually the problem.
- If you've recently connected a new device to USB, spilled water on your keyboard, dropped your USB mouse, or something similar, try unplugging all of those devices.
- Keep in mind that the problem could be with any of the connected USB devices (including the aforementioned mouse and keyboard, even if nothing happened to them, a USB hub, or even a simple cable, printer, etc.).
- Try disconnecting all unnecessary (and ideally, necessary) devices from USB when the computer is turned off.
- Check if the USB device over current status detected message has disappeared.
- If there is no error (or has changed to another one, for example, about the absence of a keyboard), try connecting devices one at a time (turning off the computer in between) to identify the problem.
- As a result, if you identify the USB device that is causing the problem, do not use it (or replace it if necessary).
Another simple, but rarely encountered case - if you have recently moved the computer system unit, make sure that it does not come into contact with anything metal (heating radiator, antenna cable, etc.).
If these simple methods do not help solve the problem, move on to more complex options.