Hello! We will now flash the Tp-link TL-WR841N router. These instructions are also suitable for the TL-WR841ND model. On our website we already have instructions for flashing firmware for Tp-link routers. There I told you how to find out the hardware version of the router, download the firmware, and actually flash the router. This is such a general article, and I thought that I would need to prepare a separate article on firmware for the Tp-link TL-WR841N router.
This is a very popular model, one might say folk :) Therefore, I think the article will be useful to many. By the way, I wrote about setting up this router in a separate instruction, you can read it here. As for the Tp-link TL-WR841N firmware, everything is just as simple:
- First, let's find out the hardware version of the router
- Let's download the firmware for our model (TL-WR841N, or TL-WR841ND) and hardware version from the official website.
- Let's connect to the router via cable and update the firmware.
All this will take a few minutes. And updating the software can significantly improve the performance of your router. In new updates, the manufacturer always improves, adds, and refines something. Therefore, after updating the firmware, your Tp-link TL-WR841N can work even better and more stable.
How to update the firmware
Updating the software (firmware) can solve problems with previous firmware versions and improve the performance of the device.
To avoid problems with the update, please review the following information. Check that the hardware and firmware versions match - installing the wrong version may cause the device to malfunction and void the warranty (usually version 1.x = version 1). How to find out the hardware version of a device?
It is not recommended to install firmware designed for another region. Click here to select your region and download the latest firmware.
Do not turn off the power during the update, as this may cause the device to malfunction.
Update your router firmware via Wi-Fi only when this is the only possible way.
Before updating, it is recommended to close all programs on your computer that require an Internet connection, or simply disconnect the network cable from the device.
Before updating, the firmware file must be extracted from the archive using an archiver (for example, WinRAR or WinZIP).
Recommendations for updating the firmware: Wi-Fi router, Wi-Fi router with ADSL2+ modem, Wi-Fi signal amplifier.
More less
| TL-WR841N(RU)_V14_200921 | Download | |
| Publication date: 2020-11-27 | Language: Russian, Ukrainian | File size: 4.52 MB |
| Changes and bug fixes 1. Security issues have been fixed. 2. The preset list of Internet providers has been updated. Note: for TL-WR841N(RU)14.0. | ||
| TL-WR841N(RU)_V14_200304 | Download | |
| Publication date: 2020-04-16 | Language: Russian, Ukrainian | File size: 4.38 MB |
| Changes and bug fixes: 1. Optimized system stability and reliability. 2. Added indicator management function. 3. The stability of the PPPoE module connection has been improved. 4. Improved stability of L2TP and PPTP connections. 5. Fixed some security issues. Notes: For TL-WR841N RU v14. | ||
| TL-WR841N(RU)_V14_180515 | Download | |
| Publication date: 2018-06-20 | Language: English, Russian | File size: 4.01 MB |
| First firmware released for TL-WR841N(RU)_V14. | ||
Firmware in Russian for TL-WR841ND
For this model, many people search and ask about the firmware in Russian. I think this question needs to be answered. Below, I will show how to download the firmware from the official Tp-Link website. So, for each hardware version of the router, the website displays several firmware versions. Yes, there are versions in Russian. At the time of writing, Russian firmware for Tp-link TL-WR841ND is only available for V9 and V8 (not the newest). The website indicates what language the firmware is in.
I agree that setting up a router is much easier when the control panel is in Russian. But in English there is nothing false there either. Moreover, almost all instructions for setting up this router are written using the English version of the web interface as an example.
Open source for programmers (GPL)
The following information is intended for programmers and is not relevant to most end users of TP-Link products. TP-Link products contain code developed by third parties, including code developed under the GNU General Public License (GPL) version 1/version 2/version 3 or the GNU Lesser General Public License (LGPL). You may use the corresponding software under the terms of the GPL license.
You can view, print and download the relevant GPL license terms here. The GPL Source Center provides you with downloadable GPL source code for the relevant software used in TP-Link products, as well as other information, including a list of TP-Link software that contains GPL source code.
Determining the hardware version of the router
TL-WR841N and TL-WR841ND differ only in that ND has detachable antennas, while N does not. Their firmware is compatible with each other, provided the devices have the same hardware version. But the hardware versions are different, it is strictly forbidden to confuse them!
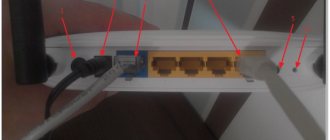
Therefore, before downloading the firmware, you need to correctly determine the hardware revision of your device. You can find it on a sticker on the back of the router, next to the words Ver. In my case it is Ver. 8.2. Accordingly, I will need to download the firmware for V8.
Saving settings
Sometimes when installing the firmware, the settings are reset to the factory state. This happens if the versions differ greatly and it is not possible to update using the usual method. In such a case, it is worth saving a backup of the parameters in order to restore them after the process is completed. In the left column, select “System Tools” - “Backup and Restore”. On the right side of the window, click on “Backup” and select a location to save the settings.
In the new interface, go to the “Advanced Settings” tab at the top, and then “System Tools” – “Backup and Restore”, click on “Backup”. Save the file in a safe and accessible location. You may also need it when resetting to factory settings, so that you don’t have to fiddle around with reconfiguration for a long time.
Wi-Fi setup
Wi-Fi and wireless network are configured in block 5 of the left menu.
For the initial launch of the grid, the first two pages are enough.
On the first one you need to install:
- “Network name” - under this name the router will appear in the search for home devices. It is immediately noted that it should not exceed 32 characters (but should not be too short - 6-10 characters).
- “Region” - for post-Soviet bloc countries, “Russia” is suitable.
- “Mode” - it makes sense to install if all the user’s devices are approximately the same year of manufacture. If not, put it as in the picture.
- “Channel” - since the device has only one operating range, let it select the channel and its width (higher) automatically.
- “Maximum transmission speed (Tx)” is set by the standard, but it can be further limited.
- “Enable wireless broadcasting” - the position of this switch is changed using the toggle switch on the router body. This is the ability to disable or enable the network.
- “Enable SSID Broadcasting” - it is recommended to enable it. Useful if not all devices can find the network upon initial connection.
- “Enable WDS” - this function will be discussed in the next section. Off by default.
Having configured the network, go to the second page - to install protection. 4 blocks on the page offer you to select a type and configure it in detail. The choice is large, but the official website recommends that the home user choose, as in the picture - “WPA-PSK/WPA2-PSK”.
It’s interesting here that one of the four blocks is to disable protection (at the very top).
The parameters can be set according to the picture.
“PSK Password” is the password for the WIFI network; you will need to enter it the first time you connect to the router’s network.
“Group key update period”—set to zero so that the router does not try to change passwords on its own. This reduces the load on its processor and home network.
The process of updating the firmware on the Wi-Fi router TL WR841N
So, let's take a step-by-step look at how to reflash a Tp-link router. Of course, it is assumed that all previous conditions are met:
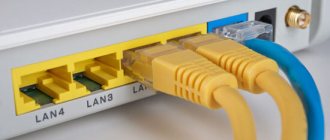
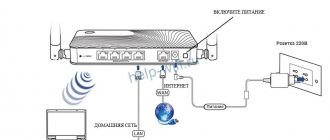
- The device is connected directly to the computer via a cable.
- The firmware is unpacked and is in an accessible place.
- Wi-Fi is turned off.
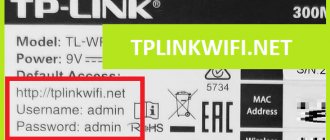
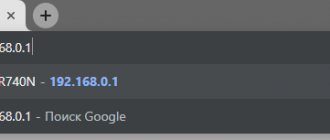
Step 1. You need to open the html device management page. To do this, in the browser, in the address bar, you need to type https://tplinkwifi.net. You can also use https://192.168.0.1, less often https://192.168.1.1. An administrative access request window will open. If the factory settings have not been changed, then the user is admin and the password is admin. Having successfully completed this stage, a blue or green version of the control interface opens. In essence, the difference between them is small, it is only in appearance.
Step 2. Save your settings. If the device is new or there is no need to preserve it, then skip this point. In the blue interface, go to the tab at the top “Advanced Settings”, in the green interface on the right, go to “System Tools”. Further, the same item names are used. Interested in “Backup and restore”. Inside this section there are two buttons “Save” (“backup”) and “Restore”. Accordingly, “Save” saves the parameters. You must press it before the update, and “Restore” restores and press it after the process is completed.
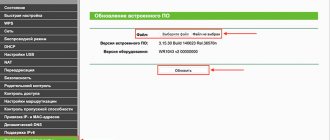
Step 3. The actual update process itself. In the same menu - for the blue interface it is “Advanced settings”, and for the green “System Tools” you need to go to the “Firmware upgrade” sub-item. There you will find on the page in blue “Update manually” and next to the “Browse” button, in green there will simply be a file selection button “Select file” (“Browse file”). By clicking on it, in the window that appears, find the unpacked firmware file on your computer, select it and click “Ok”.
Step 4. Start firmware updates. After selecting the software to update the already installed one, you must click on the “Upgrade” button on the same page. The process of making changes will begin, after which the communication device will reboot.
When everything is over, you need to log in to the web interface again to restore the communication parameters or set them again.
Step 5. Restoring saved settings. If step 2 was not done, then you can skip this point by going directly to manually entering the router settings. If saving was done, then we go as usual in the blue version to “Advanced settings”, in the green version it’s “System Tools”. Then “Backup and restore”. In this menu item, you must click “Restore”.
So, the entire firmware process is described. Let's talk a little about the already mentioned alternative firmware for routers from third-party manufacturers. Indeed, they give new capabilities to the device, and installing them is no more difficult than the method already described. But by installing non-native software, the user loses the warranty on the router. And there is a possibility that a system software update created by other manufacturers, and not Tp-link specialists, simply will not be installed, or may lead to hardware damage to the device. Although the functions that are available in alternative firmware are very interesting, one can even say that in some cases they are even worth a certain risk. This:
- Creating your own file or media server on a local network based on a router with a USB connector and a USB hard drive.
- Support for various 3G/4G modems, again with USB.
- Fixes for some security issues that were accidentally left out of the official software.
Firmware for TP-Link router in the new version of the control panel
If you have a TP-Link router with new firmware with a blue and white interface, then to update the software you need
- Open the “Advanced Settings” tab
- Go to the menu “System tools - Firmware update”
Here you can check the update automatically, or you can also manually select the firmware file.
The procedure is the same
After installing and updating the firmware of the TP-Link router, you need to reboot it and continue working.
How to flash TP-Link with an old version of the control panel?
Now you need to install the firmware update on your TP-Link router. To do this, first of all, we fulfill two mandatory points:
- Flash your router by connecting it to your computer via cable.
- Do not turn off your computer or router while flashing
You also need to take into account that after the update, all configurations are not necessary, but they may disappear, so personally, I always make a backup copy “just in case,” so that everything can be easily restored later.
If you are ready to fulfill the conditions, then log in to the admin panel of the router, for which, through a browser, go to the page https://192.168.0.1 or https://tplinklogin.net and enter the login/password for access - by default they look like “admin/ admin".
Next, in the left menu, open the “System Tools” section and follow the “Firmware Update” link.
Here we click on the “Select file” button, select the downloaded file on the computer - from TP-Link it has a .BIN extension, and click on the “Open” button.
And then on the page click on “Update”