Wireless technologies are penetrating our lives more and more intensively, and setting up a Tp-Link router is very popular in Internet search engines.
I will explain to you how to properly connect and configure a Tp-Link router. This is a step-by-step instruction, both for beginners, for dummies, and for those who have little experience, whose settings have gone wrong or gone wrong and would like to reconfigure the router or check the settings on it, including checking the password for wi-fi fi if it was forgotten.
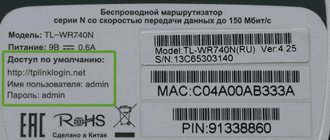
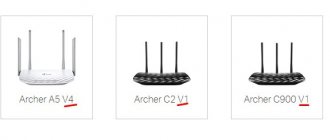
All Tp-Link routers are different from each other, as a rule, the more expensive it is, the more powerful it is. And therefore you need to find out which model you got into your hands. The manufacturer wrote the model on the box; it can also be seen on the back of the equipment itself. Tp-Link models usually start with Archer, TL-WR.
Below in the list you can select your router for further configuration.
| TL-WR743ND | TL-WR843ND | TL-WR740N | TL-WR741ND |
| TL-WR840N | TL-WR841N | TL-WR841ND | TL-WR940N |
| TL-WR941ND | TL-WR1042ND | TL-WR1043ND | TL-WDR3500 |
| TL-WDR3600 | TL-WDR4300 | TL-WR720N | TL-WR842ND |
| TL-WR941ND 450M | TL-WR940N 450M | TL-WR1045ND | Archer C50 |
| Archer C20i | Archer C20 | Archer C2 | Archer C5 |
| Archer C7 | Archer C8 | Archer C9 | Archer C2600 |
TP-Link: login to your personal account
To access the router (router) system, the IP address 192.168.0.1 is used. If a physical connection between the two devices has not been made, it must be done first.
It may differ from this if the local IP address was changed in the router.
Instructions for logging into the personal account page of the TP-link router:
- Open any browser (for example Google Chrome) and paste or write into the search bar 192.168.0.1
- Choose to go to a regular address, but not a Google search.
- In the Username field, enter admin
, for the “Password” field - too
admin
. Click "Login". - Done, you are on the main page of the router panel, where all the information about it is collected and you can configure it.
This authorization method works for all models of TP-Link routers, N series (TL) and AC series (Archer). Also, Archer routers use the tplinkwifi.net address to log into the admin panel. Therefore, you can choose which address to go to, it makes no difference.
Setting up a wi-fi network
Let's start setting up the router. You can use the settings wizard or quick Internet setup in the router menu, but let's do it differently.
In the menu of the Tp-Link router, select the “ Wireless ” item, if the interface is in Russian, then “ Wireless mode ”. Below I will write settings for English and Russian interfaces simultaneously, since everything is identical.
I note that the router can be single-band or dual-band - 2.4 GHz and 5 GHz.
2.4 GHz - this is where the era of home wireless technology began. This range is susceptible to interference from any household appliances, especially from Bluetooth, because the operating frequencies are the same. If you notice any malfunctions in the future, this is one of the reasons.
5 GHz - high throughput, expressed in high transmission speeds. One of the disadvantages is the short range, but the big advantage is that it is little susceptible to external influences from household appliances. Therefore, it is better to place the router closer to the devices you use.
If there are two bands on the Tp-Link router, I recommend setting up both, this will help you use the Internet in the 2.4 GHz band, for example, on a bench outside, when the 5 GHz band is not visible to the device, or when you have a phone, tablet, or even a computer that does not support this range.
Let's share a video on how to password-protect a Wi-Fi network on a Tp-Link router
In the “ Wireless Network Name: ” field or in Russian “ Wireless network name: ” we will invent and write in Latin the name of the wi-fi network, it will be displayed on the phone, tablet, computer when connected to wi-fi, for example we will call: “Kak_dela_sosed ?. “ Region ” select Russia.
Set a password for wi-fi
Now we need to secure our network, set a password for wi-fi so that neighbors cannot connect to us.
You need to go to the “ Wireless Security ” or “ Wireless Protection ”
Select the encryption type “ WPA-PSK/WPA2-PSK ” or “ WPA/WPA2-Personal (Recommended) ” on the Russian interface, in the line “ PSK Password: ” or “ PSK Password ” we will come up with and set a password. This is the same password that is needed to connect to wifi. Those who are reconfiguring a Tp-Link router can change the password here.
Click “ Save ” or “ Save ”.
If you have a dual-band router, we also make settings for 5 GHz.
If you set up via wi-fi, without a cable, you need to reconnect to the newly created network to continue the setup.
How to log in from a smartphone?
To access the router panel, you need to connect to it via the Wi-Fi network that it distributes. If distribution is turned off in the router settings, you need to turn on Wi-Fi. Further:
- Open the Wi-Fi section on your phone and connect to the network access point by entering your login (network name, SSID) and password.
- Launch your browser and write your login IP in the address bar 192.168.0.1
- Enter login and password - admin
in the first and second fields (by default, but it can be changed). - Ready. Access granted.
By the way, about changing the password
This is a rather important procedure, because anyone who connects to the network can enter the router setup menu. So if your network is not password protected, then your neighbor can easily change all the factory settings and set his own username/password. In this case, only a reset will help. Therefore, to prevent this from happening, you should change the standard password immediately. It's easy to do:
Go to the System Tools , then to Password .
Old User Name - in this field we write admin or previous login.
Old Password - enter admin or previous password.
New User Name - come up with any desired login.
New Password - write any desired password, we recommend a strong one that is difficult to guess.
Confirm New Password - type the same as in the previous field, thereby confirming the password and your desire to change it.
Click Save . Password has been changed. Now you should reboot the router. To do this, without leaving the System Tools click Reboot . The password has now been finally updated.
TP-Link ID or remote access to router settings
TP-Link ID is the company's cloud service that allows you to manage a network device remotely via a global network, without the need to connect directly to the router's local network. Cloud service is available only for AC (Archer) series devices.
Registering TP-Link ID is done as follows:
- Through the Internet browser, open the url https://tplinkwifi.net and log in to the web interface using the admin username and password.
- Follow the navigation to the “Basic setup” → “TP-Link Cloud” section and click the “Register now” button.
- Next, enter the email to which the cloud profile is linked and the password.
- Confirm your registration by clicking on the identifier link in the letter sent to the specified email address.
- Ready. Now, in the TP-Link Cloud section, enter your new login details to manage your router remotely.
Important note!
After binding the ID, entering the router settings will be possible only through TP-Link ID. You can no longer log in to the system using the local device administrator using the admin login and password.
Incorrect network settings
If, despite all the above recommendations, you cannot open the required menu, the likely reason for this is an error in the PC’s network settings.
You need to do the following:
- In the control panel, click the link “Change adapter settings”;
- Right-click on the connection and click on the “Properties” line;
- Click on the “Internet Protocol Version 4” column so that this item is highlighted;
- Next, click the “Properties” button;
- In the menu that appears, check the boxes for automatic address assignment;
- Click "Ok".
Managing TP-Link ID from a smartphone
For convenient remote control, the developers have created the TP-Link Tether application. Through it you can:
- see models that support the TP-Link cloud service;
- manage your TP-Link ID account and network devices linked to it;
- register a new device in the cloud.
The application is localized into Russian, so there will be no problems with adding and settings in terms of “misunderstanding”.
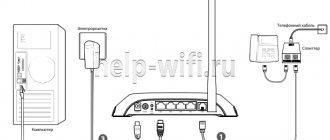
Checking the connection to the computer
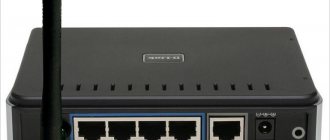
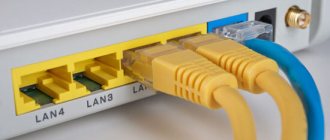
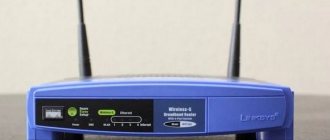
Before setting up the router, you need to check its connection. It comes with a network cable - patch cord . Using it, the router connects to the computer.
patch cord with RJ45 connector
If you did it correctly, but the problem does not go away, then reboot the devices. It also doesn’t hurt to check all the cables again; they may not be plugged into the ports enough. This completes the installation of the device.
If the Wi-Fi transmitter is connected to the PC correctly, the LAN lights on it will light up.
We are looking for a problem in IP and DNS
This is one of the most popular reasons why you cannot access the web interface on TP link routers. You need to check whether IP and DNS are automatically obtained. This is especially true for those who have previously used connections with static addresses.
Possible errors when logging in
I will indicate the most common login errors in this block.
The page takes a long time to load or the message “cannot access the site.”
Troubleshoot the following:
- Wrong router IP address (most common).
- The PC is not connected to the router with a patch cord.
- The patch cord connectors do not fit well into the connectors.
- The network cable itself is faulty (broken).
- The router is turned off or faulty.
- No drivers are installed on the computer's network card.
Start with the first one (which is most likely the reason):
- key combination Win+R
open the line and activate
cmd - at the command line run the command ipconfig
- “ Default Gateway
” will indicate the real address of the router to which the laptop or PC is connected.
It is possible that your router provided by your ISP has been changed by them, or by you, to 192.168.1.1, or some other. If the IP address has not been determined, look for the problem in the following points mentioned.
The login or password is incorrect.
There are two reasons:
- You are entering your login and password incorrectly due to problems with your keyboard layout.
- It has been changed.
If you have not linked TP-Link ID
(local administrator authorization), you cannot log in via admin, and you don’t remember the changed login and password, reset the settings.
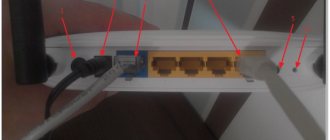
On the router body, press the Reset (RST) button for 7-10 seconds. You will reset the router to its factory state (you will understand the beginning of the process by the changed indication), thereby returning it to the standard local administrator login data (admin, admin). Unfortunately, all other data will also be lost and will have to be configured again.
If you linked TP-Link ID
(remote administrator authorization), reset your password using the “Forgot Password” form. If you lose access to email, you will have to roll back the router to factory settings using the Reset button to regain access to your personal account.
Sometimes, the Reset button is recessed into the body, so you will have to press it with a toothpick, a needle or a paper clip.
Network card software
Often, access to the web configurator is not possible after updating or reinstalling Windows, and the PC owner has not installed the appropriate drivers for the equipment.
To ensure that the network controller is functioning properly, you only need to complete the following few steps:
- Launch "Device Manager";
- If the equipment item has a red or yellow “!” icon, then it means you need to update its drivers.
If the system was unable to detect the corresponding software in its database, the user needs to visit the official website of the device developer from another PC located online on the network and download the drivers to a flash drive, from which they can then be installed on the problem computer. After this, nothing should prevent access to the router interface.