A wireless WiFi bridge will expand the network coverage area by connecting two or more access points wirelessly. Let's take a closer look at what it is, how to set up a mode in a router (using TP-Link as an example), and solve problems that arise with its organization. We will help you choose equipment to create a bridge.
The solution is used in business - it unites various segments (divisions) of a corporate network, less often - in a private home, but such cases exist.
A wireless bridge is also deployed when connecting to the Internet in places remote from civilization, where it is not possible to install and maintain cellular communication towers, for example, recreation areas, rescue operations, and tourist routes. Where are you planning to do the setup?
What is it and what is it for?
A Wi-Fi bridge is a local network that involves combining a pair of wireless access points located at a distance of up to several tens of kilometers. Allows you to connect a couple of company departments or a city apartment and a country house to the Internet without laying cables. It is used for organizing video surveillance, creating a connection between a computer and cameras separated over a long distance. WiFi bridges or regular routers operating in bridge mode are used as connecting links.
A special feature of the technology is the storage of MAC addresses of all network clients.
To deploy a stable network, you need a clean Fresnel zone - the space between routers through which electromagnetic waves propagate. Over 60% of the area must be clear of any obstacles. The greater the distance between devices, the worse the quality of communication. To improve it, powerful bridges are purchased, the signal from which extends over the required distance with a margin. For example, if network fragments are located at a distance of 4 km, it is advisable to take devices with a signal range of 5 km.
Wireless Distribution System or WDS is a previously common technology for expanding a Wi-Fi network, operating in one of two modes: a wireless bridge or a repeater (repeater).
Additional actions
If you use more advanced devices like ASUS routers, you can use special additional modes. We will not consider how to connect a cable to a router from a device with a missing wireless module, since a standard LAN port is used for this. More interesting in this case is enabling the network adapter mode, which can be found directly in the parameters of the router’s web interface. This is the one you need to choose. However, if we are talking about setting up a router as a repeater, using the appropriate mode is also simple.
Source
“Bridge” and “router” modes: the difference
A router in bridge mode becomes an intermediary between network clients: it receives information from computers, smartphones and other devices, sends it to a second router, which already sends the information to the target recipient, for example, a website. The device fully controls the traffic of each network element: it can set restrictions regarding traffic and speed for any device by MAC address.
A WiFi router can be used as a repeater or repeater - it amplifies the wireless network signal. It must operate in the same channel as the router that organizes access to the Internet, while the repeater reduces the overall network bandwidth by half.
What are the features of the bridge?
A bridge is characterized by connecting a pair of devices via wireless communication. This method can be used if it is necessary to strengthen or expand the Wi-Fi network. The situation can be clearly seen using the example of a router that distributes a connection. Its network does not cover the entire space, therefore, it needs to be expanded. For this, a second Tp-Link router is used. It is connected and configured according to the instructions below. As a result, it takes over the settings from the main equipment and distributes the network further. The difference from an amplifier is that with a bridge you will have two wireless networks with independent access parameters.
The method is quite convenient if there is no other way to configure it. The amplifier is more beneficial since it simply duplicates all the parameters and does not create its own connection. In the case of a bridge, you will have to choose each time which of the two networks to connect to.
Sometimes the question arises of how to configure the tl-wr941nd to receive a wireless connection and then transmit it further via cable. It turns out that the router will be used as a receiver, and is such use of the equipment possible?
The answer is simple, when you configure a router using a bridge connection, it will work as a receiver. In this case, you can easily connect a TV, laptop or other equipment through it that does not have its own adapters for connecting via a Wi-Fi network.
Options to create a bridge between 2 routers: WiFi or cable
There are a couple of techniques for building a bridge between routers.
- Wired connection. An outdated but reliable method that requires running a cable between routers.
- Wireless Wi-Fi communication line. Using a radio channel, you can connect two devices at a distance of up to tens of kilometers. The devices must be within direct visibility of each other. The quality of the connection is worse than with a wired connection, depending on obstacles, weather conditions, distance, and equipment characteristics.
Conditions for connecting a wireless bridge
In what situations is it advisable to use a wifi bridge?
- If we are talking about a room that is located close to the source of your wireless signal, that is, from a wifi router, then it is likely that the network will reach it after installing a regular antenna or repeater.
- If the distance is no more than a few tens of meters, then you can do without additional devices to increase the range or use two routers that support wifi bridge mode.
- But for larger distances, ranging from several hundred meters to kilometers, to ensure more stable operation, it is recommended to use special wifi access points designed specifically for building such wireless bridges. They are already equipped with a powerful directional antenna and are designed to work in conjunction with each other.
Today there are no outright leaders in the market for the production of such equipment. Both TP-Link and any other major manufacturer have similar solutions. But the pioneer at one time was Ubiquiti, which to this day has many models of different price ranges and performance characteristics.
Line of sight
Pay attention to one detail that an attentive reader probably noticed when I talked about where we need to connect the Internet from your apartment - to a neighboring house or to the nearest forest. That is, you will need to purchase and install two identical access points and point them at each other so that their direct contact is not disrupted by any obstacles or obstacles, such as walls, trees, etc.
The main condition for stable operation of a wifi bridge is direct visibility between two objects.
Therefore, in the case of houses, if they are located opposite each other, you can simply fix the access points on the balcony or roof. If we are talking about a greater distance, for example, to distribute WiFi over a bridge to a summer cottage hidden by a forest, then you can install the receiving access point on a high pole towering above the trees or houses.
Equipment Specifications
Another condition for creating a wireless bridge is the technical characteristics of the equipment - what distance they reach and at what frequency they operate. It is best that these are two identical models so that they are most suitable for communication with each other.
Also, reception stability can be further increased by using a separately purchased external amplifying antenna.
When installing points, it is necessary to take into account the directional pattern of their signal. You need to understand that the greater the distance, the more accurately you need to aim them at each other.
Range
Let's look at some equipment for setting up a wifi bridge based on range. If you plan to create a wifi bridge for a distance of no more than 3 km in line of sight, then the Ubiquiti NanoStation Loco M2, NanoStation Loco M5, NanoStation M2 models are suitable - in increasing order of their range.
The following WiFi access points already reach up to 10 km - Ubiquiti NanoStation M5, NanoBridge M5 22dBi, NanoBridge M5 25dBi. The last 2 with more amplified antennas.
The PowerBridge M3 and PowerBridge M5 models with built-in powerful highly directional antennas will help you overcome a distance of 20 km.
And finally, you can cover a maximum distance of 30-50 km using the Ubiquiti Rocket M2, Rocket M5, Rocket M5 GPS models (with coordinate synchronization). Also, for more stable reception, they can be further amplified with antennas - for example, for the Rocket M2 point, operating at a frequency of 2.4 GHz, the RocketDish 2G-24 is ideal, for the Rocket M3 - the Rocket Dish 3G, and for the Rocket M5 - the RocketDish 5G-30.
If there is no direct visibility, then the NanoStation Loco M900 model will help you at a distance of up to 5 km. Unlike most access points that operate at a frequency of 2.5 GHz, this equipment has a frequency range of 900 MHz, which helps radio waves better avoid obstacles.
In addition to the points themselves, during outdoor installation you will need some more devices - this is the so-called Lightning Protection, which protects devices operating using PoE technology (that is, receiving power via a network cable) from dangerous voltages that may arise due to atmospheric phenomena.
Let's summarize - to create a wireless WiFi bridge through a router you will need:
- 2 configured local networks,
- 2 external access points with antennas
- and 2 lightning protection.
If you are in doubt about what to buy, just Google and find online stores that sell this equipment. In most cases, they have a convenient wizard for selecting models or have ready-made kits that you just have to purchase and configure.
Here are the characteristics of a series of access points from the Ubiquity website:
Access points of the NanoStation M and NanoStation Loco M series are perfect as client devices for receiving signals from the base station; as a distributing antenna in the specified direction; as a bridge connection, where visibility between objects is limited, due to MIMO 2x2 antenna.
Bullets do not come with built-in antennas and are therefore universal. Through the N-type connector, you can configure a panel, directional, or omnidirectional antenna of the appropriate range. Mainly used for building bridges and for distributing signals in a circular direction.
Rocket are designed to build provider-class point-to-multipoint connections and for highways over 40 km thanks to joint use with proprietary AirMax Sector, Dish and Omni antennas. The main advantage of the points is power, performance and support for MIMO 2X2 mode.
AirGrid, NanoBridge and PowerBridge are equipped with built-in highly directional antennas and are mainly intended for building bridge connections. Antennas differ from each other in performance, power, form factor and purpose.
What is your opinion: is WiFi harmful?
Yes
22.92%
No
77.08%
Voted: 36613
Setting up WiFi Bridge from different routers
Setting up a connection on TP-Link network devices with different firmware interfaces differs little. Let's take a closer look at the process for the old interface (green) and the new one (blue).
First, of course, you need to configure the main router - it must distribute the Internet.
In the old version of the interface
The primary task is to select a static channel for organizing a Wi-Fi network. Read more about what a wireless network channel is and how to choose a free one in our separate publication.
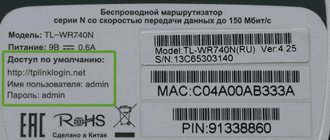
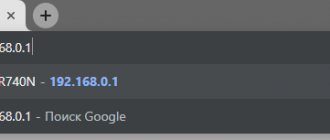
- To visit the device settings web interface, go to 192.168.0.1 or another address indicated on the device body sticker.
- Enter your login and password – “admin”.
- In the “Wireless Mode” section, select the appropriate channel and save the changes.
Open the settings of the second router in the same way.
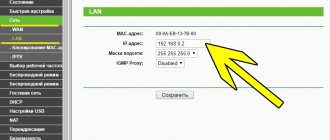
- In the “Network” menu, go to the “LAN” subsection.
- Change the IP address of the device to something different from the one through which you accessed the settings of the first router. For example, change the last digit to “2” if there are no other clients connected at that moment. Therefore, it is better to indicate a larger number. For example, 100, but not more than 255.
- In Wi-Fi settings, select the same channel as for the first router.
- Activate the “Enable WDS” option, click “Search”.
- Click “Connect” next to the desired device in the search results. Focus on the SSID column - this is the name of the first router.
- Select an encryption algorithm for the connection, enter a strong password to protect it.
- Restart the device, for example, through “System Tools” - “Reboot”.
The process is complete.
In the new
In the Archer firmware everything is similar.
On the main Wi-Fi router that distributes the Internet, select a static channel in “Advanced settings” - “Wireless mode” - “Settings...”.
Pay attention to the frequency range. If all devices support 5 GHz, select it; if older equipment will work on the network, switch to 2.4 GHz.
Move on to the second device.
- In the "Operating Mode" section, select "Access Point".
- Save the settings and reboot your device to apply them.
- Open the wireless mode settings, click “Search” and click “Connect” next to the name of the main router.
- Next, set a password to encrypt your Wi-Fi network.
What points should be considered?
- For the main router, you can choose a device from any manufacturer. It is desirable that he be alone, but not necessary. The ideal option is when both routers are the same model. In the example, the main one will be the D-link DIR-615/A, and the TL-MR3220 model will be used for the bridge. It should be noted that not all models can interact correctly. The connection between the old version of Asus RT-N13U and Tp-Link was not configured.
- The main router settings will also be changed. You will need to specify a static communication channel.
- This method is optimal for wireless communication. An example of use is a situation where a main device is installed in one place, and another device is installed in another, which is connected to the main one via Wi-Fi via a bridge.
Locking WDS Mode
Equipment with “green firmware” switches back to router mode by disabling WDS in the wireless mode configuration section.
To switch the operating principle of the Wi-Fi router on the new firmware, open the corresponding section and move the switch to the “Router” position. Save your settings.
Advantages and disadvantages of the radio bridge function in the router
The method of organizing a wireless network in bridge mode through a pair of routers has positive aspects:
- There is no need to lay cables between network nodes.
- The MAC addresses of the devices are saved.
- Simple and fast configuration deployment.
The solution has more negative aspects:
- Throughput drops by half.
- The problem arises of compatibility of equipment from different manufacturers, of different generations, for example, with the 2.4 and 5 GHz bands.
- It is necessary to install a common static Wi-Fi channel for both routers, which sometimes negatively affects the quality of the signal.
- Older devices only work with WEP encryption protocol.
- Some Wi-Fi functions are not supported: parental controls, DHCP - speed limits, traffic.
Basic connection options
Configuring WDS on all routers is carried out according to the same scheme. The main device is connected to the Internet via a wire. It sends the signal further. The secondary router becomes a repeater. It relays the signal, thereby increasing the coverage area of the wireless network. If the WDS bridge is configured correctly, both devices will work simultaneously.
There are several WDS operating modes:
- Point-to-Point/Wireless Bridge. In this mode, the wireless access point exchanges information with the repeater. This mode is often used to synchronize equipment in two different buildings. Clients connect to the router via a wired connection.
- Point-to-Multipoint / Multi-point Bridge. It differs from the first option by using two access points.
- WDS with AP (WDS with Access Point). Allows you to connect user computers and other devices wirelessly.
Possible problems
Let's look at the main problems and how to fix them.
Internet via cable does not work in bridge mode
After organizing the bridge and setting up the network, it may turn out that there is no Internet on computers connected to the router via LAN - via cable. To access the Internet, you must disable the DHCP option.
On the old interface this is done in the section of the same name.
There is no need to reboot the device.
Sometimes the following solution helps: in the DHCP configuration parameters (after enabling the function), as the default gateway, specify the address of the main router through which you open its settings through the browser, most likely it is 192.168.0.1.
The problem with the bridge on the “blue” firmware is fixed in the “Network” section, subsection “DHCP server”.
The IP address of the main gateway also changes there.
Can't set up connection: disable WPS
If after taking the solutions the network does not work, disable WPS in the settings section of the same name.
On the new design, activate quick access by PIN code in the “WPS” subsection in the radio channel configuration or disable the function altogether.
The function is disabled on both Wi-Fi routers: the main one and the one working as a bridge.
How to lock bridge mode
To block bridging in a router, it is enough to make changes to the second (additional) router. To do this, go into its settings and set the Routing mode. Where it is turned on may vary depending on the manufacturer and model. Most often, the necessary item where changes are made is called Mode.
In this case, the appearance of the settings immediately changes and you can enter data - select PPPoE, specify your login and access password. If you wish, you can return the previous IP address for login. After making changes, be sure to reboot your equipment.
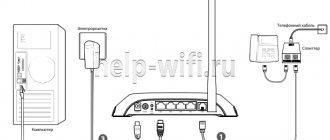
Connecting routers using a cable
When it is impossible to organize a Wi-Fi connection between routers, it does not meet the needs or a reliable connection is needed, the routers are switched via twisted pair. On the first router (main), the functions of DHCP and automatic distribution of IP addresses to clients are activated.
In the old firmware this is done in the section of the same name.
Dynamic IP addresses are enabled in the WAN settings.
In most cases, these are the default settings and you won't have to change anything.
Next to create a bridge:
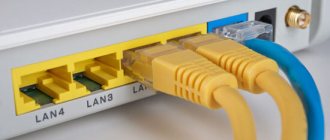
- A twisted pair jack is connected to a free LAN connector on the main router.
- Its second plug is connected to the WAN interface of the second device.
Long distance bridge
When organizing a Wi-Fi bridge within a house, apartment, or with direct visibility of routers, inexpensive models are sufficient. To work over long distances—kilometers—you need powerful radio signal transmitters. These are being developed by the Latvian company MikroTik, the American LigoWave, and Ubiquiti Networks. The connection diagram using an example of a device from the latest manufacturer is shown below.
- The Wi-Fi router receives the Internet and distributes it to network clients.
- It connects to the PoE power supply, where the twisted pair cable is connected.
- The power supply receives energy from the household electrical network.
- A second weatherproof cable (twisted pair) is connected to the second connector. It supplies power to the plate along with data packets.
It is also recommended to use lightning protection.
Setting up the “transmitter” and “receiver”
To configure the main device:
- Connect it via twisted pair to a computer or laptop via a LAN connector.
- In your Internet browser, open the address 192.168.1.20.
- Enter your login and password – “ubnt”.
- In the “Wireless” tab, enter the following information:
- Set the mode to “Wireless access” – “Access point”;
- network name – SSID, the “Hide SSID” option will make it invisible;
- channel width – choose the loosest one, always static;
- Encryption algorithm specify “WPA2-AES” – the most reliable;
- Enter and remember a password to secure the connection.
- Click "Change" to save the changes.
- In the “Network” tab, select the bridge network mode – “Bridge”, click “Change”.
Move on to the second device.
- After logging into the admin panel, in the “Wireless” tab, select the “Station” or “Station” mode.
- The channel width, network name, method of protecting it and the password are the same as those specified when setting up the first router.
Reboot both devices.
Choice of equipment up to 10, 25, 40, 100 km
For distances of a couple of hundred meters, inexpensive routers are sufficient. When the distance between devices is kilometers and tens of kilometers, you need specialized equipment with powerful antennas called a radio relay bridge.
| Option | Model | Signal range (km) | Data transfer rate (MB/sec) | Signal output power (dBm) |
| Budget | MikroTik SXTsq Lite5 | 3 | 70 | 25 |
| Budget | Ubiquiti AirGrid M5 HP 5G23 | 15 | 70 | 25 |
| Budget | Ubiquiti AirGrid M2 HP 2G20 | 30 | 70 | 28 |
| Budget | LigoWave LigoDLB ECHO 5D | 60 | 70 | 29 |
| Average | LigoWave LigoDLB 5–15ac | 7 | 450 | 30 |
| Average | Ubiquiti Powerbeam 5AC Gen 2 | 25 | 450 | 28 |
| Average | Ubiquiti PowerBeam 5AC-400 | 35 | 200 | 25 |
| Average | Ubiquiti PowerBeam M5–620 | 60 | 450 | 24 |
| High level | LigoWave LigoPTP RapidFire 5–23 | 3 | 500 | 31 |
| High level | LigoWave DLB MACH 5 | 30 | 100 | 29 |
| High level | Ubiquiti airFiber 5U | 100 | 100 | 27 |
A cheap device costing “around” $50 is enough for your home.
Setting up on an ASUS router
There should be 2 routers from this company. Let's consider the sequence of actions:
- First, open the main page of the equipment and copy the MAC address somewhere, which you will need later.
- Open settings.
- Find the "Wireless" section.
- Click on the “Bridge” tab.
- In the “AP Mode” line, select “WDS Only”. Set a channel to which the 2nd router will also connect. Enter your MAC address under the “Remote Bridge List” field. To commit the changes, click “Add”.
- When the new MAC appears, click “Apply”.
- Reload the page with the “Reboot” button (upper right corner). A reboot is a prerequisite for saving changes.
- Now let's move on to setting up the 2nd router. Open the “LAN” section.
- The required tab is called “LAN IP”.
- Here enter a new address, which will differ from the one specified in the settings of the first device. Click “Apply” and wait for the device to apply the changes.
- Go to the “LAN” section again, select “DHCP Server”.
- Opposite the line “Enable the DHCP Server?” check the “No” box. Click “Apply” and wait until the settings are saved.
- In the “Wireless” section, go to the “Bridge” tab.
- In the “AP Mode” line, select “WDS Only”. Select the same channel as on the first router. In the “Remote Bridge List” field, enter the MAC address from the 2nd router. Click “Add”, “Apply”.
- Reboot your device to save the changes.