Author of the article
Vladimir Novoselov aka Rescator
Technical support specialist, PHP programmer, WordPress developer
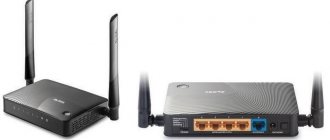
Like the 841nd model, the Tp-Link TL-WR841N router belongs to the budget class. The router's capabilities are enough to distribute the Internet within a small office or private home. The functional set will satisfy even the most demanding user. According to the official statements of the manufacturer, there is only one difference between the models - antennas. The Tp-Link TL-WR841ND model is equipped with a pair of removable antennas. They are not removable on the Tp-Link Tl Wr841n router.
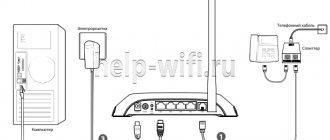
Connection
Before connecting the Tp-Link Tl Wr841n router, you need to answer the questions:
How will it be configured?
Through a wired connection to a computer, or a phone and any other wireless device?
For the Tp-Link Tl Wr841n router, configuration is possible via a wired connection, wireless, or using a special application that can be found in stores. There are versions for iOS and for Android.
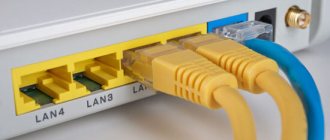
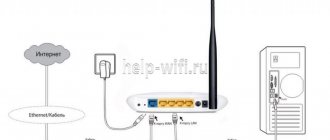
If the connection is wireless, you should look for the network address on the sticker on the bottom panel. The network does not have a password, but some firmware versions have one. It is indicated there. After this, the router is installed on a flat surface or mounted on a wall. The antennas are bent to a vertical position, where they are fixed. The provider cable is installed in the blue socket.
In case of a wired connection, the computer is connected to one of the yellow sockets. For a wireless network, it will appear in the search after turning on and booting the device. If there is no Wi-Fi to configure the Wr841n, you need to check the button on the case. Sometimes she is physically disabled there.
Reviews, operating experience
The most popular TP-Link model at the moment, if we take the total reviews in Yandex Market, e-katalog, Technopoint, M.Video. We received more than 1000 reviews.
This model is more than 10 years old, so there are many reviews and extensive operating experience has been accumulated. I analyzed the comments and came to the following conclusions:
pros
Most are satisfied with the device. Stable operation, quick setup and, most importantly, low cost. There are no frequent failures.
Minuses
For some users, about 12-17%, under heavy load, with multiple devices running simultaneously, Wi-Fi may turn off, freeze, and require a reboot. Weak signal or its complete absence in neighboring rooms. It also goes back to factory settings and has to be reconfigured.
Login to settings
After the selected connection type is established, go to the settings of the Tp-Link Tl Wr841n router.
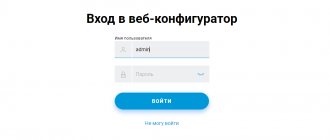
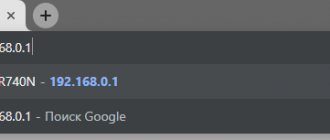
In the address bar of the browser, enter the address https://192.168.1.1 (written on the sticker) or the alternative https://tplinklogin.net. Any of the options should prompt you to enter your username and password.
Login, as in the screenshot above, or a similar window in the colors of the router. This data does not change from version to version - admin in both fields. Precisely with a small letter and without additional symbols. If the user turned the router over before connecting, he could see them on the sticker. After confirming the data by pressing enter on the keyboard, enter the web interface of the device.
If the router has not been configured before, a quick setup wizard appears on the screen, which kindly informs that if the user does not need it, he can click “Exit”.
Changing the password
Having taken advantage of the offer, close the wizard and go to “System Tools”, where on the “Password” page they change the login data for the web interface.
After reading the threatening warning written in scarlet font, they come up with a new username and password. The latter is dialed twice for control. For the update to take effect, enter the old “admin/admin” data just above. The router will reboot. Further configuration of Tp-Link Tl Wr841n will require correct entry of new data.
How to improve the signal
The most important thing is to install the router correctly. To improve the signal and reduce the likelihood of packet loss, you need to follow some recommendations:
- The router should be located on an open surface; any wall or cabinet reduces the range.
- Try to keep the device away from TVs, microwave ovens and other devices that emit waves of different frequencies.
- Antennas should be kept tilted at an angle of 45 degrees.
- Go to the “Wireless Network” on the router and check the channel. To ensure that RF waves create the least impact, channel 1, 6 or 11 is used.
Internet setup
Since this part raises the most questions, the section will be written in the form of step-by-step instructions in Russian with a detailed indication of all the settings for the Tl Wr841n.
All parameters, including setting up IPTV, which is discussed below, are located in the fourth block of the left menu.
"Net"
The wireless network has its own block in the menu. For the Internet - WAN page.
Dynamic connection type
If the Internet provider offers access to the network through a dynamic connection (when it provides everything necessary itself), in the “WAN connection type” line, select “Dynamic IP address” and the page takes the following form:
Sometimes you need to click “Detect” a couple of times for the connection to work. All you have to do is click the “Save” button for all parameters to take effect.
Static
This option is a little more complicated, because all parameters will have to be entered manually. “WAN connection type” - “Static IP address”.
All the data is in the contract, and if you are careful, there will be no problems. The Internet picks up immediately.
PPPoE
For Rostelecom, PPPoE is no more difficult to configure. For the connection type, select “PPPoE” or “Russia PPPoE” (often they are combined).
As standard, you enter “Username” and “Password”, which is repeated. They are issued by the supplier - you need to look at the contract with him.
If there is, a “Secondary connection” is established. For Rostelecom – “Static IP”.
The next step is to set the “WAN Connection Mode”. Most often, users set the switch to the “Connect automatically” position. There are many options here, choose at your own discretion.
For the “Connect on a schedule” mode, you must first set the router clock correctly (the “Time Settings” page in the “System Tools” section).
Other providers using the same connection type may require additional settings. If this is the case, the contract will contain some designations from the next screenshot.
This screen is opened by clicking the "Advanced" button on the page. There will be no explanations: you just need to set everything that the supplier requires. Updating settings - “Save” button.
PPTP
Mobile operators offer users a VPN connection using the Pptp or L2tp protocols. These connections are characterized by specifying the server address for the connection in addition to the username and password.
If the supplier offers such a connection, the “WAN connection type” drop-down list is set to “PPTP/Russia PPTP”.
The fields are filled in. Usually there is no need to configure the server address, and the supplier does not provide this data. But if the user has a unique connection type, for a completely manual setup, you need to set the switch in the middle of the page to the “static IP” position and configure all the parameters manually.
IN MOST CASES THIS IS NOT REQUIRED!
L2TP
A good example for the previous case would be setting up L2tp for Beeline on Tp-Link Tl Wr841n. “WAN connection type” - “L2TP/Russia L2TP”.
- “Username” - from the contract;
- “Password” - in the same place;
- IP address/Server name - tp.internet.beeline.ru
- Confirmation - “Save” button.
MAC Cloning
If the connection is configured correctly, but the pages still do not load, the user manual recommends going to the “MAC Address Cloning” page and changing the router address. Honest providers usually indicate this in the papers, but some “forget”, and if the address of a device previously associated with the provider has changed, the issue of access can only be resolved by communicating with technical support.
But why would anyone know that the user bought a router? On this page, with the click of one button, you can restore (for the provider) the address of the connected device.
Clone the MAC address
There are providers in the Internet communications market that provide their services based solely on the MAC address of the network card of the subscriber’s computer. This must be taken into account before setting up a Wi-Fi router.
If the MAC is not detected in the router, you will not be able to use the Internet. You can obtain additional information about the need to link a Wi-Fi router to the MAC from your provider at the time of signing the contract. Or by calling the hotline at the operator's office.
Go to the “Network” menu - “Clone MAC address” and click on the “Clone computer MAC address” icon.
As a result of these actions, the router’s MAC will be identical to the computer’s and, as a result, the Internet connection will function. You need to pay special attention to the fact that if you are setting up a Wi-Fi router from another PC, you must fill out the MAC yourself in a specially designated field.
Wi-Fi setup
Wi-Fi and wireless network are configured in block 5 of the left menu.
For the initial launch of the grid, the first two pages are enough.
On the first one you need to install:
- “Network name” - under this name the router will appear in the search for home devices. It is immediately noted that it should not exceed 32 characters (but should not be too short - 6-10 characters).
- “Region” - for post-Soviet bloc countries, “Russia” is suitable.
- “Mode” - it makes sense to install if all the user’s devices are approximately the same year of manufacture. If not, put it as in the picture.
- “Channel” - since the device has only one operating range, let it select the channel and its width (higher) automatically.
- “Maximum transmission speed (Tx)” is set by the standard, but it can be further limited.
- “Enable wireless broadcasting” - the position of this switch is changed using the toggle switch on the router body. This is the ability to disable or enable the network.
- “Enable SSID Broadcasting” - it is recommended to enable it. Useful if not all devices can find the network upon initial connection.
- “Enable WDS” - this function will be discussed in the next section. Off by default.
Having configured the network, go to the second page - to install protection. 4 blocks on the page offer you to select a type and configure it in detail. The choice is large, but the official website recommends that the home user choose, as in the picture - “WPA-PSK/WPA2-PSK”.
It’s interesting here that one of the four blocks is to disable protection (at the very top).
The parameters can be set according to the picture.
“PSK Password” is the password for the WIFI network; you will need to enter it the first time you connect to the router’s network.
“Group key update period”—set to zero so that the router does not try to change passwords on its own. This reduces the load on its processor and home network.
Front display
Using special markers, you can monitor the operation of the router and, if something happens, roughly imagine what is wrong with it. For example, your Internet has turned off, and just by looking at the display, you can understand where the problem is. Let's start from left to right.
- The power button, everything is clear here, the button does not light up - this means there is something wrong with the power supply or the socket.
- SYS LED – if it blinks or lights up, it means the system and firmware are working normally. If it doesn’t light up, then you need to make adjustments to the settings or reflash it.
- Wireless network icon. If it lights up, it means the function is working, but no device is connected. If it blinks, data is being transmitted. This way you can catch neighbors who are freely connecting to the network. It blinks, but you are not connected to Wi-Fi, which means someone is stealing your traffic.
- Internet: Flashing green – the Internet is turned on and data is being transferred.
- Flashing orange - the Internet cable is not connected or there is a problem with the integrity of the cable.
- The orange light is on – the wire is connected, but the Internet is not yet configured.
Repeater mode
The router does not have a repeater mode in the usual sense. The developers took a slightly different route. By turning on the repeater, a regular router disables your home wireless network.
In repeater mode, the Tp-Link Tl Wr841n can, without stopping the operation of the home network, strengthen another one. For this purpose, use the WDS function, which was discussed in the section above.
Checking that box will display the following window.
Here:
- “SSID” is the name of the access point to which you want to connect.
- “BSSID” - additional security, access point address. Since the MAC address is implied, it is better to use its search by clicking on the button below.
- “Key type” is the encryption method used on the connection network. It is recommended that your home network use an identical method to avoid connection problems in the future.
- “WEP Index” - in what form the password is entered, (ASCII) (normal alphanumeric) or HEX (hexadecimal).
- “Authentication type” - must match the previous parameter.
- “Password” (connection network).
After entering all the data, the window is closed.
How to connect a modem to a router?
If you connect to the Internet via a modem, then the connection will be slightly different.
- In the “Network” , “ WAN” , set the connection type to “Dynamic IP” . Save the settings and go to “Status ”. The router should have received the address automatically. If this does not happen, move on.
- In the same section, click “Network” , and then clone the MAC address. Click “Save”.
- If this does not help, then you will need to reboot the modem, and then after 15 seconds the router. To do this, simply unplug the power cord and insert it back.
Setting up IPTV
The user usually figures out how to install a local network on his own, so skipping one page of this section, let’s figure out how to connect a wireless router to a TV (Smart TV, a set-top box is required for a regular “box”).
Tp-Link Tl Wr841n is already configured out of the box to work with a TV, so there is only one parameter.
By specifying the port, all TV traffic is bound to it. Without specifying, they get the opportunity to watch programs on any computer on their home network.
Characteristics
| OS | Windows 98, NT, XP, 2000, Vista, 7, 8, 10; IOS, Linux. |
| Full title | Wireless router Wi-Fi router TL-WR841N |
| Maximum port speed | Up to 100 Mbit per second |
| Box | Power adapter Ethernet cable Manual Router |
| Nutrition | 9V DC 0.6A |
| Internet support | Dynamic IP, Static IP, PPPoE, PPTP, L2TP, BigPond |
| Operating frequency | 2400-2483.5 MHz |
| Protocols | IEEE 802.11n, IEEE 802.11g, IEEE 802.11b |
| 2 Antennas | 5 dBi |
| Environmental parameters operating temperature | Humidity up to 90% Temperature up to 40 degrees Celsius |
Firmware update
If there is any doubt about the functionality of the router, you can reflash it. For this purpose, there is a special page in the system tools - “Firmware update”.
The algorithm of actions is standard:
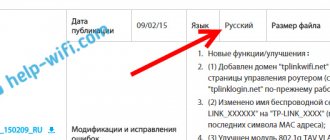
- Download the new version on the company support website https://www.tp-link.com/ru-ua/support/download/tl-wr841n/;
- use the “Browse” button to select it;
- click the “Update” button.
- wait until the router reboots with the updated software.
It is prohibited to turn it off during the update process! This will damage the router.
Only the “Hardware Version” is a little unusual. Before flashing your router, you need to make sure that the downloaded firmware is designed for the same model. Although the 841n and 841nd differ only in antennas, their firmware is different. Installing the wrong firmware may result in non-warranty repair of the router.
Blocking sites in a node by IP of local PCs
Here the blocking is based on IP addresses. For this:
- Go to “Access Control” and “Node”.
- Click add and list the range of IP addresses for which the blocking rules will apply. We also come up with a name for the rule.
- Now go to the “Target” , click “Add” and set “ “Mode” . We enter all unnecessary sites. Let's keep the rule.
- Now in the same section we go to “Rule”. Click add. In “LAN Node” select the previously created range. In “Target” is the rule that we created earlier.
- You can set a schedule. For example, allow access to social networks during lunch so that employees can rest.
ADVICE! If you want to leave your PC without a filter, then simply set the range without this IP address. Later, in the network settings in the operating system, set a static local IP address, which is not included in this range.
TP-Link TL WR841N router: review
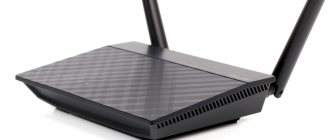
The TP-Link 841 router has a standard design. Visually it has similarities with other versions of TP-Link. The router has good technical characteristics. Data transfer speed in the wireless network is 300 Mbit/sec. Users are attracted by the stylish appearance of the device. The device has a rectangular outline, smooth bends at the corners.
Since the device belongs to the line of budget devices, the package includes only the necessary elements:
- power unit;
- installation disk with firmware;
- user manual;
- cable for connecting to a PC or laptop;
- guarantee.
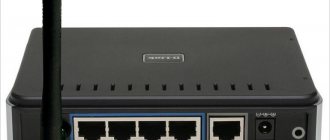
On the back of the case the developer placed:
- power button;
- WAN port for connecting an Internet provider cable;
- 4 LAN connectors;
- button with WPS function;
- factory reset button.
There are two antennas located on the top of the housing panel. Thanks to their work, normal data transfer speeds are ensured.
⇡#Appearance and ergonomics
With the change in design of the entire TP-Link product line, the network devices of this company began to look modern and somehow light. In some ways they even surpass the most beautiful examples from various famous manufacturers. For example, here is one of the heroes of our review today, the TP-Link TL-WR841ND router. This is a rare case when the device looks even better in real life than in the advertising photo.
Firstly, as it turned out upon closer acquaintance, the snow-white body of the new product is made not of easily soiled, easily scratched varnished plastic, but of slightly rough matte plastic. It seems like a small thing, but for many it will be very pleasant. At the same time, a matte router looks no worse than a glossy one! The secret is that the eye is constantly distracted either by the black trim elements or by the original concentric ventilation slots - a beautiful and at the same time practical design concept. By the way, the removable antennas are also made black, thanks to which the appearance of the TP-Link TL-WR841ND takes on very serious shades. A number of standard LED indicators are slightly retracted and are also located on a black insert.
Appearance of the TP-Link TL-WR841ND router
The bottom of the router is no less attractive. It is all cut up with small ventilation holes, between which there is room for two plastic loops, by which you can hang the router on the wall. In addition to the vertical placement of the device, the usual horizontal installation on four small rubber feet is also provided.
Bottom of the TP-Link TL-WR841ND case
All connectors and interfaces are traditionally concentrated on the rear wall of the router. In addition to the RJ-45 ports specified in the specification, there is a socket for connecting a power adapter, a reset button for all settings, a button for quickly setting up a secure QSS wireless connection, and a pair of RP-SMA connectors for installing antennas included in the package. In addition, on the back panel of the router there was a place for the power on/off button, which developers often “forget” about. Meanwhile, using this button is much more convenient than every time reaching for a plug to the socket, located, as a rule, in the far dusty corner.
Rear of the TP-Link TL-WR841ND case
Although the TP-Link TL-WR841ND router stands out from the crowd of its own kind, it still has a classic layout. In contrast, the TP-Link TL-WN822N USB adapter looks completely unusual. With the antennas folded, it is a small box of varnished white plastic with rounded edges, no larger than a pack of cigarettes. The foldable antennas located on the sides can be rotated independently of each other by up to 180 degrees and thus achieve the best signal.
Bottom view of the TP-Link TL-WN822N USB adapter
The adapter has a single QSS button for quickly setting up a secure wireless connection, as well as an LED activity indicator. The developers have provided only one installation method - on a table or other horizontal surface. At the same time, it will be connected to the computer with a one and a half meter USB cable.
Appearance of the TP-Link TL-WN822N USB adapter
I must say that the new product not only looks attractive, but is also easy to use. Such a compact and lightweight box is not at all difficult to carry in a bag with a laptop. At the same time, the adapter still takes up little space, and its sensitivity is higher compared to more compact samples that have internal antennas.