Hi all! Today we are looking at another question, how to increase or decrease the brightness of the monitor on a PC (or laptop screen) on Windows 10. First of all, you need to understand what kind of device you have - a computer or a laptop. This is very important, since this will radically change the actions themselves. If you have a desktop computer with a monitor connected to it, then see the last chapter of this article or method number 7.
If you have a laptop, then you can look at all the options presented. In fact, the initial methods work for some PCs, but not in all cases. Therefore, it’s easier to do everything through direct monitor settings or the video card panel. If something doesn’t work out, or you have any questions, write in the comments.
Method 1: Through parameters
- Open the Start menu - this is a small button that is located in the very bottom left corner of the screen. Next, click on the gear icon labeled “Options.”
- Find the main section “System”.
- In theory, you should immediately be in the desired subsection “Display” (or “Screen”) - if this is not the case, switch to the first tab. Next, look at the very top at the “Brightness and Color” item and simply move the slider.
When adaptive brightness is no fun
The function of adaptive adjustment of brightness to the tone of the image on the screen and the level of ambient light (as on smartphones) originated in Windows 8 and reached its “peak of prosperity” in Windows 10. Heyday, but not perfection, since not every display implements it correctly. The constant “now lighter, now darker” irritates and tires the eyes even more than flickering from a low frequency.
To disable this disgrace in Windows 10, open the “System” section – “Display” – “Automatic brightness adjustment...” in the “Settings” application and uncheck the adaptive backlight option.
If your laptop does not have such an item in the display settings, then it does not support adaptive mode.
You can also configure automatic backlight adjustment through the power circuit parameters. This option will be useful for those for whom disabling it in the first way did not help.
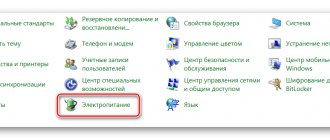
- Right-click the charging icon in the notification area and select Power Options.
- Click next to the marked plan (in my example, “High performance”) the item “Customize power plan”.
- In the next window, click “Change advanced power settings.”
- Next, in the “Power Options” window, expand the “Display” sublist and set the “Enable adaptive brightness control” item to “off”.
Again, if this setting is missing, then your computer does not support the adaptive backlight feature.
Method 2: Through the tray panel
Look in the lower right corner of the screen - there will be a button in the tray that works with all notifications, as well as with the quick access panel to Windows 10 features. Click on this icon. Next you will see a slider - just move it to change the brightness settings.
NOTE! In older versions of Windows 10, there is no slider, but you may notice a separate tile with a sun icon and percentages - just select this option.
Personal computer monitor
The owner of a personal computer with a monitor connected to it can only use the menu built into the image transmission device itself to change the brightness of the screen. There are no features in the desktop operating system that perform the intended task. Take a look at the following image to see the approximate name and location of the physical buttons on the monitor. You need to use them to bring up the menu and navigate through it.
In the list of available parameters, find “Brightness” or “Brightness”, activate this parameter and use the arrows (or buttons that play their role) on the same monitor to reduce the brightness to the required value. The display software remembers the information and stores it in the built-in memory, so when you reconnect the screen, all changes are saved in the current position. Each monitor's menu is different, so take this into account when adjusting the brightness.
Method 3: Mobility Center
NOTE! This method was previously available only on laptops, now the situation may have changed, but I can’t check this yet, since I only have a working laptop at hand. Owners of a desktop PC - write in the comments if this method works for you.
To get to the Mobility Center, right-click on the Start button. You can also call up an additional menu using hotkeys:
+X
A window will open where you will immediately see the inscription “Brightness” in the first block. Next, you already know what you need to do - just drag the slider to the right or left to change the glow of the screen.
Method 4: Hotkeys
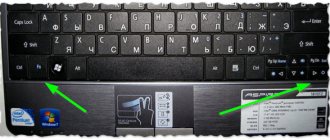
Most laptops have auxiliary buttons on the keyboard that can quickly change the brightness of the screen. You need to find the small and large sun icon. They are usually found in the row of F keys at the very top. In rarer cases, they may be located on the Left or Right buttons.
To use them you need another auxiliary button - Fn. First, we hold it down, and only then (without releasing it) use the button to increase or decrease the brightness with the sun icon.
NOTE! On most models these are the F2 and F3 buttons. There is also a small disadvantage of this method - the increase in brightness is not smooth.
How to make a very bright screen on your phone?
How to increase/decrease the brightness of your phone screen manually
- Swipe down from the top of the screen to open the notification shade. ...
- A brightness slider (sun icon) will appear, which you need to click on.
- While holding your finger on it, move the slider to the right to increase the brightness or to the left to decrease it.
Interesting materials:
What is mint? What is bone myeloma? What is a microcircuit? What is the police in Russia? What is minimalism and maximalism? What is a backing track and a plus track? What is a worldview and what is its role in human life? What is Multi-Frame Anti-Aliasing? What is a Multi-Machine Computing Complex? What is a model, why are models needed?
Method 5: Via NVIDIA and AMD panel
The brightness of the image can also be changed in the settings panel of your video card. Select a subchapter based on what video adapter you have installed. To understand this, right-click on an empty area of the desktop. Next, look based on the screenshots that I provided below.
NVIDIA
Select "NVIDIA Control Panel".
On the left, open the “Display” section and find there “Adjust desktop color settings”, then simply change the setting.
AMD
The item is called “AMD Catalyst Control Center” or “Radeon Settings”.
Go to “Desktop Management” – “Desktop Color” – change the brightness setting.
Intel Grtaphic
In this case, you need to select “Graphic characteristics”.
Go to “Display” – “Improving color quality”. After changing the setting, don't forget to click "Apply".
Method 6: Console command
So first of all, let's open a PowerShell command prompt. This can be done through our favorite auxiliary menu (+ X). Be sure to run it with administrator rights. The console can also be found through search.
Now enter the command:
(Get-WmiObject -Namespace root/WMI -Class WmiMonitorBrightnessMethods).WmiSetBrightness(1, BRIGHTNESS_LEVEL )
Instead of “BRIGHTNESS_LEVEL”, set a value from 1 to 100 - this will be the glow level in percentage. To use the command, press Enter.
Adjusting brightness using the monitor and Windows 7, 8, 10
Since screen brightness is one of the most important parameters, you can adjust it in several ways:
- On the monitor
- In the Windows Control Panel
- In the graphics adapter settings
- Via command line
- Using third party programs
Let's take a closer look at the most convenient methods.
Using the monitor buttons
Most monitors have a simple menu that allows you to change the image display. The advantage of this method is that the settings are saved regardless of what device is connected to the monitor. In addition, more “advanced” models have the ability to save several presets so that you can change them if necessary.
Each manufacturer's menu looks different, so there can be no single explanation for how to find the desired setting. However, most often you can change the brightness settings by finding the “Settings” menu, and in them – the image settings.
This method is the main one for desktop PC owners with external monitors. Typically, Windows does not allow you to change display settings directly, especially when connected via an analog interface. And with the monitor buttons it is possible to change the anode voltage of the CRT or the glow of the LED display in any OS, even in the old Windows XP.
Using the keyboard
OS manufacturers include many shortcut keys in the shell. Their purpose is for the user to be able, by remembering an easy combination, to quickly gain access to the main functionality of the computer. For example, in Windows 10, pressing “Win+I” launches “Settings”, where you can quickly find brightness settings. But this will be discussed in the next section, and now – about the keys that change brightness instantly.
Hotkeys
The laptop has a large set of function keys. For example, many have seen the “Fn” key, but its purpose often remains a mystery. It is this key that makes it possible to quickly change the brightness of the display. The second component will be the keys marked with brightness icons (“sun”). On most models these are up/down arrows. Adjustment is made by pressing “Fn” + one of these keys.
Certain types of desktop keyboards for PCs also allow you to vary the brightness of the computer screen. If there are keys with brightness icons, then you can use them to make the picture more convenient to read without resorting to the settings menu.
Using Windows Settings
In Windows 8 and later, a new menu has appeared - “Settings”. You can quickly call it by pressing “Win + I”. Or, when you right-click (Right Mouse Button) on the start button, a context menu opens, in which you should select “Options”. The section we are interested in is located along the path “System” - “Display”. Next, find the inscription: “Change brightness”, under which there will be a slider. By moving it, you can change the brightness of the screen. There is also a function to turn on night mode. When used, the colors become warmer. This picture will be better for the eyes, especially if you need to go to bed after using the PC.
device Manager
According to the official Microsoft support site, this slider may not be available on computers with external monitors. However, it should work fine on all laptops. If you still can't find it, there may be a driver problem. Open Device Manager (RMB on the Start button in Windows 10). After that, find the “Video adapters” section and update the drivers for each of them. This manipulation solves the problem.
Using the Quick Access Toolbar
The Quick Access Toolbar is located at the bottom right of the screen—the right side of the taskbar—and is a collection of icons. By clicking on the battery charge indicator (available on all laptops) and clicking “Power Options”, you can open a settings window. Among other things, it is possible to vary the brightness of the display. There are two types of settings - for mains power and stand-alone use. This functionality helps you quickly change brightness and also save laptop battery power.
Using auto-regulation
By manually changing the brightness, you can significantly distort the color of the image. The fact is that to correctly change this parameter, you also need to make changes to the screen contrast. Otherwise, the picture will look “burnt out”. If you have not yet mastered the intricacies of manual adjustment, you can use auto-adjustment, which is present in the menu of many monitors. You can find it in the same image settings section, or on the main menu page. The item may be called “Auto-regulation” or marked with the “Auto” icon. The monitor independently sets the optimal brightness and contrast. This method is also useful if you accidentally reset the settings and don’t know how to get them back.
Using the command
For those who like to use text commands and queries, there is also a way to change the brightness. The built-in command line will do (call “Win+R”, then enter “cmd” and press “Enter”). It is also possible to use third-party programs or PowerShell running as an administrator. The command looks like this:
(Get-WmiObject -Namespace root/WMI -Class WmiMonitorBrightnessMethods).WmiSetBrightness(1, X)
Here X is the screen brightness value you need, from 1 to 100. There is no need to enter the percentage icon - the system will “understand” everything itself.
Using video card settings
GPU manufacturers, in addition to the hardware itself, also produce proprietary software. Its use makes it easier to change the settings not only of the video card, but also of the image on the entire computer. Screen brightness adjustment is included in the NVIDIA GeForce Experience application, as well as in proprietary software for Radeon video cards. You can find it in the corresponding settings section. The installation will work in those programs that, when constructing an image, “load” the selected video card. This setting will not apply to the processor's integrated graphics chip.
This setup method is most convenient for gamers. Typically, brightness settings for games are different from those for surfing the web or watching movies. Using the video card settings, it is possible to create a kind of “game mode”, which is very convenient to use.
Using Adobe Gamma
Adobe Gamma is a program from the manufacturer of the same name that provides access to a wide range of image settings. Its target audience is those who are not too lazy to spend time on detailed settings, as well as users who are extremely demanding of picture quality. It is possible to select several profiles in the program, and assign each one its own set of settings. This allows you to quickly switch between profiles and select a set of parameters convenient for a particular case. Gamma can change more than just brightness and contrast. It also controls color, gamma and other parameters.
It is important to be extremely careful when setting up. If you have saved the monitor manual, it is recommended to use it to assign only parameters specific to this model. The program works perfectly on both Windows 7 and other versions of the OS.
Registry Editor
It happens that the brightness setting disappears from the Windows 10 control panel, and you cannot change it even on a laptop. In this case, you will have to delve into the registry and “force” the system to do as it should. You can launch the registry via “Win + R”, enter “regedit” in the input field and press “Enter”. In the Registry Editor, find the line containing the words “Enablebrightness” (we recommend using the registry search). There will be several such lines, and set the value “0” in each one. In some lines it will already appear, in others you will have to make changes. You can continue the search after making changes using “F3”. After completing the registry changes, restart your PC. Problem solved!
Method 7: Setting up the power supply
- Before we start adjusting the brightness, we need to get into the “Control Panel”. Previously, it could be quickly launched through the additional menu (WIN + X), but now it is not there. Therefore, you can use two methods. The first is to simply enter the full name into the Windows search bar.
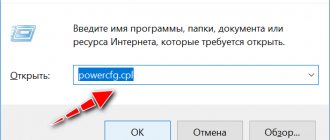
- The second way is to use the key combination + R and enter the command
control
- Find the “Power Options” item, as in the picture below. It happens that the panel displays not icons, but categories, switch the “View” mode, just like mine.
- In the main area you should see several schemes; you need to select the working one, the one marked with a black circle. Opposite it, click on “Configure power supply scheme”.
- Here we find the “Settings” item for brightness and change the configuration. As you may have noticed, there are two settings at once - one will work when connected to the mains, and the second from the battery.
NOTE! Recently, Microsoft has removed this setting in some builds.
An example of adjusting the laptop backlight using the Fn key
For example, we will use a Lenovo s110 netbook with the Windows 7 operating system.
It uses the Fn modifier key in combination with the ← and → cursor keys to adjust the backlight. To increase the backlight of the Lenovo s110 laptop, you must use the Fn+ → key combination. To lower the backlight you need to use the combination Fn+ ←.
As you raise or lower the backlight, you will see how the value of the graphic indicator changes.
Hotkey Features program is responsible for this indicator .
As you can see, increasing or decreasing the lighting settings of a laptop screen using the “ Fn ” key is quite simple. You can use this example on other laptops, since the principles of using modifier keys are the same.
In particular, on SAMSUNG NP350 , the keyboard shortcuts are:
- to increase brightness - Fn+ F3;
- to decrease - Fn+ F2.
I have a monitor
If you have a desktop computer and a monitor, then the previous methods may not work. Therefore, you can only increase the brightness on the monitor, and not on the computer. To do this, you need to find a button with a sun icon - click on it. A brightness adjustment window will appear on the screen. To increase the glow, you need to click on the button with the image or +. To downgrade – click on or –.
Finally, to apply the settings or close this window, click on the “Menu” button. The second option is to go to the main menu (the “Menu” button). There you will see much more extensive settings, but you can also change the brightness configuration there.
How to reduce monitor brightness
On external monitors, as a rule, there are additional buttons with settings.
You can use them to reduce the brightness of your monitor.
To increase the brightness of the screen, the same manipulations are performed, just move the slider to increase.
The best “Thank you” is your repost