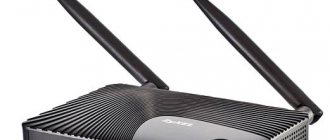
In this article I will tell you how to configure a TP-LINK router. TP-LINK routers are famous for their reliability and ease of setup. And it is true! No matter how much the routers insisted, there were never any problems with TP-link. :-). So, let's look at setting up tp link using the example of the tp link tl wr841nd router, which is currently the most popular and reliable model. This article presents the English version of the firmware; detailed instructions for setting up the Russian version of the tp link tl wr841nd router firmware are described here.
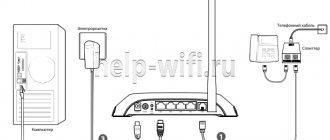
Connection diagram tp link
1. With this button we turn on and off the power (electricity) of the router.
2. This shows where to insert the router’s power supply (it was included in the kit).
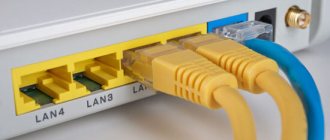
3. Into the WAN Connector we insert the Internet cable from the provider, which comes from the entrance or from another device. To make it clear, I will say in Russian “Cable with Internet signal.”
4. These four LAN connectors are for connecting the device to the network card of your computer/laptop via a network cable.
5. Enabling the QSS function to automatically securely connect the router with other network computers and devices (no need to click).
6. Pressing (with a match or a pin) and holding for 10 seconds will reset the TP-LINK settings to standard, it is better to press before setting.
You can find out more about connections in the article Connecting a router.
Well, we’ve connected it, let’s start setting it up.
Firmware update
It is also recommended to update the software if you have just purchased the device. In the future, this should also be done periodically. The process is not too complicated and is completed in just a couple of steps. Step by step procedure:
- Download the current version of the device firmware from the official website.
https://www.tp-link.com/ru/support/download/ - We log into the web interface from a phone or PC and enter authorization data.
- In the menu on the left side of the screen we find the “System Tools” section, then click on “Firmware Update”.
- A firmware update menu will appear on the right side of the page. First of all, select the firmware file, specifying the path to it.
- Click on the “Update” button.
- We wait for the firmware update process to complete and reboot the router.
Setting up a TP-LINK router Login
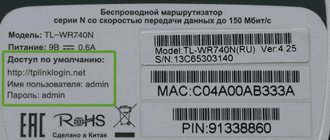
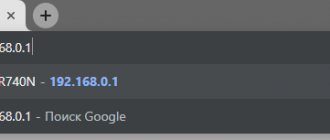
After connecting and setting up the operating system, you need to enter the router setup interface. To do this, open any browser (Opera, Mozilla, Internet Explorer, Google Chrome) and type “192.168.0.1” into the address bar. In the authorization window that appears, enter the Login value - admin and Password - admin.
After authorization (by clicking the submit button), the main page will open. Here we will start setting up the tp link router. At the very beginning, many advise changing your username and password to your own. But in my opinion, this will only complicate the further operation of the router. No matter how many times I changed the settings for my clients, the same number of times they called me and asked me to remember the login and password to log into the router. But it’s up to you, my task is only to tell you how to do it.
Comments (14)
Daria
08/06/2014 at 18:55
Thank you, everything worked out!Answer
Anna
08/25/2014 at 04:03
In the WAN settings of Rostelecom, after entering the login and password, it says for a long time Connection and that’s it, then nothing happens.. What should I do?
Answer
admin
09/05/2014 at 13:31
Refresh the page or press F5 in the browser. This is always the case with TP Link.
Answer
Vitaly
02/11/2017 at 17:35
After the update, the “connection” status still remains, waiting for about an hour. Didn't connect.
Answer
Setting up the router
03/14/2017 at 11:18
Strange. At the same time, you refreshed the page, but on the computer itself (if you connected it before) the connection with the provider was broken?
Answer
us163
10/21/2014 at 19:16
Thank you! Rostelecom "tlt" was set up without problems.
Answer
Dasha
11/17/2014 at 17:21
Hello, please help. We bought a 300Mbps Wireless N Router TL-WR841ND, but our disk drive is broken. I can't set up Wi-Fi (via disk). They say that you can download this disc on the Internet, I searched everywhere, but I can’t find it. Help please, does anyone know?
Answer
admin
11/30/2014 at 15:07
No configuration disk is needed.
Answer
Alexander
01/14/2015 at 09:36
Hello. I have a router of the same model. We have an Internet + television package connected to Rostelecom (Penza branch), via fiber optic. The television does not work (I tried to set it up both according to your recommendations and otherwise). After turning on the set-top box, there is a connection to the Rostelecom server, downloading files and a black screen. Can you tell me another way to configure the router? Technical support replies that this router is most likely not intended for playing television on their network.
Answer
Evgen
01/05/2016 at 02:32
To configure in Beeline after they have changed the connection type, you must select not L2TP but “dynamic IP”
Answer
admin
01/07/2016 at 08:28
Where is this? In my region everything is also L2TP
Answer
GadgetPostal
04/20/2016 at 01:11
In the new tplink firmware there is an “automatic configuration” item - Rostelecom is configured quite correctly
Answer
Zorik
01/27/2017 at 17:50
Hello, this model will work with home ru at a speed of 200 Mb/s.... thanks in advance for your answer
Answer
Setting up the router
03/14/2017 at 11:24
It will work, but you won’t see the same speed. You need to buy more serious equipment + with gigabit, not 100 megabit ports.
Answer
Changing the password on the tp link router
In the menu on the main page, select “System Tools”, in the window that pops up, select “Password”. After the inscription “Old User Name” we enter admin (old name), and in the “Old Password” (old password) - admin. Now let’s enter new data in the “New User Name” (New Name) - write any new name (don’t forget to write it down), in “New Password” (new password) - write a new password to log in, also don’t forget to write it down. In the “Confirm New Password” window, enter the same new password as before. Once you have filled out all the fields (AND WRITTEN SOMEWHERE), be sure to click the “Save” button. That's it, the router has remembered your settings. Now re-login using your new username and password.
Configuring PPtP (VPN) while automatically obtaining a local IP address (DHCP)
- On the left, select the Network , then MAC Clone
- Click Clone MAC address , then Save
- In the WAN Connection Type field: PPTP
- User Name: your login according to the contract
- Password : your password according to the agreement. In some firmware, just below it asks you to confirm the password (Confirm Password)
- Select Dynamic IP address
- In the IP Address/Name , enter the name or IP address of the server. Find out from your provider.
- WAN connection mode - Connect Automatically
- After entering the above settings, click Save . The Internet is configured.
Setting up the network and Internet of the tp link router
Before setting up the Internet in tp link, make sure that you have correctly identified the provider settings from the article “ Configuring a network card Determining provider settings ” and let’s get started.
Setting up a Dynamic IP tp link connection
This is the easiest way to connect to the Internet. When setting up “Dynamic IP”, the router automatically receives all the settings of your provider, so you don’t need to enter anything in the fields. But in rare cases, the provider does not automatically provide “DNS servers” settings, then you need to click the checkbox next to Use These DNS Servers. In the fields that become active, enter “DNS”.
Setting up a Static IP connection Tp Link tl wr841nd
This is a little more complicated, you need to enter the settings provided by your provider: IP address, subnet mask, Default gateway and DNS server. We leave the remaining fields unchanged.
Setting up PPPoE connections on tp link
With this type of connection, you will need to enter a username, password and password confirmation. It also happens that the provider uses the CIS connection type (in addition to everything else, it also adds a static IP). In this case, put a dot on Static IP opposite Secondary Connection and enter the IP address and mask. Also, if you have unlimited Internet, I advise you to put a dot in front of the inscription “Connect Automaticaly”. This will mean that the router will connect to the Internet automatically.
Setting up a PPTP connection on tp link
This type of connection is practically no different from “PPPoE”. We also enter: name, password and, if the provider provides “Static ip” settings, put a dot and enter the settings. And don’t forget about the point near “Connect Automaticaly”.
Optional – IPTV
The router works perfectly with the IPTV provider. And in my experience - without unnecessary movements. But some say that you still need to allocate a separate port through the bridge to connect the set-top box. What we do:
- Go to “Network – IPTV”.
- Select the “Bridge” mode.
- Set the port for connecting the set-top box.
At the same time, make sure that IGMP Proxy is enabled here. Otherwise it won't work!
For a typical home setup for many years to come, the information above will be more than enough. But if you have something specific or still have some problem, be sure to write about it in the comments. You can also share your experience of using it there. And we will try to answer any of your answers as soon as possible!
Configuring the MAC address on Tp Link
Sometimes the provider binds to the MAC address of the network card (the unique address of the network adapter). In order for everything to work normally and for us to have Internet access, we need to configure the required MAC address on the router. In the main menu, select “Network”, in the pop-up window click on “Mac Clone” and on the page that opens click the “Clone MAC Address” button. After this, the MAC address of the router will become the same as the MAC address of the network card. If you suddenly used another computer to configure the router (not the one connected to the Internet), you need to register the poppy manually.
How to connect?
It is necessary to perform the following sequential actions:
- Insert the wire from the Internet provider into the WAN port;
- Insert the plug from the power adapter into the appropriate connector and supply power to the device, then press the power button of the router;
- Observe the activity of lighting devices on the front panel of the device;
- Ready! A functioning light indication will indicate that this preparatory stage has been completed correctly.
Setting up a Wi-Fi network on Tp Link
To configure a tp link Wi-Fi router, you must first configure “Wireless Settings”, and then “Wireless Security”.
Wireless settings
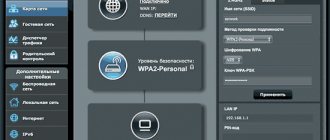
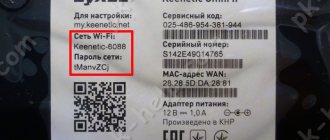
In the main menu, select “Wireless”, then “Wireless Security”. Here you need to select the country and network name (SSID). The network name must be unique so that it does not match the names of networks around you.
You can briefly look at the remaining values on the page:
Channel
– Allows you to select a communication channel. If your Wi-Fi connection has deteriorated (most likely, the channel is the same as your neighbors), you should change the channel from Auto to any other.
Mode
— choice of standard, if you don’t have devices that can operate according to the 802.11n standard (which standard the device can work with is usually indicated on the box or in the documentation on the wi-fi icon), then you can install bg mixed.
Channel width
— width of the data transmission channel.
Max TX Rate
– max. transmission speed.
Enable Wireless Router Radio
– here you can disable it, and then enable it.
Enable SSID Broadcast
– allows you to enable or disable the visibility of a wi-fi network; if this option is disabled, then you can connect to a wi-fi network only by knowing its identifier (SSID). In a regular wi-fi search, this network will not be found.
Enable WDS
– this option is needed to expand the coverage of an existing Wi-Fi network.
After setting, click Save.
Reset all parameters to factory values
This procedure is required if the device was purchased secondhand. Because the TP-Link WR841ND may have non-standard firmware, or the parameters may simply be set incorrectly. However, there are often cases when devices in the factory packaging are incorrectly configured. This is due to the fact that they can be tested in stores.
So, to bring the settings to the default values, press the WPS|Reset button and hold for half a minute. The router will reboot - this will signal that the settings have been reset. If you made fatal mistakes while trying to configure the TP router, this procedure will return everything to its original position.
Setting up Wi-Fi network security
Now let's set up network security (set a password). Go back to “Wireless” and click “Wireless Security”.
Here we need to set up encryption and set a password. We put a dot next to the inscription “WPA2-PSK” (This type of encryption is considered the most secure, so we do not consider others). Let's leave "Encryption" as Automatic. Next, enter the password, preferably it should be complex (and don’t forget to write it down).
After setting, click Save.
Now let's look at the inscription that appears below.
The inscription tells us that in order for the settings to take effect, you need to reboot the router. Let’s do so, click on the link “click here”. We get to the reboot window.
Click Reboot, wait for a complete reboot. That's it, connecting the settings is completed. Enjoy your use of the Tp link router.
Brief description of the device
The device has an optimal balance between its cost and the quality of its hardware.
Allows you to create a Wi-Fi point that supports 802.11n. In fact, the TP link brand router, version tl wr841nd, is a device that redirects the network connection to other PCs or devices with Wi-Fi functionality. Therefore, in order to ensure maximum signal quality received by all home gadgets, the router should be installed in the location of the best distribution of the wireless signal, or you will need to additionally purchase Wi-Fi amplifiers. The device does an excellent job of creating a network for small offices and apartments. Despite the fact that device owners sometimes encounter problems with the device freezing, it can be easily resolved by simply flashing the software. To connect TP Link you will need the following:
- Of course, you need the wr841nd device itself and instructions for connecting;
- Internet cable;
- Laptop or desktop PC.
The device is equipped with the following special sockets and keys:
- Key to turn the device on and off;
- Power supply socket;
- Four LAN ports;
- WAN port.
- Reset key.
The most common difficulties and recommendations for eliminating them
Problems:
- Unstable connection;
- Wireless connection is interrupted;
- Low data transmission and reception speed.
Recommendations:
- If problems are caused by unstable mains voltage, most likely, simply replacing the old power supply with a new one will help;
- Interference caused by other sources is eliminated by changing the channel;
- It is recommended to select the location of the wireless network access point with the maximum absence of obstacles and obstacles to the spread of Wi-Fi.