Hello, today we will talk about setting up the most popular router in the CIS - TP-LINK TL-WR841N. For a very low price, it has decent qualities, such as high-quality work, ease of connection and ease of setup. Also, the internal interface allows you to perform basic settings. But since this is a budget router, you shouldn’t expect much from it. All it can do is receive the Internet via wire and distribute it via WiFi and wire to other devices. I won’t tell you about its characteristics, all this is described in detail on the reviews page (you can find it by searching for self-help or go to the “reviews” section). Here we will look at detailed instructions for setting up TP-LINK TL-WR841N.
- Connection to a computer or laptop, netbook.
- Reset settings and password.
- Enter the setup interface.
- Changing the password to enter the router settings.
- Instructions for setting up various types of Internet connections.
- Setting up Wi-Fi on the router.
- Who is connected to your WiFi network.
Connecting the TP-LINK TL-WR841N router
The main rule that I recommend to everyone is to set up the TP-LINK TL-WR841N by connecting it with a wire to a computer or laptop. It is possible to set up a router via Wi-Fi, but I highly do not recommend doing this, so we connect the router according to the following diagram.
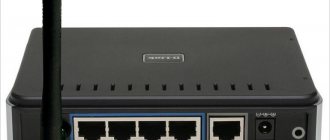
Based on the drawing and our own intuition, we can build a simple connection diagram:
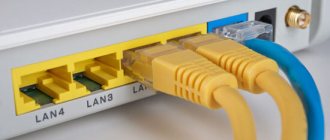
- We take the power supply and connect it to the router (in a special connector, there is only one), then plug it into the outlet, now press the On/Off button. nutrition. After this, the network indicator on the front panel (the first one on the left) should light up, and the second indicator (system) may also light up (and blink) - this means that the router is ready for use.
- Then we take the Internet cable from your provider and connect it to the WAN (Internet) connector. The fourth indicator from the left should start flashing.
- Now we take the short wire (patch cord) included in the kit and connect it to any of the LAN connectors, and connect the other end of the wire to the computer’s network card.
That's it, the connection is complete.
Possible malfunctions and ways to eliminate them
When working with tl wr841n, problems and malfunctions sometimes arise. It's easy to correct them.
For example, tl wr841n stopped responding to connection to the mains. This is indicated by non-lit indicators.
- First, it checks to see if there is electricity in a particular outlet or if the surge protector is turned on.
- If the answer is yes, it monitors whether the power button is turned on.
- If the answer here is positive, most likely either the tl wr841n router itself or the power adapter burned out.
There are many reasons why the tl wr841n does not distribute wireless Internet. All of them are easy to solve.
The first is the presence of problems on the provider’s side. In this case, you should contact technical support and outline the situation. Specialists will check the information received and, if necessary, solve the problem.
Reset TP-LINK TL-WR841N router settings
I always advise those who are setting up a router for the first time after purchase to reset the router settings to factory settings. You may ask why do this if the router should be at factory settings anyway. But in my practice, I found that the router had already been configured by someone earlier. Resetting the settings is also useful if you made a mistake while setting up the router and don’t know where exactly. It's very easy to do. On the back panel of the router there is a button labeled WPS/Reset, click on it and hold for 20-30 seconds. After which, after waiting a couple of minutes, the router will completely reboot and the default settings will be set.
Firmware update
Self-configuration of a router from Rostelecom TP-Link
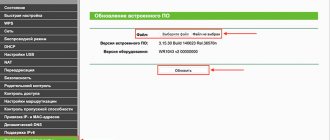
The firmware must be updated. This is due to the fact that the software is regularly updated and improved, the degree of protection increases, greater ease of use is provided, and various additional functions appear.
In most cases, this is done through the web interface. You can also use a specially developed mobile application. The tl wr841n model does not provide the ability to update via a USB device due to the lack of the necessary port.
Via web interface
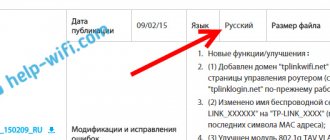
- On the official TP-Link website, enter the model name or go to the “Downloads” tab, and then again select the tl wr841n model.
- There, find the version you are interested in and download.
- To avoid failures, you only need to update the firmware using a network cable via a computer.
- The router is disconnected from the Internet and connected to the computer via a patch cord. Then follow the installation program instructions.
Via mobile application
If the family has a smartphone or tablet on iOS or Android, just download the special TP-Link Tether application. With its help, the router is managed and updated. You need to go into it, indicate the model tl wr841n, go to the system settings and click “Update”.
Changing the default password of TP-LINK TL-WR841N
Many wizards recommend changing the default password for security purposes. My opinion on this is this: if you don't have trust in the people who will have access to your home network, then it's worth changing. If you are confident in these people, then you should not change. The fact is that the password for the router is usually set once and quickly forgotten, since it is rarely needed after configuration. When you need it, you will not be able to remember it and you will have to reset the router settings again. But I can’t explain how to change the password on the router.
Once you have entered the router interface, in the left menu, at the very bottom, there will be a “System Tools” section. In it, select the “password” item. A window will open with fields to fill in, fill them in:
- Previous username - if the settings were default, then enter admin.
- The previous password is also the same if the default settings - enter admin.
- New username - you can enter any name. But again, I don’t recommend changing it; it’s better to leave it as admin.
- New password - come up with a new password and enter it.
- Confirm your password - repeat the password we created.
Also notice the red text at the top that says “Username and password must not exceed 14 characters in length and must not include spaces!”
After all the data has been entered, click on the “Save” button.
Authorization
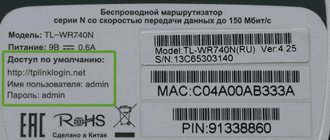
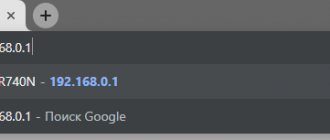
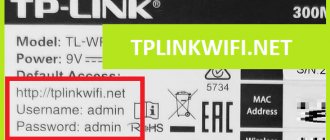
In order to get to the router’s web interface, you need to open your Internet browser and type 192. 168.0.1 in the address bar, Username - admin , Password - admin (provided that the router has factory settings and its IP is not changed).
Setting up the Internet on the TP-LINK TL-WR841N router
Before you start setting up the Internet, you need to decide what type of connection your provider uses. You should also find out what parameters you must fill out. Basically, all the data is in the contract, but sometimes you have to call the provider’s technical support. Below, for each connection type, I will indicate which fields to fill out and what data to enter. I also wanted to say, don’t be afraid to call technical support, they should provide this data for free.
The main Internet settings page is located in the “Network” section -> “WAN” item. Here in the “WAN connection type:” field we will select our connection type.
Dynamic Internet connection type
This type of connection is set by default in the router settings, so if your provider has this type, then after connecting the router you should have Internet access.
If you need to select this connection type, changing it from another type, you can do this by going to the “Network” section - “WAN” item and in the “WAN connection type” field, selecting “Dynamic IP address”. Then click on the “Define” button, wait until the data is loaded and click on the “Save” button.
Connection type Static.
Here you need to know a number of parameters, such as: "IP address, Subnet mask, Default gateway, Primary DNS." These parameters must be specified in the contract from the provider, and they can also be found out from the settings of the network card of the computer that was connected to the Internet (how to do this is described in the article setting up a network card, the link to it above). Or you can simply call technical support and find out these parameters. Let's fill in all the fields:
- WAN connection type - select “Static IP address”.
- IP address - you should know.
- Subnet mask - you should know.
- The main gateway - you should know.
- MTU size (in bytes) will most likely be 1500 by default, if the provider did not say anything additional about it. But if the provider has indicated its size, use it.
- Primary DNS - you should know.
- Secondary DNS - this parameter can be provided to you by your provider, but I recommend specifying the DNC server from Google, 8.8.8.8
Don't forget to click on the "Save" button.
Connection type PPPoE
This type of connection is used by a large number of companies, of which the largest are TTK, Rostelecom, Dom.ru. You will definitely need to know your username and password to connect to the Internet. This data must be specified in the agreement with the provider. If you have lost your contract, you will have to call technical support. Let's fill in all the fields:
- WAN connection type - select “PPPoE/Russia PPPoE”.
- Username - you should know.
- Password - you must know.
- Confirm your password - you must know.
- Secondary connection - everything is not easy here. By default, providers do not provide this service, so the point is “Disable”, but if you ordered additional parameters, such as Static IP, then you need to select the appropriate item and enter the data.
- WAN connection mode - here we put a dot on “Connect automatically”.
Don't forget to click on the "Save" button.
Connection type PPTP
A popular type of connection is used by many providers, some of the leaders are Aist Togliatti, Ufanet (UfaNet). To set up, you need to know the "Username, Password, IP Address or VPN Server Name". All this data must be specified in the contract with the provider. You can also find them out from your provider by calling technical support. Now let's fill in all the fields:
- WAN connection type - select “PPTP / Russia PPTP”.
- Username - you should know.
- Password - you must know.
- IP address/Server name - you should know.
- IP address - does not need to be specified if you did not order an additional one from your provider.
- Subnet mask - does not need to be specified if you did not order an additional one from your provider.
- Primary gateway - does not need to be specified if you have not ordered an additional one from your provider.
- DNS - does not need to be specified if you did not order an additional one from your provider.
- Internet IP address - does not require filling.
- Internet DNS - does not require filling.
- MTU size (in bytes) - if the provider has not specified this parameter to be filled in, leave it as default.
- Maximum downtime - for those who have unlimited Internet, we set it to “zero”, the rest - at our discretion in minutes.
- Connection mode - put a dot next to “Connect automatically”.
Don't forget to click on the "Save" button.
Connection type L2TP
Compared to others, this is a fairly new type of connection. The largest provider that uses this type of connection is Beeline. You need to know the parameters “Username, Password, IP address or VPN Server Name”. Let's fill in all the fields:
- WAN connection type - select “L2TP / Russia L2TP”
- Username - you should know.
- Password - you must know.
- IP address/Server name - you should know.
- IP address - does not need to be specified if you did not order an additional one from your provider.
- Subnet mask - does not need to be specified if you did not order an additional one from your provider.
- Primary gateway - does not need to be specified if you have not ordered an additional one from your provider.
- DNS - does not need to be specified if you did not order an additional one from your provider.
- Internet IP address - does not require filling.
- Internet DNS - does not require filling.
- MTU size (in bytes) - if the provider has not specified this parameter to be filled in, leave it as default.
- Maximum downtime - for those who have unlimited Internet, we set it to “zero”, the rest - at our discretion in minutes.
- Connection mode - put a dot next to “Connect automatically”.
Don't forget to click on the "Save" button.
NAT when automatically obtaining an IP address (DHCP)
- On the left, select the Network , then MAC Clone
- Click Clone MAC address , then Save
- In the WAN Connection Type : select Dynamic IP
- Click Save . The Internet is configured.
Setting up Wi-Fi on the TP-LINK TL-WR841N router
Before setting up WiFi, make sure that the Internet on your computer is working. To do this, open a new tab in the same browser and try to open any site. If everything is fine, then we proceed to setting up WiFi. Next, I will explain in detail not only how to set up Wi-Fi, but also what capabilities the TP Link TL V841N router has. Most importantly, check whether Wi-Fi is turned on on the router. The switch on the back panel of the router is responsible for this; it needs to be in the “ON” position.
Setting up a Wi-Fi network name
The first step in setting up a wireless network is to set the name of the network. This is the name that will appear in the list of available wireless connections. First, let's go to the "Wireless Mode" section -> select the "Wireless Mode Settings" item. On the page that opens, fill in the fields:
- Network name - any, in Latin letters, with numbers.
- Region - here we select the country in which you live; for the countries of the former CIS, “Russia” is suitable. But you can also indicate your country if it is on the list.
- Mode - 11bgn mixed.
- Channel width - set to “Auto”.
- Channel - we will choose one of the last ones, since there may be other routers nearby and it is better that your channels do not coincide.
- Maximum transfer speed (Tx) - leave it at default.
Then click the “Save” button.
Setting a password for a Wi-Fi network
The WiFi power of this router allows you to receive a signal within a radius of 300 meters in open areas. In a panel house, the transmission radius is at least one apartment within a radius of the router. This means that if you do not set a password for Wi-Fi, then all your neighbors will be able to use your Internet, which will lead to a decrease in quality. Therefore, you definitely need to set a password for your TP-LINK TL-WR841N router. To do this, we need to go to the “Wireless Mode” section -> select the “Wireless Protection” item. A page will open on which we will need to put a dot in front of “WPA-PSK/WPA2-PSK” and fill in the fields:
- Version - leave the default “Automatic”
- Encryption - leave the default “Automatic”
- PSK password - this is where our WiFi password will be. It must consist of at least 8 letters (Latin) and numbers. Try to set a password that you can easily remember, or be sure to write it down.
- Group key update period - set “zero” here
- Click on the “Save” button.
After setting the password, setting up your router can be considered complete!!!
Conclusion
The tl wr841n router has characteristics inherent in much more expensive models from other manufacturers. In terms of price/quality ratio, the wr841n turned out to be almost ideal. There are no special problems with it.
pros
The advantages of the router include the following indicators:
- strong signal even in large apartments/houses,
- WPS button,
- excellent cooling,
- high reliability.
Minuses
The negative aspects consumers include:
- manufacturer standard design,
- a more complex admin interface than that of direct competitors,
- inability to remove antennas,
- lack of USB port.
The last point is significant, because the router is deprived of many possible functions, but for the budget tl wr841n this is quite logical. Otherwise it would cost significantly more.
Who is connected to your WiFi network
The TP-LINK TL-WR841N router can allow you to see who is connected to your Wi-Fi network. This will allow you to monitor the users of your network and find out if there are unnecessary users. To do this, you need to go to the “Wireless Mode” section -> select the “Wireless Mode Statistics” item. A page will open that displays a list of mac addresses of devices connected via WiFi. You can compare it with your devices and identify the enemy. Then, by clicking on the deny button, you will disable access to your network to this Mac address.
Port forwarding
Using this option, you can redirect certain requests to the required local network host automatically. The function is needed to create a server behind a firewall. This solution is used for mail and web servers. To forward a port, just click on the “Add” button in the Forwarding item.