Good afternoon, dear readers! Today we will talk about the TP-Link TL-WR841N router. This router has truly won people's love because of its affordable price (up to 1,500 rubles) and normal operation.
Users note that the router performs its functions perfectly and is easy to configure. But since we started this topic, let’s talk about setting up the TP-Link TL-WR841N router. I would like to note that all configuration information can also be used to configure the TL-WR841ND model).
Turning on the device
The configuration is carried out in several stages:
- Turn on the device.
- Connecting to the network.
- Organization of Wi-Fi network.
Although the setup is simple, I will describe each stage in detail. Let's start with the connection. To turn on the device, you must do the following:
- Check the power supply and plug the router into a power outlet.
- Check that the indicators are lit. If this does not happen, then you need to press the power button on the router (most often, the button is located on the back of the device) and check that the plug fits tightly into the socket.
- If you plan to directly connect the router, then you also need to connect a network cable to the corresponding connector of the laptop or other device for which you plan to connect and configure an output to the World Wide Web.
An overview and settings of this model are also available in video format:
How to connect a TP Link router
First of all, distribute the wires throughout the apartment so that it is convenient for you. Wire from the provider and from the router to the computer/laptop. This is usually done at the renovation stage, but if your baseboards allow you to run wiring through them, do it.
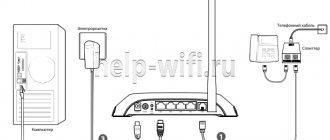
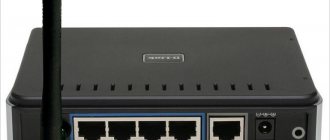
Connect the wire from your provider to the WAN port of the router, it is usually blue (see picture). And in the LAN connectors, connect the devices you need, unless of course you want to work purely via Wi-Fi. But for the initial setup, I still recommend configuring everything by wire. By the way, the wires from the router to any device are called “patch cord”.
That's it, you have connected the device, let's move on to the second stage. For more details on how to connect a router to a computer, read the corresponding article.
Making a network connection
The TP-Link TL-WR841N router is connected directly or via a wireless network. A cable connection allows you to get faster data transfer speeds than when distributing the Internet via Wi-Fi. With the second method, there is a slight reduction in speed due to technical features. Let me make a reservation right away that all routers slow down Wi-Fi speed, not just this model.
To connect to the network directly, do the following:
- Take a network cable and check its integrity.
- Connect one end to the laptop into the connector intended for the network card. It is also recommended to check the functionality and serviceability of the connector.
- Connect the other end to the LAN connector of the router.
- Connect the cable from your Internet service provider to the WAN connector of the router.
Organization of Wi-Fi network
Connecting directly has a number of advantages, but nevertheless, the comfort from using this method is quite small. If only because you have to deal with wires that you can trip over. This is especially inconvenient because it is not possible to move freely around the house, for example, with a laptop. If a cable connection is inconvenient for you, use a wireless connection, which will give you more options.
But I note that it is still better to do the initial settings of the router via cable.
To connect and configure TP-Link TL-WR841N via Wi-Fi you need:
- turn on the router;
- connect to a Wi-Fi network from any device;
- One option is to use the disk that comes with the router. You will need to follow the steps of the setup wizard sequentially and then you will be able to quickly set up the connection. Another option is to do it yourself using the router's web interface.
Correct operation of tltorrent.ru and local resources
In order for the Aist network resources, as well as the Tltorrent tracker, to work correctly, you need to configure them. In the modem menu, go to advanced, then the “Status” tab and then select network statistics. The default gateway indicator will be indicated in dynamic_ports5; it must be written down separately or remembered. We go back and select “Advanced” - “Routing”. Now, by clicking “Add”, enter:
- The gateway requires the indicators that you recorded earlier.
- The first route has a "network" value of 10.0.0.0 and a "mask" value of 255.0.0.0
- The values of the second are “network” 172.16.0.0, for “mask” - 255.240.0.0
- Save the settings.
WATCH THE VIDEO
If you still find problems, contact the technical department, they will definitely help you fix them.
WAN setup
So, how to configure the TP-Link TL-WR841N router to access the Internet? First we need to get into the admin panel:
- check that the Internet cable is connected to the router and there is a connection to the network;
- check that the device from which you will make the settings has successfully connected to the router;
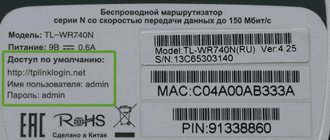
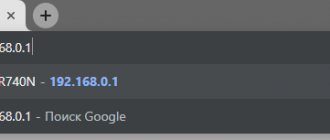
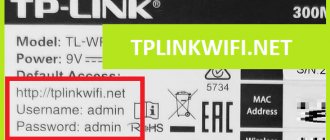
- open the browser and enter the router’s IP address (192.168.1.1, 192.168.0.1 or tplinkwifi.net) into the search bar;
- Enter your username and password to enter the admin area. This information can be found on the bottom of the device (by default it is “admin” in both windows).
In the future, it is recommended to change the username and password to increase the level of security of your router. If you continue to use standard data, then it will be easy for other users to get into the router interface. After entering the authorization data, the start page for the router settings will be displayed.
You can immediately check the firmware version. If it is outdated, it is worth updating it. Follow the update instructions, which will be described on the settings page, and you will be able to install the new firmware version. I'll tell you more below.
Now let's move on to the WAN connection, that is, directly to the configuration. Go to the Network -> WAN tab, select the connection type in the “WAN Connection Type” field and click on the save changes button.
If the IP address is of a dynamic type, then no additional steps will be required to configure the configuration.
If the address is of a different type, then the setup must be continued. Select the connection type PPPoE, L2TP or PPTP, depending on what your provider uses. You need to apply the information received from your Internet service provider (login, password and the IP address itself, which can be static or dynamic).
Typically this information is specified in the contract. If they are not there, or you have lost this data, then you should call the service provider's support line to obtain this information.
After filling out the required items, click on the save changes button. After this, a connection to the Internet should be established.
If you cannot access websites, but there is an Internet connection (this can be seen by the successfully lit indicators), it means that something is incorrectly specified in the network connection settings. In this case, it is best to call technical support and follow the recommendations of the provider’s specialists step by step.
Downloading new DIR-300 firmware
In order to be sure that everything will work as it should, I recommend installing a stable firmware version for your router. This is not at all difficult and, even if you have little knowledge of computers, I will describe the process in great detail - no problems will arise. This will help avoid router freezes, disconnected connections and other troubles in the future.
D-Link DIR-300 B6 firmware files
Before connecting the router, download the updated firmware file for your router from the official D-Link website. For this:
- Check which version (they are listed in the list above) of the router you have - this information is present on the sticker on the back of the device;
- Go to ftp://ftp.dlink.ru/pub/Router/, then to the DIR-300_A_C1 or DIR-300_NRU folder, depending on the model, and inside this folder - to the Firmware subfolder;
- For the D-Link DIR-300 A/C1 router, download the firmware file with the .bin extension located in the Firmware folder;
- For routers of revisions B5, B6 or B7, select the appropriate folder, in it - the old folder, and from there download the firmware file with the .bin extension with version 1.4.1 for B6 and B7, and 1.4.3 for B5 - at the time of writing these instructions are more stable than the latest firmware versions, which may cause various problems;
- Remember where you saved the file.
Setting up a Wi-Fi network
To set up a Wi-Fi wireless network on the TP-Link TL-WR841N router, in the admin panel of the router you need to open “Wireless – Wireless Settings” and specify the name for the network itself. In addition, it is worth indicating your region of residence. Select a channel (“Channel” item) – I recommend setting automatic channel selection.
Then you need to select the standards on which the router will distribute Wi-Fi - select b/g/n/mixed. Next, check the boxes next to “Enable Wireless Router Radio” and “Enable SSID Broadcast”. Apply the settings.
Increased network security
When you have successfully configured everything and you have access to the Internet, your network is not yet secure. This leads to the fact that other unauthorized users can use the network secretly from you, which can overload it or perform illegal activities.
To avoid all this and improve overall security, you will need to do the following:
- Specify the security type WPA/WPA2 – Personal (Recommended).
- Set a security password. It is recommended to use a high complexity password. To do this, you need to use Latin characters of different case, as well as numbers and/or special characters.
- Click on the save changes button.
In addition to the network password, it is also recommended to change the login and password to enter the router settings page.
When all these steps are completed, it is recommended to reboot the router and check that all settings were successfully saved.
What should I do if I can’t enter the settings?
Most likely, the problem is that the address or login/password and standard information that was used when initially purchasing and setting up the device have been changed. For this reason, standard data is simply not suitable.
In this case, it is recommended to perform a factory reset. This can be done by holding (no more than 5-10 seconds) the reset button. The indicators will flash and restart. After this, the router will reboot and you can try to re-enter the default data to enter the settings page.