After purchasing a wireless router, we think about how to configure the device to ensure a stable signal level and access to the Internet without interruptions in communication. Almost all routers have the same configuration principle; you can enter the parameters manually or use the express configuration wizard. It all depends on your experience and desire. In this guide, we will tell you in detail about Netis routers and how to configure these devices, since almost all models have identical firmware, the only differences are in the names of the parameters.
About Netis routers
Before setting up a Netis router, let's talk about popular models of these devices:
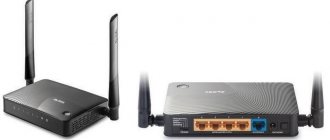
- Netis WF2411E. The device is a combined type, can be used as a wired and wireless router. The device is optimized to work with gadgets that support 802.11 b/g/n connection protocols. Data transfer speed up to 150 Mbit/s. A little and a lot, quite suitable for a small apartment or office. The router is equipped with a signal repeater, which is good in areas where there is no stable coverage. Thus, if you want to buy an inexpensive device, then feel free to take the Netis WF2411E.
- Netis WF2419E. This device is already more serious than the Netis WF2411E. Here the data exchange speed will be 300 Mbit/sec. It is quite enough for large premises, for example, a store, cafe or country house. In addition, two 5 dBi antennas expand the signal coverage area. If you want to watch movies in maximum quality or play online games, you can't go wrong. The router will satisfy your needs.
- Router Netis N4. Now let's talk about the flagship among the routers of the N line. The dual-band high-speed router model N4 provides transfer speeds of up to 1200 Mbit/s. Supports frequencies of 2.4 GHz at speeds up to 300 Mbit/s and 5 GHz with data transfer speeds of 857 Mbit/s. Two non-removable antennas with a gain of 5 dBi will expand the signal area. The ability to create a guest network will allow you to save confidential information.
The firmware for the models under consideration is the same, since these devices are representatives of the same line. Next, we will tell you how to configure a Netis router.
To take or not to take – in short
For those who are considering purchasing this model for themselves, I will express my thoughts right away.
- Dual band 2.4+5 GHz – coverage + speed.
- Budget - 1,700 rubles (analysis at the time of publication, your prices may differ), for 5 GHz - very nice.
- Gigabit WAN+LAN ports – i.e. It’s quite possible to bring optical fiber to your home through the terminal – the speeds of the ports allow it.
- Modern design - see everything below.
- No USB – don’t connect a modem, disk, or printer. Personally, I abandoned USB on my home router, and so far there has been no urgent need. A simple home user does not need it.
- There is no Wi-Fi 6 - it would be more expensive to implement such technology, but those looking into the distant future cannot do without it. And again, the average home user will not notice the difference between Wi-Fi 5 and Wi-Fi 6.
With that said, here are a few scenarios for the average person:
- If you’re just planning to buy a router and don’t have any special needs, yes, it’s a good option. Set it and forget it for many years.
- You already have a router with Wi-Fi 5 - the purchase is pointless.
- You already have a router with Wi-Fi 4 - it’s better to wait for cheap routers with Wi-Fi 6.
- I would like to feel modern high technology - no, this decision is not about that.
I hope my position is completely clear. Feel free to leave your questions and suggestions in our open comments right below this article. Now let's move on to the review.
Initial setup
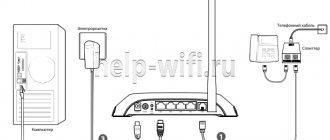
First of all, you need to connect the router to your computer. See below for step-by-step instructions:
- Find an Ethernet port on the router. All ports are located on the back of the device.
- Use a patch cord to connect the computer to the router.
- Connect the device to the network via a power adapter.
- Wait until the LEDs start flashing.
Now you know how to connect the device via a patch cord to a computer or laptop.
Network connection settings
It doesn't matter which router you use, Netis WF2411E or N4, you need to do the initial setup. To do this, you need to change the network configuration settings on your personal computer. How to do this, see the following step-by-step guide:
- In the system tray, find the Network Connection Control Center icon.
- Now let's go to the adapter parameters.
- Click on the wireless connection and select “Properties” from the dialog menu.
- You need to go to the IPv6 and IPv4 protocol parameters.
- It is necessary to check the checkbox with the name “Receive an address automatically”.
- Click the “OK” button for the new settings to take effect.
We have configured the network and connected the router to the personal computer, now let’s set up the modem.
Login to the web interface
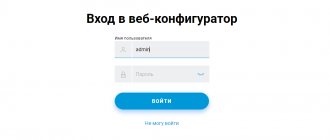
Many people ask: how to enter the settings of the Netis router. Our algorithm will help you log into the router through a web browser. Please note that absolutely any browser will do:
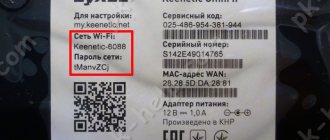
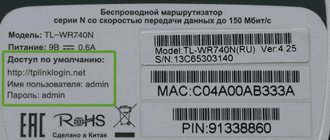
- Turn the device over and find the sticker on the back cover.
- The sticker will contain your login credentials. On a Netis router, the following combination is usually used: “guest” and “guest”. In addition, you need to look at the IP to log into the web interface. Typically, the following address is used: 192.168.1.1.
- Open a browser and write the device IP in the address bar.
- Enter your login and password.
- Click on the “Login” button.
Access Point Settings
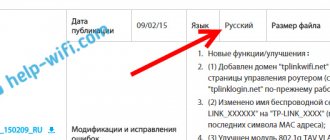
After we have entered the admin panel, we need to select the firmware language. Click the "Language" button and click "Russian". Let's start configuring:
- Click on the “Advanced” button.
- Select the “Network” button in the side menu.
- Go to the “WAN” section and check the checkbox with the desired connection option: “Wired” or “Wireless”.
- In the “WAN connection type” item, set the parameter “Russia PPTP” or “Russia L2TP”.
- In the “Username” line, enter a custom login using the Latin layout. Special characters and punctuation are prohibited.
- In the “Password” column, set the key for the access point. The minimum password length is 6 characters.
- In the “Connection type” section, specify the router address. It can be found on a sticker located on the back cover of the router.
- In the “Subnet Mask” item, write the address 255.255.255.224.
- In the “Gateway” line, enter the following address 166.37.27.205. If you use a static IP, then look for the necessary parameters in the service agreement or contact your provider.
- It is not necessary to fill in the “Primary DNS” and “Secondary DNS” items if you are using dynamic routing. Otherwise, also contact the provider’s technical support or look for the necessary information in the agreement for the provision of telecommunications src=”https://ustanovkaos.ru/wp-content/uploads/2021/04/16-parametry-seti-L2TP.jpg” class =”aligncenter” width=”580″ height=”267″[/img]
- Select how the connection to the network will be made: “Automatically”, “On demand”, “Manually”. The first option implies that after the operating system starts, the connection to the network will be made immediately. In the second case, you do not need to enter your login and password. Everything is done simply - go to the system tray, click on the button with the name of the access point and click “Connect”. In a few seconds you can go online. If you select the third item, the user himself specifies the login and password for the access point.
- Click "Save".
On a Netis router, setting up an access point takes a few minutes, there is nothing complicated, the main thing is to know the parameters. If the necessary data is not available, then, of course, you should contact the provider.
Routing options
We continue to configure the Netis Wi-Fi router. Now let's set the parameters for routing:
- In the right column we will find the “Advanced” item.
- Let's go to the "Static routing" section.
- The static routing rule parameters form will appear on the screen.
- In the line “Destination IP address” we indicate 172.16.0.0.
- In the “Subnet Mask” section we will write the following value: 255.225.0.0.
- In the “Main gateway” column we write 166.37.27.205.
- Click on the “Add” button.
Setting up a Wi-Fi network
Our instructions for connecting a Netis router will help you configure the settings for your wireless network. This point in the user manual is important, because if the setup is done incorrectly, you will not be able to access the Internet:
- Enter the "Wireless" section.
- In the submenu, select “Wi-Fi Settings”.
- In the “Wi-Fi connection status” line, set the switch to “On”.
- There is no need to change the MAC address, the value will be set automatically.
- Under Radio Mode, select Access Point.
- In the “SSID” column, enter a custom name for the network. You can use Cyrillic or Latin.
- In the “SSID Broadcasting” section, Fr.
- In the "Region" section, select a country. If necessary, values can be entered manually.
- In the “Channel” column, you can select any of 12 possible channels. The manufacturer recommends that we use the “Auto” value, since the router will automatically select a less loaded gateway.
- In the “Channel Width” section, set the value to “40 MHz”.
- Select the authentication type, it is recommended to use "WPA/WPA2-PSK".
- Specify the encryption type "TKIP&AES".
- In the “Key Type” item, do not change the parameters.
- Go to “Password” and enter the access key. The minimum length of the cipher is 8 characters.
- Click on the "Save" button.
Bandwidth
Bandwidth will allow you to set values for incoming and outgoing data transfer rates:
- Go to the side menu and select the “Bandwidth” section.
- In the item “Status” o.
- Open "Rule".
- In the “Incoming speed” column, set the value “100000 Mbit/s”.
- In the “Outgoing speed” line, set the parameter “100000 Mbit/s”.
- Leave the “Configuring Bandwidth Management Rules” section unchanged.
- Click on the “Save” tab.
If, when you go to the rules section, you see arbitrary values set automatically, then you need to replace them, as indicated in our instructions.
Restart
At this point, setting up the router parameters is complete; for the changes to take effect, you need to reboot the device:
- Go to the side menu and select “System”.
- In the dialog box, click “Restart system”.
- On the main screen, click “Restart”.
- The indicator on the router will start flashing and after a few seconds will go out completely.
- After 2 minutes, the router will start working again, so you can try to connect to the Internet.
Additionally
If something goes wrong, then click on this “Advanced” button:
A lot of settings will open, many of which we described in the article indicated at the very top. Here I will focus on brief points:
Changing the Internet type and its settings : Network - WAN
Turn on Wi- Fi and change the password : Wireless mode – Wi-Fi settings
Setting a password to enter the configurator : System – Password
IPTV Settings : Network – IPTV
Turn off WPS : Wireless mode - WPS
This is where we end our short tutorial. Links to detailed articles on models are above, questions and suggestions are below. See you soon!
With all the variety of different network equipment on the market, today choosing a new router is a rather complex process. On the one hand, now it must be dual-band, and this usually means a slightly higher price than a regular one. Secondly, I want it to have as wide a wireless network coverage area as possible. And with all this, I don’t really want to overpay extra money - there’s a crisis right around the corner! Therefore, everyone is looking for a universal solution for themselves. The netis N4 router can definitely be considered this way - it is inexpensive, simple and quite functional for its price. He visited our stand and now I will tell you in detail and show you why he is good.
- Setting up a Netis router: 3 steps to quick setup
Troubleshooting
When you configure the router yourself, various types of malfunctions may occur. Some are due to incorrectly set parameters, while others may be the result of a software glitch. Next, we’ll look at how to find and fix typical problems with the Netis router.
Reset
Resetting the settings is the most preferable option. This will clear all settings and allow you to reconfigure your device. A factory reset is performed as follows:
- On the back panel of the device, find a button called “Reset” or “Default”. It all depends on the model of the device.
- Press and hold the button for 8–10 seconds.
- The indicator on the router will go out completely.
- The device will turn on automatically and the default settings will be restored.
No connection
Typical problem. In most cases, malfunctions occur on the provider's side. In this case, there is no need to reset or configure anything again. Try calling technical support. In addition, if you have a single operator in your apartment building, you can simply go to your neighbors and ask if there is a connection. In a situation where everything is fine with the provider, let's try to fix the problem through the router's web interface:
- Log in using your admin credentials.
- On the main page, check what type of connection is being used.
- Try setting "DHCP" if your ISP uses dynamic routing. Otherwise, use a “Static IP” connection.
Reviews
If at the beginning I gave a personal opinion about this model, here I will cut out the most important reviews from real users. And that's roughly what it comes down to:
- Beautiful design
- Great price
- Simple settings
- Gigabit ports
- Excellent coverage
- Two ranges
- 4 LAN
- Beautiful antennas, no backlash
- Pleasant dim indicators
- Easy
- No USB
- No wall mount
Changing the password for a wireless access point
Many owners of Netis routers ask how to change the password for a wireless access point. Everything is quite simple, to change the settings, use the following step-by-step instructions:
- In the main menu, select the “Wireless Mode” option.
- Go to the “Access point security settings” item.
- Find the line called “Password”.
- Enter a new access key. The minimum password length is 8 characters. You can use letters and numbers.
- Click on the “Save” button.
The access point password has been changed. When connecting, use the new data. If the connection is impossible and the “No Internet access” error appears, then restart the wireless router or delete the access point in the operating system settings.
The network will be created automatically when you connect to the router; you don’t need to configure anything yourself.
WiFi mode
To enter WiFi parameters, you need to enter the “Wireless Mode” section, where you specify the name of the WiFi being created, its access code, type of encryption protection, channel width, etc.
After completing the adjustments, click on “Save”.
In the future, when connecting devices to the created network, you will need to specify the name and password entered in this window, so it is strongly recommended to write them down in a notepad, since even the worst notepad is always better than the best memory.
Router capabilities
The device is compatible with a USB modem, which allows it to work with 4G/LTE mobile wireless communications. The device supports the IPv6 network protocol. The speed of data and file transfer with a wired connection can reach 1000 Mbit/s, which is enough to provide Internet to a large apartment or business office.
Additional functions:
- DHCP server is a standard network protocol that transmits IP addresses and information about current settings to connected devices;
- Dynamic DNS is a network protocol responsible for timely sending current local network data to the DNS server;
- a firewall or firewall is used to increase the security level of a dedicated network;
- IPSec Pass-Through is a technology used to create an isolated VPN connection with a high degree of security;
- the NAT mechanism is necessary to convert external IP addresses into internal ones and ensure the full operation of Internet applications;
- Filtering by MAC and IP addresses is used to automatically sort devices by authority and access.
The NETIS N1 Internet router is a good choice for creating a full-fledged Internet point with high wireless speed. In order for the network to work stably and quickly, you need to follow the step-by-step instructions for setting up the router.
How to set up IPTV
As I said above, Netis N4 works without problems with Interactive TV. To set up IPTV, you need to go to the advanced settings of the router and open the section Network -> IPTV .
Here we select the mode through which the service will operate and the port into which the provider’s TV set-top box is connected. In most cases, it is enough to select the transparent bridge mode - Bridge. This scheme works in Dom.ru, Beeline and TTK.
If your provider delivers multicast in a separate virtual network and you need to register its identifier, like Rostelecom in my case, select the 802.1Q Tag Vlan mode. You will need to find out the required virtual network number from the technical support of your provider.
As a rule, with this scheme, Internet traffic is untagged and there is no need to enable the VLAN Tag for the Internet. In the “VLAN ID for IPTV” field you need to enter the virtual network identifier that you found out from technical support. Below, in the “Vlan Priority” field, it is advisable to put the number 4 so that the multicast has a higher priority. All that remains is to select the port into which the TV set-top box will be connected - LAN1 or LAN2. Save the settings.
Attention! On firmware 1.5.611 and 1.5.615, after selecting one port for TV, the other port also “falls off” from the general group. Everything works fine via WiFi. The problem has been reported to technical support - we are waiting for a solution.
If, after the above settings, multicast on the set-top box does not work for you, then try going to the advanced settings and in the “IGMP” section enable IGMP Proxy. Please note that IGMP Snooping is also enabled.
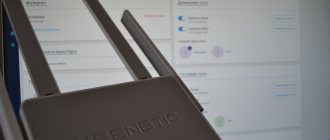
Unboxing and Design
The design of the box is dominated by light colors. The packaging is informative and essentially contains all the information the user needs about the device.
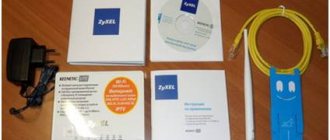
In addition to Netis N2, the box contained instructions, a warranty card, an AC power supply, and an Ethernet cable.
The matte plastic of the case looks like metal from above. In addition, the texture is very practical. There are no greasy stains left when you touch the router with your hands. Those who are close to high-tech steel will not have the desire to hide it away. Four antennas enhance the positive aesthetics of the device. They look cool and stylish, but are not at all decorative. Two for each frequency range. You cannot remove it, but you can change the tilt relative to the body.
It is not advisable to place the router in a closet for two reasons. The first, common to wireless equipment, is to avoid interfering with the radio signal. Second, below the brand logo there are LED indicators that inform the user about the current operating modes of the router.