Paragraph indents can be set in the Paragraph .
Select the desired paragraph(s) or the entire document (keyboard combination CTRL + A ) and right-click - Paragraph .
The paragraph indent settings window will open.
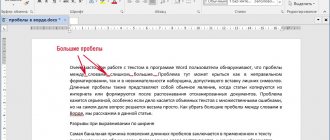
Typically, the text is written at a distance from the edge of the page set in Page Margins, but it may be necessary to set an additional indent - already from the page margins. This is a paragraph indent, a paragraph indent. It can be configured on the left or right (see figure) or for both fields at the same time.
Paragraph left indentation
- Paragraph right indent
- To set indent margins, you need to set the indent value in centimeters in the Paragraph .
- For example, a paragraph indent of 3 cm on the left and right looks like this:
You can also set paragraph indents on the left and right, not through the Paragraph , but on the Word ruler by pulling the lower markers. How to turn on the ruler.
Mirror padding
Mirror indents will allow you to bind printed sheets together like a book, in which there are different indents on the left and right. You also need to first select the required piece of text.
Red line
- The indentation of the first line is called the red line and is set there, in the Paragraph . There are two types of red line indentation:
- Setting the red line indent: select the type (indent or protrusion) and set the value in centimeters.
You can also set the red line by moving the red line marker (first line indent) on the ruler - this is the upper left marker - press the left mouse button on the marker and, while holding it, move it to the left or right. Paragraphs for which you want to set a red line must first be selected.
- Indentation
- Ledge
- For most documents, it is customary to set the red line as an indent of 1.25 cm.
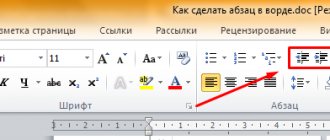
How to open the Paragraph window?
- Having selected the necessary paragraphs, right-click anywhere in the selection and select Paragraph .
- Click on the button with the arrow on the Ribbon: Home – Paragraph area .
FAQ
- — How to remove all indents in Word or set them the same?
- - Select all the text by pressing the combination CTRL + A , right-click - Paragraph - and in the window set the value of all indents - or any desired value - OK .
Source: https://korolevairin.ucoz.net/publ/vsjakie_poleznye_prijomy_dlja_raboty/abzacnyj_otstup_v_word_vorde_krasnaja_stroka_otstupy_sleva_i_sprava/5-1-0-15
Menu
You can also adjust the first line indent using the menu. Select the text that needs to be formatted or place the cursor in the desired fragment if you want to change the position of only one of it. You can also set the settings in a blank document before writing the text - then it will be automatically formatted at the time of entry in accordance with the specified parameters.
On the main tab, in the “Paragraph” section, open additional options using the button in the right corner. Or go to the function of the same name through the submenu that appears when you right-click anywhere in the text. Here you can set the left and right margin values to move the text relative to the page boundaries. The Mirror Indents option creates different spacing intervals, just like in a book.
For the first line, select an action - indent or protrusion - and enter the value in centimeters. The Spacing section sets additional spaces before and after paragraphs, as well as line spacing.
We figured out how to make the correct indents in Word. Create structured documents using all the features of Word.
A document is easier to read and better visually perceived if the text is divided into paragraphs and has the first line indented. When typing text on a computer using the Word interface, there is no need to repeatedly press the space bar at the beginning of each paragraph. There are several ways to create an indent, each of which has its own advantages.
How to indent in Word - Internet
Having written text in Word and moving on to editing it, there are many tasks that need to be completed. One of the important points when finalizing an article is maintaining paragraphs.
Each new thought is written from a new paragraph and, accordingly, from a red line. In today's episode we will talk about how to indent in Word.
Let's look at all the different ways you can use.
How to indent in Word and other text editors?
First, we will answer the question of how to indent in Word, from the established page layouts on the left and right sides, for the entire paragraph.
Indents can be set using the Ruler tool.
If suddenly the ruler does not appear above the page.
That is, it is possible to find it along the path: View -> Show -> Ruler (check the box). This can be done in Microsoft Word.
In Liber Office the instructions are slightly different. Follow the path View - Ruler. Or hold down the key combination Ctrl+Shift+R.
You won't be able to display a ruler in Word Online. All operations for shifting text are performed in the “Page Layout” section. As you can see, on the right side there is only one marker (adjuster). You can make an indent on the right side by holding down the right marker with the left mouse button and then moving it.
In order for everything to be displayed the way you intended, it is important to first select the text that needs to be shifted, and only then move the marker. If you do not select, only the paragraph on which the cursor is positioned will be moved.
To quickly select all text, hold down the “Ctrl+A” key combination, and then drag the marker to the required distance.
If you look to the left, there are two markers, but the bottom marker has two functions. Now about everything in more detail. To move a paragraph or entire text in Word, just use the lower left marker. In the same way as in the case of the right marker, select the entry and drag it along the ruler. Along with the lower marker, the upper one will also move, do not pay attention to this.
How to make a paragraph in Word?
Now let's try to make a red line. As a rule, this is what is required in many printed works. To make a paragraph in Word, that is, offset one line, you need to place the mouse cursor on this line, anywhere, and move the top marker to the right by a distance of 1.25 cm. Or to the distance that you need.
There is only one function left for the left markers. The lower left marker has the ability to offset text that is located below the current cursor. For example, place the mouse cursor on the first line of the paragraph and drag the bottom marker to the right.
You will get something like this: Everything that was described above can be done in another way. In Microsoft Word, in the “Home” -> “Paragraph” section, click the arrow in the lower right corner. When you hover over you can see that it says “Paragraph”.
A new Paragraph window will appear. In it you can completely adjust the layout of the text: paragraphs, indents, spacing, etc.
Now a little more detail! The general ones will not be touched, since left alignment is the standard that should be followed.
Indents . Before the text means shifting from the left side to the right, and “after the text” means shifting from the right side to the left.
Special. The drop-down menu has three fields: (none), indent, overhang. The indentation allows you to make a red line, the indentation offsets the text located below the cursor. In the “On” section, write down the length of the indentation or protrusion.
Interval . “Before” and “after” adjust the height between paragraphs. "Interline" has four options in the drop-down menu: multiplier, single, 1.5 lines, double. To make the text look convenient, choose “single” correctly.
- The variable “Value” parameter allows you to set the required gap between the lines.
- Well, that’s all about how to make a paragraph and other indents in Word.
- Learn text editors with us!
Interesting posts:
Source: https://medicina-treat.ru/kak-v-vorde-sdelat-otstup/
Fine-tuning via the Paragraph dialog box
To fine-tune the indentation, use the “Paragraph” window. The first step is to select the paragraphs for which the indentation parameter is set, and right-click on the selected fragment. In the context menu that appears, select “Paragraph”.
In the “Indents and Spacing” tab, find the “Indentation” group, and in it the “First Line” column. In the drop-down menu, select “Indentation”, and in the “by” box, enter the value in centimeters. The default indent is 1.25 cm.
In Word 2010, you can also open the Paragraph dialog box by clicking on the menu on the Home tab, and then in the Paragraph group, clicking on the square with the arrow in the lower right corner. Then proceed as indicated above.
Indents and spacing in Microsoft Word are set according to default values. In addition, they can always be changed by customizing them to suit your own needs, the requirements of the teacher or the customer. In this article we will talk about how to indent in Word.
Standard indents in Word are the distance between the text content of the document and the left and/or right edge of the sheet, as well as between lines and paragraphs (spacing), set in the program by default. This is one of the components of text formatting, and it is quite difficult, if not impossible, to do without it when working with documents. Just as you can change the text size and font in the Microsoft program, you can also change the indent sizes. How to do this, read below.
1. Select the text for which you want to adjust the indents (Ctrl+A).
2. In the “Home” tab in the “Paragraph” group, expand the dialog box by clicking on the small arrow located in the lower right part of the group.
3. In the dialog box that appears in front of you, set the required values in the “Indent” group, after which you can click “OK”.
Tip: In the Paragraph dialog box in the Sample window, you can immediately see how the text will change when you change certain parameters.
4. The position of the text on the sheet will change according to the indentation parameters you specified.
In addition to indentations, you can also change the size of line spacing in the text. Read about how to do this in the article provided at the link below.
How to indent a line in Word
When a document is structured and has a good overall presentation, it is easy for the reader to navigate the text, which makes reading easier.
When a document is enjoyable to read, it means that the text is well formatted. There are quite a lot of formatting elements in Word, but in this article the only one that will be touched upon is the paragraph.
It is also called the red line, which will be done periodically in this text.
Unfortunately, few people know how paragraphs are made in Word, or they know, but still do it incorrectly. The article will discuss all three methods: using the ruler, tabulation and the “Paragraph” menu. They perform the same role, but the approach to each of them is different. Therefore, read the article to the end to choose a method for yourself.
Paragraph using a ruler
As mentioned above, paragraphs in Word can be made in three ways. Now we will consider the first of them - using a ruler. This method is quite easy to use, but it is still not popular enough. Most likely, this is due to its inaccuracy - the length of the paragraph is determined by eye, but if this is not important to you, then you can safely use it.
So, first you need to figure out where that ruler is. The fact is that sometimes it is removed by default and needs to be enabled. To do this, follow three simple steps:
- Go to the “View” tab in the program.
- Find the area called "Show".
- Place a check next to the "Ruler" line.
If you use Word 2003, then you need to click “View” and select “Ruler” from the list.
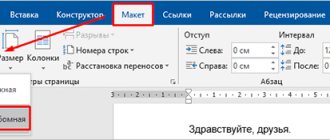
Pagination of paragraphs
When working with large documents, you may need to set the proportional placement of paragraphs of text on pages. For example, you are writing a document with large paragraphs, and you need each new paragraph to start on a new page. To paginate paragraphs, do the following:
- Select the necessary paragraphs;
- Right-click on the selected fragment and in the context menu that appears, select “Paragraph”;
- In the Paragraph window, go to the Page Position tab;
- In the “Paging” group, select the items you need:
- “Prohibition of dangling lines” – prohibition of one line from moving to the next page or the first line from moving to the previous one;
- “Do not tear away from the next” – prohibits the transition of the next paragraph to the next page;
- “Do not break paragraph” – prohibits the division of a paragraph into two pages;
- “From a new page” – inserts a page break before a paragraph (each subsequent paragraph begins on a new page).
Figure 7 Breaking a paragraph using the “Page Position” tab tools
To quickly set the spacing at the top of a paragraph that matches the standard line font size (12pt), do the following:
- Place the cursor on the desired paragraph;
- Press the key combination.
Please note that pressing the keys again removes the interval.
How to easily indent in Word
Formatting the typed information in a document of the Word office application is what the user spends most of the time when working with the finished file. Many users do not even know the basics of working with an office application during formatting.
How to indent in Word
The main categories that the user operates when formatting are indentation and protrusion. They are used to highlight fragments of information available in a file. Indentation is used to highlight the first line of a paragraph. In this way, it is possible to shift the first line to the right relative to the entire contents of the document.
An overhang is when what is printed shifts to the left. It is natural to assume that the first is much more common than the second. In this regard, you need to focus special attention on how to indent. This skill will be useful for both experienced users and beginners. No matter how much you avoid it, sooner or later you will have to learn.
Forming paragraphs
There are several ways to format a paragraph. To make it, select “Format” from the menu, then “Paragraph”, then determine how many units the first line will be indented. As a rule, this is 1.5 units. Save your changes. Now you can open Word and work in it, and paragraphs will be formed in accordance with the specified parameters.
Didn't like the result, do you think the paragraph was too big or small? Use the ruler on the toolbar.
It is worth saying that the user cannot always see it right away, since it may be hidden. Click the icon in the upper right corner of the document.
Please note that the ruler is graduated, that is, centimeters and millimeters are marked on it to form indents and protrusions.
After the ruler appears, position the cursor at the first paragraph of your file, then drag the ruler slider the required number of points. Please note that this will only change the size of one paragraph. Naturally, they need to be made identical throughout the document. To do this, select the entire text and move the ruler slider to the required number of units.
Perhaps these two methods are optimal when formatting a document and creating
indentations. A Word document itself does not exist without paragraphs as structural units, and indentation is the formative element of a paragraph.
There is another way to make a red line. However, it is not entirely correct, or rather non-academic, since it creates problems with further editing of the typed information. We are talking about the tab key, or Tab. It advances the first line of a paragraph by a certain number of units. Using tabs is not normative, although it is an easier, more convenient way.
However, if you want to learn correct academic formatting, then it is better to immediately get used to using the first two methods. Remember, it is always more difficult to relearn than to learn again. With Word, formatting cannot be avoided.
Tools
Several of the tools in this section relate to paragraph formatting. Each time you click on the increase indentation tool, the paragraph indicated by the arrow will shift by a specified distance, which is equal to 1.25 cm. The tool located on the left side of the highlighted red rectangle is called “Decrease indentation”. Thanks to it, a paragraph shifted to the right side returns to the left by the same distance.
Using the next group of tools, outlined in a red rectangle, the paragraph text is aligned accordingly to the left edge, center, right edge, and also to the width.
The last case deserves explanation. The following screenshot shows the change in the distance between words when aligned to width.
In addition to adjusting line spacing, you can also control the spacing that separates paragraphs using the drop-down tool called Spacing.
The following screenshot illustrates the downward shift of a paragraph (marked by a red arrow) when selecting the line to add space before the paragraph. Obviously, clicking on the next line will return the paragraph to its original position.
How to indent a paragraph in Word?
Creating a red line in Word. Or how to indent a paragraph?
Continuing to study the capabilities of the MS Word word processor, today we will look at such a popular function as setting the required indent for a paragraph. This indentation is also called the red line. This operation is done the same way in all versions of Microsoft Word. You will find out exactly how in this article.
Setting paragraph indents in Word
So, to set the indent of the required size, we need a ruler. You will learn about what it is and how to enable it if it is missing in this article.
After the ruler is turned on, to set the indentation of a paragraph, you need to place the mouse cursor at its beginning. Then, on the same ruler that you will have at the top of the MS Word sheet, you need to pull the upper triangle to the right by the amount that is required.
The position of the cursor and the appearance of the upper triangle, which you need to drag to the right to add a paragraph indent
Thus, you will make a red line for the paragraph in which the input cursor was located.
If you need to set an indent for all paragraphs in the text, then to do this quickly you need to select the entire text (for example, using the shortcut key combination “CTRL” + “A”) and do the same thing - drag the upper triangle on the MS Word ruler to the right.
As you can see, the process of indenting the red line in MS Word is quite simple and can be done in a few mouse clicks. The main thing is to enable the display of the ruler at the top of the document if it is missing.
The best way to thank the author of the article is to repost it on your page
paragraph in Word paragraph indents in Word
Source: https://helpadmins.ru/kak-sdelat-otstup-abzaca-v-vorde/
Highlight paragraphs with the same formatting
This technique can be used when you insert text fragments with different formatting, for example, you are preparing a review of a new car from Aston Martin and you need as much information as possible from various sites. In this case, you insert text fragments from sites as you download (read) the article. The sites are different and the formatting also varies, but, for example, you most trust a couple of sites that specialize in covering the automotive industry. Accordingly, you need to find all the articles from these sites that you copied into your document. You can do this by setting just one paragraph as an example - all other paragraphs with similar formatting will be highlighted, and you, for example, can rearrange them into a block for subsequent actions (editing, formatting).
To highlight paragraphs with identical formatting, do the following:
- Select the paragraph with the desired formatting options;
- Right-click on the selected fragment and in the context menu, move the cursor to the “Styles” item;
- From the Styles pop-up menu, click Select Text That Has the Same Format.
Undo formatting in a paragraph
To remove changes you made when formatting paragraphs, do the following:
- Select the desired paragraph;
- Press the key combination
Indentations in Word (MS Word)
Previously, we already had a lesson on the topic of indents and borders in Word, but it only discussed indents in a paragraph (see the lesson “Indents in paragraphs”). This time we will consider additionally the main fields and repeat the previous material
How are indents done in MS Word?
The most important text indents on the sheet are set in the page parameters in the fields section. The second tool is a ruler . With its help, you can indent each paragraph individually or for several selected paragraphs at once.
Learn more about each tool.
Page margin indentations
Now we are talking about the fields indicated in the figure. To configure them, call the “Page Settings” window and set the required values in the first field tab.
- How do I open the Page Setup window?
- 1st method: 2 quick left clicks on the ruler (see picture below)
- 2nd method: at the top of the toolbar, open the “Page Layout” tab in the “Margins” tool, select the last item “Custom margins" (see figure below)
Ruler in MS Word
The tool is displayed at the top and left of the program window. If the ruler is not visible, you can turn it on (see picture below)
The ruler consists of several elements (sliders). Each slider is responsible for its own paragraph indentation. In the figure, I tried to indicate and clearly describe below the purpose of each slider.
| Item number | Description of the indentation made by this element |
| 1 | Adjusts the indentation of the first line in a paragraph. |
| 2 | Adjusts the indentation of all but the first line in a paragraph. |
| 3 | Simultaneously adjusts the indentation of element 1 and 2 from the edge of the sheet, but does not change the distance between the first and second element. |
| 4 | Adjusts the indentation of all lines from the right side of the sheet |
| 5,6,7,8 | These are the margin indent values that are set in the “page settings” window |
Download the MS Word file with an example of using three types of indents
Open the downloaded file and click on each paragraph. Pay attention to how the indentation sliders are positioned in the selected paragraph. Analyze and figure out which slider is responsible for which indent. It is not difficult.
Click
Add to the group on VK and Odnoklassniki!
Source: https://tim-plus.ru/uroki/word/otstupyi-i-polya-v-ms-word
Line spacing
Line spacing is very often used when formatting documents, and its most common values are single and one and a half. The spacing itself is determined based on the base lines of the lines that run through the center of the letters (this takes into account their upper and lower elements, such as superscript/subscript marks). Thus, single spacing corresponds to the font size of the text, and is the “default” spacing in Word 2010. One and a half spacing is used in most business documents, course papers and abstracts. To set line spacing, do the following:
1 way:
- Select the required paragraphs and right-click on the selected area;
- In the context menu, select “Paragraph”;
- In the “Paragraph” window, “Indents and Spacing” tab, in the “Spacing” group, in the “Line Spacing” column, select the one you need from the list:
- “Single” – the spacing corresponds to the font size of the paragraph text;
- “1.5 lines” – the spacing is equal to one and a half font size of the paragraph text;
- “Double” – the spacing is equal to double the font size of the paragraph text;
- “Minimum” – the interval is not less than the size specified in points;
- “Exactly” – the spacing exactly corresponds to the size specified in points (that is, if the font is 12pt, then the spacing will be exactly the same);
- “Multiplier” – a multiplier for a spacing equal to the font size of the paragraph text (the larger the multiplier, the larger the spacing).
Method 2:
- In the “Paragraph” group, click on the “Line Spacing” button (you will go to the “Paragraph” window to the “Indents and Spacing” tab);.
- In the Interval group, in the Value box, enter the desired value and click OK.
3 way:
- Select the required paragraphs;
- Using keyboard shortcuts, set the required interval:
- Ctrl+1 – single spacing;
- Ctrl+5 – one and a half interval;
- Ctrl+2 – double spacing.
How to indent in Word
After you have typed everything you need in Word, or you have been given a document that has already been typed, you can proceed to editing and formatting the finished text in Word. And one of the things you have to do is adjust the indents for the lines in the document.
In this article, we'll figure out how to indent an entire paragraph, just the first line, and indent text.
Using a ruler
For the entire paragraph
Let's start with the first question. You can move the printed text away from the established margins on the right and left sides. This can be done using special markers on the top ruler of the document. If it is not displayed for you, go to the “View” tab and in the “Show” group, check the “Ruler” box.
There is only one marker on the right side. To move away from the field, left-click on what is printed and drag the marker to the desired distance on the ruler. The ruler division value is 0.25 cm.
If you did not select anything, then the indentation will be made for the part where the cursor is positioned. If you need to make the same distance from the margin for everything printed, select everything by pressing the “Ctrl + A” combination and drag the marker. To indent different parts, select them and drag the handle.
There are three markers on the left side of the ruler. In order to indent to the left for one selected part, put italics there, left-click on the bottom marker, it looks like a rectangle, and drag it to the desired distance on the ruler.
At the same time, highlight the entire text or individual paragraphs.
For the first line
If you need to retreat only for the first row, it is also called the red line in Word, then on the ruler on the right side, drag the top marker to the required distance. Considering that the division value is 0.25 cm, in the example we made an indent equal to 1.25 cm.
You can read a detailed article about paragraphs in Word by following the link.
Text tab
Using the last marker, you can make a protrusion for the text. Click on it with the left mouse button and set it to the desired distance on the ruler. In this case, all text, with the exception of the first line, will shift by the specified value.
Ruler
You can quickly indent paragraphs using the ruler, which is located directly below the menu icons.
If you don’t see the measuring tape there, go to the “View” tab of Word 2007, 2010 or higher, in the “Show” section, check the box next to “Ruler”. If you are using version 2003, the function is located in the menu section of the same name. On the tape on the left there are two arrows pointing at each other, and on the right there is another arrow. To indent the first line, you will need the top left arrow. Hold it with the mouse pointer and drag it to the right - the first line of the paragraph on which the editing cursor was placed will begin to recede after it. If you drag the arrow to the left, the first line will start to extend beyond the paragraph.
To set an indent in Word for the entire document at once, first select all the text, then move the arrow on the ruler. If you want to move an entire paragraph, use the lower arrows to move its left and right borders, respectively. The lower left arrow consists of two parts - triangular and rectangular. If you move the triangular part, only the left border of the paragraph will move. If you grab a rectangular one, the indent of 1 line will move along with the border.
What difficulties might there be?
The user unknowingly made the red line with spaces; in this case, you must first remove all unnecessary spaces, and then indent it, as written above.
Thank you for your mark. If you want your name to be known to the author, log in to the site as a user and click Thank you again. Your name will appear on this page.
Have an opinion? Leave a comment
Did you like the material? Want to read later? Save to your wall and share with friends
You can post an announcement of an article on your website with a link to its full text.
Error in the text? We are very sorry that we allowed her to do this. Please select it and press CTRL + ENTER on your keyboard.
By the way, this option is available on all pages of our website.
| Excel template “Analyzer of Unified State Exam results in SOCIAL STUDIES + ESSAY - 2022, 2019” with automatic output of an analysis report |
| Do you want to receive information about the most interesting materials on our site? Subscribe to the E-mail newsletter Install the application on Android 2007-2019 “Pedagogical community of Ekaterina Pashkova - PEDSOVET.SU.” 12+ Certificate of registration of mass media: El No. FS77-41726 dated August 20, 2010. Issued by the Federal Service for Supervision of Communications, Information Technologies and Mass Communications. To confirm the authenticity of documents issued by the site, make a request to the editor. webinar service About working with the site We use cookies. By publishing materials on the site (comments, articles, developments, etc.), users take full responsibility for the content of the materials and resolution of any controversial issues with third parties. At the same time, the site’s editors are ready to provide all possible support both in publication and other matters. If you discover that materials are being used illegally on our website, please notify the administrator and the materials will be removed. | |
| Visitors: 298981 | (today 33) | Font: |
Method 2: Keyboard shortcuts
Using hot keys can significantly simplify and speed up the workflow in many programs. Microsoft's text editor also supports all sorts of combinations, thanks to which you can conveniently interact with the contents of documents and almost instantly perform certain actions, for example, highlight paragraphs.
Option 1: Paragraph from beginning to end
So, if a piece of text needs to be selected from top to bottom, you need to proceed as follows:
- Place the cursor at the beginning of the paragraph that will be highlighted.
- Press CTRL+SHIFT+DOWN ARROW keys.
- The paragraph will be highlighted from beginning to end.
Option 2: Paragraph from end to beginning
To select text in the opposite direction to the one discussed above, that is, from bottom to top, one key in the combination will need to be replaced.
- Place the cursor at the end of the paragraph you want to highlight.
Other keyboard shortcuts
In addition to quickly selecting paragraphs, keyboard shortcuts will help you quickly select any other fragments of text, from a single character to the entire contents of the document. Before you start using the shortcuts below, position your cursor to the left or right of the element or part of text you want to highlight.
Note: Where (left or right) the cursor should be before selecting text depends on the direction in which you “move” it - from beginning to end or from end to beginning.