Published on September 16, 2018 by Konsultant
MS Word has a special operating mode that allows you to make changes and edit documents without changing their content. Roughly speaking, this is a good opportunity to point out mistakes without correcting them.
Lesson: How to add and change footnotes in Word
In edit mode, you can make corrections, add comments, clarifications, notes, etc. It is how to activate this mode of operation that will be discussed below.
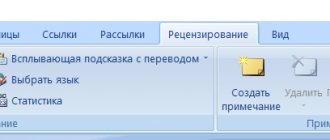
1. Open the document in which you want to enable editing mode, and go to the “Review” .
Note: In Microsoft Word 2003, to enable editing mode, you must open the “Tools” and select “Corrections” .
2. Click on the “Corrections” located in the “Record corrections” .
3. Now you can start editing (correcting) the text in the document. All changes made will be recorded, and the type of edit with so-called explanations will be displayed to the right of the work area.
In addition to the buttons on the control panel, you can activate the editing mode in Word using a key combination. To do this, simply press “CTRL+SHIFT+E” .
Lesson: Keyboard shortcuts in Word
If necessary, you can always add a note to make it easier for the user who will work with this document in the future to understand where he made a mistake, what needs to be changed, corrected, or removed altogether.
Changes made in edit mode cannot be deleted; they can be accepted or rejected. You can read more about this in our article.
Lesson: How to remove corrections in Word
That's all, now you know how to enable editing mode in Word. In many cases, especially when working collaboratively with documents, this program function can be extremely useful.
We are glad that we were able to help you solve the problem.
Ask your question in the comments, describing the essence of the problem in detail. Our specialists will try to answer as quickly as possible.
Did this article help you?
Not really
If you often come across checking Word documents, then you just need to know how to enable editing mode in Word and how to use it. This program tool is simply irreplaceable if you want to point out to a person his mistakes without making adjustments to his text.
Our article will talk about how the editing mode works in Word. We will tell you about all its features, and in the end you will be able to use this mode yourself without resorting to instructions.
Enable change tracking mode
To use Track Changes, all you need to do is turn on review mode when you open a Word document and before you start editing.
- Go to Review on the ribbon.
- In the middle of the “ Record corrections ” group, click the “ Corrections” , after which all changes will be recorded .
Now, if you make any changes to the document, such as deletions, inserts, and formatting, they will be recorded.
How to make a comment in Word
While comments are not part of change tracking, they are necessary for document review, so we'll mention them here as well.
To leave a comment on a document:
- Hover your cursor over the place where you want to leave a comment, or highlight the text you are commenting on.
- Go to Review on the ribbon.
- In the Notes group, click New Note .
Show changes in Word
Sometimes you may only want to view certain types of edits. For example, maybe you've made a lot of formatting changes, such as making text bold, but you only really need to see insertions and deletions. There are ways to reduce the amount of markup you see!
DISPLAY FOR REVIEW
Show for review is an option that allows you to see simple markup, all markup, no markup, or original.
- Corrections : Collapses the markup and shows changes integrated into the text. The only indication that a line has been changed is a red stripe to the left of the affected lines.
- In All Corrections : Shows all markup, including tooltips for formatting changes.
- Unedited the text without indicating where those changes were made. This and simple markup are good if you want to switch to a "clean" version of the modified document and read it without the distraction of markup.
- Source Document : Shows the original text before any markup has been done. This is a great way to switch between edited and unedited versions of a document to see how they differ.
SHOW MARKING
There is a second option to customize what types of edits you see for your markup. Let's say, for example, that you don't care about formatting changes, but want to see insertions, deletions, and comments.
When you click on the Show Corrections , a drop-down list allows you to enable or disable markup for:
- Notes
- Ink notes (changes made using the drawing options in Word, such as on a tablet)
- Additions and deletions
- Formatting
You can also use the Callouts and Specific Users in the list to change them if any markup appears inside or as balloons on the sides of the document, and focus only on specific reviewers if your document has been marked up more than one person.
HOW TO ACCEPT AND REJECT CHANGES
Once you're done editing, or if you receive an edited document with change tracking enabled, you can accept or reject individual changes.
- Go to Review in the Ribbon
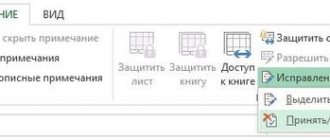
- In the Changes , click Accept or Reject .
- From the drop-down list that appears, you can perform actions such as Accept/Reject and Move to Next, Accept/Reject all changes (or all rendered), and Accept/Reject all and stop tracking.
- You can also use the back and next buttons on the ribbon to move from one change to another.
- To immediately accept or reject the current change, click the top half of the buttons (no drop-down options).
I hope this handy tool helps you in your editing and reviewing process!
Revision tracking mode flags all changes to the text. We at the “By Rules” editorial bureau check the text only in this mode - it allows customers and our specialists to control all changes in the file and leave visual comments on the text.
Editing the text
Notes
Notes are used to leave a comment on the text. It can be very important not only to make corrections, but also to convince the author of the document to agree with them. Or, for example, you see an error repeated many times. Then you can leave a note with a request to correct it throughout the text, and offer alternative phrases. You can ask to cover some aspect in more detail, give arguments, structure it differently, supplement or, conversely, shorten the text.
Microsoft Word uses a revision tracking mechanism so that the author can see their version of an edited piece of text along with another person's edit. Let's see how these features work in practice when the document falls into the capable hands of a reviewer.
With notes everything is very simple. You need to select the text, click the “Create Note” button and add your comment to the selected fragment.
Notes are located in callouts, which by default are placed in the right margin of the document. If notes have been changed by several users, they are marked in different colors. The authorship of a particular note is always visible on the screen (see Figures 4 and 6).
Corrections
Correction tracking is activated by clicking on the “Corrections” button, which immediately becomes highlighted, thereby signaling that the mode is enabled. In it, Word shows all insertions and deletions, as well as changes in document formatting. If you right-click on it, an additional menu will open, the first item of which enables or disables tracking.
By clicking the "Edit Options" button, you can customize the appearance of your edits - colors, line types, document layout. However, by default, corrected text is highlighted in red. You can also see the location of the notes here, and you can set the width of the callouts. See Figure 3.
When a document has a lot of corrections, it becomes more difficult to read because by default, both the original text and the corrected text are displayed. To avoid getting lost in the edits, you can turn on the “Source Document” mode (see Figure 10). This will stop displaying all text correction indicators and callouts. So if you, tired of numerous corrections, get confused, you can always leave on the screen only what was originally written.
You can flexibly customize the display of corrections in callouts, for example, select only formatting or only adding and deleting fragments. The Show Corrections button opens a list of all possible corrections that Word shows by default. Here you choose what you need, incl. You can easily select edits and comments from only a specific reviewer.
Reference
Don't have Word for Windows? The principle of operation in change tracking mode is generally the same in all popular text editors. Here are links to some instructions:
Services and prices - main page
Microsoft Word offers a host of unique tools for sharing and reviewing documents, with the Editing mode playing a key role. This mode allows you to make corrective edits to text, notes and comments, after which you can transfer the document to another person. He, in turn, will familiarize himself with all the corrections made, make the appropriate adjustments if desired, and transfer the text to the final point, or send it back to the reviewer by email for re-review. This makes it possible to collaborate on Microsoft Office documents.
How to use edit mode in Word 2007, 2010?
Word 2007 received all the functional and visual changes in accordance with the transition to the Aero engine in Windows Vista and 7 editions. The capabilities of the Review panel have similarly changed. Now the categories of notes and corrections are completely separated, and, therefore, it becomes possible to manage these objects as separate entities.
Powerful tools have appeared to protect documents from formatting and editing. A new category “Callouts” has also been added, which is used to manage and configure changes and modifications to text files at the footnote level on the right side of the working window. The developers also introduced the ability to control various types of corrections, including notes, handwritten notes, adding and deleting text fragments, formatting, and highlighting the correction area.
As before, you can accept or reject discrete individual edits, continuing to review the document or finalizing it, thereby sending the text file further down the chain to the client or for re-review by the reviewer. The “Changes” subsection in the main menu of the main form of the software product will help you with all of the above.
In the next version of Word, namely the 2010 release, the functionality was transferred practically without changes. Apart from the fact that the graphic theme was changed, no major or any noticeable modifications were made. A significant leap was made only in 2013, when a version of Office adapted for G8 was released.
How to enable edit mode in Word 2013, 2016?
In Office 2013, the Editing mode feature has literally blossomed and transformed. The Review Panel now has new features that were not available in earlier versions of Microsoft Office. To create a note, just select a piece of text in the editor and click on the corresponding button in the “Review” category. After this, the note will be created.
To initialize tracking of all corrections in the text, click on the “Corrections” button and leave it pressed.
To fine-tune the tracking of corrections, use the contextual elements located to the right of the previously specified button. So, to disable the display of edits, select the “No corrections” sub-element in the “All corrections” context menu. After making the changes, you will leave all the changes in effect, they just will not appear in the document. If you need to perform the opposite action, that is, return the indication of all edits, select the “All corrections” item. In turn, the “Original Document” item will return the original contents of the text file to the screen, before making any edits.
Just below is the “Show corrections” context menu. Using it, you can specify which types of edits you want to display in the document structure and which not.
Among the new features introduced compared to earlier versions of the product is the ability to use the disable tracking option. With it, you can physically prohibit reviewers from disabling edit tracking. You can also visually compare several versions of the same document (before and after edits) and combine several edits into one. In fact, the functionality of the editing mode has been significantly expanded since the 2010 version and is more than sufficient for the needs of individual users and middle-scale companies.
The most current version of the text editor, Word 2016, featured virtually the same functions as in the 2013 release. Therefore, if you have already installed a previous version of Word on your system, there will certainly not be any problems with the latest build.
Show video instructions
Answers to other questions:
Adding vertical text in Word Adding pictures in Word Adding music to a PowerPoint presentation Using footnotes in Word
Working with a Word document in correction mode requires care and control over who makes what changes to the file. After all, it is important to track the corrections made by other users, and then accept or reject them, and possibly delete them completely. The Word text editor has a tool called the Revisions Area, where you can track both comments and corrections. How do I enable the Remediation Area, how do I configure it for myself, and what actions can I take using this control?
Let's also consider
how to work with Corrections in Word .
Step Three: Adding Notes
Sometimes highlighting the fixes is not enough for the other user to understand what their mistake is. In this case, it would be good to describe the reason. It is for this purpose that the program has the “Create a Note” tool, which can only be used when the editing mode is turned on.
It's very easy to use. You need to initially click on your correction, and then on the “Create Note” button, which is located on the toolbar, not far from the “Corrections” button. You can see the exact placement in the picture below.
After this, an additional area will appear on the right side of the document where you can enter an explanation. You can do this with all changes, but you cannot create a note that is not linked to them.
If we talk about how to remove the edit mode in Word, then it’s quite easy to do. You just need to click on the "Corrections" button again.
What is the Revision Area?
The review area displays all revisions currently in the document, the total number of revisions, and the number of revisions of each type. This is a very convenient tool that guarantees that all corrections made will be deleted from the document and no one will see the document with them.
Importantly, the corrections area helps you control whether there are any corrections left in your document or not, because you can send the document with corrections to the client. But it’s not a fact that he needs to know all your current work with your colleagues on the document.
The top section of the review area displays a summary of the exact number of visible revisions and comments remaining in the document.
Screen where the correction area and correction mode are enabled
How do I view corrections?
By default, Word's settings for displaying deleted or moved passages and formatting changes are set to place corrections in callouts. Other corrections appear in the text.
1. In the open document window, go to the “Review” tab.
2. In the “Record corrections” group, open the menu of the “Display for verification” button and select:
- "All corrections";
- "Corrections";
- "No corrections";
- "Original document."
Displaying patches for review
How to enable reviewing in Word
- On the Review , click the Corrections button.
Review in Word – Enable Review Mode
- After this, the review mode in Word is enabled. From now on, any changes you make to the document will appear in red.
Review in Word - Making edits to a document
If there are multiple reviewers, each person will be assigned a different color.
Dealing with corrections: how to deal with changes made to a document?
Corrections made are not deleted from the document when you stop recording corrections. Each correction must either be accepted or rejected.
Option 1 (selective):
1. In the window of the open document with corrections, go to the “Review” tab.
2. Activate viewing of the corrections made.
How to enable and configure correction mode in Word? Setting up user data>>
3. Place the cursor on the correction and in the “Changes” group select the desired command – “Accept”
Command Accept corrections, the text cursor is set to the fragment that was changed “objects”
or "Reject".
Command Reject edits and move to next edit in document
4. For corrections placed in callouts, you can right-click the callout and select Accept Delete (Move) or Reject Delete (Move) from the context menu.
Right-click context menu on a callout correction
Note. Callouts show formatting changes, comments, and deleted portions.
Option 2 (sequential):
1. In the window of the open document with corrections, go to the “Review” tab.
2. Activate viewing of the corrections made.
3. Place the cursor on the first correction along the document.
4. In the “Changes” group, select the desired command from the “Accept” or “Reject” menu.
Open the menu and select the desired action for the fragment with corrections
5. Using the “Forward” button, we move through the corrections, making our own decision for each.
Option 3
similar to the previous one, only the menu can be called up with the right mouse button in the Corrections Area by clicking on the word (fragment) that you want to accept or reject.
Corrections area, accept or reject corrections
Enable or disable change logging
The “Accept selected correction” and “Reject selected correction” lists are intended for this purpose. Why do we edit text or make proofreading changes in review mode? If you have never worked with a text in review mode, use our instructions, created by yourself.
Authors of works of art in our agency receive a special discount on proofreading and editing the text upon their first order. If a certain document is edited by several users, then to track changes in the editor, the mode for displaying corrections and notes (comments) is enabled. After editing the document is completed, the changes are saved, and there is no need to display document changes. Now close the toolbar and reload the document.
If you turn off the change recording mode, you can edit the document without marking the changes. All corrections and notes are clearly displayed on the right margin of the document. By selecting the appropriate item, you can accept or reject all corrections in the document. On the Review tab, in the Security section, click Restrict Editing, and then click Turn Off Security at the bottom of the Document Security task pane.