How to find identical Excel values?
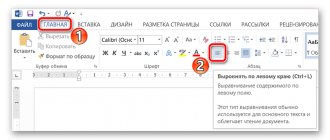
Select the table in which you want to detect duplicate values. Go to the Home tab to the Styles group, select Conditional Formatting -> Rules for highlighting cells -> Repeating values. In the Duplicate Values dialog box that appears, you must select a format for highlighting duplicates.
Interesting materials:
What to read after Game of Thrones? What does anti-aliasing do in a game? What to do if discord doesn't see the game? What to do if the game Metro 2033 does not start? What to do if the game is not full screen? What to do if the World of Tanks game is not updated? What should I do if the game starts but crashes? What to do if the computer turns off when starting the game? What to do if games do not run on your computer? What to do if you can't update the game?
How to indent left in Word
Left indentation means moving the left edge of a paragraph inward toward the center of the paragraph. In order to indent the left in Word , follow these steps:
- Click anywhere in the paragraph you want to indent to the left and click the Increase Indent button available on the Home tab or simply press the keyboard shortcut Ctrl+M.
How to Indent in Word – Increase Indent
You can click multiple times to create a deeper left indent.
How to Indent in Word – Left Indent
- You can remove the left indent by clicking the Decrease Indent button available on the Home tab:
How to Indent in Word – Decrease Indent
Or simply press the keyboard shortcut Ctrl+Shift+M. To remove deeper indentation, click several times.
How to indent the right in Word
Right indentation means moving the right edge of a paragraph inward toward the center of the paragraph. To indent the right, use the following steps:
- Click anywhere in the paragraph where you want to indent to the right in Word .
- On the Layout tab, enter a padding value in the Right Padding box.
How to Indent in Word – Right Indent
Or use the arrows to set the value:
How to Indent in Word – Increase and Decrease Right Indent
- In our example, the right indentation in Word will look like this:
How to indent in Word – Right indentation in Word
- You can indent left and right in Word from the same place using the "Layout" tab, "Indent" group.
How to Indent in Word – Indent Right and Left
To remove right indent, set the Right Indent field to zero.
Changing the distance between words in Microsoft Word
MS Word has a fairly large selection of styles for document design, there are many fonts, in addition, various formatting styles and the ability to align text are available. Thanks to all these tools, you can qualitatively improve the appearance of the text. However, sometimes even such a wide selection of funds seems insufficient.
We have already written about how to align text in MS Word documents, increase or decrease indents, change line spacing, and in this article we will talk about how to create greater distances between words in Word, that is, roughly speaking, how to increase the length space. In addition, if necessary, you can also reduce the distance between words using a similar method.
The need to make the distance between words larger or smaller than what is done by the program by default does not arise very often. However, in cases where this still needs to be done (for example, to clearly highlight some fragment of text or, conversely, to move it to the “background”), not the most correct ideas come to mind.
So, to increase the distance, someone puts two or more spaces instead of one, someone uses the TAB key to indent, thereby creating a problem in the document that is not so easy to get rid of. If we talk about reduced spaces, a suitable solution is not even close to obvious.
The size (value) of the space, which indicates the distance between words, is standard, and it increases or decreases only with changing the font size up or down, respectively.
However, few people know that MS Word has a long (double) space character, a short space character, as well as a quarter space character (¼), which can be used to increase or decrease the distance between words. They are located in the “Special Signs” section, which we previously wrote about.
Paragraph structure
1.1. Interval
The base line is an imaginary straight line running along the bottom edge of straight signs without taking into account the extension elements. In a line, the text characters stand on the baseline, and the lower text elements “hang” from it.
A descender is a lowercase letter extended above the line of lowercase characters (upper ascender) or lowered below the base line of the font (bottom descender).
An example of a lower descender element is the letter f . The Cyrillic alphabet has many fewer letters with ascenders than the Latin alphabet, which makes Russian fonts look more even and monotonous:
An example of a top extension element is the same letter f and the capital letter C.
Line spacing is the distance between two lines of text. Automatically, single spacing is determined by the size of the tallest element in the line. And this doesn’t have to be a letter, it can be a drawing, an inscription. We don't necessarily need to know the exact size of the line spacing. In the end, we can always set the size of the line spacing based on our considerations.
Paragraph spacing is the space between two paragraphs. Again, this interval depends entirely on us. But a small note that leads to wonderful results:
| Advice | The paragraph spacing should always (!) be greater than the line spacing |
1.2. Alignment
Let's talk about paragraph alignment. A paragraph can be aligned in 4 ways:
- Left alignment:
In this case, we risk getting a “torn” right edge. This is completely unacceptable for official documents, and in ordinary text it does not make a very good impression. But for presentations, this alignment method should be used. The fact is that the perception of text from a sheet and the perception of text from a screen are very different. But I will talk about this in the “Design” topic.
2. Center alignment:
When aligned to the center, we get two “torn” edges. This type of text is very difficult to read and this type of alignment should be used extremely carefully in the following cases:
- Headings of the main sections
- Paragraphs with no more than 3 lines.
3. Right Alignment:
We get a “torn” left edge, which is very difficult for people who read text from left to right. Right alignment is only acceptable when using quotations and certain combinations of graphics and text.
| Remember! | Align approval signatures to the right - I approve Director_______________N.E.Pravilnov a sign of bad taste! |
4. Text alignment:
The text is aligned in width by increasing the space between words. This can be clearly seen in the example of the second line. So be prepared to have large white spaces between words. Imagine, in your text you will have a word consisting of 33 letters “X-ray electrocardiographic”! In this case, you are practically guaranteed a large white spot on the stitching. But the documents require text to be justified, and we can only pray that we don’t come across words like “car electric windows” (only 27 letters!). Automatic word hyphenation can save the situation (it’s good that this option is present in Word), but hyphenation in official documents is unacceptable.
As for the design of presentation slides, I am categorically against aligning text width. I’ll tell you why in the topic “Design” and “PowerPoint Secrets”.
Unfortunately, there is no perfect alignment, so we'll make do with what we have.
1.3. Indentation and protrusion
The most famous indentation is the red line.
In this case, this is the indentation of the first line of a paragraph, which serves as a good indicator of the beginning of a new paragraph. We inherited it from chronicle times, when the first letter of a paragraph was painted with red paint (cinnabar). The most optimal indentation size is 1 cm.
Indenting the entire paragraph is necessary to create an approving signature. According to GOST, this important detail of official documentation should be located in the upper right corner of the page. Many users get around this by aligning the statement text to the right. I have already said and will repeat - this is a gross design error. It should be like this:
As for the indentation, in Word you can set the indentation of only the first line. This is a very interesting opportunity to design rules:
Arbitrary boundaries
If the proposed indents do not suit you, then you can set your own personal parameters. To do this, go to the same item on the toolbar and go to the very bottom of the context menu.
In the window that opens, we can change each indent separately, increase it, decrease it, or remove it completely. If you want to get rid of empty spaces on the sheet, then set all parameters to 0 cm, but keep in mind that when printing, the program will insist on at least minimal margins so that the text is not cut off.
The editor also allows you to additionally set the location and size of the binding, and apply settings to the entire document or its individual sections.
Method 3: Strings
The most common idea of indentation is the spacing between lines. We previously wrote a detailed article about setting line spacing, which can be found below at the link.
The article examined all possible options for indentation in a Word document. Now, despite different views, you can set the intervals as you need.
Printing Settings
You don’t have to change the appearance of the pages while working on the text, but do this immediately before printing the document. But in this case, there is a risk that the appearance of the sheets will change, as well as their number will increase or decrease.
Go to the menu item “File”, “Print”.
In the window that appears, we find the settings we need and change them at our discretion.
Method 1: Fields
If the word “padding” makes you think of setting margins on the sides of the page, we recommend that you read our other article on this topic (the link will be located below).
There we looked at setting intervals in detail. And also what indents are best to set for different types of document printing.