A bootable flash drive is a drive from which you can start a computer or laptop without a hard drive or operating system. It is used to restore, reinstall the operating system, load a simplified portable (lite) version of the OS, in the environment of which most familiar programs are launched. With bootable media you can do backups, testing, file recovery, virus removal, etc. – a useful tool for a tester, system administrator, service center employee, and even for a home computer.
Normally copying content from an image does not create a boot record on the flash drive, which means you cannot start the computer with it. For this, utilities such as Media Creation Tools from Microsoft or from third-party manufacturers are used. Powerful tools allow you to create multiboot flash drives - drives where you can place two or more images. For example, for installing various operating systems, creating combined media: installation media and with Win PE.
Preface
Good day, Habr. Just recently, while reading Habr, I came across the article Life-giving Flash Drive, which described a method for creating a multiboot flash drive with a set of useful utilities, various systems, etc. And everything would be fine, but here the dog is buried - let’s pay attention to this comment thread, which discusses the functionality of multiboot in systems with UEFI. Thus, I began my own investigation to look for a universal way to solve this problem. You didn’t have to look far - ever since the crazy popularity of the Windows XP Zver Edition build, its developers have used a set of utilities called RMPrepUSB to write the build to a USB drive. The assembly has faded from people’s memories, but the utility package project itself continues to develop and grow stronger. Well, the basis itself is the Easy2Boot project. While studying their website, I found a universal way to create a multiboot flash drive that can contain any distribution, LiveCD or floppy disk images that you want to add. So, let's start creating such a miracle flash drive.
Programs for rare cases
Sometimes you need to create a specific boot drive, for example, to reinstall MacOS. Utilities have been developed to work with a variety of Linux images (dozens of distributions and their versions).
UNetbootin
A tool for downloading installation and boot disks with Linux distributions, creating bootable USB media based on them (you can specify your own ISO file).
- In the first drop-down list, select your Linux distribution.
- To the right is his version.
- Enter the path to the ISO with the distribution.
- In the “Type” list, select “USB Device”, otherwise you can “kill” the disk with the operating system.
- “Media” list - select a flash drive.
- To start recording, click “OK” and confirm formatting.
Universal USB Installer
A tool for creating an installation drive with any Linux distribution.
- In the first list, enter the name of the distribution.
Activating the “Download link” option will open a browser with a page for downloading the corresponding files.
- Click the “Browse” button to open the window for selecting an image on your hard drive.
- Below, select a flash drive, a new file system and write with the “Create” button.
DiskMaker X
A utility for MacOS 10.10 and later, capable of creating and beautifully designing a bootable USB flash drive for reinstalling MacOS from a ready-made image or installer from the App Store. The functionality allows you to decorate the distribution interface in a couple of clicks.
Install Disk Creator
A utility for creating bootable flash drives of different versions of MacOS on the same operating system.
Preparing a flash drive
Go to the folder with E2B and run the file _ISO\docs\Make_E2B_USB_Drive.cmd
.
Attention:
if you did not install, but unpacked RMPrepUSB, then at the first stage you will be asked to specify the path in the RMPrepUSB folder.
We will be asked to indicate the drive number from the list provided, will be asked if we really want to format the drive and will be asked to select a FS. And here's attention!
We choose FAT32 - we boot into UEFI without problems, but there is no support for files >4 GB, and vice versa - NTFS without UEFI, but with support for large files.
If your images weigh less than 4 GB each, then feel free to choose FAT32. With NTFS it’s a little more complicated, namely, the flash drive will not boot into UEFI, but if you boot it into a regular BIOS and then select an image for UEFI (more on that below), then Easy2Boot will rewrite the MBR of the flash drive and it will boot into UEFI, provided that in that image there is support for it (the presence of the files efi\bootia32.efi
and
efi\boot\bootx64.efi
) We follow the difficult path - we write N (that is, we format it in NTFS), a confirmation window will pop up, click OK and wait.
After formatting, the E2B files will be copied and the message “Press any key” will appear on a green background. Screenshots
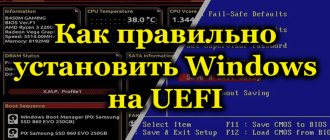
Rufus
You can download the program here. Launch the program and set the following parameters:
- Device – first select the exact flash drive or disk on which the image will be written. If you cannot find the required media, then make sure that the future EUFI flash drive is inserted into the port. If you are using a system unit, try connecting to the rear USB ports.
- Download method – Click on the “Select” button and indicate the path to the already downloaded image. If you have installed a new version of the program, then you can download the image from the official website, to do this, click on the arrow below and select the “Download” type - click on the button and select the image you need.
- Image parameters - there are two options here: “Standard installation” - this is the image option from which you will install the system; "Windows To Go" is a bootable Live version that does not require installation and runs a virtual OS.
- The partition scheme is MBR (for Legacy/CSM) and GPT (which is what we need, since it uses UEFI).
- New volume label - specify any name, it will be displayed in the system and in the BIOS.
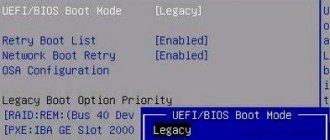
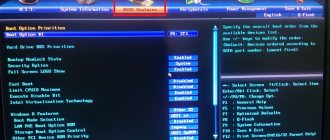
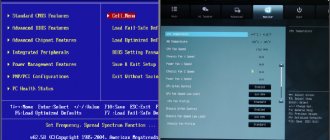
- File system - if you choose NTFS, then before installation you will need to go into the BIOS or UEFI, go to the “BOOT” section and turn off the “Secure Boot” mode.
- Click on the start button.
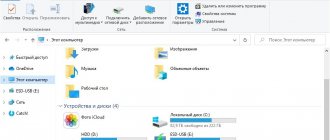
Folder structure or where to put images?
We go to the drive, see the files and the _ISO
. I will briefly describe the structure (details are on the website):
- ANTIVIRUS
- upload images of anti-virus LIveCD (Kaspersky, Dr.Web and others like them) - AUTO
- drop any image into a subfolder with the desired name (for example, along the path Ubuntu\My_Ubuntu_Distro.iso) - LINUX
- accordingly, we drop any Lunx image into this folder. - MAINMENU
- drop the image into this folder and it will appear in the Grub4DOS main menu upon boot (not in the submenu, more on that later) - UTILITIES
- we throw diskette images here - UTILITIES_MEMTEST
- the same thing, but, alas, I can’t say more precisely - WIN
- here we will put images prepared for loading into UEFI. More on this later - WINDOWS
- from the subfolder structure it is easy to understand that for each Windows family you need to put the image in its corresponding subfolder.
Next, run RMPrepUSB, select the drive in the list and press Ctrl+F2, agree and wait a couple of seconds. The program will play tricks with the files and you can boot from the flash drive.
Windows installation
If the previous steps were completed correctly, after the computer is rebooted, the standard installation of the operating system from the flash drive will begin. Click “next”, “install”, accept the user agreement, select full installation.
Now you need to open the command line using the combination Shift + F10. Next, enter the following sequence of commands:
diskpart (after each command you must press the enter button) sel dis 0 clean convert gpt exit exit
More details at this point. Using these commands, you will delete all data from the HDD, mark it as GPD and format it for subsequent system installation. Click "update" and "next".
The installation of Windows 7 on the HDD of your personal computer will begin. During the installation process, the PC will be rebooted several times, after which you will only need to specify its name and password, time zone and set a list of users. Once the installation is complete, Microsoft Update will download and install all the necessary patches and drivers, and you can use your computer.
What does it all look like?
A working example - I threw different images onto the drive, the structure is as follows:
- _ISO\LINUX\linuxmint-17-xfce-dvd-64bit.iso
- _ISO\WIN\ru-en_win7_sp1_x86-x64_18in1_activated_v2.imgPTN
- _ISO\WIN\Boot_USB_Sergei_Strelec_2014_v.6.9.imgPTN
- _ISO\WIN\ru_windows_8_1_pro_vl_x86_dvd_LITE_3.iso
Screenshots
Main menu of the flash drive
Linux submenu
Submenu with regular Windows ISO images
Submenu with images for UEFI
When loading the image for UEFI, we will be asked if we really want to overwrite the table with a flash drive partition? Press Enter
And this is what the bootloader of any image for UEFI looks like. Instructions for returning to the main menu are below.
We boot into the BIOS, select the desired UEFI image, switch UEFI back and get a flash drive with one partition containing the files of this image.
Accordingly, if this image supports booting into UEFI, it will appear in the list of devices from which you can boot. Attention!
If you booted from images prepared for UEFI, then you will notice that the next time you boot from the drive there will be a boot menu from that same image.
Where are all the ones we put on the flash drive? And the files on the flash drive are not the same... There are two options - select the top item EASY2BOOT
or run the script
e2b\RestoreE2B (run as admin).cmd
.
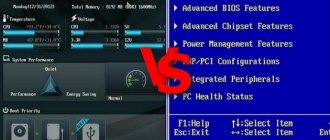
Advantages and disadvantages of UEFI compared to BIOS
It is difficult to find a user who is unaware of the low-level BIOS program stored on the motherboard chip of a computer device. It has existed since the days of archaic MS-DOS. At the same time, the old BIOS was improved not very actively and clearly did not keep up with the evolution of the personal computer, which led to the need to introduce a new generation of low-level software. In 2007, major companies Intel, AMD, Microsoft and computer manufacturers adopted the new UEFI specification and the lion's share of PCs available for sale today uses improved firmware instead of the classic BIOS. Updating from BIOS to UEFI will not work, since the software must be supported by the hardware. At the same time, backward compatibility is present - most UEFI versions provide the ability to emulate BIOS, which may be required by users when installing a not-the-new OS that requires a BIOS.
Benefits of the new specification:
- Support for disks with a capacity of more than 2.2 TB, which is due to the use of a partition structure in the GPT partition instead of MBR.
- The OS loads much faster.
- It is possible to have a graphical interface in various languages and mouse support.
- There is an OS boot manager that allows the device to boot from drives that do not have their own boot loaders.
- The presence of a network driver, which allows UEFI to be updated without the need to start the operating system.
- Possibility of expanding functionality by installing third-party software and drivers.
- Secure Boot support.
- Functioning over a network, which makes it possible to configure or debug remotely.
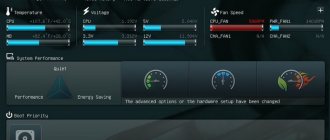
The interface and functionality of UEFI may differ on different computers; many PCs today work with new firmware, but with the options and appearance inherited from the BIOS.
Among the shortcomings of the specification:
- No support for 32-bit OS. It is possible to install an old or 32-bit operating system while being compatible with the hardware by switching UEFI to BIOS emulation mode, which will also disable many firmware functions.
- HDDs with MBR partitioning are not supported (due to limitations on disk capacity up to 2.2 TB and the number of volumes up to 4, the standard is being replaced by GPT).