When working in the word processing program Word, you often need to insert tabular data. When creating tables, there is always a need to add new rows and columns. However, not every user knows about all the available ways to insert these table elements. Therefore, below are detailed instructions on how to add a column to a Word table.
The sequence of steps will be demonstrated in Word 2013 and 2007. But in other older and newer versions of the program, the execution functionality remains approximately the same.
Let there be some table with data on the page:
In the 2013 version of the program, there are three ways to add columns to Word tables.
Press Tab to add rows
The easiest way to add rows to a table is to place your cursor in the cell in the lower right corner of the table and press Tab on your keyboard.
This will add a new line. Every time you want to add a row, you can select the cell in the lower right corner and press Tab again. If you highlight any other cell and press Tab, the cursor will move to the next cell. Only in the last cell a new row is added automatically.
NEXT:
Tables and other formatting controls
Conclusion
We looked at how to add a column to a table. Use this opportunity to present your data beautifully. Work will become faster and more comfortable.
Often when working with tables in the Microsoft Word text editor, you need to add a row or an entire column. It’s also good if such a need arises first by creating a table, and if you have already managed to fill it out and the table is not small. What then, start all over again? The developers have provided for such moments, so there is no need to redo the table. It is enough to decide where in the document another column is needed and add the column to the table in Word.
Click Delete to delete rows and columns
You can also quickly delete rows and columns by pressing the Delete key on your keyboard. First you need to select a row or column. The fastest way to select a row is to click in the area directly behind the first cell on the left. You will notice that the mouse pointer has flipped over.
When you see the upside down pointer, you can click to highlight the entire row. Now press Delete on your keyboard to get rid of the entire line.
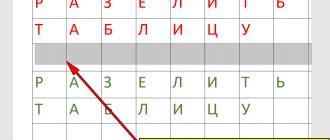
To select a column, move the mouse pointer to the first cell of any column. The pointer changes to a down arrow symbol. Now click to select the entire column.
Press Delete on your keyboard to delete a column.
How to work with tables in Word
Greetings, dear reader! You've probably noticed that we receive a lot of information in tabular form. This could be a list of products with characteristics, a weather forecast for the week, a transport schedule, and so on. Tables improve the perception of information, and where necessary it makes sense to use them.
Today we will look at the creation and design of simple tables in the Word text editor.
How to create a table in Word
Before you create a table, you need to decide on the number of rows and columns. Before inserting, you must place the text cursor at the place in the document where the table will be placed.
If its dimensions do not exceed 10x8, then go to the Insert and in the Tables , use the mouse pointer to select the required number of cells and left-click to insert the table into the document.
We will get cells that are absolutely identical in width and height. Of course, we can change their parameters. But if the table is small, then you can draw it. In the same Tables there is a Draw table command .
By turning on this mode, you can draw rectangles and lines, just like in a graphics editor. The cursor will take the form of a pencil. If you need a table with a large number of rows or columns, then it is better to select the Insert table .
And just specify the required number of rows and columns.
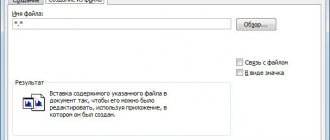
Here you can additionally specify auto-fit parameters for the width of table columns:
- Constant : Auto aligns columns within the available table width; when specifying the exact size, the width of one column is set.
- By content : the original table has cells with a minimum width, their sizes will change as text is added to them.
- By window width : the same as constant in Auto mode
Using the Ribbon Menu to Add Rows or Columns
If you have a table in your Word document, the Ribbon menu lets you see some additional options for adding rows and columns. You can access these options using the Layout tab in the ribbon menu at the top. The only confusion is that for some reason the menu bar has two tabs called “Layout”. You need to select the "Layout" tab on the right - the one next to "Table Design".
Once you select it, you will find several table-related options here. We'll focus on the Rows and Columns subsection because our goal is to add rows and columns.
If you want to insert a row above a cell selected in a Microsoft Word table, click Insert Above. To add a row below the selected cell, click Insert Below.
You can also quickly add columns using the buttons provided here. "Insert Right" will add a column to the right of the cell. Likewise, Insert Left will add a column to the left of the selected cell.
You can also click on the arrow icon located to the right of the Rows and Columns heading to open up some more options.
Here, you can click "Insert Entire Row" or "Insert Entire Column" to add rows or columns.
More with Microsoft Word
It's no surprise that you can do so much more with Word, even with tables, including changing formatting. You can also use Outline View when you're working with large documents and inserting animated GIFs, among other tasks.
You can find Microsoft Word in Microsoft 365. For home use, Microsoft 365 (formerly O365) is currently available in three flavors, including Family, Personal, and Home & School. The former is priced at $100 per year (or $10 per month) and includes Word, Excel, PowerPoint, OneNote and Outlook for Mac. Membership covers up to six users. The personal version is for one person and costs $70 per year or $6.99 per month. Finally, the student plan is a one-time purchase of $150 and includes Word, Excel, and PowerPoint.
Business users can choose from Basic, Standard and Premium plans starting at $5 per user per month.
Delete rows and columns using the Ribbon menu
Microsoft Word also allows you to delete rows and columns using the same ribbon menu. Click the Layout tab next to Table Design.
Go to the Rows and Columns subsection. Click "Delete" to open options for deleting rows and columns.
Select Remove Columns to remove the columns you selected from the Word table. You can also click Remove Rows to remove selected rows from the table.
Reducing the field
If you don’t know how to delete a row in a Word table, then our recommendations will help you cope with the task. To reduce the field, if some columns are no longer needed, you can delete a line/column.
Removing an element
You can operate in Word through the “Layout” tab or simply through the pop-up menu. But there is another option - through a keyboard shortcut. Let's consider all the methods in more detail.
- Place the cursor where you want to delete. Right click. In the menu, go to “Delete Cells”. An additional window will open, where you will be given the opportunity to delete both a row/column and an individual cell (just watch out for the row shift in the latter case: the integrity of the rectangular shape will be broken, a recess will appear - it can be removed by moving the border of the outermost cell).
- Click the mouse on the desired place, in the “Layout” tab that appears at the top of the sheet you will see a button labeled “Delete”. By activating it, you will receive a window similar to that described in the previous paragraph.
- Move the mouse to the left border of the line or to the top border of the column. Hover over the line until a small black arrow appears. By clicking, you will select the entire row/column. All you have to do is press Ctrl+X and they will be deleted. The difficulty of this method is that you can only remove what is selected.
How to remove several rows/columns
When you need to remove more than one line, select the required number of cells in a column. To remove columns, we take, by analogy, a certain number of cells in a row. Next, follow the links we described in the instructions above.
So, we looked at how to remove a column from a table in Word and add it. The same methods work when working with lines and individual cells, but with slight differences. The process is simple; after following the recommendations, you will be able to do everything yourself.
Adding rows and columns using the context menu
Another quick way to add rows and columns is to use the context menu in Microsoft Word tables. To do this, select any cell, column or row, right-click and select “Insert”.
You can choose Insert Columns Left or Insert Columns Right to add columns to the left or right of the selected cell.
Alternatively, you can click "Insert Rows Above" or "Insert Rows Below" to add rows above or below the selected cell in your table.
You'll also find similar options in the Insert button, which is located in the font selection menu that also appears after right-clicking on a cell.
Third way
This method is available only in versions newer than 2010. You must move the mouse cursor over the border (line) separating the columns of the table. As a result, a graphical “+” button will appear:
Next, you need to click on this graphic button and a new column will be inserted on the right.
Each insertion method will result in a new column in the table:
Using the context menu to delete rows and columns
Removing rows and columns is quite simple using the context menu. An easier method is to right-click inside any cell and then select the Delete menu in the box at the top (the one that displays the font settings options).
Here you can click "Delete Rows" or "Delete Columns" to remove rows or columns from your table.
Alternatively, you can select a row or column in your table and then right-click. Now click on Remove Columns to remove the selected columns. This option will be called "Delete Rows" if you have selected one or more rows.
If you found this article helpful, you're sure to have a lot of fun nesting a table within another table in Word.
POST:
How to Nest a Table Within a Table in Word
How to Get Offline Maps and Navigation on iPhone
How to survive a long delay at the airport
How to insert a table into a Word document
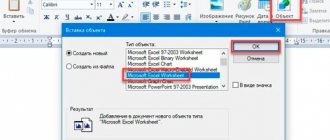
A table is inserted in Word as follows. Go to the main control panel, select the “Insert” function, “Table” and the number of columns that we want to see in this table. (Picture 1).
These columns can be increased and decreased depending on how many times you move the left mouse button. If you want to have a large table, you can select all the columns and then get a table with many cells.
How to insert a table into a Word document? As it turned out, everything is very simple, but that’s not all. Next, you will be presented with step-by-step instructions on how to create a table in Word for a beginner.
How to insert text into a table in Word
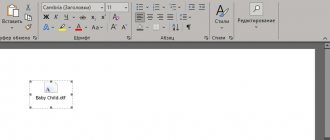
To do this, open the “Insert” section and select the “WordArt” button from the menu. A whole list of different text formats will open in front of you. Choose any one and replace it with your text. (Figure 2).
After clicking the "OK" button, you will have text in the table.
How to make a line in a table in Word
To make a line in a table in Word, place the mouse cursor in any field and select the “Designer” section, then “Border” and “Horizontal Line” (Figure 3).
As shown in Figure 3, the line was successfully inserted into the table cell. In this way you can insert lines in other columns of the table.
How to make a table invisible in Word
If you need to make a table in Word invisible during printing, then to do this you should use the “Design”, “Border”, “No Border” functions. (Figure 4)
First, you need to select and then apply these sections, which are presented in the fifth figure. Now, as you can see, the table has become invisible.
How to make a bold table in Word
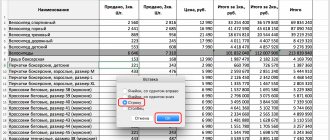
Making a table bold in Word is quite simple. To do this, we need to select the entire table again by clicking on it once, then select the menu in the Word document “Borders” and “Borders and Filling”. (Figure 5).
Then you should set the color to black and the table line size to 2.25 in thickness. Next, click on the “OK” button and the table will be displayed in bold color.
How to make numbering in a table in Word
To set numbering in a Word table, first select the table itself, then select the numbering item, and set the numbering values that we need (Figure 6).
Numbering can be selected not only from numbers, but also from letters of the Latin alphabet and Roman symbols.
How to make a frame in a table in Word
To create a frame in a Word table, you will need to open the “Borders and Fill” menu and select from its functions – “Frame” (Figure 7).
After that, click “OK”, and the entire selected table will turn into a frame.
How to insert a row and column into a table in Word
To insert a row in Word, click on any cell in this table, and in the top control panel “insert from below” or “insert from the right” (Figure 8).
Thus, you will install new cells and columns in the created table. They can be made in large quantities.
How to insert text and table name before a table in Word
When you have created a table in Word, you can fill it with some information. For example, add text. Inserting text into a table is quite simple. To do this, move the mouse cursor over a certain area in the table and write something (Figure 9).
Thus, we inserted text in front of the Word table.
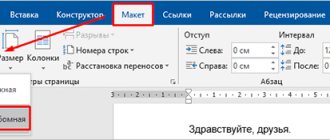
How to insert a table in Word in landscape view
To insert a table in Word in landscape form, you need to set the following parameters – “Orientation” and “Landscape” mode (Figure 10).
Using this option, you will set up a landscape table. So, we got acquainted with Word and learned how to insert a table into a Word document and also used its capabilities.
Conclusion
In this article, we looked at the question of how to insert a table into a Word document. Of course, this program has many other features. But the options listed above are the basics that will help beginners.
And especially for those who make money via the Internet and constantly write texts. Using these Word functions will help you not only create tables, but also use them for regular text.
Using tables, you can create various reports, events and business-friendly documents.
Best regards, Ivan Kunpan.
PS You will find even more articles on working with Word on the blog:
(How to insert a picture in Word, How to put emphasis, How to correct errors in Word, How to connect a broken table in Word).
Source: https://biz-iskun.ru/kak-vstavit-tablitsu-v-dokument-vord.html
Change your appearance
You can not only edit elements and the entire table, but also change their appearance. To do this, click on the object and go to the “Table Designer” menu item.
Here you can:
- use ready-made templates, which are visible in the screenshot above;
- paint cells in any color;
- change the appearance of borders, add and remove them.
Make your document even more beautiful and easier to read with these features.