- 2shared
- 0Facebook
- 2Twitter
- 0VKontakte
- 0Odnoklassniki
Very often, when working with text in the Word editor, users find that the spaces between words are too large. The problem here may lie either in incorrect formatting techniques or in the inattentiveness of the typesetter, who allowed the insertion of extra characters. Long spaces are a common occurrence when articles are copied from the Internet or generated after OCR of scanned documents. The problem seems serious, especially when it comes to voluminous texts with multiple errors, but in fact the issue is solved quite simply. We will tell you how to remove large spaces between words in Word in this article.
Gaps when aligned to width
The most common reason for the appearance of long spaces is the alignment applied to the text on both edges. In this case, the words are stretched and large spaces are formed between them. Certain fragments may look completely ugly.
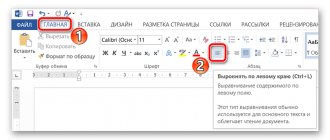
The way out of this situation is to change the alignment method. Select a piece of text that you want to format in a new way, and in the “Paragraph” on the “Home” , click, for example, “Align Left” ( Ctrl+L ). The words will shift, and the distance between them will decrease to the standard one familiar to the eye.
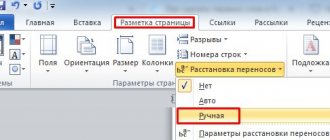
If the width alignment is determined by the document design requirements, you will have to look for another way to remove large spaces between words. Alternatively, you can play around with inter-character intervals, but it will still be difficult to achieve an acceptable result with such manipulations. Therefore, there is nothing left to do but set up transfers. Open the "Layout" , click the "Hyphenation" and select the "Auto" .
That's it, now the program will automatically make hyphens where possible, and the spaces between words after such editing will become smaller.
Reason 5: word wrapping
How to remove large spaces in Word? Continuing to explore this issue, we can highlight one more method. For example, your document may allow word hyphenation. But they have not yet been implemented. In such a situation, follow this simple algorithm to reduce spaces:
- Select all the contents of your document. To do this, you just need to hold down the key combination “Ctrl+A”.
- Now take a look at the menu at the top. Click on the “Layout” tab to move on to the next step.
- Find the Page Setup group. After that, click on the “Hyphenation” component.
- You will be offered several configuration options. You just need to specify the “Auto” item.
- As a result of such elementary manipulations, hyphens will appear in the part of the text that you highlighted. This will solve the problem of large gaps.
Why is this happening? The program gains access to an action such as word wrapping. Consequently, the content on the page is redistributed. Everything looks more compact and neater.
Incorrect tabulation
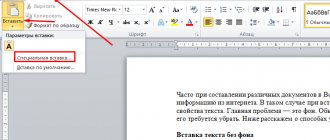
If large spaces in Word are not observed in the entire text, but only in certain places, then tabs may have been inserted between words. To find out whether this is true or not, first turn on the display of hidden formatting elements by clicking the special button in the “Paragraph” of the top panel.
Now look to see if there are any right-pointing arrow icons in the text. These are the symbols that indicate tabulation (inserted with the Tab ), adding a gap between words.
Remove all tabs or replace them with standard spaces if necessary to separate words.
If you have a large number of tab stops, use the Find/Replace tool. Copy a tab character by selecting it and pressing Ctrl+C . the Find and Replace dialog box (called by Ctrl+H or the corresponding button in the Editing ).
Now paste the tab character saved in the buffer into the “Find” line by pressing Ctrl+V (it will appear as a long indent), and enter a space in the “Replace with” line or leave it blank.
Start the replacement process. Unnecessary tabs will be removed, and large spaces will disappear along with them.
When marking complex text, tab markers are often used, and there may be several of them. Place the cursor on the line with large spaces and look at the top horizontal ruler to see if there are markers there.
If necessary, remove them by simply dragging them outside the ruler. Then remove the tabs. This way you will solve the problem of large distance between words.
Non-printing characters or formatting marks
To mark up a document in Word , characters are used that are not displayed on the screen. They may be the cause of long spaces in the text. To check this and fix the problem, first, you need to display all these signs and delete them.
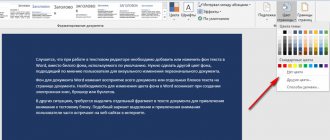
Even characters, spaces or paragraphs have their own graphic display on the screen. Formatting marks can be shown or hidden. This is done with the “show all characters” button on the “Home” , or with the key combination “CTRL+*” .
Each sign has its own display. Thus, a space is represented by a dot, a tab by an arrow, and a paragraph mark by a special character. If there is hidden text in the document, it will be underlined with a dotted line. A soft hyphen is represented by a hyphen where words will be moved to the next line.
Tabulation and object snapping
To enable or disable the display of hidden characters, and also to configure which ones to display in Word 2007, you must follow these instructions:
- Click the Microsoft Office button.
- Select the “Settings” section -> “Display”.
- The “Always show these formatting marks on screen” section will be on the right. In it you can check the boxes next to those items that are needed.
1 In Word 2010, the same “Options” item can be found in the “Help” section. This section is located on the “File” tab. The following steps will be the same as in Word 2007.2. In Word 2019, the options section is located in the “File” tab. Just like in Word 2007 and Word 2010, you can change the formatting marks that are displayed in the appropriate section.
End of line sign
Another reason for a long space may be the end of line sign. It appears as a curved arrow. To solve the problem you need to remove this formatting mark.
This sign may appear if you use justification. When the last line of a paragraph contains fewer characters than can fit. Then the words stretch out, creating large spaces. It is in this case that an “end of line” .
In order to check whether this is the cause of the large gap, it is necessary to display all hidden characters. Then, pay attention to whether this character is at the end of the desired line. If there is one, it must be removed.
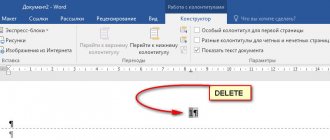
You can remove such a sign like all others. You need to select it, then press the “DELETE” or “Backspace” . Then the long distance in the sentence will be replaced by ordinary ones.
Tab characters
If text alignment does not solve the problem of large spaces, it may be a tab stop issue. Especially if the text or document used was not previously formatted by you.
Tab in a document is responsible for indentation and alignment of text. This happens using the TAB . This way you can, for example, select a paragraph in the text.
Tabulation
In hidden formatting characters, tabs are represented by an arrow. Having displayed it, you can see whether it is in the sentence by replacing the space. If this is the case, then you need to remove the tab, then there will be no long spaces.
There are several ways to remove a tab. The first method involves manual removal. You need to highlight the arrow and press the “DELETE” or “Backspace” . After this you can put regular spaces.
If there are too many such sections of the document, manual deletion will take a lot of time. You can delete everything at once using the “Replace” . It is located in the “Home” , “Editing” .
Replace
In addition, you can call the “Replace” function with the keyboard shortcut “CTRL+H” . But first you need to copy the tab stop section. This can be done as follows: select it, right-click and select “Copy”, or press “CTRL+C” .
Next, paste the copied tab into the “Find” . In this case, you can use the right mouse button and select “Paste” or press “CTRL+V” . “Replace with” line .
After clicking on “Replace All” , Word will notify you how many replacements have occurred. Then the problem of large white space will be eliminated in the entire document.
Multiple spaces
It is possible that the reason for the large distance between words is not one, but several spaces. This can happen if you copy information from the Internet, where the text had such formatting, or if you accidentally put them in.
To notice multiple spaces, you need to enable hidden formatting marks. In places where the space is too long, there will be several dots. Then we can say that the reason for the large distance between words will be several spaces.
You can fix this error as follows. You need to select an area with several spaces, then delete them and put only one. If there are many such sections in the text, you need to use the “Replace” . As with tab, it will change two or three spaces to one.
In order to use this function, you need to open it and in the “Find” type the number of spaces that appear in the text. In the “Replace with” you need to type one space and click the corresponding button.
Replace
If there are different numbers of spaces in different parts of the text, you need to use the “Replace” function a certain number of times. For example, first type two spaces in the search, replace them, then three, four, and so on.
Removing extra spaces
Large spaces in Word are often such for the simple reason that instead of one, in some places several spaces are inserted at once - two, three or more. You can verify this by turning on the display of hidden formatting marks. Spaces will be indicated by dots, and if you find several dots between words, it means there are extra spaces.
Removing them seems to be as easy as shelling pears, but sometimes there are a lot of similar spaces in the text. How to act in such a situation? The right thing to do is to resort to the find/replace tool, which we already used when removing tabs. To open the desired window, click on the “Replace” in the “Editing” (or press the key combination Ctrl+H ). Next, put two spaces in the “Find” field, and one space in the “Replace with” field.
Click "Replace All" . Double spaces throughout the text will be replaced with single spaces. If necessary, repeat the procedure several times until the program writes that there is nothing more to replace.
I guess that's all. We have given the most common reasons for increasing the distance between words in Word and ways to remove large spaces. Of course, long gaps can also appear due to other actions of an unprepared user. In such cases, it is more convenient to identify the cause of incorrect markup when formatting marks are turned on.
- 2shared
- 0Facebook
- 2Twitter
- 0VKontakte
- 0Odnoklassniki
How to remove Word page breaks, blank lines
In addition to extra spaces, the text may also contain line breaks, simply empty lines, as well as extra space between paragraphs. This can also be quickly removed.
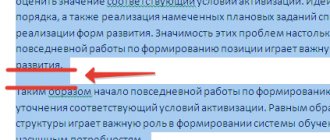
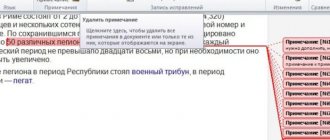
To do this, you need to select all the text. Then you need to click “Find” - “More”, select “Special”. For example, we will use the following text:
In the example given, there is an extra line, and after the words “Copy” and “Word” there is an end of paragraph mark, placed using the “Enter” button. You need to select the text, click on the “Find” - “More” - “Special” button. Select the “Paragraph Mark” function. Next, go to the replacement window and click on “Replace All”. After all the manipulations, the text will be transformed.
The result shows that the extra line was removed, as well as extra indents, spaces and other characters. The sentence came together without breaking. You can choose absolutely any one from the list of functions. If you do not know its meaning, you need to hover over the name and its meaning will be displayed.
Using the Tab key
Using the Tab key
You should not indent the beginning of a line using the Tab key. And it is completely unacceptable to place tabs inside the text between words. If you display non-printing characters, an arrow appears when you press the Tab key.
You can also remove a tab using the Replace function. The tab character is located on the Special tab. If you insert a tab in the Find field and put a space in the Replace field, Word will correct the incorrect use of tabs within the text.
These were the main rules on how to quickly edit and check your text. Good luck to everyone and see you again. And finally, a short video on the topic.
How to insert image text in Word?
This is probably a task that most people rarely need to do. But Word includes this feature, so there's no denying the fact that it might come in handy sooner or later. So let's look at this question in more detail.
You can choose one of two ways: use WordArt or make a regular inscription. Let's look at the available options.
How to insert picture text in Word using WordArt?
WordArt is a huge repository of various text styles found in the Word program. WordArt will help you change the letters of your text, their volume, color, and so on. Most often, WordArt is used to design headings or subheadings.
Let's look at a small algorithm with which you can insert a picture through WordArt:
- You will need to open the document where our drawing is located
- Let's write text using WordArt
- We change it by selecting slopes, volume, and so on.
- Open "Insert". Open the “Text” item and find WordArt
- A list with a variety of styles will open before us. Choose the one you like
- An area appears in the drawing. There you can enter the required text
- You can move, increase or decrease the inscription
Agree that this is quite simple. By following the instructions, you will definitely get what you want to see in your text document.
You don't have to start all over again to change the text. You can select what you wrote, open Drawing Tools and select Format.
How to insert picture text in Word using an inscription?
You know you don't have to use WordArt to attach text to a drawing. To use this method we need:
- Attach the picture we need
- Find the “Insert” item. Find "Shapes"
- Find "Inscription"
- We use the cursor and draw a rectangle in the place of our picture where we want to place what we write
- If you need to change your inscription in any way, you should find “Drawing Tools”. Here you can change your entry as you please.
- Once you find the “Text” heading, you can change the font. In it you need to find the “Font” item and you can safely begin the transformations
Adding text to a photo in Word 2007
Now let's turn to a specific version of Word, namely the 2007 version. To place the text, we will need to use this method:
- Open the document. Determine where to place the desired photo
- Open "Insert". In the “Illustration” section we look for “Shapes”. Opening “New Canvas”
- Let's return to "Insert". Click on “Drawing”
- Select a photo from the provided catalog. We select a suitable location for our picture
- We return to “Insert” again. Find WordArt. Choosing the right style
- Transfer the text to the photo
- Click on the outer border of our image. Next, press Ctrl. You need to hold it while clicking on the edge of the WordArt object. Thus we will select two objects
- In "Drawing Tools" open "Format". Find the “Arrange” section. Click on the arrow that is located near “Grouping”
- Select “Group”
At first glance, this method may seem quite difficult to you. But if you carry out all the points of the proposed algorithm correctly, you will definitely achieve success.
← back to Blog
Article tags: Working with Word (MS Word)
Interesting and similar articles:
Author:
Working with Word - part 1: rotation, page alignment, etc.
read
Author:
Working with Word - part 8: make a link, remove text wrapping
read
Author: