In this article, we will look at ways to repair or change file associations in Windows. A file association is the association of a file type with a specific application that launches that file to perform an action.
For example, after clicking on the executable file “EXE”, the program will launch; after clicking on the file in the “JPEG” format, the file will open in a program that has an association with this file type.
Sometimes, a file association violation occurs on a computer, which occurs due to incorrect user selection, or as a result of malicious software.
If selected incorrectly, the user will not be able to open a file of this type on his computer, due to the fact that the erroneously selected program does not support opening files of this type. Moreover, there are quite serious cases when, due to incorrect matching of file types, work on the computer is paralyzed.
After clicking on the shortcut, a program for opening files of this type does not start, another one opens instead, which cannot open the desired file, or nothing happens on the computer at all.
The way out of this situation is to change the association for files of this type. There are two options to solve the problem: changing the association for a specific file of a given type (suitable for regular files), or resetting the default association settings in Windows, using programs or by making changes in the registry.
In the first case, to restore the correct association, the change will affect only the file of this type. In the second case, all default file associations will be changed, the file associations will be the same as on the newly installed Windows.
Changing file association using "open with"
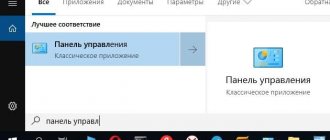
You can change the file association using operating system tools. After clicking on the file, select “Open with” in the context menu, and then in the drop-down list, click on “Select another application”.
The window that opens asks the question: “How do you want to open this file?” The Windows operating system will offer you programs that it thinks are suitable for opening a file of this type. In Windows 7, these windows look a little different.
Please note that the choice of system is not always correct. Therefore, if you do not know which application should open a file of this type, uncheck the box next to “Always use this application to open .*** files.” Thus, through experience you will be able to select the appropriate program. Next time, activate this item in order to automatically open a file of this type.
It is quite possible that there will not be a suitable option in the proposed list of programs. To find the program you need, click on the “More applications” link. Next, in the Explorer window, find the required program on your computer.
Handstand without support
The following type is easy to perform for gymnasts and acrobats. If a person has overcome the psychological barrier and learned how to do a handstand against a wall, it will not be difficult for him to do the exercise.
If a novice gymnast is unsure that he can perform a stand-up without support, it is better to resort to the help of a partner. He must support the person while he learns to catch himself if he falls.
After completing the exercises, a beginner will not be afraid to make a stand perpendicular to the surface without support or support:
- push off, spin, get down on your feet,
- if you fall, bend over and make a bridge.
The lesson will allow you to behave confidently while taking a pose upside down. It will strengthen your muscles and allow you to feel a sense of power over your own body. Will sharpen coordination of movements, improve orientation in space without support.
Steps to take a position perpendicular to the surface without support:
- Repeat all the steps of the wall stand until point No. 5.
- Take one leg off and stand. Change to another, stand again.
- Take both legs off the wall and try to stand.
- Move 2 steps away from the wall and repeat all steps.
- After the above steps, train in free space.
Important! You need to calculate the force of pushing your foot off the ground, otherwise a fall is inevitable.
File Type Mapping
I will show this method using Windows 10 as an example (other versions of Windows have a similar algorithm of actions). Go to the “Start” menu, then “All applications”, “System”, “Default programs”. In the Default Programs window, click the Match file types or protocols to specific programs link.
Next, in the “Configure associations” window, to restore the correct association, select the desired file type, and then click on the “Change program...” button.
In the window that opens, you will be asked the question: “How do you want to open this file now?” Select another application.
If the associations of executable files (exe files), folders, shortcuts (lnk files), registry files (reg files), etc. are broken, the methods described above will not help. You can restore default file associations in Windows using special programs.
Restoring desktop shortcuts to manual mode
In order for shortcuts to be displayed correctly, certain files of a special type are assigned to their properties. If instead of a beautiful shortcut icon you see a blank sheet icon, it means that those special type of files are corrupted. With the help of these instructions you must definitely cope with the problem that has arisen.
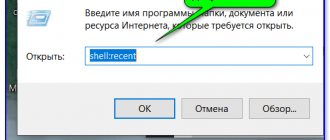
Press the key combination “Win + R”, then type “regedit” in the command line and press Enter (or “Ok”).
- that opens, go through the registry tree: HKEY_CURRENT_ USER
->
SOFTWARE
->
Microsoft
->
Windows
->
CurrentVersion
->
Explorer
->
FileExts
->
. lnk
. - Call the context menu by right-clicking on the UserChoice ( if available)
.
In the menu that opens, select “Delete”. Confirm your intention by clicking on the “Yes” button. Close the System Registry
.
To restart a computer.
Restarting your desktop using Task Manager
If, after taking steps to restore desktop shortcuts, it would be faster for you to restart the desktop using the task manager, then you can try this using a detailed description of the process.
In order to restart the desktop, carefully read the instructions to the end and copy explorer.exe to the buffer (which will need to be launched as a new task in the manager), so after turning off the process, the desktop and this instruction with the browser will be inaccessible
In order for the changes made to restore shortcuts to take effect without restarting the computer, but after restarting the desktop, press the key combination “Ctrl+Alt+delete” - the main window of the Task Manager
.
Go to the Processes
tab -> find “explorer.exe” in the list of processes -> select it and right-click to end the process (or select it and stop using the “End Process” button located below) - after which the desktop will disappear along with labels.
Next, in the same window of the Task Manager “” -> click on the file button, select “New task”
Now enter the command “explorer.exe” -> click on the “OK” button. Thus, we turned on the desktop.
Restoring file associations in Kaspersky Cleaner
The free Kaspersky Cleaner program contains a “Restore system settings” section. After opening the tab, select to fix file associations, look at all the options: “Important problems”, “Moderate problems”, “Minor problems”, check the necessary boxes, and then start restoring system parameters.
Read more about using Kaspersky Cleaner here.
Restoring the previous system state
The easiest way to restore connections is to roll back the system to the moment when everything was working. This method is the most preferable, since there is no risk of making things even worse than they already are. But! This method will not work if the association of *.exe files is broken - something else will simply open instead of the recovery program. But if everything is fine the exe and lnk
Click the button that opens the Start . Enter the command in the search bar:
rstrui.exe
The desired object will appear in the results window. Run it as Administrator as shown in the figure:
The System Restore utility will launch. Click the button.
In the list of recovery points, select the date at which file associations were in order. Don't forget to check the box as shown in the picture to see all possible options. Press again.
After clicking the button, the system recovery process will begin. It may last for several minutes. The computer will also restart. Restoring the file association in Windows 7 or 8 will restore it.
Restoring file associations in AVZ
The AVZ anti-virus utility can restore associations of some file types.
You may also be interested in:
- 7 ways to find out your Windows product key
- How to switch from 32 bit to 64 bit version of Windows
Launch the AVZ program, go to the “File” menu, select the “System Restore” context menu item. In the “Restore system settings” window, check the box next to “Restore startup parameters of .exe, .com, .pif files”, and then click on the “Perform selected actions” button.
Basic information about the program
Unassoc is a free program that allows you to unassociate certain formats with certain programs on Windows Vista and Windows 7. Surely you know that using the standard tools of these operating systems, you can, for example, force a video in the MKV format to open in the desired multimedia player, and TXT documents in your favorite text editor. So, Microsoft did not provide tools for canceling such binding of formats to certain programs. You can only “reassociate” the format with another program. But cancellation can be done using this small utility.
The Unassoc interface consists of one small window, and it doesn’t even require installation on the system to launch it. Just download and run the executable file. So, what needs to be done in order to unassociate a certain format with a certain program? To do this, simply enter the desired extension (or select it from the list) in the “File types” field and press the “Remove file association” button. The changes made are applied instantly.
The program automatically generates a list of extensions that have an association. After deleting one, you can refresh the list by pressing the “Refresh list” key. There is also a key that removes the specified extension from the list - “Delete file type”. In general, this is the end of all the significant interface elements that Unassoc has. The developer tried to make the program as simple and easy to use as possible.
Briefly about the utility
If you do not have knowledge of working with the system registry and do not have practice, then the most effective method in eliminating the problem of files of the same type is the U nassoc.exe
The utility is designed to remove associations of specific files. It is publicly available, free, and can be downloaded from any website that distributes software. Installation will also not take much time.
Attention. The utility U nassoc.exe is intended only for Windows version 7.
Methods for eliminating file associations
The easiest way to remove associations is to go to the Start menu and go to Control Panel, and then to Default Programs. In the window that opens, select the “File Type Associations” tab. In the displayed list of files, you need to select the one that does not open for you and click on the “Change program” function, where you should specify which application should open this file. Next, in the window that opens, you should select the file type for the corresponding program and cancel the comparison.
If this procedure does not help, “heavy artillery” should be used. Or rather, it is called heavy rather arbitrarily. A program called Unassoc weighs 50 Kb, but in this matter it is simply irreplaceable.
Step-by-step instructions for working with the utility:
- Download the program, for example, from here - https://windowstech.ru/82-unassoc-14-udalyaem-associacii-fajlov.html and run the utility.
- After launch, a window like this will open
- The window displays file extension types. Find a file with a .lnk extension using the search bar on the left.
- Found it? Now click on the Remove File Association button. This button removes file associations with this particular extension. If the files on your desktop have a different extension, then enter it.
The utility also has a “Delete File Type” button, which deletes the selected file type from the registry.
Additional recommendations
Associations can also be removed through the system registry. This method will be relevant for those who did not cope with the method described above.
- To launch the “System Registry Editor”, you need to open “Start”, enter the command “regedit” in the line or press the combination Win + R and Enter on the keyboard.
- An editor opens in which you need to open the “HKEY_CLASSES_ROOT” section.
- We look for the required extension type and delete it.
We hope that the recommendations we have given will help resolve this issue and make working with your PC much more comfortable.
Unassoc is a small utility for removing a program's association with a specific file extension. Thanks to it, you don't have to change extension settings in the Windows registry.
A change in association may be due to the installation of various programs. For example, if Notepad is used by default to open plain text files, then after installing the Notepad editor, TXT files will be opened with it. But in some cases, association violations occur due to viruses, which can lead to the opening of completely different, unwanted applications. And in this case, Unassoc will help you remove the extension association for all programs.
The program interface consists of only one window. On the left is a list of all extensions found. You can select the desired format from the list or enter it into the search bar. To remove an association, click Remove file association. Additional features include removing the extension from the general list and simple updating.
It’s worth saying right away that Unassoc cannot reassign file associations. To do this, use standard Windows tools.
Fixing file associations in File Association Fixer
The free program File Association Fixer v2 corrects file associations in Windows 10, Windows 8.1, Windows 8, Windows 7 on 32-bit and 64-bit systems. Download the archive with the program to your computer, and then unpack the archive. Launch the File Association Fixer application from a file corresponding to the bitness of the operating system installed on the computer.
File Association Fixer download
After launching the File Association Fixer program, in the main window, click on the “Fix Files” link. After this, the “Select the Association to Fix” window will open. Select the desired file extensions to restore default settings, and then click on the “Fix Selected” button.
Other free programs: Open With (in Russian), Unassociate File Types, change or restore file associations in Windows 7 (the programs have not been updated since then).
Two main reasons: why did the information disappear?
So, when you inserted a USB drive into your computer, you discovered that there are no files visible on the flash drive. In the vast majority of cases, it is the user who is the culprit of this kind of trouble. And most often, it is as a result of improper operation that the Flash device begins to work in “magician” mode. Of course, one cannot discount manufacturing defects in the production of a product and unfavorable accidents of a metaphysical nature. However, the harsh reality shows that the cause of the malfunction can be either hardware or software.
Restoring an association in Windows using registry files
To restore default file associations in Windows, you can use ready-made registry files. After running the .reg file and performing the action, common file associations will be corrected.
To run registry files, use the following procedure:
- Unzip the ZIP archive.
- Select the desired registry file.
- Run the registry file as an administrator (click on the file twice with the left mouse button, or after right-clicking, select “Merge” in the context menu).
- Restart your computer.
Using the RstAssociation program.
If you have a problem with exe files, this bun will start for you, because... it itself has the extension scr.
As you can see, it allows you to fix associations with quite a lot of extensions. Just tick the boxes you need and go into battle.
Button assignments:
- Tous – select all
- Aucun – uncheck all marks
- Restauer – Fix associations
- Quitter - quit
After completing the procedure, restart your computer
rstassociations-version-scr_1.3.scr_
Restoring file associations in Windows 10 using the system tool
If the file association is broken in the Windows 10 operating system, then using the system tool, you can easily correct the file associations to the default values.
Go to the Start menu, select Settings, then go to the System window, click on the Default Apps section, and then select the Reset to recommended defaults option.
To reset the file association mapping, click on the "Reset" button.
In this section you can also select other options: “Select default applications for file types”, “Select standard applications for protocols”, “Set default values by application”.
Data recovery after a virus
All actions are performed in stages:
- The text is copied: attrib -s -h Z: \*.* /s /d.
- Press the Win and R keys simultaneously.
- The copied text is pasted into the window that opens.
- Z is replaced with the letter that identifies the flash drive inserted into the computer. Only the English alphabet is used, since letters represent drives in the Windows operating system.
- Press Enter or OK.
While the operation is in progress, a black window appears on the screen. It will disappear in a few minutes. The exact request processing time depends on the number of folders on the flash drive. At the end of the process, all folders and files stored on the media will open.
After all data has been recovered, it is advisable to check the flash drive for viruses to avoid similar problems in the future. Regular scanning with an antivirus will prevent files from completely disappearing if there are viruses.
The method described above almost always works, however, if the information is not recovered, then they resort to the use of specialized programs aimed at returning data. So let's continue! If files are lost after scanning a flash drive, how to recover them?