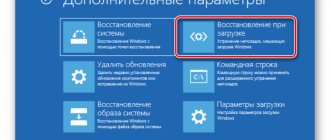
The last question I often come across is how to restore dir-300
after unsuccessful firmware?
Let's try to figure out this problem. I think it’s worth starting with the fact that at the moment there are two modifications of the dir-300
that are radically different from each other - these are
dir-300
and
dir-300 nru
. Accordingly, the recovery methods for these routers are also different.
Before the recovery process dir-300
Reset
button again with the router's power on and holding it for 15 seconds . Sometimes it helps with software failures =)
Restoring DIR-300
(
not suitable for
dir-300 NRU ).
1. 2.
Connect the computer’s network card and the router’s WAN port with a network cable.
We do not turn on the router's power! 3.
In the network card settings, enter the IP address 192.168.20.80 and the mask 255.255.255.0
4.
Run ping -
Start>Run>ping 192.168.20.81 –t 5.
In the address bar of the browser enter – 192.168.20.81 (this is done in advance in order to , so as not to type the address with one finger in the future).
6.
Press the Reset button on the router with a handle and do not release it.
7.
dir 300
router while holding down the Reset button and wait 20 seconds. If everything is fine, you will receive pings to 192.168.20.81
8
.
Press the “Enter” button in the browser to go to 192.168.20.81. The emergency interface should open - Emergency Web Server
.
9.
Let's release Reset.
10.
Click
Browse
and select the file with the firmware.
Click the “ Upload” 11. 12.
Set up
DIR-300
and work.
Restoring DIR-300 NRU
.
1.
Download the latest firmware for the router from ftp.dlink.ru
2.
Connect the computer’s network card and the first LAN port of the router with a network cable.
We do not turn on the router's power! 3.
In the network card settings, enter the IP address 192.168.0.10 and the mask 255.255.255.0
4.
Run ping -
Start>Run>ping 192.168.0.1 –t 5.
Press the
Reset
with the handle and do not release it.
6.
Turn on the power of the DIR-300 NRU router while holding down the Reset button and wait 20 seconds. If everything is fine, you will receive pings to 192.168.0.1 Release Reset.
7.
In the address bar of the browser, enter – 192.168.0.1 and press the Enter button.
The emergency interface should open - Emergency Web Server
.
8.
Select the file with the firmware and click the
Upload
.
After 1-2 minutes the countdown should appear. 9.
We are waiting for the restoration procedure to complete.
The router should reboot and return to normal operation. 10.
Set up the DIR-300 NRU and get to work.
Note: These DIR-300 recovery
are suitable for returning a router with
DD-WRT
to factory firmware.
It happens that after unsuccessful firmware D-Link DIR-300/NRU B5, for some reason the router stops responding. Do not rush to throw it away or run to the D-Link service center. There are repeatedly proven ways to independently restore a device, as well as return it to the factory firmware.
Restoring a router can be described in several steps:
1. Download BIN
firmware from
320NRU
at the link: https://ftp.dlink.ru/pub/Router/DIR-320_NRU/Firmware/DIR_320NRU-1.2.94-20110803.bin, and save the file.
It is the BIN
firmware from
320NRU
; it is not always possible to restore the router directly using the files of the original firmware from DIR-300/NRU B5.
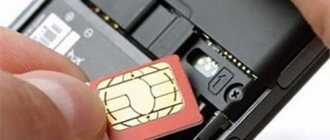
2. In the properties of the computer’s network adapter, set the static address 192.168.0.10, subnet mask 255.255.0.0. To do this: Start -> Control Panel -> Network and Internet -> Network and Sharing Center -> Change adapter settings, select Connection and open its properties.
Next, you need to select properties as well. In the properties window that opens, you need to activate “Use the following IP address” and enter the address 192.168.0.10, subnet mask 255.255.0.0.
3. Disconnect all cables, leaving only the router’s LAN1 –> PC connection from the router. We always use the “straight” wire (blue included in the kit).
4. Turn off the power to the router and press the Reset
device (small hole on the back of the panel) and do not let go. We remove the power supply plug from the router, and without releasing the button, insert the power back in, wait for the router to boot for about 15 seconds and only then release the button.
5. Now quickly open the browser (Internet Explorer, Firefox, Google Chrome), enter 192.168.0.1 and in front of us is the Emergency room. Through Failsafe UI, select the downloaded firmware file DIR_320NRU-1.2.94-20110803.bin and click “Submit”.
6. We wait 3-4 minutes during the flashing process and the router will come to life.
7. Same as in step 2. We return the automatic issuance of IP addresses.
A situation in which it is necessary to restore the firmware on DIR-300 routers
different revisions may arise for various reasons. In addition to a malfunction in the firmware, when a WiFi router simply stops distributing the Internet and its web interface becomes unavailable, this could also be a simple rollback to the usual “stock” firmware after DD-WRT. Or it could be a recovery after an unsuccessful flashing, when the router was fed firmware from a different hardware version. In general, the developers - the D-Link company - foresaw such a development of events and on many modern devices they created an Emergency Web Server or Failsafe UI, which is actually the same thing. Now let's figure out together how to use it.
Before doing anything with the router, you must first download the firmware from the official D-Link server - ftp.dlink.ru:
You can find out what hardware version of DIR-300 you have on the sticker on the back cover of the case:
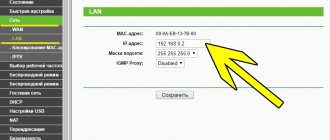
After that, go to the desired folder on the server, look for the “Firmware” directory there and download the latest firmware version and the previous one, just in case. After that, we begin to conjure with a piece of iron. We disconnect the provider’s cable from it and all clients, except the computer from which we will do the recovery. Then we do this - go to the Local Area Connections settings and manually enter the IP address in the properties of the TCP/IPv4 protocol 192.168.0.2
, mask
255.255.255.0
and gateway -
192.168.0.1
:
You can register the addresses of DNS servers, or you can not - this is not important, because they will not be used. Click on OK
and close the settings.
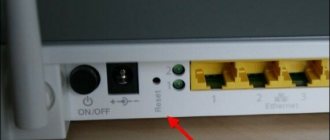
We take our DIR-300 in our hands and press the Reset
:
Keeping it pressed, turn off the power to the router with your other hand and turn it on again. Wait 15 seconds and release Reset
.
Now you need to launch an Internet browser and enter the address in the address bar - https://192.168.0.1. The result should be like this:
There may be another nuance here. Earlier DIR-300 models had a disaster recovery interface at a different address. Therefore, if your router does not respond to 192.168.0.1, then again go to the properties of the TCP/IP protocol and register the following IP:
You also need to enter the address 192.168.20.81 in the address bar of the browser:
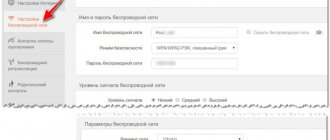
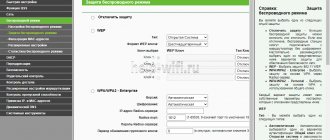
The interface of Emergency Web Server and Failsafe UI is virtually identical - a file selection button, and a button to start flashing. Click on “Browse” and select the downloaded file with the firmware. Then click on “Upload” and wait for the process to complete.
What do we have as a result? Working router D-Link DIR-300! All the best!
I have already written a dozen instructions on how to configure the D-Link DIR-300 Wi-Fi router to work with a variety of providers. Everything is described: the firmware of the router and setting up different types of connections and how to set a password for Wi-Fi. It's all there. The link also contains ways to solve the most common problems that arise when setting up a router.
To the least extent, I touched upon only one point: the buggy nature of new firmware on D-Link DIR-300 routers. I'll try to systematize it here.
Why do you need to reboot the router?
Reboot the router
allows him to obtain a new IP address along with the current settings.
When a large number of users connect to the current wireless network, the router's
may become full and it may freeze because it cannot process the connected devices.
Interesting materials:
How to protect your facial skin from frost? How to protect your flash drive? How to protect the hob? How to fall asleep when coughing? How are figure skaters' skates sharpened? How to brew baby porridge? How to brew mint for a bath? How to end a call on iPhone? How to tie a bandana instructions? How to tie a bandana on a girl's head?
Orange (red) internet indicator
People are faced with a situation where the red TP Link Internet light on the router is on. It signals problems with the provider. The equipment cannot connect, so the WAN indicator lights up. On some TP-Link models the light glows orange, on others it glows red.
On older routers, the indicator blinked. With the advent of new models TL-WR941ND, TL-WR842ND everything has changed. The bright green color of the WAN port indicates the smooth operation of the router. If the indicator is not active, then the router does not respond to signals.
Probable reasons:
- problems with equipment;
- incorrect setting.
Speaking of equipment, it is necessary to disassemble the devices that the provider uses when connecting to the Internet. When setting up a router, the IP address parameter is taken into account. Users often purchase a new router, connect it to the network, and just wait. The equipment freezes, so the Internet indicator does not always light green.
Important ! With a dynamic connection, everything is much simpler, since there is no binding to the MAC address. This router does not require any settings.
If you do not change the factory settings, the connection will occur automatically. To view the characteristics of the router, you need to know the user name and server address. Providers may use MAC address binding; it is better to read the contract.
In the settings you can change the network. By going to the browser at 192.168.2.1, you need to select the “Internet” tab. The window displays the following items:
- quick setup;
- standard parameters;
- additional characteristics.
In the standard settings, “connection” is selected, you need to set a dynamic IP. If the setup is done correctly, the WAN indicator will finally turn green. If there is any confusion with the mac address, you will have to contact the company that provides the Internet service. You can clone the mac address yourself or with a specialist. The type of model is taken into account; using the Archer C60 as an example, everything looks simple.
Enter the IPTV settings, then select the bridge mode. It is better to start by resetting the settings and then entering the IP, MAC address. When connecting the router, you need to check whether the computer finds it. To do this, switch to wireless network connections. The control panel provides a sharing center.
In the browser, you need to follow the official link of the manufacturer or select the combination 192.168.0.1. After logging into the tplinkwifi.net website, you will need to log into your account. The control panel prompts you to create a new password, you must confirm it. Next, you can select a language, and additional settings tabs will open.
Important ! When the IP and MAC address are entered, you should select the Connect button.
DIR-300 A/C1
So, the DIR-300 A/C1 router that has flooded into all stores is a rather strange device: neither with firmware 1.0.0, nor with subsequent versions, it works for almost no one as it should. Various glitches occur:
- it is impossible to configure the access point parameters - the router freezes or simply does not save the settings
- IPTV cannot be configured - the router interface does not display the necessary elements for selecting a port.
Regarding the latest firmware 1.0.12, they generally write that during the update the router hangs, and after a reboot the web interface is inaccessible. And my sample is quite large - 2,000 people come to the site every day using DIR-300 routers.
The orange signal on the router is on due to binding to the MAC address
If this does not happen, but you are sure that you did everything correctly, then the obvious option is that the provider binds the MAC address of the computer to your account. That is, you bought a new router, and now instead of the network card of the computer with the supplier’s equipment, there is another device that has a different physical (MAC) address. More responsible providers inform users about this - for example, when I change the router, when I try to open any site, a message appears saying that I need to restart it for a new connection.
There are two options to solve the problem:
The second option is preferable. I talk in detail about how to do this in separate articles for each manufacturer - select your company from the menu of our website and read.
Program failure or failure of the router WAN port
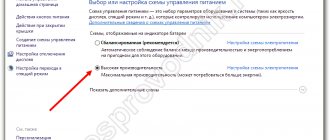
If the orange indicator suddenly lights up - the Internet worked yesterday, but today it doesn’t, and the provider says that everything is OK, then you need to think about why this happened. The first thing that comes to mind is that due to a power surge, all the settings on the router were lost. In the future, to avoid this, connect it only through a voltage stabilizer.
In order to return everything to its original state, the easiest way is to do a full reset using the “Reset” button on the router body. Then log back into the admin area using the login and password indicated on the label on the bottom of the router case and configure everything again.
Finally, no one excludes a breakdown inside the WAN connector or on the router chip. These are the thoughts on how to fix the problem of a burning or blinking orange indicator on the router - it seems like I haven’t missed anything, but if you have anything to add, write in the comments, we’ll figure it out together.
Why is the router blinking green?
But if the router is blinking green, this means that it is currently connecting to the Internet. If this happens constantly, there is a problem with the connection, and you need to dig in the same direction as when the orange signal is flashing. If the router is constantly green, then the connection to the Internet is established and everything is in order. If it does not work, then the problem may lie precisely in filters, WiFi scheduling, or some other access restriction for a specific computer, smartphone, or an entire group of devices.
Instructions and tips
The lack of Internet will upset any user. There can be a lot of reasons, so it is recommended to understand the router indication. TP-Link models come with a typical control panel, the main functions are easy to remember.
There is a power light for the Internet, wireless network, connected equipment, and settings. Some lights should flash, red, or orange depending on the type of router. When there is no access to the Internet, it is recommended to trust the advice of experts. They propose the following algorithm:
It is recommended to start with simple actions and then eliminate one reason after another. The easiest way is to reboot the router and computer. Restoring the system, as well as searching for viruses, takes time, so it is better to leave them for last. A call to the provider in most cases solves the problem; it is better to stay in touch.
We discussed above why the Internet icon on the modem is red. There are times when some or all of the lights flicker. The instructions will help you deal with a damaged cable or settings.
Source
Problems on the provider side
When the Internet icon on the TP Link router is red, users rarely blame the provider. A message about lack of Internet access should alert you.
Important ! Before setting up the router or checking the cable, it is recommended to contact your provider. He is able to give advice, regardless of the installed operating system.
Most users rarely pay attention to the router indicators. The first bell is the Internet shortcut on the Start panel, next to the clock. If the message “no Internet access” is displayed, in 50% of cases the provider is to blame.
Only the power indicator is on or all lights are blinking
A common problem is when only the power indicator on the panel remains active. It can be easily found by the designation power. It is impossible to make settings in this situation. If you enter 192.168.1.1 in the browser, the system will not respond. When other lights do not blink, it is most likely a technical fault.
What are the differences between 3G and 4G networks: features, advantages and disadvantages
Using the example of the TR-740N model, it can be seen that the activation of all indicators does not indicate the presence of the Internet. The problem may lie in the power supply or board malfunction. When the lights are blinking, it is impossible to connect to the router from another device. Users may experience a temporary network outage or constant flickering.
Important ! Experts point out a system error and suggest reflashing it.
Do I need to restore the firmware?
To carry out initial diagnostics, you will need a working power supply that is compatible with the router being repaired. If you have one, supply power to the router without connecting the network cables. All connectors (WAN, LAN and even antenna) must be left empty. After a minute you need to see how the light bulbs behave. The device may be in firmware recovery mode.
Let's list the “symptoms” of recovery mode:
For ASUS routers - the “Power” lamp blinks slowly, the “Wi-Fi” indicator is not lit For TP-Link devices – all lamps blink, turning on and off simultaneously For D-Link routers, the power indicator blinks orange For all routers: it doesn’t matter, All lamps blink or just one, but the blinking period is always 1-1.5 seconds.
If recovery mode is already enabled, you cannot remove the device from it. Or rather, the procedure for this output involves installing the firmware. You need to find the firmware file that matches the model and hardware revision of the device (the value is indicated on the sticker).
Not all firmware, even branded ones, are compatible with Recovery Mode.
Let's look at how to get the router out of “Recovery” mode, that is, how to install the firmware:
- For D-Link devices (except for the oldest models), a recovery console is provided, accessible via a standard IP address. Only now, since the router’s DHCP server does not work, the network card is configured to “static”, and then they try to open the web interface.
- For ASUS routers, the role of the recovery page is performed by the “Firmware Restoration” utility. Having configured the network card to static values, the router is connected to the PC with a patch cord, but instead of the browser, the utility is then launched.
- For ZyXEL devices, everything looks more complicated - you need to install a TFTP server. Details are discussed here: zyxel.ru/kb/2146.
- For TP-Link devices, except for the latest models, as well as for D-Link devices of older models, the only method is suitable - you need to connect a UART cable. The UART connector is located under the housing cover, and it is better to perform restoration in a service center.
All recommendations listed above are “software” repair methods. But, nevertheless, you can use them only at your own peril and risk. Having determined that the “Recovery Mode” is active, you can take the router to the service center. The duration of firmware recovery is 10 minutes, unless additional problems arise during the process.
Connection settings are lost
Users are interested in the question of why the red Internet light is on on the router. When the settings in the router are lost, signal transmission through wireless systems is impossible. Thanks to the WLAN indicator, the problem is quickly recognized and it can be assumed that it lies in unsaved connection settings.
To re-enter the menu, go to the browser, type 192.168.1.1 and press Enter. The router is capable of operating in several modes. Before setting up protection and checking the connection, you need to do certain actions in the control panel. The adapter is logged in, it’s worth finding the IPv4 protocol. Step by step, automatic settings are selected in the mask and also in the gateway.
Enter ipconfig /all on the command line and the physical address will be displayed in the window. When the user navigates to the browser using the link 192.168.1.1, the Windows Security window will open. The system will ask you to enter your login and password, you can fill out your account. By default, admin is specified; a different login may be specified on the router packaging. While on the official TP-Link page, you need to select Quick Setup.
You are taken to the next page, where there is a Dynamic IP line. The window will ask you to select a security level and create a unique password. Beginners most often make the mistake of not specifying the MAC address. It is entered in the WAN field and then you need to save the data by clicking the Save button.
Wi-Fi icon is not lit
Review and configuration of the D-Link Dir-320 modem
Users are interested in the question of why the Wi-Fi is orange, but previously the light was not on. When the router is able to transmit data wirelessly, the indicator will glow. As soon as the Wi-Fi connection is lost, the light goes out. There is a WLAN label on the panel so the indicator is easy to find.