The use of disk images has become more and more popular in recent years, so many programs have appeared to read ISO images, which helps avoid wasting the use of a disk drive. What is ISO? This is a file image where the data and disk structure are stored. In addition, recently many laptops are sold without it. In order to use a virtual disk, you need to have a special drive where it will be written. In order to understand all the nuances, you need to download the UltraISO Pro torrent utility from our website completely free of charge. If you want to know how to use UltraISO, then read this article to the end.
Creating a bootable USB flash drive in UltraISO
In order to make a bootable USB flash drive, you need to follow this algorithm:
- Download the required Windows 10 disk image from the Internet.
- Once it downloads, open it in the Ultra ISO utility.
- Once this is done, select the self-download section.
- Click on the “burn hard disk image” section to burn to a flash drive.
- When the pop-up window appears, click on the name of the media, and then on the “Record” button. Agree to the license agreement, and then wait for the process to complete.
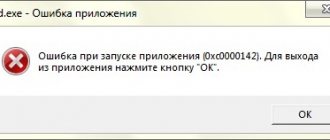
Please note that for full recording you need to have administrator rights. Otherwise an error will occur.
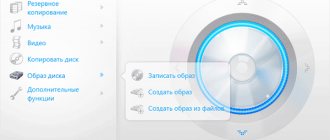
If, instead of making a Windows installation flash drive, you want to create a disk, you should click on the “Burn CD image” button located on the toolbar. When a new window appears, select the required drive, and then click on the “Burn” button. After that, wait until the process is completed.
Remember that the developers have added the possibility of hidden recording, and have also already set values acceptable for recording. If you set the Hide Boot Partition to Hidden, you will not be able to detect the recording media, because it will be hidden. Take this into account when changing settings.
Download CDBurnerXP
Go to the site
https://cdburnerxp.se/ru/download
Click on the link “ More download options ”
In order not to install an additional program, download the portable version[6] of CDBurnerXP for your Windows bit size[7].
Unpack[8] the downloaded archive
CDBurnerXP downloaded.
Creating a disk image
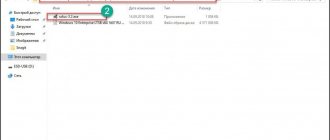
- The first step is to launch the free downloaded UltraISO 9.7 program, and then figure out how to use it. After that, rename the ISO file as you wish. In order to do this, right-click on the shortcut and select “Rename”.
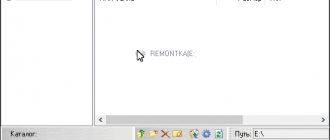
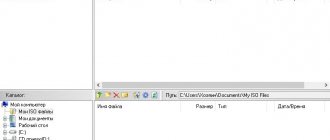
- After that, add the necessary files. At the bottom is the “Explorer”, where you can find the required materials by dragging them to the right side.
- Once the files have been added, you need to save it. To do this, press the hotkey combination “Ctrl+S”, and then click on the “Save” button.
- At this stage you need to decide on the format; it is best to choose .ISO. This is because the format is standard, so any ISO opening program will handle this material.
If you do not plan to continue using the program in question, you can change the format. Some formats are suitable for use in Nero, Alchogol 120% software.
Specify the folder where the final product will be located, and then click the "Save" button. After this, the ISO adapter will begin saving the image. It does not take a lot of time.
Congratulations, the process was successful! By following these instructions, you won’t have to spend a long time figuring out how to use the UltraISO program to unpack ISO.
WinCDEmu Free ISO Mounter
You know about WinCDEmu, but there is also WinCDEmu Free ISO Mounter. As the name suggests, it is a free ISO mounting software. In everything it is similar to the program of the same name.
The usage is very simple and with just one click you can also get any kind of ISO files. Also supports both 32-bit and 64-bit versions of Microsoft Windows XP and 7.
Download link: https://wincdemu.sysprogs.org
06 of 19
Burning an image to a disk or flash drive
Burning an image to a flash drive in Ultra ISO
To write Windows to a flash drive, you need to adhere to this algorithm. First, let's perform the usual and expected actions: launch the application and insert the USB flash drive into the port.
Please note that the files on the media will be erased, so it is better to save them in another location in advance.
Burning ISO to USB must be done with administrator rights to avoid problems. So, follow these steps:
- After everything starts, you should click on the “open file” section, and then start searching for the image you need to burn.
- The next step is to select the burning method: “Self-boot”, and then click on the “Burn disc image” button.
- At this point, you should ensure that all options are checked and correspond to all required settings.
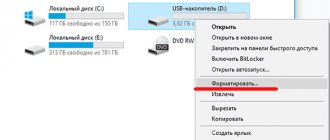
- If the media is not formatted, then you need to click on the “Format” menu, and then select the FAT32 type. If everything has been done in advance, then you should open the ISO, and then “Burn”, agreeing to the license agreement.
- In a few minutes, a startup flash drive will be created, and you can continue working with the image.
If all actions were performed correctly, the name of the flash drive will contain the name of the image. This way you can write anything, even Windows 7 64 bit or a popular game.
How to burn an image to disk
- Insert the disc you want to burn into the drive, and then open the portable ISO reader.
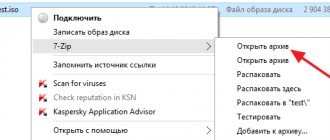
- Add an image to the utility by dragging the desired file onto the work surface. Or enter the application menu, then go to the “File” section, and then select the required one through “Open”. When the pop-up window appears, click on the desired material.
- Once the image is added to the software, it's time to start burning. To do this, go to the “Tools” section, then go to the “Burn CD” item.
- Once the new window appears, you will be able to see several options required to read the ISO:
- Drive unit. If the device has several connected drives, it is worth marking the one you need to record.
- Write speed. The maximum speed is set first, but it is best to set it to a lower setting for excellent performance.
- Recording method. It's best not to touch anything here.
- Image file. This location specifies the location of the file required for recording.
- If you are recording to a rewritable disc, you must first clear it. To do this, click on the special button.
- When everything is ready, you should start burning by clicking “Burn”.
Please note that you can record any image this way. If the error “unknown image format” occurs, you should use the image editor.
The process will complete in a few minutes, after which a completion notification will pop up.
Power ISO
PowerISO is the choice of many users when it comes to mounting ISO files on Windows PC. The program is very versatile and has many additional features. With PowerISO you will be able to mount and even burn various file types such as BIN, ISO, NRG, CDI and DAA.
PowerISO runs on Windows 7 and one of its most notable features is the ability to create a bootable USB drive. As mentioned earlier, the program is also very versatile.
Download link: https://www.poweriso.com
08 of 19
Creating a virtual drive in UltraISO
This algorithm will show you how to use UltraISO premium edition to create a virtual drive:
- Go to the program settings, located in the “Options” section.
- Open the "Virtual Drive" section to specify the quantity. There should be no less of them than devices.
- You can complete the process here, or you can rename all the drives to make it easier to navigate. Select the drive where you want to change the name, and then click on the “New Drive Letter” tab.
If you turned on the program not as an administrator, an error warning window will pop up. To solve it, read the article: How to fix errors in UltraISO.
The process of creating a virtual drive has been successfully completed, so you can start mounting the image, and then use the materials located in the image in UltraISO. You can read below about how to mount the image. When is it needed? When you use licensed games that do not work without a disc. You can mount the image into the drive to pretend that the disk is in the drive. If necessary, you can always unmount the image.
Virtual CloneDrive
Virtual Clone Drive is a great ISO mounting tool and third on our list. You can create several virtual disks and mount image files with them, which is very convenient. The program is available for free on the official website.
Mounting ISO files will be easy using virtual drives created with Virtual CloneDrive. But there is a drawback. The number of virtual disks that you can create is only 8, no more. But for most users, 8 virtual disks are enough.
Download link: https://www.redfox.bz/en/virtual-clonedrive.html
05 of 19
Mounting the image
Mounting images of an optical drive is quite simple, because it is a simple process of connecting the disk to the drive only in the virtual world. In simple terms, you simply virtually insert the disc into the drive. In the software in question, this can be done in two ways, using the application directly or the explorer.
Method 1: Launch through the application
- First, launch the application to open the image used for editing. To do this, click “File” and then “Open”.
- Specify the folder where it is located, select it, and then open it.
- Use the menu to go to the "Mount to virtual drive" section in the tools.
- When the pop-up window appears, specify the required drive, and then click on the “Mount” button.
The program may freeze for a while, but don't be alarmed, because the developers simply didn't provide a tracking line. After a couple of seconds, the mounting will be completed, after which you can continue working.
Method 2: Windows Explorer
The presented method allows you to do faster work because you don’t have to open your program.
- Open the folder where the ISO is located.
- Right-click on it, then select the “UltraISO” menu, then go to the “Mount image into virtual drive F” section.
- After completing the steps, the installation will be completed.
This method has a slight drawback, because you cannot notice that the image disk is full.
Workshop ISO
Another ISO management program for your PC is called ISO Workshop. The program has been developed very efficiently using modern codes, making it one of the best for mounting and creating virtual disks. The procedure is very innovative and convenient. You will be able to easily convert ISO files and copy the contents inside.
Download link: https://www.glorylogic.com/iso-workshop.html
12 of 19
Installing games using Ultra ISO
Very often, users ask how to install a game using ISO. This question arises due to the existing copy protection. Many toys are licensed and require a disc in the drive. Read the article to the end to learn all the nuances of working with the software.
Creating a game image
First, insert the licensed disc containing the game into the drive. After that, open the software, doing it as an administrator, and then click “Create”.
Specify the required drive and the location where the image will be saved. The format must be .iso for the program to recognize it.
Wait for the process to complete.
Installation
- Close windows that are not needed while working, click "Open".
- Specify the location where the game data was saved.
- Press the "Mount" button, having previously created a virtual drive. Read above how to do it.
- Wait while the program completes the mount. Close the utility.
- Go to the drive where the mounted game is located to find the “setup.exe” file. Follow the same steps as for a normal installation.
This concludes the work on this issue. This is an interesting way to use licensed toys without a special disc. Now the game will always run as long as there is a virtual drive. Enjoy!
Microsoft Virtual CD-ROM
In 2013, Microsoft released the Virtual CD-ROM Control Panel. The specified program was available in Windows XP, 7 and Vista. The software has been designed in such a way that all Windows users can mount an ISO disk image at any time. The program is also useful for burning discs and restoring backup files.
The latest version of Windows, such as 8, 8.1 or 10, supports ISO files. So you will actually use this program on older versions of Microsoft Windows such as 7, XP or Vista. The program doesn't have many additional features, but it's great for mounting ISO files.
Download link: https://www.microsoft.com/en-in/download/details.aspx?id=38780
04 of 19
Types of images
You don't need to have the DVD itself for this. There is specialized software (for example, the UltraISO utility) with which you can do everything you need right on your computer. You prepare a set of folders and files, and use the program to create a disk image.
The second type is a backup copy of the operating system. It can be done even using standard Windows tools. It is needed to restore your OS in case of unforeseen emergency situations.
In fact, this is a cast of the hard drive. The computer scans the entire contents of the specified HDD and packs it into a special archive. If something happens, you can always restore everything back.
How to use
Using this file, you will not be able to install the OS until you create an installation disk/flash drive. You can even open .ISO with a regular archiver, but it won’t do any good. The installation must take place from external media and start from the BIOS. Otherwise, you may harm the operation of the system on which you downloaded Windows 7. More details about downloading:
If you open the archive, you will find regular program files inside, as if you had opened them on disk. In this regard, the format is as similar as possible to archives. Moreover, using this format, the final size of installation files is significantly reduced. But this is not an archive, it is a convenient shell for creating installation media. You can use it not only to create a disk, but also a flash drive.
To give you the maximum experience, we have released Windows 7 Ultimate. This is the most complete version of the OS, but it is also the heaviest.
Format
The .ISO format is in no way related to Windows 7. This format is used to distribute any programs, including the distribution of operating systems. Moreover, when you buy a CD/DVD with a game/program, there is a very high probability that the media was created from this type. So there is no connection between Windows 7 and the ISO format; the OS is only one of many utilities that is distributed in this format. This format has gained popularity for a number of objective reasons:
- Allows you to reduce the size of installation files;
- Allows you to create installation media;
- Optimal for working with external media;
In Russia they are not very accustomed to the term ISO, most often calling it simply an image. This is the same thing, and if you want to call it an ISO image, then you can do so. The main thing is not to get confused about why this format exists. From it you can create installation media.
On the Internet you can download the OS in another form, for example, in its pure form or a ready-made installation file. These formats also have a right to exist, but they often hide viruses. The ISO format is also good because it is literally transparent to antiviruses and can be checked even by regular ones.