The Android system is considered one of the most widespread; its variations can be seen not only in smartphones and tablets, but also in TVs, watches and even cars. However, there was initially no version adapted for personal computers. Over time, users were able to install Android on PCs and laptops running Windows.
Preparatory work
Before installing the Android OS on a PC, the user needs to decide how exactly he plans to use the new system. If the owner of the device wants to replace Windows with Android (that is, install the latter as the main system), you need to transfer all important information from the C drive to another drive, since the files will be destroyed during the installation process.
If you plan to use Android as an additional OS, you should create a separate partition in advance (from Windows or using a disk with special utilities) to install the new system. The fact is that working with the hard drive repartition tool built into the installation image can be quite difficult even for an experienced user.
If Android is needed only to perform individual tasks, and the PC owner does not intend to use this system constantly, you can do without installation, limiting yourself to launching from Live USB or installing an emulator.
To install Android on a PC, the user will need a flash drive with a capacity of at least 4 GB, as well as a separate partition on a hard drive of at least 8 GB in size. In addition, you can install the operating system on a second USB drive and boot from it if necessary.
Alternative options
There are other porting projects besides Remix OS, Phoenix OS and Android x86, for example Bliss OS, which allows you to install Android version 9.0.
It is based on Android x86, but, unlike its predecessor, it is equally well optimized for smartphones and PCs.
Another way is to use an emulator. It's easier and faster, the only drawback is that you will need a lot of RAM (at least 2 GB). On most netbooks, this is all the available RAM.
It’s worth installing for those who need one application on Android or just want to play. Emulators are not suitable for fully functional use of the OS.
Creating an installation flash drive
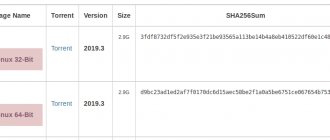
The first thing the user needs to do is download a ported image of the Android OS, prepared for use on a PC with x86 or x64 architecture. To do this, you need to visit the android-x86 website and select the appropriate version of the system. Then the image must be written to a USB flash drive using the UltraISO program. Then proceed like this:
- Install the utility on your computer, run it as an administrator and go to the “File - Open” menu.
- Find the downloaded ISO image with the operating system and open it.
- Connect the USB drive to the connector (if this has not been done previously).
- Select the item “Boot - Burn hard disk image” from the program menu.
- In the Disk Drive drop-down list, find the connected media and format it by pressing the corresponding button.
- When formatting is complete, click on the “Record” button and wait for the operation to complete.
If for some reason the user is inconvenient to use the UltraISO utility, the image can be burned using any similar program, for example, UNetbootin, Rufus or Universal USB Installer.
Possible problems
Installation on a virtual machine
When installing Android-x86 on a virtual machine, many are faced with the fact that the graphical shell does not load, i.e. After loading, a command line appears as in the figure below.
This behavior is due to the fact that the 3D graphics accelerator is not enabled. In VMware Workstation, to do this, you need to open the virtual machine settings and enable the “3D graphics acceleration” option in the display properties.
In the Virtual Box virtual machine, 3D graphics acceleration is enabled in a similar way.
If the computer uses a graphics accelerator integrated into the CPU, then problems may remain. For example, the operating system will simply show a black screen after loading. In this case, you need to boot into Debug nomodeset mode
Installation on a computer
After completing the preparatory steps, you can proceed directly to installing the Android system on your PC. First, you need to restart the computer without removing the bootable flash drive from the connector, go to the BIOS and configure booting from the USB drive. After this, the user should act like this:
- Restart the PC from the BIOS, having previously saved the changes made, and boot it from the flash drive.
- Select among the suggested Installation items and proceed to the next step.
- Find the partition on which you want to install the system in the list of media and format it. You should not leave the NTFS file system - the best option would be ext3/ext4. If the partition is formatted in FAT32 or NTFS, the user will not have access to most of the disk space - a maximum of 2047 MB will be allocated for data.
- Accept the program's offer and install the GRUB bootloader. If Android is installed on a computer with UEFI, you must additionally install the EFI GRUB2 subkey. If the device has a regular BIOS, this step should be skipped. Other operating systems found on the computer will need to be added to the boot menu.
- Click Yes in the dialog, thereby allowing writing to the system directory.
- Wait for the installation to complete.
Once the installation is complete, a dialog box will appear on the screen asking you to select a download option. You must choose to restart the PC, remove the drive from the USB connector and boot from Android.
As in the case of Windows, when starting for the first time, the user will need to configure the operating system: select the language and Wi-Fi network, specify a Google account, etc.
It is important to understand that Android is a Linux-based OS, so programs designed for Windows cannot be launched directly. You will either have to install special software on your computer, or use utilities originally created for Android-based devices. Moreover, it will also not be possible to work with programs written for Linux. Android uses the Dalvik virtual machine exclusively to run applications written in the Java language, and the latter are focused only on application programming interfaces (APIs), which Linux itself does not have.
The best option would be to install Android on a PC as a second system, that is, installation on a specially designated HDD partition, virtual disk or flash drive, followed by booting from this media if necessary. The computer owner will be able to fully use all the necessary programs both in Windows, Linux or MacOS, and in Android. Darknet users often resort to installing OSes on flash drives or virtual machines to increase the level of anonymity.
You can do without installation at all by booting the system in Live USB mode (Guest Mode) directly from a bootable USB flash drive. In addition, it is advisable to run the OS once in Guest Mode before starting installation to check compatibility with the computer and identify possible bugs.
OS setup
There are many initial settings after installation:
- Wi-Fi connections;
- Login to Google accounts;
- geopositioning;
- Username;
- permission for software updates.
After saving the system settings, you can go to the settings section inside Android itself and make the device more convenient for yourself.
The Android x86 project has settings that look similar to those on a smartphone or tablet, and Phoenix OS has its own menu for selecting options.
OS setup
After installation, Android will prompt you to complete the initial settings, which include:
- select a Wi-Fi network, Google account, allow geopositioning (can be skipped);
- set time and date;
- Enter your username and allow software updates.
After this, we recommend testing the functionality of key devices: sound playback/recording, Internet access, mouse or keyboard operation. You may need to additionally install a driver.
Now you can configure the interface. Drag your most actively used programs to your desktop. Classic Android x86 has similar settings to a smartphone. "Phoenix OS" and the like have more extensive capabilities.
Changing the default background image
Adobe photoshop cs5
Template with image and utilities for work:
Skin and utilities for work
Go to the folder Skin and utilities for work, open the file using Photoshop.
The Photoshop program starts, you need to wait a little. There is no built-in profile, select Leave unchanged (do not manage color) and click OK.
We update some text layers, click Update.
Then everything will depend on your taste and imagination. It is advisable to find (select) a dark image with a size of 800 x 600 pixels so that the light text of the boot menu looks concisely against the general background.
The final image (background image) should not exceed 200 KB in size; if the file is larger than 200 KB, then the graphic image will not start and you will see different hieroglyphs.
I found and prepared an image in advance that I liked. Open our image through Photoshop, leave it unchanged.
Select our picture using the key combination + , then copy it by pressing + . If you want to learn more about useful keyboard buttons and get the most out of them, then read the article Windows 7 hotkeys.
Go to the tab of the first image Skine.psd, select the bottom layer and insert the image + . You will get something like this.
Next, you can change the text at the top. I won’t change the multiboot USB flash drive, but Installation and Recovery... I’ll change it to my own.
Then we remove the ozone.net logo, you can also remove the flash drive and the box with the disc, but this is optional. To do this, display or hide the desired layer, go to layers, click on the eye and remove unnecessary objects. If you want to return items, then click on the eye again.
In order to move the desired item to another place in the image, right-click on it, select it and place it where you need it.
Once you have edited the background image, that is, the skin for yourself, you need to save it.
Go to the File tab and select Save As...
Set the file type and click Save...
We indicate the location on your hard drive and save our skin.
A window with BMP parameters appears, set the depth to 32 bits and click OK.
Copy the created file.
Next, open the graphic editor Paint. Go to Start Menu >>> All Programs >>> Accessories >>> Paint. Select Insert from.
Open our just saved file.
Then click save as and save the image in Jpeg format.
Then we rename the file name from to .
We return to the Skins and utilities folder for work, go to the Skins folder and run the .
Next, go to the Files folder and replace the old file there with our new one. A warning message will open: A file with the same name already exists—copy it and replace it.
We return to the Skins folder and run the Pack.cmd file.
An additional file is created, but we don't need it. Rename the updated file to or any other name, copy it, go to the folder on the flash drive and paste our new skin there.
Then we return to the root of the flash drive, go to menu.lst, change the name in the second line to and save the file.
We do almost the same thing with the second menu sheet, which is in the boot folder.
Only here we change to and save the file in the same way.
Let's check our progress WinSetup From USB >>> Refresh >>> Test in Qemu >>> GO.
As you can see in the image, the background screen has changed. Open Additional Utilities - the splash screen is the same, which means we did everything correctly.
Well, we have finally finished all the work on creating our own portable, bootable USB device. All that remains is to set the boot to boot from USB media, check the functionality of all programs, distributions, utilities and use them for their intended purpose.