Downloading Kali Linux
Go to the main page of the distribution in your browser. Click on the "Downloads" link.
For computers with a 32-bit processor, you need to download a version of the appropriate bit size. If the PC is no more than 10 years old and was not one of the cheapest at the time of purchase, it is most likely 64-bit. Follow the “Torrent” link next to the version of the OS you are going to download and install.
There is also an unofficial release of Kali Linux, which is updated weekly. Follow the link to the page where you can download it.
Choose the version compatible with your PC. Click on the link and the download will start.
Creating a bootable Kali Linux USB flash drive
Go to the Universal USB Installer website. It is a simple software tool for creating bootable USB drives of Linux distributions. Download the program's executable file for Windows operating systems in EXE format.
The utility works without installation. Insert the flash drive into the USB port of your computer. Launch Universal USB Installer. Read the terms of the license agreement. To continue working with the program, they must be accepted by pressing the “I Agree” on-screen button.
In the main program window:
- Step 1: Select your distribution (Kali Linux) from the list.
- Step 2: Use the Browse button to navigate to the ISO image file you previously downloaded.
- Step 3 (Step 2): Select the drive letters associated with the bootable USB flash drive.
- Click the “Create” button located in the lower right part of the Universal USB Installer window.
- Wait until the Kali Linux boot drive is created.
Remove the flash drive from the USB port and turn off the PC. Turn your computer back on.
Why is this necessary?
- Now you don’t have to worry about the question of how and where to install the system. Whether to use a virtual machine or overwrite the Windows bootloader.
- Your Kali Linux will always be at hand, turning any computer at hand into the tool you need.
- Whatever goes wrong, nothing will be damaged except the flash drive, which is formatted in seconds.
- Immediately after working with Kali in this form, you will notice how much the system has speeded up.
- It makes working with built-in wireless adapters and much more much easier...
BIOS Settings
Connect the bootable USB drive to your computer.
Turn on your PC and enter the BIOS or UEFI by pressing the key or keyboard shortcut provided for this task in your model. When the computer boots, a prompt will appear on the screen. The most commonly used keys are:
- "Delete" ("Del")
- "F2"
- "F10"
Different computer models have different UEFI or BIOS interfaces. You need to find the “Boot” (or similar) section.
Change the boot order so that the installation USB drive you created comes first. Press the “F10” key to confirm the changes.
Press the “OK” and “Enter” screen buttons.
conclusions
In this article, we looked at how to install Linux on UEFI, as well as how to manage the boot order on the installed system. Now, if you want to install this operating system on your new laptop with EFI, then you already know how to do it. If you have any questions, ask in the comments!
View Queue
Queue
- delete everything
- Disable
Do you want to save this video?
- Complain
Report a video?
Sign in to report inappropriate content.
Liked?
Launching the Kali Linux Installation Wizard
Use the “Down” arrow on your keyboard to move to the “Install” line. Press "Enter". Next, use this button to go to the next OS installation window.
Installation wizard language. Location. Keyboard layout
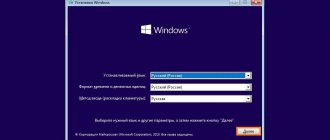
Determine the language of the Kali Linux installation wizard.
The location you enter in this window will be taken into account when setting the time zone.
Select your keyboard layout. The Latin layout works out of the box. There is no need to add it additionally.
Define a key or keyboard shortcut to switch between layouts.
The Kali Linux installation wizard will download additional components. It will take some time
Computer name and domain
In the field, enter the computer name to identify the system on the network. Can only consist of one word. For your home network, use a random one; for office use, use one allocated by the company’s system administrator.
The domain name is the part of the Internet address located to the right of the computer name. On a home network - any, but the same for all devices.
root account
Define the root password, that is, the system administrator password.
By re-entering, confirm the password you created.
Create your user account
Define a username. It will be used for those tasks that do not require entering the root password. It will appear in the “From” field in the emails you send. It will be used by software that requires a username and will be displayed in the “From” field in sent letters.
Set the account name. It starts with a small letter and consists of any number of numbers and letters of the Latin alphabet.
Enter the user account password.
It must be confirmed by re-entering.
Time
Select your time zone from the list.
Preparing the disk for installation
From the list, select the HDD or SSD partitioning method:
- Auto - use the entire disk.
- Auto - use the entire disk and configure LVM.
- Auto - use the entire disk with encrypted LVM.
- Manually (user is expected to create partitions).
In this manual, I consider the first option, in which the entire drive is one partition.
All information from the disk you selected for installing the OS will be deleted. Before pressing “Enter”, you need to remember whether files that are valuable to you are saved on additional media. If not, interrupt the installation of the operating system.
Disk layout:
- All files in one section (recommended for beginners).
- Separate partition for /home.
- Separate partitions for /home, /var and /tmp.
Beginner users are better off choosing the first option. Use other drive layout schemes only in cases where you know why it is necessary.
To continue installing Kali Linux, select “Finish partitioning and write changes to disk.” You can "Undo partition changes".
The installer will prompt: “Write changes to disk?” To continue installing the system, select “Yes”. Do this only when you are sure that the previously made settings are correct.
Installing the OS automatically
The disk will be formatted and the distribution installation process will begin. The installation wizard will now display information about the percentage of completeness of the installation.
Agree to use mirrors from the network. They are often sources of newer versions of software.
If you need to use an HTTP proxy, enter it. When a proxy is not needed, leave this field blank.
Loader
Agree to install the GRUB bootloader.
Select a disk to install the system boot loader. You are prompted to specify the drive manually.
After some time, the operating system will be configured and ready to use.
When a message appears indicating that the installation is complete, press Enter. The computer will restart.
Get started with the operating system.
Mounting the Persistence partition
Once Kali boots up, we will use fdisk to browse disk devices and partitions.
Open a new terminal window and run:
sudo fdisk -l
You will see several entries for partitions and devices in the list. Look for your USB drive. It will have two partitions: a 4 GB partition and a permanent partition created earlier. The Persistence section should appear as Linux in the Type .
Device Boot Start End Sectors Size Id Type /dev/sdb1 2048 8390655 8388608 4G with W95 FAT32 (LBA) /dev/sdb2 8390656 30463999 22073344 10.5G 83 Linux
In the example above, we see a USB drive with a 4GB partition and a device name of sdb2. This device name may be different in your case. Make sure you remember your correct one, in my case it is sdb2
IMPORTANT: You must enter these commands accurately and make sure you select the correct device (yours may not be sdb2), otherwise the save will not work.
Create a new mount point named my_usb.
sudo mkdir -p /mnt/my_usb
Mount your USB partition to save my_usb. Reminder: Your persistence section may not be sdb2, please make sure you set the correct one.
sudo mount /dev/sdb2 /mnt/my_usb
Create a new persistence.conf file using the nano text editor.
sudo nano /mnt/my_usb/persistence.conf
In this file /mnt/my_usb/persistence.conf enter
/ union
Save the file and exit. (Press CTRL+ X, press Y, then press ENTER).
Now unmount your permanent partition.
sudo umount /dev/sdb2
Ready!
Restart your computer, boot from USB again and from now on always select Live system (persistence, check kali.org/prst)
To check if saving data works correctly, try creating an empty test folder on your desktop and restarting. Select again (persistence, check kali.org/prst) and if the testing folder is still there, saving works correctly.
What software does Kali Linux support?
Kali Linux (like Debian, Linux Mint and Ubuntu) supports DEB application packages.
Kali Linux, as well as the most user-friendly distributions, can install VirtualBox without giving up using Windows 10 or 7 as the main operating system. The installation process was previously discussed by me in detailed step-by-step guides:
- Linux Mint
- Ubuntu
Managing UEFI Bootloader with eifbootmgr
When the system boots you can display the default UEFI settings by running the command:
Let's take a closer look at what each of the parameters means:
- BootCurrent – the bootloader that was used to launch this operating system;
- BootOrder – the order of bootloaders in which the boot manager will sort them out during system startup. If the first bootloader does not work, the second one will be used and so on;
- BootNext – bootloader that will be launched at the next boot;
- Timeout – timeout during which the boot loader selection menu will be shown before it is selected automatically;
- Items 0000 – 0004 are loaders that can be used.
You can change the boot order using the -o option, for example, let's make the OS from the optical disk boot first:
sudo efibootmgr -o 0,1,2,3
And let's put Ubuntu back in first place:
sudo efibootmgr -o 3,0,1,2
You can change the timeout to display the system selection menu:
sudo efibootmgr -t 20
Here we have set the timeout to 20 seconds.
Kali Linux Developer Recommendations
The distribution is intended for use by computer security specialists. Its developers do not recommend using the OS for those users who:
- Not familiar with Linux operating systems.
- They want to use the operating system as a learning tool to become familiar with the capabilities of Linux.
- They are looking for a general operating system: for development, web design, games and other everyday tasks.
The "apt-add-repository" command, LaunchPad and PPA are not supported. Trying to install Steam may result in a crash. Tasks that are easily performed in user-friendly Linux distributions require professional knowledge and additional effort in Kali Linux. The set of software sources is kept to a minimum. If you try to add others, there is a risk of damaging the operating system. Additional services, such as Bluetooth, are included in the blacklist by default.
Kali Linux developers advise starting to learn the basics of Linux from other distributions:
- Ubuntu
- Linux Mint
- Debian
Do you know any reasons why it is better for the average user to install Kali Linux rather than Ubuntu, the installation of which I recently discussed in detail in VirtualBox?
Install Kali Linux on a flash drive: check if saving changes works
- launch from a flash drive
- open the terminal
- recruiting a team
- we're going into reboot
- boot again with USB persistence
- in the terminal we type
If testfile , everything works. Now you can install updates, which, among other things, will include a choice of layouts with Russian characters. Don't miss out and customize to your liking. The default login and passwords are the same: root and toor .