01/20/2016 for beginners | mobile devices | programs
This instruction tells you how to run Android on a computer or laptop, as well as install it as an operating system (main or additional), if the need suddenly arises. What can this be useful for? Just for experiments or, for example, on an old netbook, Android can work relatively quickly, despite the weakness of the hardware.
Previously, I wrote about Android emulators for Windows - if you do not need to install Android on your computer, but the task is to launch applications and games from Android inside your operating system (i.e. run Android in a window like a regular program), it is better to use the ones described in the specified article there are emulator programs. See also: PrimeOS - Android, adapted for weak laptops and computers.
Types of platforms on Android
Their difference from standard OS is that they are optimized for the most popular x86 computer architecture. Below we talk about them in more detail.
Android x86
The presented platform is an unofficial distribution of the Android mobile OS, which was developed by Chinese programmers Li Sun and Zhi-Wei Huang for installation on personal computers with x86 architecture.
The operating system, in fact, is a practically unmodified Android kernel, into which additional options have only been built in, thanks to which the user can run it on x86 devices. The platform retained the familiar interface and design that can be seen on every Android device. In addition, the functionality of the system was completely preserved. For example, it is possible to use special installation files with the .ark extension, which also allows you to install various programs on the device.
In addition, Android x86 is also perfectly compatible with all the computer hardware that is currently used the most. So, for example, the platform works perfectly with AMD and Intel computer processors, and works perfectly with Radeon and nVidia video cards. In addition, full compatibility with the integrated graphics core from Intel was confirmed. If the video adapter built into a personal computer is not supported, the OS will process images a little differently, using the resources of the device itself.
Just like other operating systems based on Android, the software can be installed completely free of charge. To do this, you just need to go to the official website of the developers of this platform.
Distribution download link
Remix OS
The presented OS was developed based on the Android x86 platform. At the same time, Remix OS has many significant differences from its “parent”:
- Changed interface. In this case, the interface was optimized for use on desktop devices, and it was also as close as possible to the appearance of other operating systems. In the new interface, the user can see full-fledged windows, an analogue of the Start button and its menu, and even the taskbar. Moreover, it is incredibly convenient to interact with all elements of the system not only with your fingers, but also with the mouse;
- Compatibility. The platform was focused mainly on working with processors from Intel. In this regard, the developers do not guarantee the correct functioning of the system on devices with AMD processors;
- Google services are missing. The developers cut all Google software from Remix OS. But it is worth noting that the platform can, in any case, function perfectly without them;
- UEFI support is available. The developers have optimized the system to work with all modern UEFI bios;
- Closed source. Any Android OS is open source, which the user can make changes to. In this case, it is closed, which means that only platform developers will be able to make changes to it.
It is worth noting that the development of the presented operating system is currently closed. Consequently, new versions are not released, and old ones are no longer supported. However, the platform has a successor - an OS developed on its basis called Prime OS. Users can download it for free from the developer's official website. But Remix OS can only be installed from third-party sources.
Phoenix OS
The presented OS was developed based on the Remix OS platform, which is also currently no longer supported. In fact, Phoenix OS is simply an improved version of the system described above, and its interface is closer to the Windows platform. The platform operates only with processors from Intel.
It is worth noting that for proper and fast operation, Phoenix needs new processor technologies. Moreover, the OS will not run on processors that were manufactured more than five years ago.
You can install the described platform for free on the official website of its developer. For users from Russia, the page contains general information and installation instructions in Russian.
Link to developer's website
What are the system requirements?
The absolute minimum requirements for the system were initially as follows: 200 MHz processor, 32 MB of RAM and 32 MB of memory. Currently, these parameters are no longer relevant.
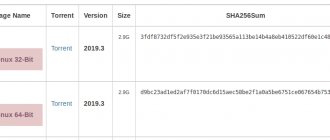
Today the project does not have traditional system requirements, as is the case with a standard OS, but is a list of tested systems. When installing Android-x86 on a PC, select the version that best suits your computer.
The platform has been tested with six different systems and manufacturers. It contains installation files customized for ASUS brand EeePC laptops and netbooks, as well as for the Dell Inspiron Mini Duo tablet PC. The rest of the computers tested are actually tablets, including the Lenovo ThinkPad x61, ViewSonic ViewPad 10, Samsung Q1U and Viliv S5.
Even if your PC hasn't been tested, you can still try Android X86. The developers recommend choosing the version closest to your system, or creating your own distribution based on the instructions on the Android X86 website. 4PDA (a resource specializing in computer technology) also offers such a guide.
Selecting a distribution and downloading
To install, you must follow the steps below:
- First, you will need to go to the website of the developer of the selected distribution;
- Then you need to go to the OS boot section and select the appropriate installation file type;
- To download, you need to click on the link and then wait for the process to complete.
As a rule, developers offer users several types of files for installation:
- EXE is an executable file for computers with Windows installed. Great for installing the Android system in a separate disk partition, and it is also possible to save the previous OS;
- ISO is an installation disk image, and it is intended only for recording data onto a memory card or DVD;
- PRM is a package manager for operating systems that were developed based on the Linux kernel. It is worth immediately noting that this type of files requires knowledge in the field of working with them, as well as experience in using the command line. In this regard, the presented file type may not be suitable for every user.
For use on a desktop personal computer, it is recommended to download files with an ISO extension. After this, the user can write them to a memory card and use them on absolutely any device. In addition, the OS can be written directly through the drive without installing it on a personal computer.
Click the link below to watch a video that explains how to install Android on a personal computer.
Possible problems and their solutions
Vyacheslav
For several years he worked in mobile phone stores of two large operators. I understand tariffs well and see all the pitfalls. I love gadgets, especially Android ones.
Ask a Question
Question to the expert
I can't build and burn the distribution image to disk.
Most likely the problem is a damaged ISO file. You need to try downloading it again. If the problem occurs again, you need to download the file from another source.
After starting the PC after a while, Android “goes” to a black screen
The problem can be caused by a time discrepancy in Android and Windows next to it. To do this, Android sets the time zone to zero. After such synchronization the problem disappears
I can’t create an additional disk partition, Windows says that there is not enough space
You can try scanning the disk with Acronis Disk Director. Installing on another disk or completely formatting the existing one will also help.
4.4/5 — (28 votes)
Creating bootable media
Once the ISO file is installed, it must be burned to bootable media, such as a disk or memory card.
Burning to a DVD or CD can be done using standard Windows tools that appeared after the release of version 7 of the OS. To burn to disk, you need to do the following steps:
- First you need to insert the disc into the drive;
- Open the folder with the image and double-click on its icon;
- Then select the disk on which the personal computer system should write the image and wait until the download completes.
If you want to install an image on a memory card, you should be warned that this cannot be done using standard Windows tools. This problem can be solved by installing special software. The Daemon Tools program is best suited for this, but it’s worth noting right away that it’s paid. You can also find a free version of the application on the Internet, however, it does not have the option of recording images to a memory card.
The paid version of the program has a trial period that lasts several days. At this time, you may well have time to create a boot image of Android.
To write an image to a card using the Daemon Tools program, you must perform the steps described below:
- First you need to open the main screen of the utility and select the memory card icon on it;
- Then connect the portable drive to your personal computer and select the disk, image, and recording type;
- After that, click on the “Start” button and wait for the image to finish recording.
Creating an installation flash drive
The first thing the user needs to do is download a ported image of the Android OS, prepared for use on a PC with x86 or x64 architecture. To do this, you need to visit the android-x86 website and select the appropriate version of the system. Then the image must be written to a USB flash drive using the UltraISO program. Then proceed like this:
- Install the utility on your computer, run it as an administrator and go to the “File - Open” menu.
- Find the downloaded ISO image with the operating system and open it.
- Connect the USB drive to the connector (if this has not been done previously).
- Select the item “Boot - Burn hard disk image” from the program menu.
- In the Disk Drive drop-down list, find the connected media and format it by pressing the corresponding button.
- When formatting is complete, click on the “Record” button and wait for the operation to complete.
If for some reason the user is inconvenient to use the UltraISO utility, the image can be burned using any similar program, for example, UNetbootin, Rufus or Universal USB Installer.
Creating a partition on a hard drive for Android OS
If you need to save the operating system previously installed on your personal computer, create a partition on your hard drive before installing the Android platform. This is done as follows:
- Find the “My Computer” shortcut on the desktop and right-click on it;
- A menu will open in which you need to click on the “Manage” line, after which another menu will open. In it you need to go to the “Disk Management” section;
- Then right-click on the drive on which you want to install the operating system. In the list that opens, click on the “Compress volume” line and select the compression volume, after which you will need to wait until the end of this process;
- A new section will appear in which you also need to right-click. in the menu that appears, select the line “Create a simple volume” and specify its size, assign a letter;
- At the end, you will need to format the new partition; to do this, check the box next to the corresponding line in the volume creation dialog box and click on the “Finish” button.
Install the Android operating system
Restart your PC (desktop or laptop) and at startup choose to boot from the installation USB flash drive you created earlier, just as you would if you were going to install Windows or another operating system.
In the installation interface for the distribution kit of the Android mobile operating system, select “Installation - Install Android-x86 to harddisk”. After this, the download begins. After a short time, you will see the operating system setup interface, starting with choosing a language.
After selecting the language, you need to make other initial settings for Android-x86.
Select a wifi connection and enter access data
Enter your Google account information to log into Android on your PC
We install Google services in Android on your computer
After completing the settings, connecting to the Internet and logging into your Google account, you will see the main screen of the Android operating system installed on your laptop or desktop computer. Ready! The Android mobile operating system is installed on your computer!
Basic settings are enough for Android to work stably on your PC, although you can always change the default settings. Now you can fully use your computer to surf the Internet, watch videos, listen to music, and use certain Android applications.
By the way, the Android-x86 distribution allows you to enable multi-window mode in Android.
BIOS setup
To enter the BIOS, you must press the “Delete” button on the keyboard while starting the personal computer. It is important to do this before the system boots. Then you need to specify the boot media priority by going to the menu called “Boot”.
This menu will list all media connected to the personal computer in the order in which they are used. As a rule, the hard drive on which the device OS is installed comes first. In its place, you need to set priority to the previously created bootable media.
Using a virtual device
If necessary, you can install the Android-X86 emulator. At first glance, this may seem like a slow, unintuitive way to use Android on your computer, but using a virtual device has many benefits. If you are a developer and need to test applications, this is the best way to make sure everything works smoothly. There are two main virtual device emulators in use today: Genymotion and Google Android Virtual Device Manager, which comes with Android Studio.
These services have evolved quite a bit since they were first released. If you select x86_64 as the architecture, you will be able to run the Android virtual device in fast virtual access mode, which uses Intel's Hardware Acceleration Manager (HAXM) to speed things up. But this only works for x86_64 and will not speed up x86_32, ARM or MIPS.
Genymotion runs on x86 architecture and also does not provide great speed. One of the biggest disadvantages of using this method is the lack of Google Play Store. For this reason, you will not be able to install third-party applications on the virtual device without an additional download. Also, if you don't plan to do any development, downloading Android Studio and wasting space on your computer may be inconvenient. In addition, Genymotion requires that the VirtualBox virtual machine manager be installed in order to work. This method will work on OS X, Windows and Linux without any problems.
How to install Android on PC
There are two ways to install Android on a personal computer. Each is described in detail below.
Primary OS
In this case, we mean the complete removal of Windows on which the personal computer previously functioned. However, this method has several disadvantages:
- Android will not be able to properly run Windows executables with the EXE extension in the future. These tools are used in most software, and the user simply cannot do without them;
- The interface of desktop versions of Android is not as convenient as the interface of a full-fledged OS for a desktop computer.
You can install Android on a personal computer as the main operating system as follows:
- First, bootable media is created;
- The BIOS then sets the priority for booting it;
- At the end, the installation starts, indicating the drive partition in which the other operating system is installed.
At the end of the download procedure, the old operating system of the personal computer will be completely removed, and Android will be installed in its place.
During the installation process, you must allow the system to delete and edit files located on the device’s hard drive.
You can also install Android as the main operating system without erasing the old version from the device. To do this, you just need to download the android to a pre-prepared partition of the disk you are using, and then set the download to default. To install you need to do the following steps:
- Install Android and run it on your Windows computer;
- Then right-click on the “My Computer” shortcut. In the menu that opens, click on the “Properties” line and go to the “Advanced Settings” section;
- Then open the boot options and select Android as the default operating system.
Additional system
In this case, it is implied that another operating system on the computer will be loaded by default. The user can initiate the Android download independently, if necessary, by simply pressing the F10 button while starting the device.
Important! Installation as an additional OS must be done on a previously created partition on the hard drive. Thanks to this, the user can save a previously installed distribution of another operating system.
Install Android games on your computer
The most modern games on Android can already compete in graphics with computer games that are several years old, so it is quite reasonable to want to play Android games on a computer without thinking about the battery charge and sudden calls interrupting the game.
For those who do not yet know how to play Android games on a PC, there are short instructions in the article.
How to install on a virtual machine
You can also run Android on your personal computer without a full installation. For this, a virtual machine is used, that is, software that emulates the desired platform and hardware devices that the computer needs for stable operation of the operating system.
It is also worth noting that the emulator allows you to run any version of Android on a personal computer, even those that are not designed to work with devices based on the x86 architecture.
Special programs are used for emulation. The VirtualBox utility, which the user can install completely free, can be a great help with this.
Installation link from the official website of the developers of this utility
Emulation is done as follows:
- First, the above utility is launched, in which the user must specify the path to the image with the OS distribution;
- Then you need to specify the size of RAM, virtual disk and other parameters;
- After this, you can launch the emulator.
A window should appear on the Windows desktop, in which the desktop of the installed Android will be located. The user can fully interact with it.
How to download and prepare?
All installations of Android-X86.org are carried out in ISO file format, which contains an exact copy of the disk. Downloads are divided into legacy, stable and unstable releases. It is best to choose a stable version that matches your computer. ISO files are usually burned onto CDs, but they are about 70 MB in size and only take up about 10 percent of the disk. An easier way is to create a bootable USB drive. For Android-X86, it is recommended to use the UNetbootin application. If you want to create a bootable CD, Windows offers its own disc image burning program.
Setting up Android OS
The process of setting up the desktop version of Android is practically no different from installing the operating system on a mobile device. After starting your personal computer, you just have to select the system language, log in to the WI-FI network, as well as your Google account.
Important! If your personal computer uses a desktop version of the operating system, the Android setup process may be slightly different. The main difference is that the user does not have to log into a personal Google account and connect to the network.
Alternatives to Android-x86 distribution
Currently, there are several alternatives to the Android-x86 distribution, for example, the PrimeOS and PhoenixOS x86 operating systems, which are forks of the Remix OS project (the last release was several years ago). There is a Bliss OS project, which is a version of the Android OS optimized for use on computers, currently available in Android 9 Pie.
The installation of these Android distributions, optimized for use on desktop computers and laptops/netbooks, may differ and will be different for each operating system, but is similar to installing and configuring Android-x86.