Changing the volume label
Users treat their PCs differently. Some are quite satisfied with the default parameters offered by the system, others prefer to “customize” the system for themselves, achieving the most comfortable conditions for using the computer.
After installation, all partitions on the hard drive are often named “Local Disk,” but it is much more convenient to designate the space allocated for movies, photos, or backups more clearly. This is especially true if the PC is used by several users.
A volume label is a descriptive name for a partition on a hard drive; it is necessary only for user convenience and does not affect the operation of the OS.
Let's look at the main ways to change the volume label:
- use of a graphical interface;
- label command.
Photo: hard drive
Most users are not used to working with command-based systems. For them, changing the volume label using a GUI is much more suitable.
Here is the procedure for changing the volume label:
- open “My Computer”;
- right-click to open the menu on the desired drive;
- select “Rename”;
- enter a new name;
- press Enter.
Photo: “My Computer” Windows 7
Before changing the volume label, you need to know the basic requirements for it, because otherwise proper operation may be disrupted, consider them:
- maximum label length is 11 characters for FAT or 32 for NTFS;
- spaces are allowed;
- It is prohibited to use a tab character in a label;
- The label of a disk formatted in FAT cannot contain the following characters: * ? / | . , ; : + = ".
The laptop reboots itself, why? The answer is here.
Hard drives have usually been formatted in NTFS for many years now; other drives may still be formatted in the older FAT file system.
It is more convenient for experienced users to change the volume label using the command line and the label command.
Let's look at how to change the label from the command line:
- open a command prompt with administrator rights;
- enter the command label drive letter;
- press Enter;
- specify a new label and confirm the entry using the Enter key.
Please note that the old label will be erased without displaying an additional warning. Photo: Windows 7 command line
Photo: Windows 7 command line
If you just need to remove the volume label, you need to do the following:
- run command line with administrator rights;
- type the command label drive letter and press Enter;
- when prompted, leave the input field blank and press Enter;
- Confirm deleting the mark by pressing Y.
Possible problems
Sometimes Windows 7 users cannot change the drive name. This is due to the big changes that have occurred in this version of the OS. Often on computers with Vista and XP, to prevent infection by certain viruses, an autorun.inf file was created in the root of the disk. In Windows 7 there is no point in creating it, but this file may be hidden.
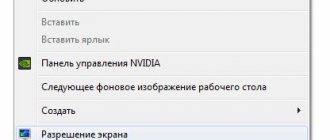
Photo: Control panel
Let's look at how to enable the display of hidden files:
- open “Control Panel”;
- go to the “Folder Options” section;
- on the “View” tab, check the box next to “Show hidden files and folders”;
- Click Ok.
You can now delete the autorun.inf file and restart the computer, after which you can change the volume label.
Command line help
You can prepare a flash drive for installing the operating system using Windows itself. What is required can be launched in different ways:
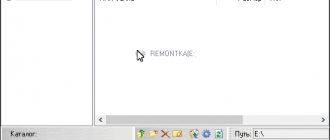
As a result, a black window will appear, which is what you want. In it you need to type diskpart and press Enter. This key is pressed after each command entered. Now, actually, the instructions for creating a bootable flash drive:
The main part is done, after that you need to copy the Windows files to a flash drive, and in the same form as it was on the installation disk.
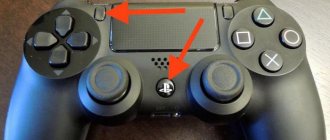
How to rename a flash drive and make an icon for the flash drive
(spayte
) wrote, 2012-07-21 17:56:00
spayte
2012-07-21 17:56:00 Manufacturers of modern flash cards decorate flash drives in all sorts of ways. They use rare materials for the case (up to platinum and gold), and make flash drives in the form of everyone’s favorite cartoon characters and video games. But, no matter how beautiful the flash drive is in appearance, when we insert it into the computer we will see everything - the same template icon that the operating system uses to designate flash drives. But, as you understand, this pattern can be easily corrected - rename the flash drive or select colorful icons for the flash drive.
In order to rename a flash drive using Windows, we need to connect the flash drive to the computer, go to the My Computer menu and find your flash drive in the devices with removable storage section. Next, right-click on the flash drive and select Rename. Enter a new name and click OK.
How to rename a flash drive and make a flash drive icon
In this method, we will consider the option of not only renaming a flash drive, but also making colorful icons for a flash drive that will allow your flash drive to be different from other devices.
First, let's select suitable icons for the flash drive. You can select the desired image and reduce it to 64x64 px in Photoshop, or you can go the other way and turn to the online service for searching icons iconsearch. Using this service, you can select icons of absolutely any topic and make a flash drive icon of the appropriate size.
Once you have chosen an icon, download it in .ico format (any other format will not be displayed).
Icon=car.ico Label=Tramp
Accordingly, car.ico is the name of our icon, and Tramp is the name of the drive. If you want to rename the flash drive using this method, write the name of the icon in the Label field.
The flash drive was renamed and acquired its own icon, but now we have two files on the flash drive that are responsible for the name and icon of the flash drive, so that these files are not accidentally deleted, let's hide them. Right-click on the file, select properties and in the properties menu set “Read Only” and “Hidden” - this will allow you not to delete these files when you work with the flash drive.
It turned out very beautiful and original. But, in addition to design, creating a personal icon for a flash drive allows you to protect yourself from viruses to some extent. The thing is that when a virus penetrates a folder, it first attacks the autorun.
inf changes the icon to the standard one. That is, if you connected a flash drive to your PC and saw that the icon there was replaced with a standard one, you know that some kind of nasty thing has moved onto your flash drive. That is why be sure to use a good Anti-Virus on your PC.
https://steepbend.ru/windows/kak-per...u-dlya-fleshki/
Original post and comments on LiveInternet.ru
In conclusion
To ensure that choosing a flash drive does not turn into a headache, you need to choose the device wisely. You should not be guided only by the big name of some popular brand. Without a doubt, many companies can offer quality products. But only those manufacturers who have stood the test of time deserve trust. In this case, you can be sure that the purchased drive will last for a long time.
It is also worth considering that you can infect your computer through a flash drive. And to avoid this, you need to use licensed anti-virus software!
Almost every person who works at a computer knows about the existence of a device called a “flash drive” (USB drive). Initially, these drives were quite expensive and were considered exotic devices. Back then they were not very common, and people exchanged information using disks, hard drives and floppy disks. Today, these drives have almost completely replaced the above methods of information transfer.
A USB drive is an electronic device that is used as a storage and storage medium. It connects to a personal computer, laptop, etc. The main advantages of this device are ease of use, a wide range of models and a fairly low price. Among its main characteristics are compactness, a significant amount of memory, and high data transfer speed. The drive is a universal device and is perfectly protected from mechanical influences. You can easily carry it in your pocket and use it if necessary.
A flash drive can be completely different in its design. You can buy a wide variety of drives in stores, which will differ in capacity, design, interface type and capabilities.
USB 1.0; 1.1; 2.0; 3.0; 3.1.
The main distinguishing feature of these types of drives is the data transfer speed. Yes USB 1.1
transmits data at a speed of 600-800 KB per second. In this case, recording is supported up to 700 KB per second. USB 2.0
more advanced, they can transmit data at a speed of 480 Mbit per second.
USB 3.0
introduces a new type of storage device that allows data transfer at speeds of up to 5 Gbps.
USB 3.1
devices are capable of transferring data at speeds of up to 10-12 Gbps.
However, you should not delude yourself with the desire to own the most advanced device. Actually a USB 3.1
unlikely to support most of your devices. The fact is that the USB receivers themselves in most cases have USB 2.0
.
As a result, when connected to a USB 2.0 port or in the reverse order, the drive will operate in USB 2.0
, that is, the speed will be significantly limited.
There may also be drives that operate using voice control. Such a device recognizes the owner’s voice, after which it unlocks the ability to work with data. There are devices with antibacterial coating. The body of such a drive is made using special antibacterial materials, so that germs do not multiply on it.
There are also double-sided drives. The flash drive has two USB connectors. Using such a drive, you can store work information and personal information separately. This is convenient in cases where you might accidentally overwrite an important document. Devices are sold that combine a storage device and a digital camera.
Device
How to rename a flash drive on a computer and why to do it
How to rename a flash drive and what goals can be achieved. Let's find out in this publication.
Flash drives, or simply flash drives, are currently extremely popular among users due to their mobility and ease of use.
- When you insert a flash drive into a USB port, a green icon appears in the lower right corner of the screen - Safely remove devices and disks, which signals that the flash drive is connected and ready for use.
- Working with a flash drive is absolutely the same as working with folders and files on a computer.
- You can create any file or folder on a flash drive, edit something, rename it, save it.
- You can copy by dragging and dropping onto your computer, or copy through the context menu, or delete an unnecessary document.
A flash drive is mainly used to transfer files.
Maybe for their temporary storage.
How to format a flash drive
The flash drive can be formatted if necessary by calling the context menu with the right mouse button.
In the context menu we find the Format item. A formatting window will open.
Click Start. A dialog box will appear warning you that after formatting, all data from the flash drive will be deleted. Click Ok.
- After formatting is completed, the flash drive will be clean.
- In order to check the actual capacity of the flash drive, call Properties from the context menu.
In the dialog box that opens, you can see that the flash drive has a capacity of 8 GB. At the moment, 0 bytes are occupied, that is, it is really clean.
- If some information is stored on the flash drive, then it will show how much space is occupied.
- When formatting a flash drive, you can randomly format any local drive.
- Therefore, you need to be careful not to lose important data from your computer.
How to rename a flash drive on a computer
Many people do not like the default name of the flash drive. The name is usually assigned according to the manufacturer.
It can be especially inconvenient to work when there are several identical flash drives from the same manufacturer.
For this reason, it is better to give them some interesting names so that the flash drives are different from their own kind. Renaming a flash drive is really easy.
Right-click on the flash drive that you want to rename, open the context menu and, as with a regular folder, select - Rename.
In the window that opens, select the desired name, for example, Windows 7. Now this flash drive will be detected under the name Windows 7.
- It immediately becomes clear and understandable that this flash drive is bootable for Windows 7.
- It must be borne in mind that when the task is to rename a flash drive, the new name should consist of no more than eleven characters, including spaces.
Rename the flash drive through the control panel
It is possible to rename the flash drive through the Start menu. Go to the Control Panel, select - Administrative Tools, then - Computer Management, then - Disk Management.
A window will open where all local drives will be displayed, as well as the connected flash drive.
In the same way, we stand on the flash drive and call Flash Drive Properties from the context menu. From here you can format the flash drive, rename it, or perform any other actions with it.
Additionally, you can assign your own icon to the flash drive. But it is worth noting that it is much more convenient to rename a flash drive and work with it from Explorer.
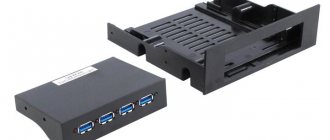
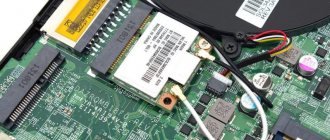
REPLACING A BROKEN USB JACK IN A TABLET
Hi all! Today I’ll tell you about replacing the USB connector on the tablet. This replacement is unusual in that it had to be replaced with a regular soldering iron, without a soldering station. It all started when I was far from home, in a neighboring city. My friends, having learned that I was a radio amateur, immediately asked for help in repairing their devices. The first one turned out to be a tablet with a loose USB connector, which did not even want to charge the tablet, which will be discussed here. First, it was necessary to think about dismantling the broken connector, since it is very easy to damage the printed circuit board, especially with a conventional soldering iron. It was decided to cut through the old connector with needle-nose pliers, and to cut through the upper end of the connector. But first, let’s look at our “patient”. Removing the back cover:
In this tablet, it was on the latches, and under it there was already a main aluminum cover, we see a bunch of screws, above in the photo I have already unscrewed them.
We look very carefully, have we forgotten any bolt, have we unscrewed everything that might prevent us from removing the back cover? - Okay, let's take it off.
Now you need to remove the board itself from the top of the tablet. The main thing is not to rush, otherwise we might break something, we check how and with what the board is attached to the tablet, in this tablet it is with bolts and latches. We unscrew the bolts.
We disconnect all connectors and cables from the board; to disconnect the cable, simply lift up this connector clamp and pull the cable toward you:
We disconnect the display connector from the board; this tablet uses a connector like on laptops:
All the bolts have been unscrewed, all the cables have been disconnected, and now you can remove the board for further manipulations.
We take out carefully, just like there are SMD parts on the board, and planar microcircuits that can only be soldered with a soldering gun. And if SMD output parts and microcircuits can still be soldered with a soldering iron, then BGA can only be soldered with a hairdryer. We carefully pry off the latches that hold the board; you need to pry it off with something soft, for example, I use a regular SIM card or a bank plastic card for this. By the way, I also use them to disassemble plastic panels of various gadgets, since you cannot disassemble plastic cases with metal tools - they can be damaged or even broken very easily. Here is the actual board removed:
Why do you need to change the drive letter?
When working with USB drives normally, the letter that Windows assigns to the drive is not particularly important.
However, there are special use cases for USB flash drives.
For example, Bank clients of several banks can be installed on one computer or laptop. Each Bank client is activated using a special key using a free USB port.
During installation of the Bank Client, the USB key receives a specific letter, which Windows automatically assigns to it.
If Bank clients of several banks are installed on one laptop, then confusion with drive letters is possible.
In this case, a problem arises with the activation of the corresponding Bank-client, which cannot find the key at the address generated during activation.
Indeed, the key received a different letter and the address changed.
A similar problem with the drive address may occur when running a local server on a removable drive.
Assigning a drive letter using Windows Disk Management
You do not need any third-party programs to assign a letter to a flash drive - this can be done using the Disk Management utility, which is present in Windows 10, Windows 7, 8 and XP.
The procedure for changing the letter of a flash drive (or another USB drive, for example, an external hard drive) will be as follows (the flash drive must be connected to a computer or laptop at the time of performing the steps)
- Press the Win+R keys on your keyboard and type diskmgmt.msc into the Run window, press Enter.
- After loading the disk management utility, you will see all connected drives in the list. Right-click on the desired flash drive or disk and select the menu item “Change drive letter or drive path.”
- Select the current drive letter and click “Change”.
- In the next window, specify the desired letter of the flash drive and click “OK”.
- You will see a warning that some programs that use this drive letter may stop working. If you do not have programs that require the flash drive to have the “old” letter, confirm the change in the flash drive letter.
At this point, assigning a letter to the flash drive is complete, you will see it in Explorer and other locations with a new letter.
How to assign a permanent letter to a flash drive
If you need to make sure that the letter of a particular flash drive is constant, this is simple: all the steps will be the same as described above, but one nuance is important: use a letter closer to the middle or end of the alphabet (i.e. one that is randomly will not be assigned to other connected drives).
If, for example, you assign the letter X to a flash drive, as in my example, then in the future, every time you connect the same drive to the same computer or laptop (and to any of its USB ports), it will be assigned the assigned letter.
Side effects warnings
If you are performing letter replacement steps in parallel with reading this article, then I consider it necessary to immediately warn you about some things:
- You will not be able to change the letter for the system dedicated drive “C:”, on which the OS is already installed. Because Microsoft decided so, which somewhere out there, in the depths of system files and registries, refers to a location associated only with such an address;
- Following this logic, changing the name of other partitions of local disks can also lead to malfunctions of programs already installed on them.
- It is better to change the disk name on a cleaned partition. Therefore, first we create a backup copy of the data and add there the installation files of the programs that you want to see on the disk with a new name.
Taking into account the above nuances, you can continue to work with the Disk Management utility.
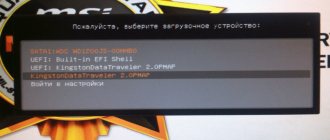
Ways to create a boot device
To decide how to make a flash drive bootable, you can use several methods:
All of these methods are easy to do. It’s just worth clarifying that if the bootable media is made using different utilities, then you will need an image of the operating system, preferably in ISO format. And for it to fit on a flash drive, its volume must be at least 4 GB.
The image should be prepared in advance using the same UltraISO program or any other appropriate type. Then let it be stored on the hard drive, which will save the optical media with the operating system, which is prone to scratches with frequent use.
After creating a bootable flash drive, you must set the initial boot from a USB device in the BIOS.
How to assign the desired drive letter to a USB drive in Windows?
In some cases, it is required that a specific drive be identified by a specific letter.
This can be a USB drive or a virtual disk.
Everything is simple here. Using the approach described above, you should choose letters for the drives that are at the end of the English alphabet.
Example 1
The virtual disk may receive the letter z:
This letter is the last in the alphabet and it is difficult to imagine that it can be occupied automatically.
Example 2
A specific flash drive (or other USB drive) can be assigned any free letter located at the end of the English alphabet. For example w:
Creating files with the desired letter
As mentioned above, you can create service files on a flash drive that will “tell” the computer which letter it needs to assign. There are several ways to do this.
Method 1
Create a batch file that will automatically change the letter to the required one. For this purpose you need:
1. Open Notepad or another similar text editor.
2. Type in notepad or copy the following lines from this page:
for /f "tokens=*" %%a in (' mountvol %
How to rename a flash drive on a computer?
This article will discuss the following questions: how to rename a flash drive on a computer, as well as how to change the letter of the flash drive.
- Changing the name of the flash drive
- How to change a letter?
We will demonstrate the process of renaming and changing the letter in the Windows 7 operating system, but this guide is also suitable for owners of Windows 8/8.1 and Windows 10.
Changing the name of the flash drive
Changing the name of a USB drive is very simple, so the process will not take you more than one minute. 1. Go to the “My Computer” folder
3. Enter the required name and press the “Enter” key. Done! This is interesting: Formatting a hard drive via BIOS
Attention! As a result of these actions, all data on this drive will be destroyed, so copy the existing information in advance. The drive has been renamed
The drive has been renamed.
How to change a letter?
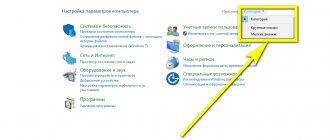
The process of changing the drive letter takes a little longer, but there is nothing complicated about it either.1. Open the Control Panel (in the article How to access the Control Panel in Windows 7, we described this process in detail). Then, for convenience, switch View to “Small Icons” mode.
3. Double-click on the “Computer Management” line.
4. In the window that opens, select “Disk Management”.
5. As a result of these actions, you will see a list of all the disks and partitions you have. Select the required flash drive from this list and right-click on it. In the menu that opens, select “Change drive letter or path..
6. Next, click on the “Change” button.
7. Select the desired letter and click on the “OK” button. After this, a warning message will appear in front of you, do not worry and just click on the “Yes” button.
Until now, the removable disk on our computer had the letter “A”, but now we will change it to the letter “Z”. Select the letter “Z” and click on the “OK” button.
To check, go to “My Computer” and see that the letter has indeed changed. The letter has changed!
Assigning a flash drive letter using Disk Management
To assign a letter to the flash drive, you can use the Disk Management utility, which is included in the toolkit of Windows 10 and other modern versions of the operating system from Microsoft. You can apply it as follows:
- Press Win+S, enter your request Computer management and click on the search result.
- In the left column, click on Disk Management.
- In the table that appears, you will see all removable devices connected to the computer. Right-click on the desired one and in the context menu click on Change drive letter or drive path.
- From all the suggested actions, select Change.
- In the next window, open the list of available letters opposite the item Assign a drive letter (AZ), select the appropriate one and assign it by clicking on OK.
- The utility may display a warning that programs using the old drive letter will no longer be able to work with it. If your computer does not have these, give your consent to apply the changes.
How to change the icon of a disk or flash drive
How to change the disk icon or change the flash drive icon in Windows? In the Windows operating system, drives and connected removable devices are displayed with standard icons.
If the manufacturer has made a special icon on the device connected to the computer (flash drive or external hard drive), then in this case, the Explorer will display not a standard icon, but an icon created by the device manufacturer.
Why do you need to change the icons of flash drives or disks on your computer? In the case of a hard or local drive, there is no particular need to change the disk icon, but changing icons for connected USB flash drives is in some cases desirable.
How to change the disk icon or change the flash drive icon from the standard image in Windows to another icon? In the article I will tell you how you can change the disk icon, how to change the icon of a flash drive on a computer in the Windows operating system. This method works equally in Windows 10, Windows 8.1 (Windows 8), Windows 7.
Preparing the image and autorun.inf file
To change the icon of a hard (local) drive or flash drive (external hard drive), you will need two files: a picture and the “autorun.inf” file.
First of all, you need an image in “.ico” format with a resolution of 128x128 or 256x256 pixels. You can find a finished image on the Internet or make it yourself in a graphics editor. Create an image in JPG or PNG format and then convert it to ICO format using a converter program or online converter.
Now you need to create the “autorun.inf” file, which will be needed to display the icon. Open Notepad or another text editor and paste the following command into it:
ICON=icon_name.ico
In this entry, replace “icon_name” with your own, which will be displayed in Windows Explorer. The icon name can consist of numbers, letters, words. Save the file on your Desktop or other convenient location.
When saving a file, in the Explorer dialog box, in the “File name” field, insert “autorun.inf” (without quotes), in the “File type” select “All files”, and then click on the “Save” button.
The "autorun" file has the extension "inf". The files are ready to use.
First, let's change the icon of the USB flash drive, and then I will tell you how to change the icon of the disk (hard or local) on the computer.
How to change the flash drive icon
Let's see how to change the flash drive icon from a standard image to your own image. In this image, the Windows 7 operating system Explorer displays the standard removable disk (flash drive) icon: “Removable disk (F:)”.
Prepare an image in “.ico” format and an “autorun.inf” file for the flash drive.
Copy the files to the root of the disk (flash drive). You need to move the files to the root directory (directly to the flash drive itself), and not somewhere in a folder on the flash drive.
Next, in Explorer, right-click on the flash drive. From the context menu, select Properties. In the “General” tab, set the “Read Only” and “Hidden” attributes. Click on the "OK" button.
First, disconnect the flash drive from the computer (remove the USB drive from the connector), and then reconnect the USB drive to the computer.
In the Explorer window, you will see that the flash drive has changed its icon to the new one that is selected for this device.
How to change the drive icon in Windows
In order to change the icon of your hard drive or local drive, you must perform similar steps. Prepare an image in the “ICO” format and the file “autorun.inf”, in which write down the name of the icon prepared for the hard drive.
I want to change the drive icon on the Local drive “E:” (this is a separate hard drive) of my computer in the Windows 10 operating system. Changing the hard drive icon in Windows 7 or in Windows 8.1 (Windows works in a similar way.
In this image, Local Drive "E:" has a standard icon. Here you can also see that a flash drive is connected to the computer, on which I changed the icon in Windows 7.
Copy the image in “.ico” format and the “autorun.inf” file to the root of the disk (to the disk whose icon you want to change), in my case, to the Local disk “E:”.
Enter the properties of these files (right-click on each file, select “Properties” in the context menu), add the attributes (check the boxes) “Read-only” and “Hidden”.
Then restart your computer. After booting the PC, you will see that the hard (local) drive has changed its icon to a different icon.
Conclusions of the article
The user can change the icon (icon) displayed in Explorer on the disk (hard or local) of the computer, or change the icon (icon) of the flash drive displayed in Explorer after connecting a removable device.
Assigning a letter through Windows settings
Method 1
1. Connect the USB flash drive to the computer.
2. Open the Disk Management window using one of the following methods:
• press the Win+R key combination on the keyboard, enter the command diskmgmt.msc in the window that opens and press the Enter key.
• right-click on the “Computer” icon located on the desktop or in the “Start” menu, and select “Manage” in the context menu that appears;
• in the left part of the window that opens, select “Disk Management” and wait for the system to display the storage devices connected to the computer.
3. In the disk management window, find the flash drive for which you want to set a permanent letter, right-click on it and in the context menu that appears, select “Change drive letter or drive path...”
4. In the next window, click the “Change” button and then select a new letter for the flash drive in the drop-down list.
Important. You need to select a letter from the second half of the list (closer to the end), so that the next time you connect a flash drive, this letter will not be occupied by another storage device.
5. Having selected a letter, press the “OK” button. A warning dialog box will appear in which you need to confirm the changes (click the “Yes” button).
As a result of the actions described above, the computer will “remember” the user’s choice and will always assign the same letter to this flash drive. Other devices will still be assigned letters as normal.
Method 2
Information about the settings for connecting storage devices is stored in the Windows system registry. By changing it, you can achieve the desired effect.
Procedure
:
1. Connect the flash drive to the computer, open the “Computer” section and see what letter the computer automatically assigned to it.
2. Open the Windows Registry Editor.
Let me remind you that for this purpose you need to press the Win+R key combination on your keyboard, enter the regedit command in the window that opens and press the Enter key.
3. In the editor, open the HKEY_LOCAL_MACHINESYSTEMMountedDevices branch (I recommend reading these instructions for readers who do not have experience editing the registry).
A large list of keys will be displayed on the right side of the editor, at the very end of which there are options displaying the storage devices connected to the computer. These parameters have names like "DosDevicesL:", where L is the letter of the storage device.
4. Among the mentioned keys, find the key responsible for the flash drive by letter (you need to look for the letter in the “Computer” section) and change its name accordingly. To do this, you need to right-click on the key and select “Rename” from the list that appears.
Nothing in the name except the letter should be changed. It is advisable to choose a new letter, as in the previous method, from the second half of the English alphabet.
5. Close the registry editor. The computer will begin assigning the selected letter to the flash drive, starting from the next time it is connected.
Method 3
You can also change the letter of the flash drive through the Windows command line, proceed as follows:
1. Open a command line as an administrator (see how to do this here).
2. Type the command diskpart and press the Enter key (the Enter key will also be pressed to enter all the commands mentioned below).
3. After a while, when the DISKPART>
, enter the list volume command.
The command line will display a list of all storage devices connected to the computer. Among them you need to find our flash drive (see image, in my case the flash drive is number 5 in the list).
4. Enter the command select volume n, where n is the number of the flash drive in the list.
5. Enter the command assign letter=W, where W is the letter that you want to assign to the flash drive. It is important that at the time of entry it is not occupied by another storage device.
6. Enter the exit command, then close the command line.
Windows 7 USB/DVD Download Tool
This utility was created by Microsoft, which is responsible for releasing operating systems of the Windows family. It comes in handy for creating bootable media. First, you need to download the program from the Microsoft website and install it on your computer.
You must also run the program with administrator rights (how to do this was described above). Then do the following:
The formatting process will start, after which the necessary files will begin to be copied to the flash drive.