Today, the Internet has become so firmly established in our lives that it is impossible to even imagine how we managed without it before. Some people use the global network to carry out business correspondence, complete purchase and sale transactions, while others simply communicate with their family and friends who live very far away. The Internet has brought a lot of useful things into our lives, it’s stupid to deny it. But sometimes an appropriate connection speed is needed to perform the required tasks. That's when high-speed connections come to our aid.
Nowadays, users have already forgotten what slow Internet is.
Of course, today few people use the Internet with low data reception and transmission speeds. However, there are those who have just connected to any provider and need to know how to create a high-speed Internet connection in Windows. Let's look at the process of creating a connection using the example of the three most popular versions of Windows today. First of all, it is important to note that the router or router settings must be set in advance. And subsequent operations will help you gain access to the existing network.
High-speed Internet connection in Windows: what is it?
First, let's find out what this type of connection is. Actually, the name speaks for itself - Point-to-point protocol over Ethernet.
This connection is characterized by a high data transfer rate, and in a compressed form, which has a positive effect on the speed of calling the requested websites or downloading files. A high-speed connection works in Windows 10, systems of a lower rank, or even in other operating systems different from them, in exactly the same way. In essence, it is somewhat reminiscent of the outdated type of dial-up access, but instead of a telephone line, an Ethernet network is used. It is worth mentioning separately that this type of connection, if you decipher the abbreviation PPPoE, is a point-to-point connection, in which one of the parties is the user, and the other is the provider’s access server. Due to data compression, the connection speed is increased, and the use of logins and passwords, not to mention encryption without loss of bandwidth, eliminates the possibility of access to such a connection from the outside or third parties who have not passed authentication, which, by the way, is performed every time a communication session is started .
Connecting the Internet
There are several ways to connect to the global network, it all depends on your capabilities and (or) needs.
- Cable connection. This is the most common and simplest option. In this case, the provider provides the subscriber with a line - a cable laid into the room, which is connected to a PC or router. There are three types of such connections - regular, PPPoE and VPN.
- Wireless. Here, access to the network is carried out via a Wi-Fi router, to which the same provider cable is connected. Wireless methods also include mobile 3G/4G Internet.
- We will separately discuss the possibility of using a mobile phone as a modem or access point.
Method 1: Ethernet
This type of Internet service provision does not require special access requirements - login and password. In this case, the cable is directly connected to the LAN connector on a computer or router.
In most cases, with such a connection no additional actions are required, but there is one exception - when the provider provides the subscriber with a separate IP address and its own DNS server. This data must be entered in the network settings in Windows. The same thing will have to be done if there is a change in provider, that is, find out what IP was provided by the previous one and what the current provider provides.
- First, we need to get to the corresponding settings block. Right-click on the network icon in the notification area and go to the “Network Center”.
Next, follow the link “Changing adapter settings”.
Here we right-click on “Ethernet” and press the “Properties” button.
Now you need to configure the parameters of the TCP/IP protocol version 4. Select it in the list of components and go to properties.
We check the IP and DNS data. If the provider provides a dynamic IP address, then all switches should be in the “Automatic” position.
If additional parameters are received from him, then enter them in the appropriate fields and click OK. This completes the setup and you can use the network.
Ethernet has one feature - the connection is always active. In order to be able to disable it manually and do it quickly (by default you will have to go to the network settings each time), let's create a shortcut on the desktop.
Now, if the Internet is connected, then when we launch the shortcut we will see the “Status-Ethernet” window, in which we can find some information and disconnect from the network. To reconnect, just launch the shortcut again and everything will happen automatically.
Method 2: PPPOE
PPPOE is a high-speed connection, the only difference from the previous one is the need to independently create a connection with a given login and password provided by the provider. However, there is one more feature: PPPOE can compress and encrypt data. As already mentioned, access to the network still occurs using a cable connected to a PC or router.
- Go to the “Network Control Center” and go to the “Wizard” for creating new connections.
Here we select the first item – “Connect to the Internet” and click “Next”.
In the next window, click the big button called “High-speed (with PPPOE)”.
We enter the login and password received from the provider, for convenience, save the password, set a name and general access, and then click “Connect”. If everything is done correctly, then in a few seconds the Internet will work.
You can manage PPPOE in the same way as Ethernet - using a shortcut.
Method 3: VPN
VPN is a virtual private network or simply a “tunnel” through which some providers distribute the Internet. This method is the most reliable from a security point of view. In this case, manual connection creation and access data are also required.
- Go to “Network Settings” by clicking on the network icon.
Open the “VPN” section and create a new connection.
Enter the authentication data provided by the provider and click “Save”.
To connect to the network, open the list again by clicking on the icon and select the created connection.
A settings window will open, in which you will have to click on our connection again, and then on the “Connect” button.
These were instructions for Windows 10; in Windows 7, everything happens a little differently.
- To create a connection, go to “Control Panel” – “Browser Options”.
Next, on the “Connection” tab, click on the “Add VPN” button.
In the first window, enter the address.
In the second – login, password and click “Connect”.
Subsequently, to connect, you only need to perform a couple of steps: open the list of connections, select the one you need and click “Connection”.
Method 3: Wi-Fi
Connecting a computer to a Wi-Fi router is similar to a simple cable connection: everything happens as simply and quickly as possible. This only requires an adapter. In laptops it is already built into the system, but for PCs you will have to purchase a separate module. There are two types of such devices - internal, connected to PCI-E connectors on the motherboard, and external, for a USB port.
It is worth noting here that inexpensive adapters may have problems with drivers on different OSes, so before purchasing, carefully study the reviews about this device.
After installing the module and detecting it by the operating system, a new network connection will appear in the notification area, with the help of which we will receive the Internet, just click on it and click “Connect”.
Of course, the appropriate Wi-Fi network must be configured on the router. You can read how to do this in the instructions included with the router. Setting up modern devices, in most cases, will not cause difficulties.
Wi-Fi networks, for all their advantages, can be very capricious. This is expressed in communication interruptions, lack of connection with devices and the Internet. There are different reasons - from driver problems to incorrect network settings.
Method 4: 3G/4G modem
All mobile Internet providers provide users with modems equipped with built-in memory with software stored in it - drivers and a client application. This allows you to connect to the network without unnecessary movements. When connecting such a modem to the USB port of a computer, you need to install the program and run it. If autostart of external devices is disabled in the operating system and the installer does not start automatically, then you need to go to the “Computer” folder, find the disk with the corresponding icon, open it and run the installer manually.
To access the Internet, just click the “Connect” button in the program.
If you don’t want to constantly use the client application, you can use the automatically created connection.
If a new item does not appear in the list, you can create a connection manually.
- In “Internet Options”, “Control Panel”, on the “Connections” tab, click the “Add” button.
Select “Switched”.
Enter your username and password. In most cases, the operator's name is entered in both fields. For example, "beeline". The dialed number is *99#. After all the settings, click “Connect”.
Working with such a connection in Windows 10 occurs in exactly the same way as in the case of a VPN, that is, through the settings window.
In Windows 7, everything is again a little simpler. Open the list, click on the name, and then click the “Connect” button.
Method 5: Mobile phone
If it is not possible to connect your PC to the Internet using the above methods, you can use your smartphone as a Wi-Fi access point or a regular USB modem. In the first case, a wireless adapter is required (see above), and in the second, a USB cable is required.
For normal operation of the access point, you need to make a number of settings in the phone menu or use a special program.
If the computer is not equipped with a wireless communication module, then the only option left is to use the phone as a regular modem.
- Go to the network connection settings and select the access point and modem management section. In other options, this block may be located in the “System - More - Hotspot” section, as well as “Networks - General modem and networks”.
Next, check the box next to “USB modem”.
The Internet is indispensable in our lives, but it must first be connected and configured. And this is not the easiest task, especially for those who are doing it for the first time. For this reason, most Internet providers meet their customers halfway and provide Internet connection services for a few pennies. This process occurs as follows: you enter into an agreement with the provider, then a specialist comes to you, connects everything and sets it up, and all you have to do is enjoy life with the Internet. But if you refuse such a service or have some problems, then you will have to connect and configure the Internet yourself. And this article will help you with this.
Creating a high-speed connection in Windows 7 and other similar systems
As for creating a connection of this type, in any Windows system, performing such actions, as they say, is as simple as shelling pears. To do this, through the standard “Control Panel” you need to enter the network and sharing management section, and then use the option to create a new connection. In a new window, you need to select an Internet connection, after which a window will appear with three options.
The preferred connection is a high-speed connection using PPPoE. It’s worth immediately taking into account that the described course of action assumes that there is not a single active connection on the computer. Otherwise, a warning may appear that you need to ignore using the “Continue Anyway” option.
How to check network status
Among the problems with the Internet, we can highlight those that are most common and occur periodically for most users. Resolving them can be very simple. The first thing to do is check the network status.
You can do this in two ways:
- left-click on the network connection icon;
The current connection status is described under the network name - Check the network status through the Control Panel. In this case, you will need to select the “Network and Internet” section in the “Control Panel” and find the “Change adapter settings” item in it.
The local network status is also checked in “Changes adapter settings”
In both cases, your network status will be described below your network icon.
Required settings
After selecting the connection type, a window will appear for entering the required parameters that are provided to the user by the provider or mobile operator.
Here you will be required to enter your high-speed connection password. The user name and connection name are entered arbitrarily. To avoid re-entering your password in the future, it is recommended to immediately check the box to remember it. After completing all the steps, you can make the first connection and check your Internet access. Again, if the computer already has an active connection configured, at some stages the connection proposed for execution will need to be postponed and, as in the previous case, all system warnings will need to be ignored.
Where does the connection begin?
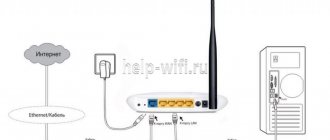
Let's start looking at the procedure step by step. Let's start by showing you how to connect an Internet cable to a laptop or PC.
- At the end of the network cable that your Internet provider provided to you, there is an RG-45 plug; it must be inserted into the network card on your computer. Below in the photo you can see an example. Please be careful with the plug, you don’t need to pull it hard or force it into the connector, otherwise you will have to additionally read our article on the procedure for crimping a twisted pair cable with an RG 45 plug.
- After you make the cable connection, on the monitor in the lower right corner, the connection icon will change from a red cross to a yellow triangle. This means that your computer sees your provider's switch, but there is no Internet. Next, you need to make settings on your computer, see what and how below.
What should you pay special attention to?
As you can see, creating a PPPoE connection looks very simple. In this case, the user does not need to go into any additional parameters to set their values independently. Even if you look at the properties of the IPv4 protocol, which in most cases is used for connections of all types (IPv6 is not yet widely used), the parameters will indicate automatic acquisition of addresses of all types. This is only due to the fact that a connection of this type, unlike the similar PPPTP, which uses tunnel transmission from point to point, works only through MAC addresses over Ethernet, and not through TCP/IP, so set some parameters in the properties the protocol itself or in the router settings (especially forwarding ports 1723 or 1792) is absolutely pointless. The same applies to setting exceptions in port rules when using the built-in Windows firewall (you can only set permissions there for individual applications that use the current high-speed connection, such as browsers).
Checking third-party software compatibility
If you installed any programs along with Windows or additional applications are already included in the operating system distribution, check whether third-party software is blocking your network connection.
The easiest way to find problematic software is to disable startup programs. To do this, press the Windows keys + R, enter the msconfig command in the line and press Enter. In the window that opens, open the “Startup” tab.
Uncheck all the boxes and restart your computer. Check if the Internet is working. If it works, turn on startup items one by one. This way you can identify the program that blocks the network in the seven.
Common errors
Despite the apparent advantages of the described type of connection, it is not immune from failures or unexpected errors. At the same time, messages with different failure codes look almost the same.
As for the failures themselves, most often you can find codes 651, 678, 800, etc. A connection error (the high-speed connection is interrupted) can be fixed quite simply, but only if it is not related to the provider.
Connecting the Internet
There are several ways to connect to the global network, it all depends on your capabilities and (or) needs.
- Cable connection. This is the most common and simplest option. In this case, the provider provides the subscriber with a line - a cable laid into the room, which is connected to a PC or router. There are three types of such connections - regular, PPPoE and VPN.
- Wireless. Here, access to the network is carried out via a Wi-Fi router, to which the same provider cable is connected. Wireless methods also include mobile 3G/4G Internet.
- We will separately discuss the possibility of using a mobile phone as a modem or access point.
Method 1: Ethernet
This type of Internet service provision does not require special access requirements - login and password. In this case, the cable is directly connected to the LAN connector on a computer or router.
In most cases, with such a connection no additional actions are required, but there is one exception - when the provider provides the subscriber with a separate IP address and its own DNS server. This data must be entered in the network settings in Windows. The same thing will have to be done if there is a change in provider, that is, find out what IP was provided by the previous one and what the current provider provides.
- First, we need to get to the corresponding settings block. Right-click on the network icon in the notification area and go to the “Network Center”.
Next, follow the link “Changing adapter settings”.
Here we right-click on “Ethernet” and press the “Properties” button.
Now you need to configure the parameters of the TCP/IP protocol version 4. Select it in the list of components and go to properties.
We check the IP and DNS data. If the provider provides a dynamic IP address, then all switches should be in the “Automatic” position.
If additional parameters are received from him, then enter them in the appropriate fields and click OK. This completes the setup and you can use the network.
Ethernet has one feature - the connection is always active. In order to be able to disable it manually and do it quickly (by default you will have to go to the network settings each time), let's create a shortcut on the desktop.
Now, if the Internet is connected, then when we launch the shortcut we will see the “Status-Ethernet” window, in which we can find some information and disconnect from the network. To reconnect, just launch the shortcut again and everything will happen automatically.
Method 2: PPPOE
PPPOE is a high-speed connection, the only difference from the previous one is the need to independently create a connection with a given login and password provided by the provider. However, there is one more feature: PPPOE can compress and encrypt data. As already mentioned, access to the network still occurs using a cable connected to a PC or router.
- Go to the “Network Control Center” and go to the “Wizard” for creating new connections.
Here we select the first item – “Connect to the Internet” and click “Next”.
In the next window, click the big button called “High-speed (with PPPOE)”.
We enter the login and password received from the provider, for convenience, save the password, set a name and general access, and then click “Connect”. If everything is done correctly, then in a few seconds the Internet will work.
You can manage PPPOE in the same way as Ethernet - using a shortcut.
Method 3: VPN
VPN is a virtual private network or simply a “tunnel” through which some providers distribute the Internet. This method is the most reliable from a security point of view. In this case, manual connection creation and access data are also required.
- Go to “Network Settings” by clicking on the network icon.
Open the “VPN” section and create a new connection.
Enter the authentication data provided by the provider and click “Save”.
To connect to the network, open the list again by clicking on the icon and select the created connection.
A settings window will open, in which you will have to click on our connection again, and then on the “Connect” button.
These were instructions for Windows 10; in Windows 7, everything happens a little differently.
- To create a connection, go to “Control Panel” – “Browser Options”.
Next, on the “Connection” tab, click on the “Add VPN” button.
In the first window, enter the address.
In the second – login, password and click “Connect”.
Subsequently, to connect, you only need to perform a couple of steps: open the list of connections, select the one you need and click “Connection”.
Method 3: Wi-Fi
Connecting a computer to a Wi-Fi router is similar to a simple cable connection: everything happens as simply and quickly as possible. This only requires an adapter. In laptops it is already built into the system, but for PCs you will have to purchase a separate module. There are two types of such devices - internal, connected to PCI-E connectors on the motherboard, and external, for a USB port.
It is worth noting here that inexpensive adapters may have problems with drivers on different OSes, so before purchasing, carefully study the reviews about this device.
After installing the module and detecting it by the operating system, a new network connection will appear in the notification area, with the help of which we will receive the Internet, just click on it and click “Connect”.
Of course, the appropriate Wi-Fi network must be configured on the router. You can read how to do this in the instructions included with the router. Setting up modern devices, in most cases, will not cause difficulties.
Wi-Fi networks, for all their advantages, can be very capricious. This is expressed in communication interruptions, lack of connection with devices and the Internet. There are different reasons - from driver problems to incorrect network settings.
Method 4: 3G/4G modem
All mobile Internet providers provide users with modems equipped with built-in memory with software stored in it - drivers and a client application. This allows you to connect to the network without unnecessary movements. When connecting such a modem to the USB port of a computer, you need to install the program and run it. If autostart of external devices is disabled in the operating system and the installer does not start automatically, then you need to go to the “Computer” folder, find the disk with the corresponding icon, open it and run the installer manually.
To access the Internet, just click the “Connect” button in the program.
If you don’t want to constantly use the client application, you can use the automatically created connection.
If a new item does not appear in the list, you can create a connection manually.
- In “Internet Options”, “Control Panel”, on the “Connections” tab, click the “Add” button.
Select “Switched”.
Enter your username and password. In most cases, the operator's name is entered in both fields. For example, "beeline". The dialed number is *99#. After all the settings, click “Connect”.
Working with such a connection in Windows 10 occurs in exactly the same way as in the case of a VPN, that is, through the settings window.
In Windows 7, everything is again a little simpler. Open the list, click on the name, and then click the “Connect” button.
Fatal problems
It will be impossible to correct failures only in the most critical situations. So, for example, if the connection is interrupted precisely due to the fault of the provider or mobile operator, nothing can be done. The same applies to cases when the connecting equipment fails and needs to be replaced with a working one. Sometimes the connection may be interrupted by the server containing the requested page, which is very rare and mainly concerns only situations where a virus was detected on the page and the user ignored the threat message.
Basic methods for fixing software crashes
We figured out how to set up a high-speed connection. There also seems to be some clarity with errors. Now let's look at the simplest user actions if the failures are purely related to the subjective settings of the connection itself and the operating system as a whole.
First of all, to eliminate failures with codes 651 and 678, you should use a reset of the router settings, either by completely turning off the power supply for 10-15 seconds, or by using the corresponding item in the web interface. The second method is more preferable.
If this does not help, you can restore your high-speed connection by reinstalling the network adapter drivers and components listed as Miniport in Device Manager. In this situation, it is better not to “reinvent the wheel”, but to give preference to automated programs like Driver Booster, which will update the drivers of all components of the computer system without user intervention. If you use several network adapters on computers or laptops, you need to disable all unused ones, and leave for work only the one that will be used for the created connection. Finally, in the most extreme cases, it is recommended to change some registry settings (regedit).
In the HKLM branch you need to find or independently navigate to the Tcpip directory, located in the Parameters folder, nested in the settings directory, and set the DisableTaskOffload key to “1”, and the EnableRSS entry to “0”, and then perform a full system reboot. If there are no such keys in the specified section (which is quite common), you will need to create the DWORD parameters yourself, and then assign them appropriate names and values. The latest solution is to create a new connection, but the existing one must be deleted without fail.
The default gateway is not available
Network diagnostics will help you detect the following problem. Right-click on your connection icon and select “Troubleshooting”.
By right-clicking on the icon you can open the “Network and Sharing Center”
If you receive a message about the gateway being unavailable after performing a system diagnostic, the following steps may help.
Prohibit disabling the network adapter to save energy
Sometimes the system turns off the network adapter—the device that allows you to connect to the Internet—to save power. Try disabling this option.
- Find "Device Manager" through the search bar in the Start menu.
Opening "Device Manager" through search is not the only way, but it is the most convenient - Expand the “Network Adapters” tab, select the one you need, and right-click on it.
In the context menu, click on “Properties” - Select "Properties" and open the "Power Management" tab.
Changing these settings will help solve the problem of the Internet disconnecting after the computer goes into sleep mode - Uncheck the box next to “Allow the computer to turn off this device to save power” and save your data.
After changing the settings, do not forget to save them by clicking on the “OK” button
Updating or reinstalling drivers
You can also update drivers through Device Manager: expand the Network Adapters tab, right-click on the network driver and select Update or Uninstall, then restart your computer.
If the action does not help, you can download drivers from their manufacturers' websites and install them yourself. Typically, manufacturers offer to download drivers in an “.exe” file format, so to install, you only need to run the downloaded file and accept the agreement.
Video: how to reinstall drivers yourself
Brief summary
In principle, this is the end of the description of a PPPoE connection. Setting up the connection, as is already clear, is completely simple. As for eliminating possible failures with various errors, there should not be any particular difficulties. However, the most important conclusion that can be drawn from all of the above is that the manually assigned parameters for the created connection should not be changed. In the most urgent situation, as an additional solution, you can use changing DNS servers, setting as their addresses free combinations from Google, Yandex or other services that provide them to all users without any restrictions.