Materials and equipment
As mentioned above, trying to install operating systems developed by Microsoft on an external drive in the traditional way always ends in an error. Third-party software designed specifically for this purpose will help solve the problem. We will need two programs: for installation and for working with the boot sector. In addition, you need a computer running Windows and a distribution of the operating system, which can be freely obtained on the Microsoft website.
How to boot a laptop from a flash drive?
In order for us to be able to boot a laptop from a flash drive, disk or other media, so-called hot keys were invented that allow us to get to the boot menu bypassing the BIOS settings.
I will give an example of how to get to such a boot menu on various laptop models. We reboot the laptop and, depending on your model, at the moment the boot starts, press the corresponding hot key. On my Asus laptop this is the ESC key.
It will look something like this. Select the USB flash drive and start the installation. If you need to create a bootable Windows 10 USB flash drive with UEFI support, then read the guide at the link.
By the way, I recommend that you read my new article “Five programs for creating a bootable USB flash drive,” which you will find here.
As I already said, the process of installing Windows from a flash drive is identical to installing Windows from a disk. How to make a bootable USB flash drive with Windows 7 and Windows 8 or method number 2, read here. That's all. Good luck and see you in new articles!
Preparing the drive
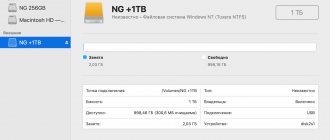
We begin the operation by preparing the external drive. It must first be formatted in NTFS, the default file system for OSes with the NT kernel. The operations below are performed when the disk is to be connected to different computers. If the drive with Windows installed will only be used in conjunction with one PC, formatting it in Explorer is sufficient.
Call the extended Start menu with the keyboard shortcut “Win + X”. Click on the line highlighted in the frame to launch the Disk Management utility. If the base PC uses an OS younger than Windows 8, call the “Run” dialog box with the keyboard shortcut “Win + R”. Type “diskmgmt.msc” in the window that opens and click “OK”.
We find in the list the disk marked “removable device”. Right-click on the main section area to call up the context menu. Select the line marked with a three to delete the existing volume.
We agree to the destruction of the data on the drive by clicking the “Yes” button.
Right-click on the unallocated area of the disk. In the context menu, select create a simple volume.
We allocate 100 MB to accommodate the boot sector.
In the drop-down menu marked with one, select the file system type FAT32. We indicate the desired volume label in the field highlighted with a green marker.
Having completed the creation of the first partition, we repeat the operation with the remaining unallocated area. We give all the remaining disk space to the second volume on which the operating system will be installed. Let's format it in NTFS.
As a result of the operations performed, we get a structure highlighted in yellow in the screenshot. For a disk that will not be connected as an external one to different PCs, it is enough to create one Beta volume, occupying all the free space and format it in NTFS.
How to install Windows 10 on a second SSD or HDD
If you want to install Windows 10 on a second SSD or hard drive, it can be done. There are several reasons for this. You might want to test an unreleased version of Windows 10, or you might want to have your own copy of Windows 10 that you can boot into by connecting and booting. In this guide, we will show you how to install Windows on a second SSD or HDD.
To install Windows 10 on a second SSD or hard drive, you need to:
- Create a new partition on a second SSD or hard drive
- Create Windows 10 bootable USB
- Use a custom option when installing Windows 10
While you can, I would advise you not to remove the external SSD or HDD unless necessary. When you install Windows, the boot loader will register the path of the installed OS. If it is missing, then this can be problematic. Also, don't remove the OS from your primary SSD or HD, especially if you plan to remove the second SSD and plan to use it as needed.
OS installation
To install the OS we use the distribution kit and the WinNTSetup program. First of all, let's consider an option that allows you to create a stand-alone media suitable for connecting to any PC.
Open Explorer and find the Windows distribution image in ISO format. Select it with the mouse and right-click to expand the context menu. We select the item indicated by two to create a virtual CD-ROM in the system.
Launch the WinNTSetup program. When you use it for the first time, you agree to download additional Windows ADK components to your PC.
After downloading the files necessary for work, the program will open. Switch to the tab indicated by one. Click on the select button to specify the path to the operating system installation files.
We find the virtual CD-ROM that we created in Explorer. We go into the “sources” directory. Using the mouse, select the “install.wim” file highlighted in the screenshot with a marker. Click the “Open” button to confirm your choice.
The top field displays the path to the distribution installation file. Press the button indicated by one and specify the Alpha partition formatted in FAT32 on the external media. The selection is confirmed by the appearance of an information line highlighted with a green marker. We repeat the operation in the next line, indicating the main Beta section allocated for hosting the OS. Click on the “Install” button.
In the pop-up window, select the bootloader type from the drop-down menu. To be able to connect an external drive to any PC, select the “ALL” line in it. Click the “OK” button to close the additional options window and wait for the distribution package to be unpacked onto external media.
Completion of the preparatory operation is accompanied by a notification. Close it by clicking on the button indicated by the frame.
Let's launch BOOTICE. We indicate the external drive in the menu indicated by the arrow. Press the partition management button, indicated by the number “2”.
We find the Alpha volume allocated for hosting the bootloader. Select it and look at the button marked with a two. In the example, it is darkened, which indicates that the selected section is already active. If necessary, click it to activate the volume and thus allow the traditional bootloader to write to it. Close the utility and restart the PC. We select to boot from external media and complete the deployment of the operating system following the instructions of the installation wizard.
Dual booter
The second installation option involves creating a dual boot loader on the base PC. When turning on the computer, the user has the opportunity to choose which system to use - from his own or from an external hard drive.
At the stage of selecting sections, we act differently. In the top of the fields marked with arrows, indicate the path to the “install.wim” file in the “sources” directory of the virtual drive. At the bottom is an NTFS-formatted external media volume. We do not touch the bootloader installation section, allowing the program to automatically add the necessary entries to the existing one on the PC.
In the additional window we indicate the basic input/output system used on the computer. This is UEFI as shown in the screenshot or traditional BIOS for older models.
Once the installation of the OS on the external drive is complete, the user will be greeted with a selection menu upon boot. Use the mouse or arrow keys on the keyboard to move the frame to launch the system you need at the moment.
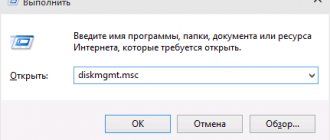
To change boot parameters we use the configuration utility. By calling up the “Run” dialog box, type “msconfig” in the text field. Click “OK” or the Enter key on the physical keyboard.
On the tab indicated by the unit, configure the necessary parameters. In the area indicated by the arrow, select one of the operating systems and assign it as the default one. If necessary, reduce or increase the display time of the selection menu in the field highlighted with a green marker. The default start delay is 30 seconds. We record the changes made with the “Apply” button.
Windows To Go Flash Drive in Rufus
Another simple and free program that allows you to easily make a bootable USB flash drive to run Windows 10 from (you can also make an installation drive in the program) is Rufus, which I have written about more than once.
Making such a USB drive in Rufus is even easier:
- Select a drive.
- Select the partition scheme and interface type (MBR or GPT, UEFI or BIOS).
- The file system of the flash drive (NTFS in this case).
- Set o, select ISO image from Windows
- O instead of "Standard Windows Installation".
- Click “Start” and wait. In my test, a message appeared that the drive was unsupported, but in the end everything worked fine.
As a result, we get the same drive as in the previous case, except that Windows 10 is installed simply on a flash drive, and not in a virtual disk file on it.
It works in the same way: in my test, the launch on two laptops was successful, although I had to wait during the device installation and configuration stages. Read more about Creating a bootable USB flash drive in Rufus.
- Download and open the free Rufus program.
- Select the device to record to.
- We select the partition scheme and interface type, depending on what base OS is installed on the computer for which the flash drive is being made.
- Select the file system of the flash drive.
- Oh, then we find the Windows 10 ISO image.
- Select the “ Windows To Go ” item.
- Click on start and wait for the download to finish