This article provides step-by-step instructions for setting up Windows 10 as a terminal server with RDP access.
After configuration, several users will be able to simultaneously connect to one computer via RDP (Remote Desktop Protocol). The most popular application of this solution is the work of several users with a 1C file database.
The setup process is shown using Windows 10 Enterprise x64 as an example, but this guide is fully suitable for installation on other Windows operating systems.
Attention! The article was written solely in scientific interests. The Windows license does not allow using the OS in this mode.
Introduction
Previously, I described a way to make a terminal server from Windows 7. Nowadays, the modern operating system Windows 10 is relevant. Due to the fact that support for Windows 7 has already ended, everyone, one way or another, will eventually have to work in Windows 10, even if the previous version of you completely satisfied.
A useful opportunity to turn a regular Window 10 into a terminal server. Previously, I have used this function more than once to allow several people to work in the 1C file room at the same time. For a small team of several employees, this is quite convenient and justified, since buying a full-fledged server and server OS for such tasks is impractical.
I’ll make an important note right away. I do not recommend using a terminal server based on Windows 10 where it is critical that everything works stably and downtime is unacceptable. Often after updates the configured functionality disappears and it is not always possible to restore its functionality quickly. Keep this in mind.
Point 3: Frequent problems
User does not connect via RDPWrap from WinXP SP3 to Win10
To solve this problem on a Windows XP PC, update the RDP client to the latest version (7.0 - KB969084). This update can only be installed on Windows XP SP3. If the problem with the RDP connection cannot be solved, then in Windows 10 you can disable Network-Level Authentication in the system properties (System - Remote access settings). Uncheck "Allow connections only from computers running Remote Desktop with network level authentication (recommended)."
It’s also worth saying that NLA support appeared in Windows XP, starting with SP3, but it is not enabled by default. You can enable support for NLA and CredSSP provider authentication only through the registry. For this:
- In the registry branch HKEY_LOCAL_MACHINE\SYSTEM\CurrentControlSet\Control\SecurityProviders you need to edit the value of the SecurityProviders key, adding credssp.dll at the end (separated by a comma from its current value!)
- Next, in the HKEY_LOCAL_MACHINE\SYSTEM\CurrentControlSet\Control\Lsa branch, add the line tspkg to the value of the Security Packages parameter
- After making these changes, you need to restart your computer
The article may also be useful: “RDP connection error: CredSSP encryption oracle remediation. How to fix?".
Oh those Windows 10 updates
But most often, RDPWrap 1.6.2 does not work on Windows 10 (at the time of writing, 1.6.2 was the most current version) after updating Windows 10 and problems arise with connecting to the server. And in the status it says the following: Listener state: not supported. What to do? Alternatively, remove Windows 10 updates from the list below, as they may interfere with the program:
- Cumulative update for Windows 10 Version 1803 (KB4503286)
- Cumulative update for Windows 10 Version 1803 (KB4499167)
- Differential update for Windows 10 Version 1803 systems (KB4493464)
Push
A terminal server on Windows 10 is of course not very good, because for this there is Microsoft Windows Server 2016 (or any other version) with its own terminal session services. If you decide to use RDPWrap, then you are most likely violating the Windows license agreement. Microsoft has already thought of everything for you and for terminal sessions you need to use a terminal server. Its installation and configuration is at least a little longer, but not much more complicated than on Windows 10, and you can read about it at this link. Thank you!
Turning Windows 10 into a terminal server
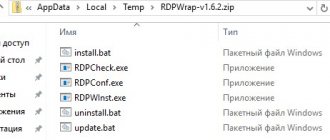
We will use a familiar tool that has proven itself well in Windows 7 - RDP Wrapper Library by Stas'M. Download the latest version either from the creator's website or from githab - https://github.com/stascorp/rdpwrap/releases. The latest version is from 2017 and because of this, many problems arise during setup, which I will discuss below. Most likely, your terminal server will not work if you take only the proposed distribution.
The archive consists of several files:
We will configure the terminal server on the following system:
This is a fairly old LTSB distribution with all the updates installed at the time the article was updated. I specifically took as an example this not the latest, but not very old version, which is still supported.
Further actions must be performed locally, not via rdp, since during installation and configuration of rdpwrap the remote access service will be restarted.
Download the archive and extract it into a folder. Then launch the command prompt with administrator rights. To do this, click Start -> All apps :
Look at the very bottom for the section System Tools - Windows , in it the application Command Prompt , run it as an administrator:
At the command line, go to the folder with the unpacked program using the cd and run the install.bat :
After successful installation you will see the following information:
Create new users, add them to the Remote Desktop Users and verify. If it works and everything works right away, you're lucky. Use it.
If terminal access does not work for you, then try running the update.bat It will download the latest program changes from the developer’s website. This situation may arise after the next Windows 10 update. After writing this article, one such update has already been released, but the problem is easily solved.
If nothing helps and your terminal connection for other users does not work, let’s figure out further what’s going on.
CONTENT
- I. Creating a user and setting rights for access via RDP
- II. Setting up a terminal server with RDP access
- III. Remote Desktop Connection
- IV. Frequently asked questions on the topic of the article (FAQ)
To configure Windows 10 as a terminal server with RDP access, you will need:
1. A computer with the Windows 10 operating system installed and administrator rights, connected to the local network;
2. A computer on the local network from which the connection will be made and which has an RDP client (note: Windows XP/Vista/7/8/8.1/10, etc. is required);
3. Library: RDP Wrapper Library
Terminal server does not work in Windows 10
If your terminal server on Windows 10 did not work initially and the number of rdp connections is limited to one. Or if your terminal access is broken after the update, then let’s figure out what to do about it.
First, run the RDPConf.exe and look at its output.
The listener state value hints that we have problems and the rdp wrapper is not working. The problem here is that almost every version of Windows 10 needs its own rdpwrap.ini . Since the author abandoned his program a long time ago, these configurations are not updated automatically. You either need to write them yourself, if you understand how, or look for them somewhere on the Internet. The easiest way to look is in the discussion of issues in the github repository - https://github.com/stascorp/rdpwrap/issues. Or another option - a repository with a utility for automatically updating rdpwrap.ini - https://github.com/asmtron/rdpwrap/. There is an archive called autoupdate.zip , which is updated regularly. You can try to use it.
In order for the terminal server to work on my version of Windows 10, I used search engines to find the configuration file 10.0.14393.3503 .txt for my version of the system. I took the contents of this file and added it to the existing file C:\Program Files\RDP Wrapper\rdpwrap.ini at the very end.
RDPConf.exe again .
The status has changed to . Now you need to restart your computer. After this, run the RDPCheck.exe and make sure that you can connect to the computer with a second account.
I got terminal access to Windows 10 through 2 different accounts.
I. Creating a user and setting rights for access via RDP
1. Click on the search icon, then use the search bar to find and select Account Management (Fig. 1).
2. In the window that opens, select Family and other people , then click Add a user for this computer (Fig. 2).
3. Click on the item I don’t have this person’s login information (Fig. 3).
4. Click on Add a user without a Microsoft account (Fig. 4).
5. In the appropriate fields, enter the user name (in this example it is UserRDP), the password for the new account and password hint Next (Fig. 5).
6. In the settings window you will see a new user (in this example it is UserRDP) (Fig. 6).
7. Click on the search icon, then use the search bar to find and select This computer , use the right mouse button to open the menu and click Manage (Fig. 7).
8. In the window that opens, select: Utilities > Local users and groups > Users , then select a user (in this example, this is UserRDP), go to the Group Membership and click Add... (Fig. 8).
9. Click Advanced... (Fig.9).
10. Click Search , select Remote Desktop Users and click OK (Fig. 10).
11. Click OK (Fig. 11).
12. Click Apply , then OK (Fig. 12).
How to fix rdpwrap after windows update
If you cannot find the rdpwrap.ini configuration file for your system version anywhere, then you can try the following trick. In some cases this helps. At least that's how it worked for me sometimes.
You need to find a working configuration for the version that is closest to yours. Next, simply use a text editor to change the version indicated there to your own. If the difference in versions is not very big, it may help. I saw in issues on Github information about what happened immediately after terminal access broke down after the next update, edited the config for the new version and everything continued to work again.
Also, in one of the discussions on github, a utility with automatic updating of rdpwrap.ini was proposed. It's called Automatic RDP Wrapper installer and updater - https://github.com/stascorp/rdpwrap/pull/859. Description and instructions for use are inside the archive. Judging by the reviews, the thing is not bad, it works. In short, use it like this:
- Download the archive
- Unpack into Program Files\RDP Wrapper
- autoupdate.bat as administrator
- We check the configuration via RDPConf.exe and try to connect.
In general, I have everything about turning Windows 10 into a terminal server for simultaneous connection and work of several users via rdp. Everything is very easy and simple, you can use it as needed to solve applied problems.
III. Remote Desktop Connection
1. Using a second computer located on the same local network, click Start , use the search bar to find, and then select Remote Desktop Connection (Fig. 21).
2. In the window that opens, enter the name of the computer to which you want to connect (ex. The one on which all the settings were made), then click Connect (Fig. 22).
3. First of all, select a user (in this example it is UserRDP) and enter the account password that you specified earlier (see Fig. 5), then click OK (Fig. 23).
4. In the window that appears, click Yes , after which the remote connection session will begin (Fig. 24).
Setting up Windows 10 as a terminal server with RDP access is complete!
Online courses on Mikrotik
If you have a desire to learn how to work with Mikrotik routers and become a specialist in this field, I recommend taking courses in a program based on information from the official MikroTik Certified Network Associate . In addition to the official program, the courses will include laboratory work in which you will be able to test and consolidate your acquired knowledge in practice. All details on the website. The cost of training is very affordable, a good opportunity to gain new knowledge in a subject area that is relevant today. Course Features:
- Practice-oriented knowledge;
- Real situations and tasks;
- The best of international programs.
Using the quick assist app
In order to use the built-in application for accessing the remote desktop in Windows 10, it must be launched on both computers - the one you are connecting to and the one from which assistance will be provided. Accordingly, Windows 10 version 1607 or later must be installed on these two computers.
To launch, you can use the search in the taskbar (just start typing “Quick Help” or “Quick Assist”), or find the program in the Start menu in the “Accessories - Windows” section.
Connecting to a remote computer is done using the following simple steps:
- On the computer from which you are connecting, click “Give Help.” You may need to sign in to a Microsoft account for first use.
- In some way, transfer the security code that will be displayed in the window to the person whose computer you are connecting to (by phone, e-mail, sms, via instant messenger).
- The user being connected clicks "Get Help" and enters the security code provided.
- It then displays information about who wants to connect and an Allow button to approve the remote connection.
After the remote user clicks “Allow”, after a short wait for connection, a window appears on the assisting side with the remote user’s Windows 10 desktop with the ability to control it.
There are also a few simple controls at the top of the Quick Help window:
- Information about the level of access of the remote user to the system (field “User mode” - administrator or user).
- Pencil button - allows you to take notes and “draw” on the remote desktop (the remote user sees this too).
- Refresh the connection and call the task manager.
- Pause and terminate a remote desktop session.
For its part, the user connected to can either pause the “help” session or close the application if suddenly it is necessary to abruptly interrupt the remote computer control session.
Among the discreet features is transferring files to and from a remote computer: to do this, simply copy the file in one location, for example, on your computer (Ctrl C) and paste (Ctrl V) in another, for example, on the remote computer.
That's probably all for the built-in Windows 10 application for accessing the remote desktop. Not very functional, but on the other hand, many programs for similar purposes (TeamViewer for example) are used by the majority only for the sake of those capabilities that are also available in “Quick Help”.
In addition, you don't need to download anything to use the built-in application (unlike third-party solutions), and connecting to a remote desktop over the Internet does not require any special settings (unlike Microsoft Remote Desktop): both of these points can be an obstacle for a novice user who needs help with a computer.
How to allow standard users to use a shadow connection
In the examples discussed above, to use a shadow connection to terminal sessions, you need local administrator rights on the RDS server. However, you can allow the use of a shadow connection to connect to user sessions and ordinary users (without giving them local administrator rights on the server).
For example, if you want to allow members of the AllowRDSShadow group to shadow connections to user sessions, run the command:
wmic /namespace:\\root\CIMV2\TerminalServices PATH Win32_TSPermissionsSetting WHERE (TerminalName=”RDP-Tcp”) CALL AddAccount “corp\AllowRDSShadow”,2
In January 2022, after installing update KB4056898 (Windows patch against Meltdown and Specter), users encountered that shadow access stopped working in Windows Server 2012 R2. When you try to make a shadow connection to someone else's session, the message “Unidentified error” appears (the error STATUS_BAD_IMPERSONATION_LEVEL is present in the logs). A similar problem occurred on an RDS farm based on Windows Server 2016.
To solve the problem you need to install separate updates:
The most common problems with the termsrv.dll file
There are several types of errors associated with the termsrv.dll file. The termsrv.dll file may be located in the wrong file directory on your device, may be missing from the system, or may be infected with malware and therefore not working properly. Below is a list of the most common error messages associated with the termsrv.dll file. If you find one of the following (or similar ones), consider the following suggestions.
- termsrv.dll is corrupted
- termsrv.dll cannot be located
- Runtime Error – termsrv.dll
- termsrv.dll file error
- The file termsrv.dll could not be loaded. Module not found
- unable to register termsrv.dll file
- The file termsrv.dll cannot be loaded
- The file termsrv.dll does not exist
termsrv.dll
The application failed to start because termsrv.dll is missing. Reinstall the application to resolve the issue.
Problems related to termsrv.dll can be resolved in various ways. Some methods are only for advanced users. If you are not confident in your abilities, we advise you to consult a specialist
Correcting errors in the termsrv.dll file should be approached with extreme caution, since any errors can lead to an unstable or incorrectly functioning system. If you have the required skills, please continue
What is an RDS terminal farm
Good afternoon Dear readers and guests of a large IT blog Last time I told you how to see hidden folders in Windows 10. Today we will talk about one very important thing in the IT infrastructure of almost any organization, we will talk about the general concepts of the RDS (Remote Desktop Services) terminal farm. We will find out what components it consists of, what deployment scenarios this technology has, how it helps improve the work of employees and reduce the administrative burden on a system administrator or engineer. This will be an introductory article before deploying a highly available RDS farm on Windows Server 2022.
