Remote desktop on Windows is a very convenient option for those who do not want to limit themselves to a stationary workplace. However, it has a limitation: there can only be one user, physically in front of the computer or remotely. In some cases this may be inconvenient. Today we will ignore the relevance and use cases of remote desktops, because since you are reading these lines, you most likely do not need to prove their usefulness at all. Instead, we'll focus on how to get around the limitation outlined above and create more than one connection at a time. Note that the restriction is purely software in nature and in fact there can be as many remote users as the computing power of your PC is sufficient. Among other things, this means that by deciding to perform all the manipulations described below, you are violating the terms of the license agreement and will perform them at your own risk. Well, that was a minute of theory, and now it’s time to move on to practice, where we will look at how you can configure the simultaneous operation of several RDPs on Windows.
RDP Wrapper: Allow multiple RDP sessions on Windows
RDP Wrapper Library project allows you to enable concurrent RDP sessions in Windows 10 without replacing the system file termsrv.dll. This program works as a layer between the service control manager (SCM - Service Control Manager) and the terminal service (Remote Desktop Services). RDPWrap allows you to enable not only support for several simultaneous RDP sessions, but also implement an RDP server on home editions of Windows 10. RDP Wrapper does not make any changes to the termsrv.dll file, simply loading termsrv with changed parameters.
Thus, RDPWrap will work even if the version of the termsrv.dll file is updated, which allows you not to worry about Windows updates.
Important . Before installing RDP Wrapper, it is important to make sure that you are using the original (unpatched) version of the termsrv.dll file. Otherwise, RDP Wrapper may not work stably or may not start at all.
You can download RDP Wrapper from the GitHub repository: https://github.com/binarymaster/rdpwrap/releases (latest available version of RDP Wrapper Library v1.6.2). The utility has not been developed since 2022, but it can be used on all builds of Windows 10 and even Windows 11.
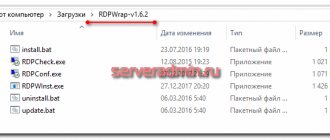
The RDPWrap-v1.6.2.zip archive contains several files:
- RDPWinst.exe —installation/removal program for RDP Wrapper Library;
- RDPConf.exe - RDP Wrapper configuration utility;
- RDPCheck.exe - Local RDP Checker - a utility for checking RDP access;
- install.bat , uninstall.bat , update.bat - batch files for installing, uninstalling and updating RDP Wrapper.
To install RDPWrap, run the install.bat file with administrator rights.
After installation is complete, run RDPConfig.exe . Check that all elements in the Diagnostics are green.
After installation is complete, run RDPConfig.exe . Most likely, immediately after installation, the utility will show that RDP wrapper is running (Installed, Running, Listening), but is not working. Pay attention to the red inscription. It reports that this version of Windows 10 (ver. 10.0.19041.1320) is not supported ().
The fact is that for each version of Windows 10 there must be a description in the rdpwrap.ini . There are simply no settings in your configuration file for your Windows 10 build.
The current version of the rdpwrap.ini file can be downloaded here https://raw.githubusercontent.com/sebaxakerhtc/rdpwrap.ini/master/rdpwrap.ini
Manually copy the contents of this page to the file “C:\Program Files\RDP Wrapper\rdpwrap.ini”. Or download the file using the PowerShell cmdlet Invoke-WebRequest (you must first stop the Remote Desktop service):
Stop-Service termservice -Force Invoke-WebRequest https://raw.githubusercontent.com/sebaxakerhtc/rdpwrap.ini/master/rdpwrap.ini -outfile "C:\Program Files\RDP Wrapper\rdpwrap.ini"
Restart your computer, run the RDPConfig.exe utility. Check that all elements in the Diagnostics are green and the message [Fully supported] appears. The screenshot below shows that RDP Wrapper with this config works great in Windows 11.
All that remains is to restart the computer. Try connecting to your computers with several RDP sessions (use any RDP client: mstsc.exe, rdcman, etc.). Everything worked out (you can even use saved RDP passwords)! Now your Windows 10 allows you to simultaneously connect via RDP to two (or more) remote users at once.
The RDPWrap utility is supported in editions of Windows, so you can turn any client version of Windows into a terminal server.
Other interesting features of RDP Wrapper include:
- Enable Remote Desktop - enable RDP access
- Hide users onlogon screen option allows you to hide the list of users on the welcome screen;
- When the Single sessionper user , several simultaneous RDP sessions under one account will be allowed (the registry parameter fSingleSessionPerUser = 0 is set in the HKLM\SYSTEM\CurrentControlSet\Control\Terminal Server\fSingleSessionPerUser branch).
- RDP Port - you can change the remote desktop port numbers from standard TCP 3389 to any other;
- In the Session Shadowing Mode , you can configure the shadow connection mode to the desktop of Windows 10 users.
Limits on the duration of RDP sessions can be configured via GPO.
Security when using RDP technology
All RDP connections are encrypted, however, it would be a good idea to check some security settings. Most of the settings can be done through the Gpedit
.
- Open it with the command gpedit.msc and follow the chain of settings indicated in the screenshot.
- Activate the policy indicated in the screenshot, set the security level to “ Negotiation
” or “
SSL
”.
Enable the Require secure RPC connection
».
Next, activate the policy indicated in the screenshot;
Follow the chain of settings shown in the image and enable the policy on the right “ System cryptography: use FIPS-compliant algorithms...
».
Change the default RDP port in Windows 10 by opening the registry editor with the regedit command, go to the specified branch and double-click on the PortNumber parameter. In the editing window, specify your custom port, then open it in the firewall.
Open the security policies with the command secpol.msc, go to the Local Policies
→
Security Settings
and make sure that the setting shown in the screenshot is enabled. This is a ban on establishing connections to accounts without a password.
Go to the advanced settings of the standard firewall and in the rules for incoming connections, find the element “ Remote desktop - user mode (TCP traffic)
"
Double-click on it, switch to the “ Area
” tab in the properties window, activate the “
Specified IP addresses
” radio button, click “
Add
”.
In the window that opens, specify the IP from which you are allowed to connect and save the settings. You can also specify a range of IP addresses.
The measures given here are recommendations, but if security is a priority for you, it makes sense to consider alternative methods of remote control, for example, connecting to a remote desktop via VPN in conjunction with RDP, where you do not need to forward ports. There is also such a technology as RDP Gateway - a gateway server that uses RDP in conjunction with the HTTPS protocol. This method of connecting to a remote desktop in Windows 10 has a number of advantages, in particular, connecting to remote hosts through firewalls and sharing the network between multiple background applications.
RDP Wrapper does not work on Windows 10
In some cases, the RDP Wrapper utility does not work as expected and you cannot use multiple RDP connections.
If the utility showed [not supported] in the status window, then there is no configuration in the rdpwrap.ini file for your version of Windows. Update the rdpwrap.ini file as described above.
If RDP Wrapper does not work after updating the rdpwrap.ini file, try opening the rdpwrap.ini file and looking for the description for your version of Windows. How can you tell if your version of Windows is supported in the rdpwrapper config file?
The screenshot below shows that for my version of Windows 10 (10.0.19041.1320) there are two sections with descriptions:
[10.0.19041.1320] ….. [10.0.19041.1320-SLInit] …..
If there is no section in the configuration file for your version of Windows, try searching online for the rdpwrap.ini lines for your build. Add the found lines to the very end of the file.
Also, if you have problems with RDPWrap, you can open a thread at https://github.com/stascorp/rdpwrap/issues. Here you can also find the current rdpwrap.ini files until the update in the official repository.
If, after installing security updates or after upgrading the Windows 10 build, RDP Wrapper does not work, check if the Diagnostics section contains the message Listener state: Not listening .
Try updating the ini file and then reinstalling the service:
rdpwinst.exe -u rdpwinst.exe -i
It happens that when you try to make a second RDP connection under a different user, you get the following message:
The number of connections allowed to this computer is limited and all connections are already in use. Try connecting later or contact your system administrator.
The number of connections to this computer is limited and all connections are in use right now. Try connecting later or contact your system administrator.
In this case, you need to use the group policy editor gpedit.msc in the Computer Configuration -> Administrative Templates -> Windows Components -> Remote Desktop Services -> Remote Desktop Session Host -> Connections section Limit the number of connections policy and change it value to 999999 (Computer Configuration -> Administrative Templates -> Windows Components ->Remote Desktop Services ->Remote Desktop Session Host -> Connections-> Limit number of connections).
Restart your computer to update the GPO and apply the settings.
How exactly do restrictions work?
First of all, let’s clarify that remote desktops work exclusively on versions of Windows Pro and higher, while on Windows Home this option is not available in principle. Also, as we have already clarified above, there can only be one connection: either locally on the PC we are interested in, or remotely; two or more sessions are not available to users. When attempting a new connection, the system will issue a warning that the current user will be disconnected and will ask for confirmation to continue working.
Modifying the termsrv.dll file to remove RDP restrictions in Windows 10 and 11
To remove the limit on the number of RDP user connections in Windows 10 without using rdpwraper, you can replace the termsrv.dll file . This is a library file that is used by Remote Desktop Services. The file is located in the C:\Windows\System32 directory.
Before editing or replacing the termsrv.dll file, it is advisable to create a backup copy of it. This will help you, if necessary, you can return to the original version of the file. Launch a command prompt with administrator rights and run the command:
copy c:\Windows\System32\termsrv.dll termsrv.dll_backup
Then you need to become the owner of the file. The easiest way to do this is from the command line. To change the file owner from TrustedInstaller to the local administrators group using the command:
takeown /F c:\Windows\System32\termsrv.dll /A
A message should appear: “SUCCESS: The file (or folder): “c:\Windows\System32\termsrv.dll” now owned by the administrators group.”
Now, using icacls.exe, give the local administrators group full rights to the termsrv.dll file (Full Control):
icacls c:\Windows\System32\termsrv.dll /grant Administrators:F (or Administrators in the Russian version of Windows). A message should appear: “processed file: c:\Windows\System32\termsrv.dll Successfully processed 1 files; Failed processing 0 files".
Now you need to stop the Remote Desktop Service (TermService) from the services.msc console or from the command line:
Net stop TermService
The Remote Desktop Services UserMode Port Redirector service stops along with it.
Before going any further, you need to know your version (build) of Windows 10. The easiest way to do this is using the following PowerShell command:
Get-ComputerInfo | select WindowsProductName, WindowsVersion
In my case, Windows 10 build 21H1 is installed.
Then open the termsrv.dll file using any HEX editor (for example, Tiny Hexer). Depending on the build, you need to find and replace the line:
| Windows version | Find string | Replaced by |
| Windows 11 RTM (21H2 22000.258) | 39 81 3C 06 00 00 0F 84 4F 68 01 00 | B8 00 01 00 00 89 81 38 06 00 00 90 |
| Windows 10 x64 21H2 | 39 81 3C 06 00 00 0F 84 DB 61 01 00 | |
| Windows 10 x64 21H1 | 39 81 3C 06 00 00 0F 84 2B 5F 01 00 | |
| Windows 10 x64 20H2 | 39 81 3C 06 00 00 0F 84 21 68 01 00 | |
| Windows 10 x64 2004 | 39 81 3C 06 00 00 0F 84 D9 51 01 00 | |
| Windows 10 x64 1909 | 39 81 3C 06 00 00 0F 84 5D 61 01 00 | |
| Windows 10 x64 1903 | 39 81 3C 06 00 00 0F 84 5D 61 01 00 | |
| Windows 10 x64 1809 | 39 81 3C 06 00 00 0F 84 3B 2B 01 00 | |
| Windows 10 x64 1803 | 8B 99 3C 06 00 00 8B B9 38 06 00 00 | |
| Windows 10 x64 1709 | 39 81 3C 06 00 00 0F 84 B1 7D 02 00 |
Tiny Hexer editor cannot edit the termsvr.dll file directly from the system32 folder. Copy it to your desktop, and after modification, replace the original file.
For example, for the edition of Windows 10 x64 21H1 19043.1320 itself (the version of the termsrv.dll file is 10.0.19041.1320), you need to open the termsrv.dll file in Tiny Hexer. Then find the line:
39 81 3C 06 00 00 0F 84 2B 5F 01 00
And replace it with:
B8 00 01 00 00 89 81 38 06 00 00 90
Save the file and start the TermService service. If something goes wrong and you have problems with the RDP service, stop the service and replace the modified termsrv.dll file with the original version:
copy termsrv.dll_backup c:\Windows\System32\termsrv.dll
Introduction
Previously, I described a way to make a terminal server from Windows 7. Nowadays, the modern operating system Windows 10 is relevant. Due to the fact that support for Windows 7 has already ended, everyone, one way or another, will eventually have to work in Windows 10, even if the previous version of you completely satisfied.
A useful opportunity to turn a regular Window 10 into a terminal server. Previously, I have used this function more than once to allow several people to work in the 1C file room at the same time. For a small team of several employees, this is quite convenient and justified, since buying a full-fledged server and server OS for such tasks is impractical.
I’ll make an important note right away. I do not recommend using a terminal server based on Windows 10 where it is critical that everything works stably and downtime is unacceptable. Often after updates the configured functionality disappears and it is not always possible to restore its functionality quickly. Keep this in mind.
Simultaneous RDP access under one account
As with past client versions of Microsoft operating systems, users of the Pro and Enterprise editions of Windows 10 (but not Home) editions can remotely connect to their computers via Remote Desktop Services (RDP). However, there is a limit on the number of simultaneous RDP sessions - only one remote user can work at a time. When trying to open a second RDP session, the first user's session is prompted to end.
In the English version the warning is:
The fact is that in desktop editions of Microsoft operating systems there are the following main restrictions on the use of the remote desktop service:
- Support for RDP access is available only in older editions of Windows (Professional and higher), and in home editions (Home) this functionality is disabled.
- Only one remote RDP connection is possible. When attempting to open a second RDP session, the user is prompted to terminate the existing connection.
- In that case, there is a user working at the computer console (locally), with a remote RDP connection, his session will be disconnected (blocked). The opposite statement is also true: the remote RDP session is forcibly terminated if the user logs in to the system console
a terminal on a workstation for the operation of several users. Although from a technical point of view, any edition of Windows, if there is enough memory, can support the simultaneous work of several dozen remote users (on average, 150-200 MB of memory is required for one user session, excluding running applications). Those. The maximum number of simultaneous sessions is in theory limited only by computer resources.
We will look at two ways to disable the limit on the number of simultaneous RDP connections in Windows 10:
- RDP Wrapper Library.
- Modification of the termsrv.dll file.
Important . Initially, in the very first version of the article, the main working option to remove the limit on the number of simultaneous RDP user connections was the method of modifying and replacing the termsrv.dll in the %SystemRoot%System32 folder. However, when installing a new build of Windows 10 or some security updates, this file is updated. As a result, you have to edit this file with a Hex editor every time, which is quite tedious. Therefore, the main way to organize a free terminal server on a client Windows 10 is to consider the RDP Wrapper Library .
Note : The system modifications described in this article will likely be considered a violation of the Windows License Agreement, with all the ensuing consequences.
