08/15/2020 windows | for beginners | programs
If you need to transfer installed Windows 10 to an SSD (or simply to another hard drive) when purchasing a solid-state drive or in another situation, you can do this in several ways, all of them involve the use of third-party software, and below we will consider free programs that allow you to transfer the system to a solid-state drive, and also shows step by step exactly how to do this.
The article demonstrates free tools that allow you to copy Windows 10 to an SSD without errors on modern computers and laptops with UEFI or Legacy (BIOS) boot and the system installed on a GPT or MBR disk. After transferring the system, do not forget to set the computer or laptop to boot from the new drive.
Note: If you don't need to transfer all your programs and data from your old hard drive, you can also simply perform a clean install of Windows 10 by creating a distribution package, such as a bootable USB flash drive, in advance. A key will not be required during installation - if you are installing the same edition of the system (Home, Professional) that was on this computer, click “I don’t have a key” during installation and after connecting to the Internet the system will be activated automatically, despite the fact that now installed on SSD. See also: Setting up an SSD in Windows 10.
- Transfer to SSD with free Acronis True Image
- Samsung Data Migration
- Macrium Reflect
- Other programs for transferring Windows 10 to SSD
Transfer Windows 10 to SSD with free version of Acronis True Image
of Acronis True Image , as a program for transferring the installed system to their solid-state drives . This free version is available for SSDs of the following brands:
- WD (Western Digital)
- SanDisk
- Kingston
- Crucial
- A-Data
The program is entirely in Russian, and the transfer process itself should not be difficult even for a novice user: the entire process is carried out using a wizard in simple or manual mode, which allows you to exclude individual folders from the transfer or configure the transferred sections.
Detailed instructions about the program, a video demonstration of the process and download links are available in the article How to transfer Windows 10, 8.1 and Windows 7 from HDD to SSD using Acronis True Image.
Preparatory stage
Any process, especially one as important as working with an operating system, requires a certain preparation stage, which should minimize the risk of failures/errors both directly during the process of transferring Windows and in its further operation.
- Installing an SSD disk. Users who have desktop computers simply insert the drive into the appropriate slot (or use special “sleds”) and connect to it the power cable coming from the power supply and the corresponding cable connected to the motherboard.
For laptop users, things are usually a little more complicated. Some laptop models already have a slot for connecting a second physical drive in a 2.5-inch form factor, so for them the connection process is even more elementary - just open the lid and connect the drive to the connector.But in most cases, laptop owners have to sacrifice something, for example, a disk drive.
First, you need to purchase the appropriate adapter, remove the drive, place the drive in the adapter and install it in place of the drive. Also nothing complicated, but more expensive.
It is logical that all these manipulations are carried out exclusively with the device turned off; it is advisable to completely de-energize the computer by turning off the power supplies and resetting the static.
- Checking BIOS settings. After installing the physical disk, you should connect the computer to the power supply and turn it on.
Next, you need to get into the “BIOS” using the appropriate key for your motherboard. The most common options are the “F2”, “F12”, “DEL”, “TAB”, “ESC” key.This information can be clarified in the motherboard documentation, on the manufacturer’s website, or sometimes this information is provided to the user at the time the system boots.
In this case, there are two points of interest in the BIOS:
Is SSD detected at all? If yes, then the BIOS will indicate the connection interface, volume and serial number;
- In what mode does SATA operate? For normal operation of the solid-state drive, you should use the “AHCI” mode.
Upon completion of the test, you should save the settings (if changes were made) by pressing the “F10” + “Enter” key.
For this:
- Right-click on the “Start” menu and in the list presented, find and open “Disk Management”;
At this point, the preparatory stage can be considered complete. Next, you can begin to directly transfer the operating system.
Samsung Data Migration
Samsung SSDs are among the most popular, and the official Samsung Data Migration for migrating your system from a hard drive or other SSD to Samsung drives is one of the easiest to use. Typically, all you need to do is specify the source and destination drives and begin the transfer.
Upon completion, all that remains is to install booting from the new SSD in the system and use the old drive for any other tasks. Instructions and download of the program are available on the official Samsung website - https://www.samsung.com/ru/support/mobile-devices/how-can-i-transfer-windows-to-my-new-ssd-samsung/
MiniTool Partition Wizard
MiniTool Partition Wizard is a disk management program. Using the utility, you can transfer the operating system from HDD to SSD, copy dynamic disk volumes and convert NTFS file systems to FAT. The software also has a built-in benchmark for disk diagnostics. The program is completely free, the interface is in English, and works on all current versions of Windows.
In the main program window, you need to select the “Migrate OS” tool.
A window will open in which two actions are available: copying the system disk to another disk and transferring system files without deleting them on the source disk. After selecting the system cloning mode, you must click the “Next” button.
In the next section, you need to select the target disk to which the program will transfer the system. After selecting the storage device, click “Next”. The MiniTool Partition Wizard utility will begin migrating the operating system. The duration of the operation depends on the amount of data and the speed of the information storage devices.
Advantages of MiniTool Partition Wizard:
- simple interface;
- the ability to use the utility for free;
- tool for complete disk cleaning;
- ability to convert file systems;
- support for disks with 4 KB sectors;
- low load on the computer during operation:
- high speed of operating system transfer.
Flaws:
- You cannot run the system backup tool according to a specified schedule.
Disk cloning (moving Windows 10 to another disk) in the free version of Macrium Reflect
Macrium Reflect is an excellent program for working with system backups, which, among other things, makes it relatively easy to transfer Windows 10 to an SSD drive. The only possible drawback for a novice user is the lack of Russian interface language.
However, it won’t be difficult to figure it out; separate detailed step-by-step instructions, information about installing the program and a video are available on the website, where the entire transfer process is shown clearly and with all the necessary explanations: Transferring Windows 10 to an SSD or other hard drive in Macrium Reflect Free.
EaseUS Todo Backup Free
EaseUS Todo Backup Free is a disk backup program. Does the utility allow you to transfer the system from HDD to SSD? create and burn images to CDs and DVDs, as well as backup data according to a specified schedule. The application is free, compatible with Windows (32 and 64 bit), but not translated into Russian.
After launching the program, select the “System Clone” tool, which is located in the left menu of the main window.
In the window that opens, select the disk to which the system will be transferred. Go to the “Advanced Options” section and check the “Optimize for SSD” checkbox. You can also clone each sector of the disk here.
If there is not enough space on the target disk to copy data, the program will automatically compress the files of the last added partition. To continue, click "Proceed".
The system cloning process will start. The larger the volume of data being transferred, the longer it will take to copy system files.
Benefits of EaseUS Todo Backup Free:
- free distribution model;
- user-friendly interface;
- Scheduled backups;
- fast data transfer;
- system optimization for SSD during cloning;
- the ability to create and burn disk images;
- function of creating backup copies of individual files and folders.
Flaws:
- There is no tool to test the disk for errors.
Other programs for transferring Windows 10 to SSD and features of their use
There are plenty of other programs that allow you to transfer Windows 10 to an SSD. But there are some nuances when using them. For example, Intel Data Migration is no longer supported and is not on the official website: you will have to use other program sources to simply transfer the system to an Intel SSD (the transfer process itself is completely the same as when using Acronis True Image).
As for the following programs, they had the ability to transfer the system for free in earlier versions, and in the latest versions it became available only after purchasing a license. But: by downloading an old version of the program (I will indicate the required versions below, how to do this in the instructions:), and sometimes a slightly different program from the same developer, you can transfer for free.
MiniTool Partition Wizard Free
The functions for transferring an OS to an SSD in the MiniTool Partition Wizard Free were free until a certain version of the program, but in the latest updates they were blocked and the transfer is not available without purchasing a license. However, if you find an old version of the program (for example, 11.6), then this function is available for free and works properly.
Details about the steps required to migrate Windows 10 to SSD in this program: How to migrate Windows 10 to SSD or other drive in MiniTool Partition Wizard Free.
Aomei Partition Assistant Standard Edition
Aomei Partition Assistant Standard is a convenient program in Russian for working with disks, in today's free version of which the “Transfer OS to SSD or HDD” function is not available. Another function, “Disk Copy,” also refuses to work. However, the same function (Disk copy) works properly in version 6.6 of the program (for MBR disks the item “Transfer OS to SSD or HDD” will also work).
- Before performing these steps
- Launch the “Copy Disc Wizard” and select “Quick copy disk”.
- Specify the source drive and then the destination drive (destination drive).
- Specify whether to resize the partitions or fit them to the size of the target disk.
- Click "Finish" and then click the "Apply" button in the main program window.
- The computer will restart and the disk cloning process will begin (this may take a long time).
- The computer will automatically restart and you will receive two identical disks. All you have to do is manually restart the computer again and set it to boot from the disk you need.
Transition to ssd'shnik with GPT standard
What to do when a beginner needs to painlessly transfer Windows 10 from the hdd to a gpt standard ssd - you need to install the program and carry out your plans with a few clicks. So, Macrium Reflect is a free trial license for home use for 30 days, the big advantage is that errors are excluded, but there is a nuance - the program is not Russified.
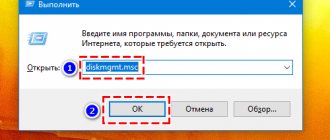
I would like to make a reservation right away, if Windows 10 does not display the installed new ssd disk, it needs to be initialized, we do it as follows:
- [win]+[R] → enter “diskmgmt.msc” without quotes → ok.
- Right-click on the unallocated disk → “Initialize”
Now the screw is displayed and we need to start transferring the Windows 10 system from hdd to ssd. Launch Macrium Reflect and then everything is intuitively simple, when you first start the program it will offer to create a recovery tool - emergency media (disk or flash drive), here you can do as you wish, we will skip this step:
- check the box “Don’t ask me again” - don’t ask again → “No”
- go to the “Create_a_backup” tab - to create a backup copy → select the disk with the OS → click “Clone_this_disk” - this is how we start cloning the hard drive
- Next, you need to mark all the partitions that need to be transferred, do not forget about the bootloader, recovery image, system partition, etc.
- A little lower, click on “Select_a_disk_to_clone_to..” → select the ssd
- For the purity of the experiment, they specified a disk with a volume smaller than required and made sure to create an additional partition at the beginning of the disk - using the example of standard factory settings.
- The program automatically shortened the last partition and displayed the message “The_last_partition_has_been_shrunk_to_fit” - literally translated “The last partition was shortened to fit”
- We click “Next” without consent to create a schedule for the operation, we have no need for this, after which the window will contain information about what actions will be performed.
- “Finish” → ok.
Once completed, depending on your needs, you can either remove the screw or leave it to store data - pre-formatted, such as movies, music, photos - since this is the type of file that is not recommended to be kept on solid-state drives. Restart the system and set the default to boot from the new disk - the migration process to the Windows 10 ssd is complete.
Transfer issues
There are no system restrictions for working with SSDs. Microsoft provided full support for SSDs with the release of Win 7. However, the transition may be difficult for laptop users. Manufacturers are reluctant to allow changes to the factory configuration.
As a result, some top MSI and ASUS models do not allow HDD replacement. The user will not be able to install a cloned SSD into it, since the laptop refuses to work with it. The only way out is to contact the manufacturer’s technical support to find out in advance the possibility of an upgrade and supported drive models.