Over time, everything changes. It seems that we ourselves know this very well, but when it comes to computer operation, for some reason many people completely forget about it. And it’s not even that the device itself becomes outdated over time. Often, users simply forget to enable update support for their dear Windows 7 OS. As a result, after working like this for several months, and if you’re lucky, years, it begins to slow down, wither, and so on. Therefore, whether you want it or not, you still have to learn how to run the Windows 7 Update service on your PC.
Method #1: Launch from the taskbar
At any time while working on your computer, this service for Windows 7 can be launched directly from the taskbar. In this case, we proceed like this:
- left-click on the icon that hides program shortcuts in the taskbar;
- Find the “Support Center” shortcut and right-click on it;
- In the menu that appears, click on the “Open update center...” item:
Next, in the window that appears on the left, find and click “Settings parameters”:
As a result, the service will offer to select a method for installing updates for Windows 7. At this stage, you can make a number of settings:
- determine who is allowed to update the operating system;
- choose to receive a Windows notification;
- install support for recommended updates, etc.
However, what is really required of us is to enable support for important updates. Note that the Center... service may offer several options for downloading and installing new files for Windows 7. However, in this case it is better to trust the operating system to update automatically. To do this, select the appropriate option in the “Important updates” section and click OK:
That's basically all!
Manual search for updates
When deciding how to launch Windows Update Center for Windows 7, you should also not discount the possibility of doing it manually.
A significant portion of users do not need the full amount of OS support that developers produce. Eliminating various unused components will save time and hard drive space.
Thus, if the user knows which package he needs, then it can easily be found and downloaded directly from the Microsoft website, where all the necessary instructions are provided. In addition, if you wish, you can enable manual operation mode and independently manage the installed files for the OS (Figure 7).
Figure 7.Updating the Windows OS version via the official Microsoft website
Option #2: Launch from the Start Menu
In order to get to Windows Update and start the corresponding service, you can use the Start menu. To do this, click on the “Start” button on the taskbar or a key on the keyboard. Next, select “Control Panel”, and in it – “Windows Update”:
As a result, the system center window will open. From this point on, we proceed in the same way as in method No. 1: open the “Settings” section, select automatic launch of important updates and save the settings.
Windows 7 and 8 Update does not work
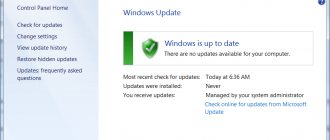
In some cases, a problem with Windows Update may occur even when the service itself is enabled. In this case, the user receives the following errors: “Windows Update cannot currently search” or “Windows Update cannot currently be started.” What to do?
First and most importantly, check if the update service is enabled. In the control panel, go to “Windows Update”, then to the settings settings. Here, select “Install updates automatically” or “Download updates, but I decide whether to install them.”
Next, go to the official Microsoft website and download a utility called Fix It. It helps to automatically restore operating system settings. Just download the utility, install it on your computer and run it. Then follow the instructions. The good thing about the utility is that it does everything automatically and you don’t have to do anything.
If the utility does not help or for one reason or another you cannot use it, then you can do some things yourself. Run Command Prompt as an administrator (click Start, type cmd in the Search programs and files box, then right-click the Command Prompt icon and select Run as administrator.
When the command prompt opens, you need to enter several commands (after each of them, press the Enter key):
net stop cryptsvc
ren c:\windows\system32\catroot2 catroot2old
net start cryptsvc
Try installing updates.
You can also try the netsh winsock reset command (necessarily as an administrator), it may also help.
Surprisingly, the problem can often lie in the hard drive controller driver. The driver itself can be found on the website of your motherboard manufacturer.
One unusual method was found on the Internet. You need to run a bat file with the text:
net stop wuauserv rmdir %windir%\softwaredistribution /s /q regsvr32 /s wuaueng.dll regsvr32 /s wuaueng1.dll regsvr32 /s atl.dll regsvr32 /s wups.dll regsvr32 /s wups2.dll regsvr32 /s wuweb.dll regsvr32 /s wucltui.dll
net start wuauserv
To do this, create a text document (notepad) on your desktop, copy the text and save. Rename the extension from txt to bat. Next, click on the file, right-click and select “Run as administrator.” Restart your computer and then try to install updates.
If all else fails, download the “System Update Readiness Tool for Windows” utility from the Microsoft website. There are different versions of the utility for different versions of operating systems, all of them are available on the Microsoft website.
ATTENTION! You perform all actions at your own peril and risk; the site administration is not responsible for the published material!
fulltienich.com
Method No. 3: Start through the Run utility
You can also run the process on a computer running Windows 7 from the Run program. You can open it with a simple combination of hot keys and R. After the utility has launched, enter the cmd command for it and click OK:
As a result, the command line will open, as you already correctly understood. We proceed like this:
- set the net start bits parameter for it and confirm the entry with the Enter key;
- Enter the value net start wuauserv into the command line and press Enter again.
As a result, the service will start automatically.
Using an ISO image
The peculiarity of this method is that the installation of the operating system is launched from the current version. There is no need to make any settings in the BIOS or UEFI.
Visit the OS Upgrade and Media Creation Tool download page. Click on the “Download tool now” button.
The utility file is now located in the operating system download directory.
Run the executable EXE file as administrator. To do this, right-click on it and select the appropriate context menu item.
Next, you will be asked to allow the application to make changes on the device (the “Yes” button). It will take some time to prepare the instrument for use.
The utility will start working only after the user accepts the terms of the license agreement.
You will have to wait a while again. Select Create installation media and click Next. Use this button to proceed to the next steps of the utility.
Leave the default language, edition, and PC architecture. You can uncheck them and identify them manually.
We need an item that suggests saving the image file for later recording on installation media (highlighted in the illustration).
Determine the directory where the operating system ISO image file will be saved. Click the "Save" button.
The dynamics of file downloading (in percentage) will be displayed on the screen.
Actions after the image is downloaded:
- Open the directory where it is saved
- Double left click
- Connect the image to a virtual drive
- Login to the virtual drive
- Run the “setup” file with the EXE extension
- Confirm download and installation of updates
- Read the terms of the license agreement. Updating is only possible if you accept them
- You cannot use your PC during the installation process.
- The device may be rebooted repeatedly
After the installation wizard completes, your laptop or desktop PC is running the latest version of the OS. If the process was successful, the files and applications did not disappear. But I recommend saving them on additional media before updating.
Previously, I wrote a detailed step-by-step guide to help you install Windows 10. I also covered what to do in cases where the operating system does not boot.
Do you prefer to configure the operating system and software update rules yourself or rely on the parameters automatically determined by the developers?
—> —>
Method number 4: Launch through task manager
You can also load the service on Windows 7 using the wuapp command. To execute it, press Ctrl, Shift and Esc at the same time, go to the “File” menu of the task manager, select the “New task” item and enter the wuapp command to execute it:
This will open Windows Update. Next, we perform the steps from method No. 1.
Time at which the PC does not restart
To restart Windows 10 not at any time, but only at a time convenient for you, on the left side of the window, go to the “Windows Update” section. Click the "Change activity period" link.
Indicate the time when you start working on the computer. Then the end time. The PC will not automatically restart during the specified time interval. Before restarting, the system will check whether the user is currently working with it.
To apply the changes, click the “Save” screen button.
Method No. 5: Launch through the Administrative Tools service
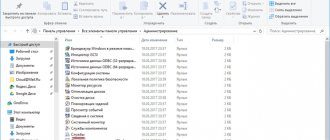
To start a service for OS Windows 7 using administration, open “Start”, type the word “admin” into the search field and click the first item in the list that appears:
After that, in the “Administration” window, find and select the “Services” item. Then, in a new window, look for and click on the “Update Center...” service and launch it by clicking on the corresponding button on the screen:
Using Windows10Upgrade
Visit the Tens Update Utility download web page. Click on the "Update Now" button.
Save the executable EXE file of the software tool on the HDD or SSD of your PC. Open the directory with the downloaded files in Explorer or the file manager you prefer.
From the context menu of the executable file, select run as administrator.
Allow the program to make changes on your device (“Yes”).
The user will be prompted to update the operating system to the latest version at the time of launching the utility. To update, click "Update Now".
The software tool will check the compatibility of your desktop or laptop with the latest OS version. If successful, it will inform you that the update is sufficient:
- CPU performance
- Random access memory
- Free storage space
The screen will display the update progress (in percentage). The user can cancel the update and return to it at a more convenient time.
No. 6: Setting up from the “Support Center”
In Windows 7, you can also start a service on your computer that will update the system through the “Support Center”. You can enter it through Start - Control Panel or directly from the taskbar. Whichever login option we choose, after the “Support Center” opens, in the “Security” section next to the “Update Center...” item, click the “Change settings” button:
In the system window that appears, select “Install updates automatically...”:
As a result, we get a working Windows 7 service that will update the system in a timely manner.
How to enable updates in the Windows 7 operating system
To increase the speed of file processing and optimize the operation of your computer, periodic updating of the Windows 7 software is required. This procedure can be performed in several ways, which will be discussed below.
Using the Taskbar
In order to enable Windows Update from the taskbar, you must perform the following manipulations:
- Use the left mouse button to activate the icon to open working shortcuts on the PC panel;
- After that, click on the “Support Center” section;
- In the window that appears, you need to select the option to open windows updates;
- Then click the “Settings” subsection, which should pop up in the left corner of the screen.
As can be seen from the figure, it is possible to define installation parameters and a number of additional options, namely:
- Set the icon for who is allowed to update the system;
- Select ways to receive notifications from Windows Center;
- Determine the list of desired and recommended applications;
- Take advantage of additional services.
Start Menu and Task Manager
After clicking the “Start” button, you need to enter the “Windows Update” section. Open the system window by clicking on the settings section, select auto-update mode and save the selected settings.
Using the task manager, you can enable the service in question using the wuapp command. To do this, you need to simultaneously press the CTRL, Shift, Esc keys, go to the “New task” section, and perform the proposed operation, as indicated in the figure.
After opening the Windows Update Center, the operations specified in the first installation method are performed.
You can enable the update system on Windows 7 by activating the service through PC support. The full cycle is carried out by clicking the following points:
- Safety;
- Updates;
- Change settings.
In the window that opens, you need to select automatic installation.
To enable the service through “Administration”, select the “Start” subsection, enter the word “admin” in the search box, and activate the first position in the list that opens. Next, you will need to open the “Services” section, launch the application center with the mouse and save the selected settings.
Ways to correct a broken service
If there are problems with the operation of the Windows service, you need to take a number of actions, which in most cases help enable the service for full use. You will need to complete the following steps:
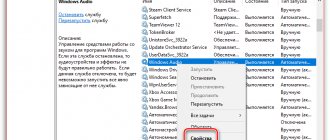
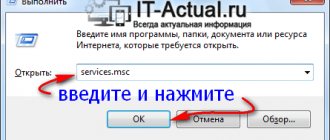
- Open the Run utility, enter the request services.msc;
- In the “Services” section, you need to select the update center window, activate the “Stop” option;
- By using the Software Distribution search file, we rename it to a similar file with the ending 12;
- We deactivate all antivirus, optimization and additional programs;
- Once again, through the “Services” window, select the Windows option using the “Run” function;
- You will also need to restart your device.
Conclusion
Considering that the need to update Windows is relevant from time to time for all types of RAM, knowing how to properly enable and install innovations greatly simplifies the operation of your computer and prolongs its uninterrupted functionality.
windowsTune.ru
Option #7: Debugging a broken service
If the service is started but not working, proceed as follows:
- open the “Run” utility and enter the command services.msc for it;
- in the “Services” window, click “Update Center...” and click the “Stop” tab;
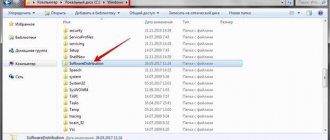
- find the SoftwareDistribution folder through a search and rename it to SoftwareDistribution12;
- disable antivirus, download optimizers and other programs;
- return to the “Services” window and restart the service using the “Run” item;
- reboot the computer.
You can be sure that one of the methods suggested to you will definitely work!
Views: 20448