OS updates are aimed at improving the stability, security and performance of the system, but sometimes after them Windows 10 does not boot . Such failures are not at all uncommon, and there are quite a few types of them. For some, the death screen appears, for others the black screen saver constantly hangs, and for some the OS starts, but after a very long period of time. The good news is that every situation has a solution. We will talk about the reasons and methods of correction in this material.
Reset BIOS to defaults
If you recently made some changes to your BIOS and then encountered this situation, you may be able to roll back the changes. Find out how to reset the BIOS from our detailed review.
To open the BIOS, you need to restart your PC and press F2, F12, Delete or other keys depending on the manufacturer of the motherboard.
Once there, you'll probably see a button at the bottom that says F9 - Default Settings. On some machines, this option can be easily found in the “Security” tab. So look around to find the right menu.
Causes of the problem with Windows 10
Problems with starting the system after the latest update may occur for the following reasons:
- presence of malware;
- incorrectly installed programs;
- Registry violation;
- corruption of system files;
- driver incompatibility or failure.
Errors after an upgrade sometimes occur due to the fact that Microsoft installed an incorrect update. This has happened at least twice since Windows 10 hit the market.
Basically, the reasons for failures after an update lie in incorrectly working applications. This often happens due to the fact that several antiviruses are installed on the computer.
Check and adjust HDD
Please get ready for the world's easiest solution to this problem.
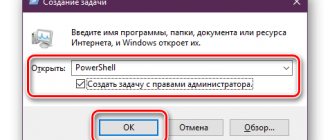
- Launch a command prompt window.
- From here, run "chkdsk c: /r/x" without the quotes and view the work done.
"/r" tells you to look for bad sectors and try to get readable information back, and "/x" will force the HDD to shut down before the operation can start.
Try using custom installation
If all else fails, use this option - try to save your data by reinstalling the OS and your applications. You can boot your PC from the installation flash drive and then do a clean install (which erases everything) or a custom install (which will keep your files).
You might be interested in:
- How to roll back a problematic update in Windows
- How to restore the system back to the restore point
- How to factory reset Windows 10
Reasons why your computer won't start in safe mode
Boot repairs for Windows operating systems using built-in tools such as “Boot Options or Advanced Boot Options”, the name depends on the version of Windows you are using, have long been a common way to solve startup problems.
Attention: If, when starting your computer, you do not get to the “Boot Options” screen, log in to Windows, or receive any error message, then try “All DIY options for repairing your computer, laptop or tablet” to find the most correct option solutions to your problem.
Try going back to the previous build
You can rollback Windows to an earlier build, where you can access the familiar desktop interface. From the installation disk, open:
Restore your computer > Troubleshoot > Advanced options > Revert to previous version.
This feature does not delete personal documents, but you may find that application settings revert to their previous settings.
How to update drivers and avoid crashes in Windows
So first of all, we are going to show you the best and fastest way to update these Windows drivers. In this way, in addition to improving the overall functioning of the components to which they belong, we can avoid future failures such as the one described here. Well, this is something we can easily perform from the system device manager. We access it, for example, by right-clicking on Start. Here we find the Device Manager option where we click.
A new window will appear with a list in which we see all the detailed components that are part of our PC. Well, for the purpose that we are looking for here, that is, to update the relevant drivers, we only need to click on these components using the additional button.
In the context menu that we will see on the screen at this time, we will only have to select the “Update driver” option. As you can imagine, this will be very helpful when it comes to updating these drivers and preventing possible glitches with them.
Refuse upgrade
This is one of the most effective methods. During the installation of the "seven" it is better not to disturb anything further. If the user did not worry about this in time, then the following steps must be taken:
- enter “Windows Update”;
- open “Settings”;
- after o ;
- click "Apply".
After this, you just need to manually check for updates and install only the ones you need, for example, software for computer components and devices that are safe for installation.