How to disable Windows updates - this question is asked by users who need to prevent the installation of system updates on their computer. With default settings, the operating system automatically searches for, downloads and installs updates released for Windows.
The corporation releases update packages for the Windows operating system approximately once a month. From time to time, Microsoft makes unscheduled updates designed to solve emerging problems in the operation of the OS, or to close discovered security holes in Windows.
The main part of the updates concerns system security. When installing updates, system fixes are applied or some new features are added.
In addition to regular updates, so-called major updates are released in Windows 10, after which, essentially, a new version of Windows 10 is installed on the computer. Such major updates are released once or twice a year.
Some users disable system updates for various reasons. The main reasons for refusing Windows updates:
- sometimes it happens that after installing updates, the normal operation of Windows and installed programs is disrupted;
- if the user has a limited Internet connection, downloading updates affects the amount of traffic consumed;
- lack of free space on the computer disk;
- after applying the update, the user is afraid of losing activation of the operating system;
How to disable automatic updates? You can solve the problem using system tools, or using third-party software. In this article we will look at 5 ways to disable updates on Windows 10 using the operating system.
Simply disabling Windows Update on Windows 10, as in Windows 7 or Windows 8, will no longer work. The maximum that can be done in this way is to pause updates for up to 35 days.
Microsoft has repeatedly changed the settings for receiving updates in the Windows 10 operating system. Because of this, some of the instructions in this article are no longer relevant. The article has been supplemented with new working methods for disabling system updates.
How to disable automatic updates in Windows 10 (1 method)
Windows 10 tools automatically detect, download and install updates on your computer.
On Win 10, you can disable updates in a way that disables the Windows Update service. This method works on all versions of Windows 10 and ensures that Windows updates are disabled forever.
Enter Administrative Tools from the Control Panel, or an easier way: in the Windows Search field, enter the expression: “administration” (without quotes), and then open the Administrative Tools window.
In the “Administration” window, double-right-click on the “Services” shortcut.
In the “Services” window that opens, in the “Services (Local)” section, find the Windows Update service.
Next, right-click on the Windows Update service, and select “Properties” from the drop-down context menu.
In the “Properties: Windows Update (Local Computer)” window, in the “General” tab, change the “Startup type” setting to “Disabled”.
In the “Status” setting, click on the “Stop” button to stop the Windows 10 update service.
After this, Windows 10 updates will stop coming to your computer.
To enable automatic updates, in the Properties: Windows Update (Local Computer) window, select your preferred startup type: Automatic (Delayed Start), Automatic, or Manual.
How to quickly abort an update
If you want to quickly abort a Windows 10 update, depending on its stage, the first thing you need to do is the following:
- if the update has just started downloading, disconnect from the Internet;
- if the update has downloaded and the system asks to restart to apply it, do not do this under any circumstances;
- If, when you turn on/off/restart the system, installation or application of updates begins, turn off the computer by holding down the power button on the case.
Regardless of the option you are faced with, all further steps will look almost the same. Now you need to start canceling the update that has started. For the last problem, start the system in safe mode.
Starting the system in safe mode
Starting the system in safe mode is guaranteed to help start the computer without installing downloaded updates.
If you skipped downloading updates and turned off your computer, canceling them will pose some difficulties: every time you try to log in, an attempt will be made to apply the updates. This problem has been fixed in later versions of Windows 10, but it's best to start your computer in Safe Mode just in case.
- Turn on your computer. After a couple of seconds, press the F8 key (to avoid missing a moment, do this every two seconds from the start).
- The system startup option selection screen appears. Select "Safe Mode with Command Line Support."
This window is called up by pressing the F8 key when you press it while turning on the computer.
How to disable Windows 10 updates using Local Group Policy Editor (method 2)
Now let's see how to disable Windows 10 updates in the Local Group Policy Editor.
Please note that this method is not suitable for Windows 10 Home (Windows 10 Home) and Windows 10 Single Language (Windows 10 Home for one language). This feature is present in older versions of the operating system: Windows 10 Pro (Windows 10 Professional) and Windows 10 Enterprise (Windows 10 Enterprise).
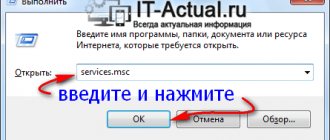
First you need to log into the Local Group Policy Editor. In the Windows Search box, type "gpedit.msc" (without the quotes), and then launch the editor.
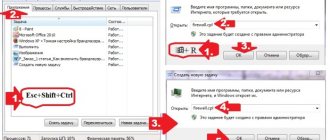
Alternatively, you can enter the Local Group Policy Editor in the following way: press the “Win” + “R” keys, enter the expression “gpedit.msc” (without quotes) in the “Open” field, and then click on the “OK” button.
In the “Local Group Policy Editor” window, follow the path: “Computer Configuration” => “Administrative Templates” => “Windows Components” => “Windows Update”.
In the “Windows Update” section, find the “Set up automatic updates” item, right-click on it, and select “Change” in the context menu.
In the Automatic Update Settings window, enable the Disabled setting, and then click OK.
After this, the operating system will not search for, download or install automatic Windows 10 updates.
Why you shouldn't disable updates
Before moving on to methods that will lead to deactivation of auto-update, you need to know the consequences. The main disadvantage of these changes is that you will no longer receive the latest versions of the system. Of course, you will still have the ability to manually start the update procedure at the most appropriate time, but if you do not do this constantly, you will remain with outdated Windows.
The system gains access to new features and increases the level of protection
Updates are released for two purposes: to fix noticed errors or add new features. Accordingly, a user who has not installed the latest version of the operating system is not only left without innovations, but also exposes himself to danger, since not only Microsoft, which is trying to fix them, will learn about existing errors, but also attackers. Therefore, people who store important data on a computer and want to work with the latest innovations are not recommended to refuse updates.
Disable Windows 10 update in Registry Editor (3rd method)
The third way to disable Windows 10 updates is to make changes to the Registry Editor. This method works in all versions of Windows 10.
In Windows Search, type "regedit" (without the quotes), and then run the command.
In the Registry Editor window, follow the path:
HKEY_LOCAL_MACHINE\SOFTWARE\Policies\Microsoft\Windows\WindowsUpdate\AU
In the Registry Editor window, right-click on the free space. From the context menu, select New and then DWORD Value (32-bit). Give the parameter a name: “NoAutoUpdate” (without quotes).
Right-click on the “NoAutoUpdate” parameter and select “Change...” in the context menu.
Enter the parameter “1” (without quotes) in the “Value” field and click the “OK” button.
To enable updating in Windows 10, you need to change the value of the parameter to “0” (without quotes), or simply delete the “NoAutoUpdate” parameter from the registry.
Using a script to deactivate the utility
Let's try to create a script to automate the process of shutting down the Update Assistant.
For this:
- Open notepad win + r→notepad and copy the text there.
Script to shutdown Update Assistant
- We save the file in *.vbs format and name it, for example, scriptUA.vbs.
- Open the “Startup” folder with the command win + r→shell:startup and transfer our created script here from the folder in which we saved it.
Now, when the system boots, the script will automatically run. It will permanently shutdown the Update Assistant.
Enable metered connection in Windows 10 (4th method)
This method allows you to configure a metered connection in the Windows operating system if the network is accessed via Wi-Fi.
Follow these sequential steps:
- Enter system settings.
- From the Settings window, go to Network & Internet.
- Go to the “Wi-Fi” setting, click on the “Manage known networks” link.
- Select your Wi-Fi network, click on the “Properties” button.
- In the “Set as metered connection” parameter, move the slider to the “Enabled” position.
After this, the Windows 10 operating system will limit the search for and receipt of updates. With this method, some updates will be installed into the operating system. Major updates such as OS version updates will be disabled.
Why you should disable auto-update
Those who have little free space on their hard drive should refuse to receive updates, as downloading them can lead to it becoming full. However, in this case, it is better to try to clean the disk or replace it with a larger one.
Downloading updates is an automatic procedure, so it is very difficult to control the traffic spent on downloading files. Some versions weigh more than 100 MB, which can lead to bandwidth consumption and high costs if the Internet is paid for per megabyte. But the creators of Windows provided for the possibility of such a situation by adding a special function “Limited traffic”, which allows you to configure the download procedure in more detail (for more details, see the subsection “By setting up limited traffic”).
Another reason that makes you want to disable auto-update may be the time independently selected by the system. Since a reboot is required to complete the installation of updates, the system, having received the necessary files, will prompt you to restart the computer many times, assigning some time or letting you do it. Sometimes you can miss such a notification or accidentally acknowledge it, which will lead to an immediate or unexpected reboot. Because of this, the work process will be interrupted, and unsaved files may be damaged.
The system constantly prompts you to reboot.
There are reasons why you should refuse auto-updates, but if you can ignore them, then try to make sure that you don’t have to prohibit automatic receipt of updates. For example, I set a certain time through the system settings at which the system can randomly reboot if necessary. Since the set period is late at night, restarting the computer does not bother me.
Disabling access to Windows Update (method 5)
In new versions of Windows 10, after the user disables it, after some time the Update Center service on the computer is forced to turn on. Therefore, we need to block Windows Update's access to Microsoft update servers.
First, disable the Windows Update service (see method 1).
Next, enter the Registry Editor.
- Follow the path:
HKEY_LOCAL_MACHINE\SYSTEM
- Right click. Select New => Partition. Give the section a name “Internet Communication Management” (hereinafter without quotes).
- Click on the created “Internet Communication Management” section, create a new section inside with the name “Internet Communication”.
- Enter the “Internet Communication” section, right-click on the free space.
- From the context menu, select New => DWORD Value (32 bits).
- Name the created parameter “DisableWindowsUpdateAccess”.
- Double-click with the left mouse button on the “DisableWindowsUpdateAccess” parameter. In the “Change DWORD (32-bit) Value” window, select “1” in the “Value” field.
In the Registry Editor, do the following:
- Enter the section:
HKEY_LOCAL_MACHINE\SOFTWARE\Microsoft\Windows\CurrentVersion\Policies\Explorer
- Create a "DWORD (32-bit) Value", name it "NoWindowsUpdate" with a value of "1".
Create a new parameter in the Registry Editor window:
- Follow the path:
HKEY_LOCAL_MACHINE\SOFTWARE\Policies\Microsoft\Windows\WindowsUpdate
- Create a "DWORD Value (32-bit)", name the parameter "DisableWindowsUpdateAccess" with a value of "1".
Close the Registry Editor window and restart your computer. When checking for updates, Windows Update will show error "0x8024002e".
To enable access to Windows Update servers, remove previously created settings from the registry.
Method 2: Disable automatic loading of device drivers
The new system still allows you to prevent drivers from being automatically downloaded and installed. Here's how to do it:
- Open the Run dialog using the keyboard shortcut + R.
- Type rundll32 newdev.dll,DeviceInternetSettingUi and press Enter to open the Device Installation Settings window.
- In the window that opens, first select “No, give me choice,” and then “Never install drivers from Windows Update.”
- Save your changes.
After this, Windows will always search for and install drivers from the computer, and the system will contact Update Center only if a suitable driver is not found on the hard drive.
Disable checking for updates in Windows 10
If all else fails, turn off checking for updates in Windows 10. If automatic checking does not work, it means that updates will not be downloaded to your computer.
To disable checking for updates, follow these steps:
- Run Command Prompt as Administrator. In the command line interpreter window, enter the command and then press the Enter key:
takeown /fc:\windows\system32\usoclient.exe /a
- Go to the path: C:\Windows\System32, find the file “UsoClient.exe”.
- Right-click on the “UsoClient.exe” file and select “Properties” from the context menu.
- In the "Properties: UsoClient" window, open the "Security" tab.
- Under the “Groups or Users” section, click on the “Edit” button.
- In the “Permissions for the “UsoClient” group” window, remove all permissions for each group or user one by one. Don't forget to click on the "OK" button.
After this, restart your computer.
To restore the permissions of the "UsoClient.exe" file, run Command Prompt as an administrator, and then run the command:
icacls c:\windows\system32\usoclient.exe" /reset
Restart your computer.
If necessary, you can manually check for and install updates from Windows Update.
You may also be interested in:
- How to disable updates in Windows 7 - 3 methods
- How to disable updates in Windows 8.1 (Windows
Clearing the update log
The update log contains information about all attempts to install updates, drivers and programs by the system. Essentially this is useless information that can also be deleted.
- We clean drive C, as shown above, after checking the boxes next to each item proposed for deletion.
- Launch the command line. We write and execute the commands one by one:
- net stop wuauserv;
- del %systemroot%\SoftwareDistribution\DataStore\Logs\edb.log;
- net start wuauserv.
Enter the commands one by one to clear the update log - Reboot the computer.
It is worth clarifying that the above instructions will only delete the update log, that is, information about them. The updates themselves will be in perfect order, their list with the ability to delete each individual update will still be present in the Control Panel applet.
Disable Windows 10 update by replacing the update server
This method involves replacing the Microsoft update server with a non-existent update server. This solution to the problem is proposed by Microsoft on the official website.
This method works when using the Local Group Policy Editor, so it is only applicable to older versions of Windows 10.
- Launch Local Group Policy Editor.
- In the Local Group Policy Editor window, follow the path:
Computer Configuration → Administrative Templates → Windows Components → Windows Update
- Double-click on the "Specify intranet location for Microsoft update service" policy.
- In the window that opens, set the “Enabled” option, and in the fields “Specify the intranet update service to search for updates”, “Specify the intranet statistics server”, “Specify an alternative download server”, enter the value: "" (in the English keyboard layout).
- Click on the "OK" button.
- Open the "Configure Automatic Updates" policy.
- Set the Don't connect to online Windows Update locations policy to Enabled.
- Follow the path:
User Configuration → Administrative Templates → Windows Components → Windows Update
- In the Deny access to use any Windows Update policy, enable the Enabled setting.
- Follow the path:
Computer Configuration → Administrative Templates → System → Internet Communications Management → Internet Communications Settings
- Double-click the “Turn off access to all Windows Update features” policy.
- In the Turn off access to all Windows Update features window, set the option to Enabled, and then click OK.
- Exit the Local Group Policy Editor and restart your PC.
After unsuccessful updates, roll back the system
If the update was installed unsuccessfully and this led to problems (for example, Windows does not start properly, a BSOD screen appears, bugs and errors appear every time you start), you can restore the stable version.
Windows will automatically open the recovery interface if your computer has problems starting. It is also possible to open this process manually by holding down the Shift button on the keyboard while clicking the “Restart” button in the “Start” menu. However, to successfully roll back you will need a disk or flash drive with a copy of Windows.
So, let's take a step-by-step look at how to roll back the system if the update fails:
- Insert a disk or flash drive with a copy of Windows 10.
- When the blue recovery drive menu appears, click "Troubleshooting"
- Click "Advanced Options" and then "System Restore."
Follow the instructions in the recovery wizard. To successfully carry out the procedure, you must log into your account using your working username and password.
Disabling Windows 10 Update
This method, described in the documentation on the official Microsoft website, is suitable for all versions of Windows 10.
Go through the following steps:
- Open Registry Editor.
- Follow the path:
HKEY_LOCAL_MACHINE\SOFTWARE\Policies\Microsoft\Windows\WindowsUpdate
- Right-click on an empty space in the Registry Editor window.
- From the context menu, select New, then DWORD Value (32-bit).
- Name the parameter: "DoNotConnectToWindowsUpdateInternetLocations" (without quotes).
- Right-click on the created parameter and select “Edit...”.
- In the “Change DWORD Value (32-bit)” window, in the “Value” field, set “1” (without quotes).
- Click on the "OK" button.
- Create a "DWORD (32-bit) Value" in this section with the name "DisableWindowsUpdateAccess" and the value "1".
- Right-click inside the “WindowsUpdate” section, first select “New”, then “String Parameter”.
- Give the parameter a name “WUServer”, right-click on the parameter, select “Edit...”.
- In the “Change string parameter” window, in the value field, enter: “” (the space character in the English keyboard layout), click on the “OK” button.
- Create a string parameter "WUStatusServer", leave it empty with a space character: " ".
- Create a string parameter "UpdateServiceUrlAlternate", leave it empty with a space character: " ".
- Follow the path:
HKEY_LOCAL_MACHINE\SOFTWARE\Policies\Microsoft\Windows\WindowsUpdate\AU
- Add a "DWORD Value (32 bits)" with the name "UseWUServer" and the value "1".
- Close Registry Editor and reboot the system.
Disable Windows Update Service in Windows Update Blocker
The free Windows Update Blocker program disables the Windows Update service and prevents the computer from receiving automatic updates. The program does not require installation; it runs from a folder.
Windows Update Blocker supports work in Russian, the program can be downloaded from the official website of the developer.
Windows Update Blocker download
Follow these steps:
- Unpack the ZIP archive with the program, and then launch the application from the folder.
The program does not yet know the status of the Windows Update service; this is indicated by a brown icon in the “Service Status” parameter.
- Activate the “Disable Updates” option. Additionally, the “Protect Service Settings” checkbox is automatically checked so that Windows does not reset the update service settings after a while.
- Click on the "Apply" button.
- As a result, the Windows Update service will be disabled and the icon status will turn red.
If you need to enable Windows updates on your PC again, in the Windows Update Blocker program window, click on the “Enable Updates” button. After this, the service status in the program window will change its color to green.
Disabling using third-party programs
Not everyone likes fiddling with the registry, and for inexperienced users it also risks damaging the system, so applications from enthusiastic developers have appeared on the Internet that allow you to get what you want faster, easier and safer. Below are the best of them.
Windows Update MiniTool
Windows Update MiniTool is a Russian-language free utility for managing Windows updates. In addition to disabling the Update Center, it allows you to:
- Choose how to check and install them - automatically, on a schedule, notifications only, downloads only, etc.
- Set up a scan schedule.
- View, hide, and delete installed updates.
- Copy update files to other folders and much more.
To prevent spontaneous downloading and installation of updates, run Windows Update MiniTool with administrator rights (the utility works without installation) and select “Disabled” from the “Automatic updates” list.
Windows Update Blocker
Windows Update Blocker is another free and very simple program designed to solve the only task - turn Windows auto-updates on and off. And also view and change the status of the Update Center and related services.
To block the installation of updates using Windows Update Blocker, run the downloaded Wub.exe file as administrator (installation is also not required), select the item shown in the screenshot and click “Apply”. One click and you're done. There will also be no difficulties with returning to the original settings.