Greetings!
The Windows 7 operating system is not losing ground and is still the most popular today. It is used by millions of users around the world. And it’s incredibly upsetting when failures and other emergency situations occur.
One of them is a constant (continuous) search for updates in Windows 7. No errors arise, just a constant search. We will solve this pressing problem by considering several effective methods.
Method one - restart the Windows Update service
- We need to open the Windows Services system window. To do this, press the key combination Win+R (how to click), in the window that opens, enter “services.msc” (without quotes) and click on the button below under the name OK.
- In the open Windows services window, find the item called “Windows Update” and double-click on it to open the window for managing this service.
- While there, click on the button located there that says Stop. Then, without closing this window, proceed to the next step.
- We need to go to the technical folder, where Windows stores technical files and logs that are generated when searching for updates. During the search process, an error may creep into the log, which causes an endless search for updates. Clearing this directory will not have a negative impact on the system; the necessary files and folders will be created again the next time you scan for updates.
And so, to go to this technical folder, you need to enter its path in the file manager line:C:\Windows\SoftwareDistribution
And press Enter .
In the directory that opens, you must delete all files and folders.
- Once you've deleted everything, go back to the window we left open in step three. And in it already click on the button Launch.
- Close all windows, restart your computer, connect to the Internet and try searching for updates again.
If after the above manipulation the problem remains, then move on to the next solution.
If the troubleshooter doesn't work
The Troubleshooter is a system program, and if it doesn't work, something serious has happened. The failure may be due to update errors, unsuccessful changes to the system (this can be done, for example, by third-party programs), as well as hardware damage to the disk. And if nothing can be done about the latter, except replacing the hard drive, then the rest can be eliminated.
- First, try uninstalling the latest updates. How to do this is described in detail above.
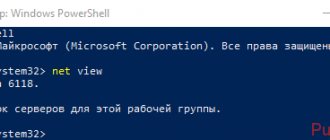
- If uninstalling updates does not help, use Command Prompt. To do this, press Win + R and type cmd in the Run window.
To open Command Prompt, press Win + R and in the Run window type cmd - In the Command Prompt, type the following commands:
- net stop wuauserv;
- regsvr32 %windir%\system32\wups2.dll;
- net start wuauserv.
In the Command Prompt, type the command and press Enter
- Restart your computer.
- If the troubleshooter still doesn't turn on, the problem is more serious. If you have backups (system backups that can be used to roll back the OS), now is the time to use them. To do this, go to “Start” - “Control Panel” - “Recovery” and select the “Run System Restore” option.
The initial window of the utility prompts the user to select a backup - recommended or another - The program itself will offer you the optimal backup copy for recovery. If you do not agree with it, select another backup from the list.
From this list you can select any backup copy and roll back your Windows to it - If you want to see exactly what will change in the system after the backup, click “Search for affected programs.” A window will open where you will see a list of changes.
The program will show which programs and files will be changed after rolling back to the backup copy - In the last window, click “Finish” and wait for the system to be rolled back to the state at the time of the backup. It will take some time.
To start a system rollback to a backup, click “Finish” and wait a moment - If you accidentally select the wrong restore point, the backup can be canceled in the same “Run System Restore” utility. To do this, open it and select the “Cancel system restore” option, and Windows will return to the state it was in before the backup.
To cancel an unsuccessful system rollback, run the program again and select “Cancel system restore”
Method two - a recommendation from Microsoft to solve the problem of a long search for updates
- Open menu Start, enter the text “Windows Update” in the search bar located there. The item of the same name will appear a little higher - click on it.
- In the Windows Update window, click on “Customize settings”, which is located on the left side of the window.
- In the settings block under the name Important updates select the item called “Don’t check for updates...” in the drop-down menu and click the button OK, which is located at the bottom of this window.
- Next, restart your computer.
- After restarting your PC, you need to download updates in the form of files from the official website of Microsoft, the developer of Windows. After downloading, you need to run them and install them.
Update options exist for both x86-bit Windows and x64. Download those that correspond to the bit depth of Windows 7 installed on you. If you don’t know the bit depth of your system, then the article “How to find out the version (edition) and bit depth of Windows 7” will help you with this.And here are the files themselves:
- For x64 (64 bit) version of Windows 7: update file KB3020369 and KB3172605
For x86 (32 bit) version of Windows 7: update file KB3020369 and KB3172605
- Now you need to repeat the first step and the second step of this guide, and then you need to enable the download and installation of updates. To do this, in the update settings window, in the block under the name Important updates You must select “Install updates automatically” from the drop-down menu and click OKto save the setting.
- All you have to do is wait for the updates to download and install. If the system was previously only reinstalled, then you need to wait quite a long time - up to a day.
Install the update with the alphanumeric index KB3020369 first, and then KB3172605.
Note: do not worry if an error appears when installing any of the above updates, it just means that it was installed previously.
When the updates are installed, restart your computer again.
If, after a while, nothing has changed and the problem with the “eternal” search has not disappeared, then move on to the next solution.
Troubleshooting programs
The built-in wizard is, of course, useful, but not ideal. It does not fully cope with cleaning the registry or fixing most bugs. Fortunately for the user, there are many third-party programs that can be used to fix bugs and keep your computer in working order.
FixWin 10
Despite its name, this free program is intended not only for Windows 10, but also for earlier versions of the OS, including Windows 7. The main window of the program has several tabs, and all errors specific to Windows 10 are placed in a separate one. the rest apply to all versions of Windows.
The main window of FixWin 10 contains information about your system; You can also launch troubleshooting utilities from here
To start automatic error correction, you need to go to the tab of interest and find the error for which you want to find a fix. Here you can see how to solve this problem manually.
The FixWin10 tabs look like this: a description of the error and a “Fix” button, as well as help on solving the problem manually
The main drawback of this program is the lack of Russian localization. So it is suitable for those users who more or less confidently know English.
You can download FixWin 10 from the official website of The Windows Club developers.
Video: how to work with FixWin 10
Anvisoft PC Plus
This program is similar to the previous one: it is free, easy to use and distributed in English. The interface is convenient and pleasing to the eye. The main window presents the most common problems, and clicking on the desired error opens a menu with a “Fix” button. The utility downloads files for repair from the network, so an Internet connection is required for its operation.
In the main window of the Anvisoft PC Plus program, you can select the error of interest, and a window will open where you can fix it
You can download the program from the Anvisoft website.
Video: Anvisoft PC Plus program
Kaspersky Cleaner
The utility from the creators of the famous antivirus is aimed at cleaning the computer. But it also has tools to “cure” some problems. The program is in Russian, free and very easy to use: you start searching for errors, and then the utility does everything itself.
In Kaspersky Cleaner, just run a search for errors, and the utility itself will find and fix everything
This utility can be downloaded completely free of charge on the Kaspersky website.
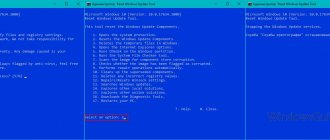
Method three - use the offline update installer for Windows 7
This method is based on installing updates from a specially created official update package for Windows 7.
A third-party developer downloaded most of the updates from the official Microsoft website and made a special installer that, upon startup, checks the system for missing updates and installs them.
After this, the problem with constantly searching for updates in Windows 7 will be solved, all subsequent updates will be installed through Windows Update , as was previously the case.
The package itself is possible. There you can also read reviews from users who use it.
As we can see, there are many effective solutions, one of which will definitely restore the functionality of Windows Update in your Windows 7 installation.
Installation of Convenience Rollup
Troubleshooting Windows 10 - Possible Methods
Convenience Rollup is a folder with files of all updates for Windows 7. You can download and install it in just 30-40 minutes, after which the user will never have to observe any additional downloads, which means that the problem with endless updates will solve itself. Before installing the software:
- in the “Start” menu, find “Computer” and right-click on this icon to open “Properties”;
- install Service Pack 1 if it is not already installed;
- make sure that the OS has the required bit depth that matches the one for which the utilities are intended.
After installing Service Pack 1, go to the following address and download servicing stack updates for Windows 7 2015 and Windows Sever 2008 R2.
Client installation
Once the stack has loaded, we begin installing all updates. The complete package is on the Microsoft website under number KB3125574. It works better with Internet Explorer. The downloaded update is launched. The installation will take some time, but less than if the necessary programs were downloaded one or two at a time. In this simple way, you can download all updates released before May 2016, the rest are downloaded through the “Center”.
Attention! After the download is complete, the computer must be restarted. If this is not done, the system will continue to operate in the same incorrect mode.
Method 4: Checking the System Time
As you know, the search for Windows 10 updates is carried out via the Internet, and Microsoft branded servers are involved. Some files are directly related to the date and time set on the computer, and if these settings do not match the network settings, updates may not be available. Because of this, we recommend checking your date and time settings and setting them to the correct value using separate instructions on our website.
Read more: Time changes in Windows 10