Windows Update is one of the most notable features of Windows 10. Because with the release of Windows 10, Windows was offered to customers as a service rather than a product. In a Software as a Service scenario, this resulted in Windows 10 updates being enabled by default and no one being able to disable them. Now, while some have criticized this move on Microsoft's part, it is ultimately a move towards the customer. Because Windows Update helps users stay protected from all sorts of threats and provides them with the latest and greatest from Microsoft. So, for those who appreciate this service, today we will talk about another way to run these updates.
1] Run Windows Update using Windows Powershell
To run Windows updates in Windows Powershell, you will need to manually install the Windows Update module, download the downloaded Windows updates, and install Windows updates. And to do this, open Windows Powershell by searching for Powershell in the Cortana search box and run it with administrator level rights.
The Windows Update Module for Windows Powershell will be installed.
It will connect to the Windows Update servers and download updates if any are found.
The Windows updates downloaded to your computer will be installed.
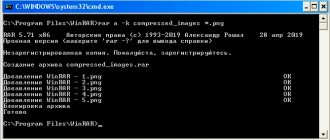
Examples of using WUSA
wusa.exe D:\Windows6.1-KB2999226-x64.msu
— install update KB2999226. A similar action will be triggered when you double-click the file name in Windows Explorer.
wusa.exe D:\Windows6.1-KB2999226-x64.msu /quiet /norestart
- install update KB2999226 without displaying any messages and without restarting Windows.
wusa.exe D:\Windows6.1-KB2999226-x64.msu /quiet /norestart /log D:\KB2999226.log
— install update KB2999226 without displaying any messages, do not restart Windows and write installer messages to the log file
D:\KB2999226.
Log wusa /uninstall Windows6.1-KB2999226-x64.msu
- remove update KB2999226
wusa /uninstall /kb:2999226
— delete the update by KB number.
Full list of CMD Windows commands | to Home Page
2] Run Windows Update using Command Prompt
The command line in Windows operating systems has been around for a very long time, while Windows Powershell is relatively new. Hence, it has similar capabilities for running Windows updates, but the point to highlight here is that you do not need to download any module for Windows updates.
First, open a command prompt by searching for cmd in the Cortana search box and run it as an administrator.
Click Yes to receive a UAC prompt.
Finally, enter the following commands and press the Enter key to perform the corresponding operations.
Start checking for updates:
Start downloading updates:
Start installing downloaded updates:
Reboot your device after installing updates:
Check, download and install updates:
It's worth noting that the Command Prompt commands mentioned above are only for Windows 10. For older versions of Windows, you need to use the following commands.
Start checking for updates:
Start installing detected updates:
Check, download and install updates:
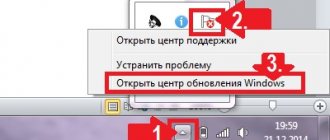
Any updates to the Windows operating system come to the user through the Update Center. This utility is responsible for automatically scanning, installing packages and rolling back to a previous OS state in case of unsuccessful installation of files. Since Win 10 cannot be called the most successful and stable system, many users disable the Update Center completely or download assemblies where this element is disabled by the author. If necessary, returning it to an active state will not be difficult using one of the options discussed below.
How to update Windows and whether it is necessary to update the system
2. Find the item “System and Security” - “Windows Update”. You need to go there:
3. Now read the information about the latest updates that were installed;
4. To install the updated version of the system, you will need to find a new version. Use the "Check for updates" button. In the “Settings” section you can automate the search process:
5. When the system detects the required version, it will prompt you to install. The user remains to confirm his intention. The download will begin, and then the computer will automatically reboot to install system files;
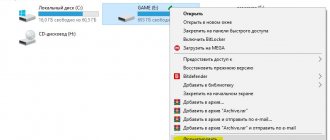
6. If you go from the “Update Center” to the “Additional information” item (you need to use the corresponding link), you can download new versions of any program:
7. The “Microsoft Update” page will open in the browser; all you have to do is accept the terms of the update and click “Next”:
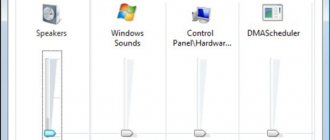
8. Now you know how to update your Windows system. But after installing the new version, you need to download the latest drivers. Use the “Control Panel”, you need the item “Hardware and Sound” – “Devices and Printers”:
9. All that remains is to move the mouse cursor over the icon with the name of the electronic equipment and press the right button. In the list that opens we find “Device installation parameters”. Oh and save your choice.
Periodically updating the operating system will keep it up to date and use the equipment more efficiently. The new version will prevent spyware from entering your computer to steal important information.
Enable Update in Windows 10
To obtain the latest versions of the update, the user needs to download them manually, which is not very convenient, or optimize this process by activating the Update Center. The second option has both positive and negative sides - installation files are downloaded in the background, so they can waste traffic if, for example, you periodically use a network with limited traffic (some 3G/4G modem tariffs, inexpensive per-megabyte tariff plans from a provider, mobile Internet ). In this situation, we strongly advise you to enable “Limited Connections”, which limits downloads and updates at certain times.
Checking for updates through system settings
By default, all services responsible for checking and automatically installing the latest updates are activated in the system. If necessary, you can view new releases manually through the system parameters:
- Expand the Start menu, click Settings.
- Go to "Update and Security".
- In the Windows Update tab, click Check for updates.
Note! If the data packages were downloaded automatically by the system, a list will be displayed on the page. You can also update there.
WUSA Command Line Options
/quiet
— Running the Wusa.exe program in silent mode without user intervention. When the program is running in silent mode, no user intervention is required. If necessary, the computer will restart without displaying any prompts.
/norestart
- Prevents Wusa.exe from restarting the computer. The /norestart option is ignored if the /quiet option is not specified. If you run Wusa.exe with these two options, you must manually restart the operating system after installation is complete if the update requires a computer restart.
/uninstall
— Removes the specified package or update.
/kb
— Identifies the package to be removed by its database entry number. Only used with the /uninstall option.
/extract
- Wusa.exe extracts the contents of the package to the destination folder.
/warnrestart
- Warn about reboot. When you use this option with /quiet, Wusa.exe prompts the user for confirmation before performing a reboot during installation or uninstallation.
/forcerestart
- Forced reboot. When you use this option with /quiet, Wusa.exe forces applications to close and restart.
/log file name
— write installer messages to the specified log file.
Enable Windows 10 updates
Windows 10 cannot be updated if the corresponding service is disabled on the system. To activate, you will need to use a special utility or perform the action through the “Command Line”.
Services
The Windows Update service is responsible for checking, downloading and installing updates. To enable this process, you need to:
- Using the search on the left side of the “Taskbar”, enter the request “Services” and click on the item of the same name in the search results.
- In the list of all processes, find “Windows Update”, right-click on the name (RMB) and click on the “Properties” line.
- From the “Startup Type” drop-down menu, select “Automatic” and click Apply.
Important! If the process status is shown as Stopped, you must first click Run.
After completing all the steps, the service window can be closed. It is recommended that you restart your computer for the changes to take effect.
Command line
You can enable the Windows 10 update through the console launched with superuser rights. Step by step guide:
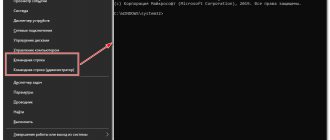
- Expand the “Start” menu, open the “Utilities - Windows” directory in the list of programs.
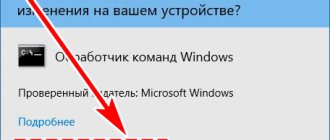
- Right-click on the “Command Prompt” item, select “Advanced” → “Run as administrator”.
- Confirm initialization by clicking Yes.
- In the console, enter the command net start wuauserv, press Enter.
If the operation is successful, a corresponding message will be displayed - the window can be closed.
How to manually install updates on Windows 10?
There is no perfect operating system. When creating a new platform, every developer understands that vulnerabilities will be discovered in it over time; there will be a need to fix problems caused by incompatibility of the OS with hardware and software; New features will be added. All this is solved by releasing update packages, which include all the fixes. Therefore, we suggest considering what an update is and how to install Windows 10 updates manually in several ways.
If you go to Windows Update and search for packages for an update, you will see a list of all updates released for a specific build. They are divided into several categories:
Let's decipher each category.
- Updates from important categories should always be installed. More precisely, they are installed automatically through Windows Update. Microsoft does not recommend excluding them from your download list. They include improvements to computer security and reliability, and fix vulnerabilities.
- Recommended updates may address non-critical issues. Most often they are aimed at improving system performance. And although such updates do not affect the main aspects of the device and installed components, they often contain significant improvements and therefore can be installed automatically.
- Optional updates contain updates for drivers and installed programs from Microsoft. Their installation is carried out manually.
Depending on the type of updates, packages are divided into several subtypes:
- Security updates. Solve vulnerability problems. Security vulnerabilities are rated based on their severity level: critical, important, medium or low.
- Critical updates. They include fixes for vulnerabilities of certain programs, as well as errors that are associated with them.
- Update packages. They represent sets of hotfixes, security updates, critical updates, and regular updates, as well as additional fixes for bugs found since the product's release.
In Windows 10, all updates (except optional ones) are installed automatically. However, if there is limited traffic or an error occurs after the update, the user is allowed to prevent certain packages from being installed.
Also, specifically for Windows 10, Microsoft developers have identified several types of updates:
As you can see, there are several types of updates. The only type that does not exist is selective. It existed in earlier builds. However, in Windows 10, you can only exclude a specific update, but not select the desired packages.
There are several ways in which you can update the latest Microsoft operating system. Let's take a closer look at them.
Method 1. Forced OS update via Command Line
To force the installation of update packages, you should launch the Command Prompt with Administrator rights and enter wuauclt.exe /updatenow.
The system will reboot and update.
Method 2. Updating through the Windows10Upgrade program
On the Microsoft website you can find two tools that will allow you to update Windows 10: Windows10Upgrade and Media Creation Tool.
If you use the first program, then, running with Administrator rights, a small window will appear. You just need to click on one button – “Update now”.
If you run the second utility with Administrator rights, a window will appear similar to when installing the operating system. Only here you need to select “Update this PC now.”
Follow the prompts of the Installer Wizard.
Method 3: Update via Windows Update
This is the official and easiest way to install update packages on Windows 10.
Go to “Settings”, “Update and Security”. In the menu on the left, select “Windows Update”. Or we go to this section through the Control Panel.
Click on the “Check for updates” button to launch the update.
Method 4. Update using CAB and MSU programs
There are special update packages that are in CAB and MSU format. They are intended for those builds of Windows 10 that cannot access the network. You can download them from the Microsoft website and run them by double-clicking, since the packages end in .exe.
If nothing happened after startup, then you can start the system update from these files through the command line with Administrator rights.
- If you are using a CAB file, then the command will be like this - dism /online /add-package /packagepath: Path_to_file;
- If you are using MSU – wusa.exe File_path.
The update will occur according to the classic scenario with a PC reboot.
All updates to the Windows 10 operating system are universal. They include components compatible with various processors, motherboards, video cards, RAM, etc. However, outdated equipment may not always respond correctly to an update. An error occurs. The user rolls back the system or solves the problem, but is already wondering about the need to install updates in the future.
First, it's worth noting that not only is Microsoft not going to ask if you want to update your OS, but they can also sue you if you don't. However, we all understand that all updates are packaged in large files, are difficult to install, take a long time, and worst of all, they do not undergo preliminary testing. It’s easier for developers to send fixes afterward rather than immediately release the correct KB. Therefore, based on this, you can enable “Limited connection” in the network settings. The system will stop updating and there will be no complaints against you, since no one can tell you how to use your PC.
Setting up automatic updates
You can change the auto-update configuration in the OS settings menu; for this you will need:
- Go to “Start”, click on Settings.
- Go to "Update and Security".
- In the “Windows Update” tab, click on the “Change activity period” item.
- Click on the “Change” link and select the activity period during which updates will be downloaded but not installed.
You can perform a similar setup through other OS tools: the Group Policy Editor and the system registry.
Local Group Policy Editor
The tenth version of the OS contains a special tool that allows you to configure individual components. To change the auto-update configuration you will need:
- Press Win + R, run the command gpedit.msc.
- Using the directory tree structure in the sidebar, navigate to Computer Configuration → Administrative Templates → Windows Components → Windows Update.
- In the list of files, find and open “Setting automatic updates”.
- Check the box next to “Enabled”.
- From the drop-down list, select “4 - auto. download and install Scheduled ".
- Set the installation schedule to “0 - daily” and “Automatic”, as shown in the image below.
- Click OK and close the window.
Important! The method can only be used in the Pro edition.
System registry
You can set a similar configuration in the Registry Editor, for this you need to:
- Press Win + R and run the command regedit.
- Go to the path HKEY_LOCAL_MACHINE\SOFTWARE\Policies\Microsoft\Windows\WindowsUpdate\AU.
- Using the context menu, create the following DWORD parameters:
- AUOptions - 4;
- NoAutoUpdate - 0;
- ScheduledInstallDay - 0;
- ScheduledInstallEveryWeek - 1;
- ScheduledInstallTime - 24.
Important! If there is no specific directory on the path to the specified address, you must create the folder yourself.
Adding a DWORD parameter works like this:
- Right-click on the free area on the right side of the interface.
- Select “New” → “DWORD Value (32 bits)”.
- Set a new name, then double-click to configure.
- Enter the number corresponding to the name of the parameter in the “Value” field.
After following the instructions, the registry window must be closed and the computer restarted.