In the previous article, we talked about how to create and configure a network folder in Windows 10. If the network folder is not detected or does not open, go through all the steps again. Important:
- configure shared access for all network users;
- make the correct security settings;
- create a new firewall rule.
On "tens" problems arise due to updates. There are two options: either shared folders and files are not displayed, or they are visible, but cannot be opened.
Network discovery
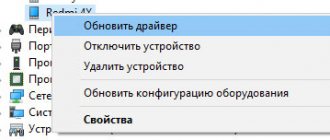
Double-check that the computers are open to discovery on the network. Go to the PowerShell command line (key combination Win+X and run as administrator). We write the following command: net view.
We see error 6118 when the list of servers in our workgroup is unavailable. Check again whether network discovery is enabled in the “tens” settings. In the previous material we described this process in detail.
Another way. We go to the network and internet settings. Here we need to select the adapter options.
Right-click on our connection (wireless or Ethernet) and select “Properties”. You need to make sure that the checkbox next to “File and Printer Sharing...” is checked.
Method 2: PowerShell Command
If you are not afraid to interact with the PowerShell shell, you can activate SMBv1 through it by inserting just one command.
- Right-click the Start menu and select Windows PowerShell (Admin).
- In PowerShell, paste the command Enable-WindowsOptionalFeature -Online -FeatureName smb1protocol and press Enter.
- Wait for the component to be enabled, which will take a few minutes.
- You will then need to restart your computer to complete the operation. You can do this later by choosing a negative answer now.
- Next, PowerShell will display information that SMBv1 has been successfully activated and is in working condition.
Additionally, we note two other commands for PowerShell that may be useful when further working with the component in question in Windows:
- Get-WindowsFeature FS-SMB1 - Allows you to find out what state SMBv1 is currently in.
- Disable-WindowsOptionalFeature -Online -FeatureName smb1protocol - disables the component.
Resetting network settings
Now let’s try not to configure the network, but rather, let’s reset all parameters. Sometimes this helps, and shared files and folders are detected. Go to Internet and network settings. We need to click on “Network reset”.
Agree to "Reset Now". The computer will reboot and the network settings will be updated. This method often solves not only network detection problems, but also other network and Internet errors.
Enabling SMB2
First let's check the SMBv2 status. To do this, open “PowerShell” with administrator rights by right-clicking on the “Start” button.
Enter the command:
Get-SmbServerConfiguration | Select EnableSMB2Protocol
14
If you see the value “True”, then the protocol is working. If the value is “False”, then you can also enable the parameter using the command:
Set-SmbServerConfiguration -EnableSMB2Protocol $true
NOTE! You can turn SMB1 on or off in the same way - just replace one digit in the command (2 by 1).
Next, click on “Y” and “Enter” to confirm your actions. If you want to disable SMB2, then instead of “true” we set it to “false”. At the end, don’t forget to reboot the system.
SMB 1.0 on Windows 10
There is often a problem with the SMB protocol. It is with its help that you can access shared folders on your work network. It supports Network Explorer, a service that generates a list of active computers on the local network.
Starting with update 1703, the browser works very poorly. Since version 1709, the SMB 1.0 protocol is not supported at all. Not everyone can update SMB to version 2.0. Often network equipment simply does not support it.
But let’s try to enable the first version on the “ten”. We go to the control panel.
In the list of settings, select “Programs and Features”.
Go to “Enabling and disabling...”. In the list, look for “Support for shared access...” and place markers opposite the client and server. Thus, we enabled the first version of the SMB protocol.
Method 3: Managing Group Policy
Note that this option is only suitable for domain owners who want to configure SMBv1 on all local computers. We do not advise ordinary users to use this option - they should stick to the previous two.
- First, you will have to add a group policy management tool to the OS. To do this, open Start and go to Settings.
- Open the Applications section.
- In the first category you are interested in the clickable inscription “Additional features”.
- Click "Add Component" to select it.
- In the list, find “RSAT: Group Policy Management Tools” and run the installation.
- Return to the previous menu and monitor the installation progress.
- Then check the component to see if it is in the list and restart the computer for all changes to take effect.
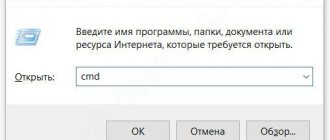
- Log in to the operating system as the domain owner, open the Run utility via Win + R and type gpmc.msc, then press the Enter key.
- Wait for Group Policy Management to load.
- There, open the main section “Group Policy Management” and find the registry.
All that remains is to fill in the registry information in accordance with the list below
- Action: Create
- Bush: HKEY_LOCAL_MACHINE
- Section path: SYSTEM\CurrentControlSet\Services\LanmanServer\Parameters
- Parameter name: SMB1
- Parameter type: REG_DWORD
- Value: 1
All that remains is to save the changes to the registry and restart the computer for them to take effect. If you want to disable the parameter in the future, change its value to “0”.
We are glad that we were able to help you solve the problem. In addition to this article, there are 12,719 more instructions on the site. Add the Lumpics.ru website to your bookmarks (CTRL+D) and we will definitely be useful to you. Thank the author and share the article on social networks.
Describe what didn't work for you. Our specialists will try to answer as quickly as possible.
CONNECTING THE SAMBA NETWORK IN MAC OS X.
To connect directly to a file server, use the Connect to Server feature in the Finder window. Choose Go > Connect To and enter a URL, IP address, or domain name.
- We enter the address, for example, of my UGOOS X3 CUBE TV STB where access is already shared.
Sources used:
- https://inforkomp.com.ua/windows-xp/obshhaya-papka-rabotaet-po-ustarevshemu-protokolu-smb1.html
- https://newadmin.ru/montirovanie-smb/
- https://hi-tech-obzor.ru/samba-%d0%bd%d0%b0%d1%81%d1%82%d1%80%d0%be%d0%b9%d0%ba%d0%b0 -%d0%bf%d0%be%d0%b4%d0%ba%d0%bb%d1%8e%d1%87%d0%b5%d0%bd%d0%b8%d1%8f-windows-mac- os-x-%d0%b8-android/
More Information
To work around this issue, contact the manufacturer of the product that only supports SMBv1 and request a software or firmware update that supports SMBv 2.02 or later. To work around this issue, contact the manufacturer of the product that supports only SMBv1, and request a software or firmware update that support SMBv2.02 or a later version. For a current list of known vendors and their SMBv1 requirements, see the following Windows and Windows Server Storage Engineering Team Blog article:
Leasing mode
If SMBv1 is required to provide application compatibility for legacy software behavior, such as disabling operating locks, Windows provides a new SMB share flag known as lease mode. If SMBv1 is required to provide application compatibility for legacy software behavior, such as a requirement to disable oplocks, Windows provides a new SMB share flag that's known as Leasing mode. This flag indicates whether the share disables modern SMB semantics such as leases and operational locks. This flag specifies whether a share disables modern SMB semantics such as leases and oplocks.
You can specify a share without using operational locks or leases to allow a legacy application to work with SMB 2.0 or later. You can specify a share without using oplocks or leasing to allow a legacy application to work with SMBv2 or a later version. To do this, use the PowerShell cmdlets New-Module SMBshare or Set-Module SMBshare along with the -LeasingMode None . To do this, use the New-SmbShare or Set-SmbShare PowerShell cmdlets together with the -LeasingMode None parameter.
This setting should only be used for shared folders that are required by third-party applications for legacy support if the vendor reports the need. You should use this option only on shares that are required by a third-party application for legacy support if the vendor states that it is required. Do not specify a lease mode for user data shares or CA shares that are used by Scale-Out file servers. Do not specify Leasing mode on user data shares or CA shares that are used by Scale-Out File Servers. This is because removing operational locks and leases causes instability and data corruption in most applications. This is because the removal of oplocks and leases causes instability and data corruption in most applications. Rental mode only works in shared mode. Leasing mode works only in Share mode. It can be used by any client operating system. It can be used by any client operating system.
Nothing helped, the folder or computer is not visible, nothing works
If the problem persists, then there are several options - from incorrect network settings to problems with some services in the operating system itself. I have already described all the solutions in a separate article, and you can read it at this link. What's described there should help.
Server Message Block (SMB) is a network file sharing protocol included in Windows 10 that allows you to read and write files and perform other service requests on network devices. Typically, you use SMB to connect to non-Windows devices, such as a file-sharing router, NAS (network-attached storage), or other Linux computers.
You can use SMB on almost all popular desktop operating systems, including Windows 10, MacOS and Linux. SMB is not enabled by default in Windows 10. To communicate with an SMB server, you must first enable it in Windows 10. It's easy to enable, but it's not immediately obvious which switches you need to enable. Here's what you need to do.
Microsoft's implementation of the SMB protocol includes the following additions:
- Dialect Negotiations
- Discover other Microsoft SMB protocol servers on the network or browse the network
- Online printing
- Authentication of files, directories and shares
- Locking files and records
- Notification of file and directory changes
- Advanced file attribute management
- Unicode support
- Opportunistic castles