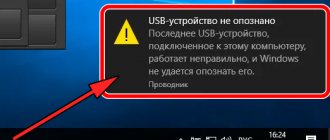
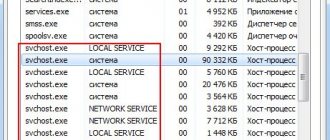
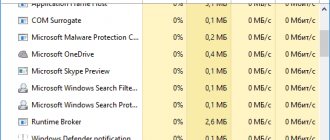
System interrupts are a service component of Windows and are displayed as a process in the Task Manager. But this is not a process at all. Rather, it is an aggregate placeholder intended to show the system resources used by all hardware interrupts occurring on the PC.
Hardware interrupts are used to efficiently manage and execute many events simultaneously. There are hundreds of processes running simultaneously on a PC. Interrupts are used as a mechanism to immediately execute a high-priority event by suspending the activity of some other processes.
Despite the high frequency of access, System interrupts should not load the processor more than 2-3% under any normal conditions. If the process jumps by about 20% and remains at this level, then there is a problem with the system. These problems may indicate problems with drivers, malfunctions of external devices, the Windows Fast Boot feature, and more.
There are several effective solutions to reduce the CPU load from system interrupts.
Disabling the USB Root Hub
A USB root hub is not a physical device that connects to a corresponding input. This is a driver that allows you to connect multiple USB peripherals to your computer. Typically, a PC has multiple USB root hubs, so the data bus can be shared among multiple devices.
If System Interrupts are causing excessive CPU usage, disable USB root hubs that are not being used by the keyboard and mouse. Therefore, first you need to determine which of them are not involved.
Open the Run window by pressing the Win + R keys together, type devmgmt.msc and confirm the launch with Enter. Expand the USB Controllers tab.
Right-click on each USB root hub in turn and go to Properties. Open the Power tab and check if your connected devices are shown.
Once the root hubs used by the mouse and keyboard are identified, all others can be disabled. To do this, right-click on the unused one and select “Disable”.
Restart your computer and check if the CPU load has decreased. If system interrupts are still consuming CPU resources, you can discard all changes and move on to the next step.
How to find out the cause of the problem
The most common reasons include drivers and external devices. There is a universal way to determine the “culprit”, but it has low effectiveness. This method consists of the following:
- You need to open a special utility. This is done by pressing Win and R together, and then further entering the command “perfmon /report” (without quotes). The utility will open immediately after clicking the “OK” button.
- Next, you need to wait for the data collection to finish. It looks like this:
- Once the procedure is completed, a report will appear. It requires you to find the section that is responsible for performance. If something is wrong, there will be a red circle next to the items. You should pay attention to such components: this is probably the reason.
In the case of drivers, it is better to use third-party utilities: they are much more efficient. You can find out more about this in the corresponding solution to the problem.
Mute sound effects
Some audio drivers use enhancements in an attempt to improve sound quality. If your computer does not support these settings, serious problems may occur, including increased CPU load. Therefore, try disabling sound enhancement and check how much system processes are using the CPU.
The problem may also arise with the exclusive mode feature, which allows other applications to completely seize control of the sound card.
Open the Run window (Win + R), enter control panel to enter the Control Panel.
In the upper right corner, switch the view to “Large Icons” and go to the “Sound” section.
Select the audio device, right-click and select Properties.
On the Enhancements tab, check the "Disable all sound effects" checkbox.
Now on the Advanced tab, uncheck both the Exclusive mode checkboxes. Save changes and exit.
If system interrupts continue to load the CPU and slow down the system, you can turn all options back on.
How to remove excessive load
If the reason is unknown, it is recommended to go in order: methods are sorted by effectiveness. There are also some additional methods that help in rare cases.
Drivers
The problem may occur if the installation is incorrect, files are damaged, or an outdated version is used. You can check which software is causing increased load using third-party programs. LatencyMon is considered the most popular because it is free and has a simple interface. In addition, this utility has an official website, which prevents a lengthy search for a safe download source.
Despite the lack of Russian language, even a beginner can cope with the task. You just need to follow the instructions:
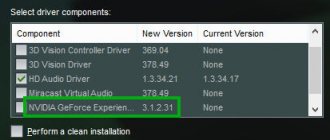
- The program has an icon in the upper left corner called "Play". You should click on it, and then go to the list of drivers (penultimate tab).
- You must click on the inscription circled in the image. This will change the way we sort.
- It is important to consider that the list contains not only device drivers. If this is the software that comes first, most likely it caused the excessive load.
Most often, the problem occurs when the following drivers do not work correctly:
- network adapters;
- sound cards;
- Wi-Fi adapters.
Simply put, the “culprit” is usually software related to the Internet, audio and video playback.
The problem can be solved simply - you need to update or roll back the driver. In the first case, it is recommended to carry out the procedure manually and download the software exclusively from the manufacturer’s website: specialized applications do not always see the latest versions of drivers and may install them incorrectly. In the second case, you need to use the device manager. Rollback is carried out in several steps:
- First you need to open the utility itself. The fastest way is to write its name in the search on the taskbar.
- You need to find the problematic software and right-click on it. In the menu that opens, at the very bottom there will be a “Properties” item.
- In the new window you need to go to the third tab. If the driver can be rolled back, the corresponding button (third in the list) will be available to the user.
USB devices
Sometimes the problem may be related to external devices rather than drivers. In this case, the latter usually work flawlessly. Excessive load can occur, among other things, when cables and connectors are damaged.
The only way to get out of this unpleasant situation is to eliminate the cause. You can find the source of the problem only by disconnecting devices one by one, including the mouse and keyboard. To avoid any difficulties, it is recommended to open the task manager in advance and monitor the load changes.
RAM and hard drive
In more rare cases, the reason may be the incorrect operation of these devices. Therefore, it is recommended to check both of them for errors. For RAM this is done as follows:
- You need to open a special built-in utility. You can find it using the search on the taskbar. In the screenshot you can see its name and icon.
- To check, you will need to restart your PC.
- During the procedure, you can optionally change the settings by pressing the F1 button. You should also be aware that the reboot will likely take longer than usual - this is normal. After logging in, the result will be displayed.
Some users complain that the result either appears a long time after the procedure or does not appear at all. In this case, you can do the following:
- Open Event Viewer.
- Go to the “System” section (the path to it can be seen in the screenshot).
- Next, in the central part of the window you need to find a check. It is called in English, namely “MemoryDiagnostics-Results”. If you double-click on the desired item, its description will open. That's where the result will be.
Now you should turn your attention to the hard drive. It, like the previous internal device, can be checked using third-party utilities, but this option will not be considered, since the procedure can be carried out without them:
- You should open the command line. This utility opens in many ways, including the same search. You need to run it only as an administrator.
- Next, you need to enter the command below, replacing “B” with the letter that identifies the drive.
- When using this verification method, the system will try to correct all errors found on its own. It is important to consider that the procedure can take a very long time. In this case, the computer often freezes for short periods of time.
It should be noted that only those disks that are not currently used by the system are suitable for testing.
other methods
In very rare cases, the problem is caused by the presence of malware: it can masquerade as system processes. If the previous methods did not help, it is recommended to check your PC for viruses. To do this, it is better to use one of the most popular third-party programs (most of them are paid, but have a trial period).
Disabling Wake on Magic Packet
Windows integrates the Wake on Magic Packet function, which allows you to wake up your computer when triggered by a signal from the local network. This magic packet is also known to be very taxing on the system because it generates many interrupts and the processor reads each one. To check its involvement in the processor load, try deactivating the option in the settings.
Open Device Manager by entering the command devmgmt.msc into the Run window (Win + R).
Expand the Network Adapters tab. Select the Ethernet and Wi-Fi adapter, right-click on it and select Properties.
Go to the Advanced tab. In the Property window, find the Wake on Magic Packet option. Switch its value to the “Disabled” position. Save the changes and restart your computer. Check the CPU load caused by System Interrupts.
Other reasons for high load from system interrupts in Windows 10, 8.1 and Windows 7
In conclusion, some less common causes of the problem described are:
There is another way to try to find out which hardware is at fault (but it rarely shows anything):
In the report, under Performance - Resource Overview, you can see individual components that will be colored red. Take a closer look at them, it may be worth checking the functionality of this component.
And maybe this will be interesting:
Why not subscribe?
Distribution of new, sometimes interesting and useful, materials from the site remontka.pro. No advertising and free computer help for subscribers from the author. Other subscription methods (VK, Odnoklassniki, Telegram, Facebook, Twitter, Youtube, Yandex.Zen)
Dmitry, hello. I just wanted to thank you from the bottom of my heart for your site! I have found a lot of interesting, useful and vital things in it over the past 2 years. I managed to fix a lot of things, I started to understand a lot of things thanks to the daily “lessons” from you (by email :))
Thank you for spending so much time and effort on educating idiots like me (and maybe smarter than me ;-))
I absolutely agree, I come here often
Why not indicate what load level is critical?
At the beginning of the article, in the first paragraph there is information: tenths of a percent are normal. However, for some equipment there are also units of percent. In general, more than 5 is already strange even for low-power computers.
I sometimes have more than 70%
I have a very weak PC, when downloading something from the Internet, system interrupts load by 20 or more. I thought there was a problem with the network driver, but nothing changed after reinstalling it. I download the latencymon program, install it, launch it, press play and... It freezes. I turned it off by holding the power button. I did this several times and... now Windows is being thoroughly restored. I don’t know what to do, I’ll probably leave everything as it is.
And if, as soon as you open the dispatcher, the load shows 100 percent for some time, precisely because of these interruptions, and then drops sharply, the laptop cooler calms down, you close the dispatcher, and it starts up again. There don’t seem to be any noticeable performance problems, but the cooler is very noisy
Is this always like this? For example, if you let the laptop stay on for an hour, does the situation not change? If not, then check it for malware/viruses just in case, what you describe is a normal short-term phenomenon, but does not seem to be normal operation of the system on an ongoing basis.
Yes, it’s like this all the time, as soon as you open the dispatcher, the load immediately drops, as if some miner had scared off) But the situation seemed to change when I disconnected the external hard drive, it makes noticeably less noise and less frequently.
It looks like a miner. Try going through Dr. Web CureIt.
I found out that ASPI.sys is in 1st place, I don’t know what to do next, I read it on the Internet, they write that it can be anything, from a hard drive on a skid (also located in the drive) to a battery. Tell me where and how to start? Laptop Sony Vaio SVE1512W1R. I've been struggling with this problem for a long time - I still can't solve it(
ACPY.sys is the driver responsible for power supply. On laptops, when it causes problems, it can be caused by problems with the battery or with the charger (check by the way - does the problem appear without the battery and does the problem appear when running on battery, but without charging, remembering to perform a reboot or rather a shutdown - inclusion in this case).
Also, with regard to Vaio laptops, many do not install original drivers on them (because they are “not installed” or for other reasons) from the office. site, and there are such important things as SFEP (which the driver pack will not install) and a separate background process (if I’m not mistaken, installed as part of Sony Notebook Utilities or Sony Extension Library... there were some such names), which is responsible for Battery management (Isbmgr.exe). And without this set, the equipment on Vaio, although it works, is not quite as intended by the manufacturer.
Good afternoon I often use your site to fix things that I can’t fix myself) The question is, NDIS.SYS comes first for me, I can’t find anything specific on the Internet, maybe you can recommend something? Thank you in advance for your response!
Hello. This driver file is related to network functionality. Most often, the reasons for the load during its operation are network activity monitoring tools in third-party antiviruses (Kaspersky, Avast) and firewalls, if they do not work completely correctly. Well, it’s worth installing original network adapter drivers if there are no third-party antivirus products.
Good afternoon, for a couple of days now the right cooler on my laptop has suddenly started making noise. Then it begins to quietly accelerate and stop. I noticed that system interrupts load the processor. LatencyMon showed high DPCs: storport.sys stornvme.sys dxgkrnl.sys iocbios2.sys.exe ntoskrnl.exe Should I disable them?
Hello. I’m not at all sure of my assumptions, but they are as follows: the NVMe SSD is heating up due to some active operations with it. There is no need to disable anything. Accordingly, ideas: 1. Are there any torrent downloaders, cleaners of some kind, etc. hanging in the background? Try to remove it. You can even look at the task manager to see what is exchanging data with the disk there. Theoretically, this could be unpacking updates, but not for a couple of days then. 2. If you installed the SSD yourself, for some “hot” SSDs it makes sense to install a heat-dissipating substrate or thermal pad (on some laptops it’s even included).
I decided to disassemble the laptop and clean it. In the end, it was just full of dust) Thank you for the advice!
I racked my brain for a couple of days, removed all the wood, installed it again, did all the steps in the article - the processes started immediately after pressing the power. Already disappointed (before reinstalling the OS), I removed the back cover to see if there was dust (it wasn’t there by the way), screwed it back on, turned it on - and oh! Miracle! I couldn’t even believe my ears at first)
Thank you for the article! Sincerely
So to speak, turned it off and turned it on.
Installing Intel Rapid Storage Technology
Intel Rapid Storage Technology is a Windows application that provides improved performance and reliability to systems equipped with SATA drives for desktop, mobile, and server platforms. When using one or more SATA drives, you can enable the feature for improved performance and lower power consumption. The technology also increases protection against data loss in the event of disk failure.
Installing Intel Rapid Storage Technology can reduce processor load. The installation version can be downloaded from the official website.
How it works: the simplest explanation
But let's look at what system interrupts are in Windows 7 or other modifications using a simple example. It should immediately be noted that in relation to software, the operation of this component is associated with non-executable program elements that can be loaded, for example, into RAM (dynamic libraries, device drivers, etc.).
Suppose you have some modern game installed on your computer, but the video card meets only its minimum system requirements, or the configuration is below this threshold. If the graphics chip cannot cope with processing software components, which leads to increased load on it, system interrupts are involved. Due to them, command processing is redirected to the central processor, which tries to help the video card cope with the increased number of requests. Accordingly, an increase in load is observed on the part of the described process in the “Task Manager”. And often the occurrence of such situations leads not only to the entire system freezing, but even to the appearance of blue screens. The same applies when equipment begins to fail. Unfortunately, if the “hardware” components of the system break down, all this can equally apply to any of them (for example, a hard drive breaks down, RAM strips fail, etc.).
Disabling Fast Startup
Windows 10 Fast Startup (or Fast Boot) works similarly to the hybrid sleep modes of previous versions of the OS. It works on the principle of hibernation. When you turn off Windows, it sends the kernel state and loaded drivers to the hibernation file, and when you turn on the computer, it loads it into memory again, which speeds up system startup. But if the percentage of processor load caused by system interrupts has increased, then try disabling the fast boot feature.
Enter “Control Panel” in the system search bar, click on the result found.
Go to the “Power Options” section, in the left side menu select “Power button action”.
Open access to editing parameters by clicking on the “Change parameters that are currently unavailable” link.
Uncheck the Quick Launch feature. Save the changes and close the window. You may need to restart your PC to check how much the specified process is using system resources.
System interrupts: what is this process
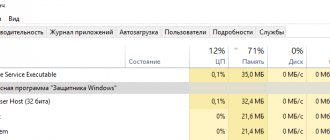
The System Interrupts process is constantly running by default in the Windows operating system, but during normal operation it should not load system components by more than 5%. If this process has a more serious impact on computer resources, this indicates a hardware problem, namely a malfunction of one of the computer components.
When “System interrupts” load the processor, this may indicate problems with the video card, motherboard, RAM or other element of the system unit. The central processor tries to supplement the missing power resulting from the malfunction of the component using its own resources, as evidenced by the “System Interrupts” process. Most often, the problem of malfunctioning computer components is associated with complete or partial incompatibility of the running program (or game) with the drivers of the computer components.
Brief summary
That's all about interrupt system calls in a nutshell. Based on the foregoing, it is recommended to resolve emerging problems by using the specified diagnostic program with sequential shutdown of the equipment. If necessary, faulty components will have to be replaced. As an additional tool that can be used to identify problems with RAM sticks, it is advisable to use the Memtest86+ utility, but without the necessary knowledge it will be of no use.
Equipment check
You cannot simply disable “System Interrupts” in the “Task Manager” window, as this may lead to a crash in the system, but will not solve the problem. The situation needs to be corrected in another way - by checking the PC hardware, which, as a rule, is associated with a large load from the process.
Programs for checking interruptions
Special utilities will help you make sure that the cause is malfunctioning equipment (sound card, RAM, video card, etc.).
LatencyMon: an effective device diagnostic tool
The Latecy Mon utility analyzes the operation of installed PC hardware drivers and identifies drivers and processes that are not working correctly, causing the processor to allocate more resources to perform certain tasks. This program is effective for eliminating problems with sound: a decrease in its quality or loss. After scanning, the utility provides a detailed report.
LatencyMon effectively scans processes and drivers to identify problems
You can download the program from the official source of the developer Resplendence Software Projects. The utility is suitable for versions of Windows from “seven” and higher. The installer file weighs no more than 2.4 MB. The downside of the utility is that its interface is in English. You can use it for free.
Tracking loads using a special utility
If installing and updating drivers does not give the desired result, you will have to use other methods. Alas, there are no such tools in the toolkit of Windows systems.
Therefore, if it is noticed that system interrupts are loading resources, most experts recommend using a small program called DPC Latency Checker, which is presented in portable form and does not require installation on a PC. In it, the first thing you need to do is enable scanning, after which the scan results will provide recommendations for troubleshooting. However, most often they are associated only with the completion of some processes corresponding to both the programs and the equipment currently in use, or a recommendation will be given to contact the “Device Manager”. But this is what we need to use, leaving the diagnostic utility active as a kind of means of changing load tracking. Do not confuse the loads shown in this program with those visible in the Task Manager.
Disabling components in Device Manager
As for this section of equipment management, the essence of troubleshooting boils down to sequentially disconnecting the devices installed in the system and then checking the loads with the above-mentioned utility.
Please note that it is strictly prohibited to disable the equipment presented in the “Computer”, “Processors” and “System Devices” sections, as such actions may lead to an unauthorized shutdown and reboot of the computer. Good thing, the entire operating system will also fail.
For the remaining components, having previously enabled the display of hidden devices in the view menu, each component should be disabled through the RMB menu, and then the diagnostics should be reactivated in the load tracking program. When the test results show that after deactivating a device, the load drops to normal, and it becomes clear that this particular component is faulty. If reinstalling the driver does not help, the device will have to be replaced.