LEDs similarly have a limited lifespan.
Why is the service life of the device not getting longer?
As I understand it, it's all about the monitor?
Could this be a video problem?
That's right, about a dozen times: LEDs - hundreds of thousands of hours
Anti-scientific nonsense! LEDs do not have such a service life.
Elementary, Watson - there is still a lot of equipment there, which has an even shorter service life.
All in all! I got to the bottom of the problem, or rather, I understood where my legs were coming from. What did you do (In case someone needs it)
- I bought an HDMI -> DVI-D adapter (No sense)
- I plugged it into the built-in video card via DVI-D and VGA (No sense)
- I inserted another video card GT9500 via VGA (No sense)
- I plugged the cable into another monitor (The brightness on the other monitor is noticeably better)
Conclusion: The problem is in the screen, I’ll go to a repair shop and see what they offer.
Here are the TOP 10 most common malfunctions of LCD monitors that I have personally experienced. The rating of malfunctions was compiled according to the personal opinion of the author, based on his experience working in a service center. You can take this as a universal repair manual for almost any LCD monitor from Samsung, LG, BENQ, HP, Acer and others. Here we go.
I divided the malfunctions of LCD monitors into 10 points, but this does not mean that there are only 10 of them - there are many more of them, including combined and floating ones. Many of the breakdowns of LCD monitors can be repaired with your own hands and at home.
PS: How to disassemble the monitor and TV (how to unclip the frame)
The most common questions when disassembling LCD monitors and TVs are how to remove the frame? How to release the latches? How to remove the plastic case? etc.
One of the craftsmen made a good animation explaining how to remove the latches from engagement with the body, so I’ll leave it here - it will come in handy.
To view the animation , click on the image.
Problem with Intel video cards
If your laptop has a built-in Intel 4000/530 or other video adapter, and the first method did not help, then do the following. Right-click on the desktop and select “Graphics characteristics”
The Intel HD Graphics Driver Control Panel will open. If this is not the case, then write “intel” in the search bar of the Start menu and select “Intel(R) Graphics and Media” from the results.
In the driver panel, select “Power Options”:
Next, turn off the display energy saving technology and set it to maximum quality:
The second option is to disable “Extended battery life for gaming applications”. Surprisingly, this can affect the floating brightness on the desktop.
DIY LCD monitor repair
A common malfunction is when the LCD monitor lights up for a second and goes out. What to do in this case and how to use this TOP of faults.
It's simple. To repair your LCD monitor, follow these steps:
- Step 1. Disconnect the monitor from the 220 V network and from the computer and decide whether we will repair it ourselves or take it to a service center for diagnostics at an inexpensive price.
- Step 2. If you decide to figure it out yourself, then take the tools: screwdrivers, a knife or scalpel and a soft base to lay the monitor down with the matrix.
- Step 3. Disassemble the LCD display, observing safety precautions and remembering the latches. How they open is shown in the animation above.
- Step 4. Discharge the high voltage capacitor. It is necessary! Especially if you want to achieve a positive result of the repair.
- Step 5. Inspect the board for swollen capacitors, burnt transistors and microcracks.
- Step 6. If any findings are found in Step 5, replace the burnt ones and solder the cracked ones.
- Step 7. Check the functionality of the monitor, observing safety precautions. If everything is ok, then go to Step 10.
- Step 8. Take a multimeter and test the fuses, diode bridge, transformers and transistors. Replace burnt radio elements.
- Step 9. Check the operation of the LCD monitor. If the monitor continues to blink, check the voltage at the test points on the board. This requires knowledge of circuit design, as well as a service manual with an ideal circuit. Further actions are difficult to describe in general terms. This is where the creative process of the Repairman begins. To discuss, write in the comments or visit our forum.
- Step 10: If you successfully repair the flickering LCD monitor yourself, do a test run for 2-3 hours in a disassembled state. After this, the monitor can be assembled and used.
What should I do if the screen on my laptop does not light up ? The OS starts up, the indicator lights turn on, but the laptop matrix only glows dimly? At times, the reason may be simple: the indicator that controls turning off the monitor backlight is stuck in the off position when the lid is closed. You should press it several times; as a rule, it is located near the monitor hinges. If this does not bring the desired effect, the reason lies in the inverter or backlight.
Four reasons why our computer screen color turned green
Good afternoon, dear blog readers! Remember the good old days when the cathode ray tube TV screen suddenly changed color? The hand itself reached for the slipper, just like when hunting a cockroach. But even a modern monitor can suffer the same fate. I was once asked to figure out why the computer screen turned green. A very simple and quick diagnosis followed.
To carry out a quick diagnosis I needed:
First, it was necessary to disassemble the existing circuit - monitor + VGA cable + old desktop computer.
Upon disassembly, it was discovered that the VGA cable was not a simple one, bought for three pennies in the transition, but with gold-plated contacts! Then the laptop was connected to the monitor, first through a VGA cable with gold-plated contacts, then through the cable that I brought. Which was without frills.
The result was not long in coming, but... first things first. What potential reasons could there be for an unexpected change in the color of the monitor screen? Why is the screen color now green?
- problem with computer video card
- problem with the monitor
- there is a problem with the cable, for example, there is a break or rupture in its wires
- Problem with software color settings
Let us briefly examine these hypotheses in order.
Video card problem
A malfunction in the graphics chip, for example, its partial failure, is the main reason that the video card “paints” the monitor screen a certain color at the output. We can treat GPU failure at home by warming it up with a special hairdryer. But, to be honest, I haven’t practiced this yet.
Unfortunately, video cards sometimes burn out. One of the reasons for this is connecting the computer to the TV, which in turn is connected to the antenna. There may be parasitic interference in the antenna cable, which ultimately destroys the video card.
If you have a discrete video card in your computer, then it must be inspected for swollen capacitors or other burnt parts. Swollen condensers can be replaced yourself if desired.
Overheating of the video card can lead to the result described. First, it is worth checking the temperature of the video card with the well-known GPU-Z program, so as not to waste something that is securely fastened with tape and works that way.
We should not see numbers greater than 90 degrees in the GPU Temperature field. Once I saw the processor temperature about 100 degrees, and it continued to rise rapidly.
I had to severely disconnect the computer from the network, otherwise it was in danger of self-digestion.
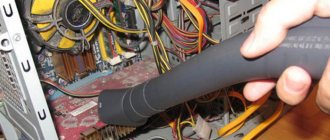
If it turns out that the temperature of the video card is really going through the roof, then it’s time to clean the inside of the computer using a vacuum cleaner or compressor, then, if necessary, check the functionality of the cooler on the video card and replace the thermal paste underneath it.
You can also damage the connector on the video card, especially if you pull the cable too hard. This can be checked by slightly shaking the connector itself. If it does not stay in place like a glove, then this may well be the reason for the monitor screen to turn a certain color.
The video card connector on the motherboard could become unsoldered during its life. If, when the video card is slightly shaken in the motherboard connector, something happens on the monitor - the screen tint changes, artifacts appear or disappear - then all this clearly indicates a problem with the connector on the motherboard. It is treated by re-soldering it. Or sending the motherboard to a service center.
Finally, the video card drivers could fail. This should be checked last if we suspect a hardware problem, but we must keep this option in mind. Download the latest drivers from the video card manufacturer's website and install them. I hope you don't get a blue screen!
Problems with the monitor itself
The screen color may have turned green or some other color due to a malfunction of the monitor itself. If the screen of your LCD monitor is painted in warm colors, then most likely the backlights are low. The only solution is to replace the burnt out lamp with a new one.
But still, the matrix, and not the backlight, is responsible for the color, so its malfunction leads to incorrect color rendition of the monitor. In particular, the screen may turn a certain color. Only replacing it will help.
Among the relatively light options is damage to the matrix cable. It is quite possible to replace it with another one. It’s easy to find out what gives the screen a reddish tint—the cable or the backlight—just remove the cable going to it from the matrix and turn on the monitor. If the backlight is to blame, then the backlit screen will remain reddish.
The control board may also be faulty. Just as in the case of a video card, a processor failure may occur on the monitor’s control board. In principle, this is also a curable disease with the same heating.
Cable problem
If successive changes of VGA cables had not led to a noticeable improvement in image quality, then it would not have been possible to identify the culprit so quickly. The problem was that there was not enough space on the table for the monitor, so they did this with the cable:
The rich inner world of the cable could not stand it and burst.
There is one adequate solution here - replacing the cable, and don’t do that again!
Problem with software color settings
If there is no reason to suspect the video card or anything else of a hardware malfunction, then it makes sense to reset the monitor’s color settings to default. Someone’s playful hands could well have rummaged through the screen settings. Of course, everything will be different on your monitor, but I will show you the very idea of how you can distort all the colors on the screen. Here is a slightly “collective farm” image:
It is clear that here you can creatively approach the issue of monitor color rendering. If you choose the wrong color scheme, you can then try for a long time to look for swollen capacitors on the video camera.
Or, for example, calibrate colors using the Windows Control Panel. You can ruin everything there too! To verify this, you can go to Control Panel -> Hardware and Sound -> Display, then click on the “Color Calibration” link.
The following calibration wizard window will appear:
Next, following the wizard's prompts, you can get to this page, where you can easily achieve the result below using the sliders:
If you compare the last two screenshots, the difference is visible to the naked eye, at least in the white areas of the window.
Also, do not forget that video card manufacturers supply their drivers with various control panels for them, for example, “Intel HD Graphics Control Panel”. Various profiles can be used here as color scheme settings. The profile can be configured in the “Display” section of this program.
So many enticing sliders!
Dim screen on laptop: what to do?
The inverter supplies current to the lamp; the correct operation of the backlight depends on its performance. Therefore, if the laptop display goes out , it is necessary to diagnose the inverter and, if necessary, replace it with a new one. Problems with the backlight also arise due to a short-circuited or burnt-out lamp, which can be simply replaced.
The technicians of our service center nout-911.ru have more than once encountered similar situations of screen fading and barely visible images. They determine the reason why the laptop screen has dimmed and repair faulty parts quickly, accurately and efficiently.
Temporarily added a shadow while the winter theme –> Here they solve various problems together. Join us!
- Unanswered topics
- Active topics
- Search
- Ad blockLog in or register to disable this ad block
Turn off adaptive brightness in Windows 10
You need to open the power settings, to do this, right-click on the “Start” menu and select “Power Options”
Next to the current scheme, click “Configure power supply scheme”
And then go to “Change advanced power settings”
Next, open the “Screen” subsection and in the “Enable adaptive brightness control” item, set the switches to the “Off” position for mains power and battery power:
Also, the brightness itself can change when connected to the network or when powered by a battery and the charge decreases to the designated level. The screenshot shows that the value is set in reduced brightness mode - 50%. We put 100% everywhere.
How to wake up your computer from sleep mode?
How to disable Sleep Mode?
- All settings are made with administrator rights.
- Click Start - Control Panel - Power Options.
- In the window that opens, select “Set up power plan”
- Now we disable Sleep mode by selecting the value in “Put the computer into sleep mode” - Never.
Interesting materials:
What is the difference between a viola and a violin? What is the difference between glass and display replacement? What is the feat of Evpatiy Kolovrat? What is the essence of philosophical materialism? What is the strength of the spirit? What is the purpose of natural science? There are advertisements in Google Chrome, how can I remove them? On what day should vacation pay be accrued? In what area is Lake Seliger? During what period should sick leave be paid?
Recommendations for adjusting brightness
If you want the monitor to minimize eye strain, you need to adjust the brightness correctly. Excessively intense light causes a lot of strain on the eyes. Consequently, vision deteriorates. It’s only dangerous because you won’t feel it right away. And after a while, less bright colors will blur and seem like a solid faded spot.
In addition to brightness, it is also worth adjusting contrast. It must be remembered that too sharp edges are difficult to perceive by the human eye.
Experiment with color and contrast and protect your eyes. This is very easy to do on Windows computers.
Using the taskbar
The easiest way to make your monitor more comfortable by changing the brightness is to use the taskbar.
To find the function you need on your computer, you need to hover the cursor over the battery image. From the context menu, select “Windows Mobility Center”. In the pop-up window in the upper right corner it will be written “Screen brightness”. Below the inscription is a slider, by moving which you will select the optimal brightness for the monitor.
Using the control panel
A more complex way to change the brightness on a laptop is to use the control panel. To do this, go to the “start” menu and select “control panel”. Next, in the window, select “screen”, and there is the sub-item “brightness settings”.
A slider will appear at the bottom of the screen; by dragging it you can adjust the brightness of the monitor.
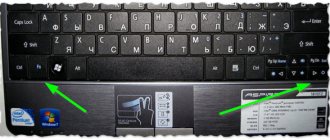
Special keys
Special keys for adjusting the monitor are present on most operating systems. And windows is no exception. This method can be called the simplest and fastest.
To change the brightness on a laptop running Windows OS, you need to press the Fn key. While holding it, adjust the backlight intensity using the up and down arrow keys.