Installing fonts in Windows 10 is no different from the same operation in Windows 7. Therefore, if you have experience downloading fonts in earlier Windows operating systems, the process will be easy. For those who are interested in the topic for the first time, we have prepared detailed step-by-step instructions.
How to install fonts on Windows 10
Where to download fonts
Let's look at sites from which you can download fonts for Windows 10.
Various fonts can be found on online services
Most of them are the same, the only difference is the number of fonts available for download. On websites, the name of the font is written by the same name, so you will immediately see the style of the font and be able to evaluate it.
| Website | Number of fonts |
| Fonts-online | More than 3500 pcs |
| Allfont | More than 2500 pcs |
| Allshrift | More than 10,000 pcs |
Further in the instructions we will use the Fonts-Online website - it has a convenient and intuitive interface.
Large collection of Cyrillic Russian fonts for Windows
By Eraj Shams • Views: 1225
• January 10, 2012, 20:33 • Comments (pcs.)
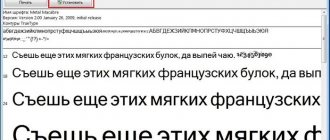
This assembly contains only Cyrillic fonts. You can download Russian fonts from my website absolutely free. Each font has been personally tested by me and I guarantee that all fonts in this assembly support the Russian language. I will make this topic as follows: the name of the Cyrillic font, an image of this font and a link to download directly from my site. In the pictures, all fonts are shown in the same size - 36 pt in Photoshop so that you know which fonts are large and which are small. Let's see, download!
Handwritten Russian font DS Note
Russian font ChinaCyr in Chinese style
Gothic Cyrillic font goth
Vampire Cyrillic font with blood drops
Cyrillic font in Texas style Invest
Uppercase Cyrillic font Still time
Russian techno font consisting of dots
Free Cyrillic font for Photoshop
Zombie Cyrillic font
Neat Cyrillic font
Free Russian font for windows
A simple Cyrillic font made using the stroke method
Cyrillic font in quake style
Cool free Russian font
Free Russian techno font podd
Uppercase Cyrillic Slavic font
Cyrillic font like on an electronic watch
Bold Russian font frankC
Stylish Russian font in typewriter style
Large Cyrillic font
Russian font in eighteenth century style
Old Church Slavonic Cyrillic font yermak
Free Russian font davidaC
Nice bold Cyrillic font
Beautiful Russian font DS uncial
Classic Cyrillic font BedrockC
Russian font in the style of old Russian writing Beresta
Beautiful Cyrillic font Beastim
Stylish bold Russian font DS stamper
Very beautiful Cyrillic font in Arabic style DS arabic
Stylish Cyrillic font DS stain
Cyrillic Techno font Terminator (size 24pt)
Decorative Cyrillic font Ecmann
Russian Cyrillic font DexterC
Russian very beautiful font in words Birch
"Burning" Russian Cyrillic font Blaze
Creative uppercase Russian font Burlak
Calligraphic Russian font Calligraph
Interesting Cyrillic font DS eraser2
If you liked this article with Russian fonts, you may want to check out another collection of Russian Cyrillic fonts. You can view all the fonts on my website by following the link. You can also download all fonts in one archive by clicking on the download button after this article!
Did the article help? Treat me to a cup of coffee =)
How to remove fonts
Removing unnecessary headsets in Windows 10 is even easier.
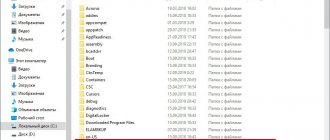
Step 1. Go to the mentioned folder “C:” - “Windows” - “Fonts”.
Open the folder “C:” - “Windows” - “Fonts”
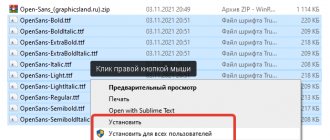
Step 2. If you want to delete one font: left-click on it, select “Delete”, as in the screenshot below.
Left-click on the font and select “Delete”
Another option: right-click on the font and select the “Delete” line.
Right-click on the font and select the line “Delete”
Step 3. If you want to get rid of several typefaces at once: select one of the fonts with the left button, then hold down the “Ctrl” key and click on the others. The result should be the following.
Use the left button to select one of the fonts, then hold down the “Ctrl” key and click on the others
After selecting the files, click the “Delete” button. These are the two best ways to permanently remove fonts on Windows 10.
Click the “Delete” button
Note! Be careful with system fonts. This is the name given to the “native” Windows headsets installed with the system. These fonts include: Tahoma, Times New Roman, Calibri, etc. It is not recommended to remove them.
How to add a font in Windows 10
- Open Windows 10 settings by pressing the Win+I key combination.
- Go to Personalization > Fonts and click the button Get additional fonts from the Microsoft Store .
- In the store window that opens, select the font you like and press the button Get.
Using the current method, the user will not need to install the downloaded font themselves. It will be automatically installed from the app store after downloading. Since the current feature appeared not so long ago, the selection of fonts in the Windows 10 store is not yet large.
Errors when adding fonts
“This is not the correct Windows 10 font” - this unpleasant message appears if the file is damaged and the font is not installed. The easiest way is to download the font from another site. Look at the beginning of the article: one of the three resources described will probably have the headset you need.
If you receive the error “This is not the correct Windows 10 font,” it is better to use another online service to install the font
How to find the fonts folder
Run window
One of them is to use the Run system utility, invented by Windows developers to make it easier for users. The Run window opens in different ways:
1. The easiest and fastest way is to press two keys at the same time - Win (located in the bottom row of buttons and looks like a floating window) and R (top row of the alphabetic keyboard, no need to switch to English).
2. You can click on the magnifying glass located at the bottom of the screen on the taskbar, enter “Run” in the search bar and activate the corresponding application from the search results with two left clicks of the mouse.
- To restore default font settings in Windows 10/8/7
3. Launch the desired window from the list of Start commands located on the left functional part of its window.
After the required window appears, to go to the fonts, you need to enter the value %windir%fonts in its line and confirm execution by pressing OK or Enter.
Control Panel
- Click on the “Start” menu, right-click;
- In the context menu that opens, point to “Control Panel” to display a list of all its elements;
- In the list itself, move down by scrolling to the desired “Fonts” folder and go into it with one left click.
If for some reason the desired element is missing from the Start context menu, then:
1. Enter the value “Control Panel” in the “Start” search bar.
2. Launch the corresponding application from the search results (one quick left click of the mouse).
3. At the top of the wizard that opens, where the “View” settings tool is located, open the list of possible options (by default, “Category” is set there, and you need to click on it).
4. Select the “Small icons” value to display all elements of the “Control Panel”.
5. Among the icons that appear, find “Fonts” and go to them with one left click.
System catalog
2. With two quick left clicks, go to the system drive (C by default).
3. Go to the Windows directory.
4. Find and expand the Fonts directory.
How to open settings
There is a simple way to get into the font settings.
1. Copy or manually enter the Fonts value into the search bar on the taskbar.
2. Select “Font Options” from the list of search results.
Installing fonts without administrator rights
To install the font on the system, you need administrator rights. Without rights, only at the user level, you will not do anything.
Fortunately, there are a number of ways to work in the system without administrator rights, but this also has its pitfalls. To allow a user to install fonts using Windows, administrator rights are required.
There is only one way out: use third-party programs. For example, a free utility called PortableApps.com Platform. Although it is intended for other purposes, it has managed to prove itself in the installation of fonts with user rights. And you don’t need administrator rights to install it. Follow the plan:
- During installation, the program will ask you to determine the installation method. Look for the "Choose a different location" option. To access the installation of fonts when installing the program, you need to select the last option
- Now, when the program asks where to install it, select a folder that you have access rights to and can edit. For example, "Documents" or "Downloads". You must download the program to a folder to which you have access
- When the utility is installed, enable it. Then find the folder where you installed it, select the directory called PortableApps and go to the path PortableApps - PortableApps.com - Data. Here in Data, create a folder called Fonts. In the PortableApps program files you need to create a Fonts folder
- Copy all the fonts you want to install into the Fonts folder. You need to copy all custom fonts that need to be installed into the created Fonts folder.
- Restart the program. It will automatically place the fonts in the original Fonts folder.
Where do you download free fonts?
My two favorite resources are Google Fonts and Font Squirrel, both of which offer completely free fonts that you can download and install for your personal use. They're well organized and easy to navigate, so finding the fonts you like isn't difficult at all.
What are your favorite font sites? What fonts do you use most often? Know of any other useful font tools that we missed? Share with us in the comments below!
How to find out the name of a font
Do you like the look of the symbols but don't know the name of the design? And how do you load fonts into Word if you can't find them? There is no need to browse websites hoping to accidentally stumble upon the desired symbols. The name is easy to recognize. There are special programs and even entire websites for this.
- What The Font. Popular and reliable service. Determines the type of calligraphy from the picture. The found style can be immediately downloaded and installed in Word. The resource has its own forum. If searching the database turns up nothing, you can ask other users for advice.
- Extension for Google Chrome browser. Scans the HTML code of the page and displays the title.
- Identifies a font by asking questions about its appearance. If you have a rough idea of what you are looking for, but don’t have specific information, this resource is suitable.
- Bowfin Printworks. Here you can choose your style down to the smallest detail. Asks about the shape of each character.
- A community of people who design calligraphy or simply understand it. You need to create a topic and insert a picture with symbols. Forum users will help you find the right style.
- WhatTheFont for mobile devices. Take a photo of a word and the app will determine what style it is.
If you've seen some interesting calligraphy on the Internet or want to expand the capabilities of Office, figure out how to install a new font in Word. Non-standard inscriptions can brighten up boring text. They are used for leaflets, congratulations, postcards, and presentations. There are thousands of them - you are sure to find the right one.
How to Add New Fonts on Mac
As in the case of Windows, fonts on MacOS are integrated into the system through the context menu: just call up the context menu by double-clicking on the file and select “Install” from the list that appears. The files are instantly integrated into the system and will become available for use in Microsoft office programs.
There is also an alternative option:
- Launch the Windows Office Compatible service through Finder, which allows you to view information about an already available collection of content and hide unnecessary items;
- The list that appears, in addition to editing, also supports loading third-party OTF and TTF files - you just need to drag and drop the missing information into the interface. The settings take effect immediately.
If in the future the files prepared in Word are to be transferred to someone, then, as on computers with Windows, you will have to look into the editor settings and check the box associated with “embedding fonts” directly into the document.
How to install a new font if you have Windows
In addition to the standard method of adding fonts, there is also an alternative one. A little more confusing, but offering additional benefits: there will be a chance to adjust the collection of already available fonts and hide unnecessary ones. And you have to act in accordance with the following algorithm:
Find, download and unpack the archive with fonts, preparing OTF and TTF format files for further interaction;
Launch “Control Panel” via search in the “Start” menu and in the upper right part of the interface activate “Small icons”.
The Control Panel will immediately begin displaying additional categories for you to interact with, including Fonts.
The selected menu item unlocks access to the library of fonts loaded into the operating system, adapted for Cyrillic and Latin, as well as Arabic and some European languages.
The last step is to transfer the fonts downloaded from the network using the hotkeys Ctrl + C or Ctrl + V.
As in standard mode (installation via the context menu), there is no need to restart the computer - new content is activated automatically.
Which font integration method to choose depends on the desired result. The option with the “Control Panel” is more profitable from the point of view of content management: unnecessary templates are hidden, transferred to the trash can, or sorted depending on their significance or the presence of Cyrillic support.
How to find the installed font in Word
Fonts added to the operating system immediately become available in Word, Excel, PowerPoint and third-party compatible software, including Figma and even Photoshop.
Specifically, office programs from Microsoft do not even offer additional insight into the details - you just need to find the new font on the “Main” quick access panel in the drop-down list.
If you have problems with a manual search, then an alternative option is provided: calling the “Font” context menu and going to the search line.
The selected settings are automatically applied to the selected text. But, if the words have not changed their style, then the problem is related to the same language support: the downloaded content must support the Cyrillic alphabet.
Embedding a font into a Word document
The key feature of Word, associated with “tightening up” the operating system settings (including fonts), upon closer examination also has disadvantages. We are talking about automatically resetting the design in documents if the corresponding content sets are not loaded on another computer. Instead of an exclusive typeface, the already boring Times New Roman will appear.
And, although the restriction has been in effect since older versions of Word, starting from 2003-2007, an additional option appeared in the “Settings” of the text editor that allows you to literally embed the missing content into the document. It is enough to repeat the following steps:
Call the “File” menu from the quick access panel and go down to the “Options” section, located in the list on the left;
Go to the “Saving” tab and in the menu that appears, check the box next to “Embed fonts into file”;
Additionally, Word will offer to configure the integration method - whether it is necessary to completely embed OTF or TTF files, or to replace certain fragments to save space.
After these steps, the saved documents will take up a little more than 40-50 kilobytes, but they will not lose their design after transferring the files to the hard drives of third-party computers and even mobile platforms.