Russification of Windows is necessary if an operating system in a foreign language is installed on the computer. Situations can be different: a computer was purchased abroad (naturally, there is no Russian language there), the user independently installed an operating system on the PC in English (or any other) language, etc.
Unfortunately, not everyone is fluent in foreign languages. Therefore, for full operation, the user will need to install the Russian language on Windows in order to change the Windows interface language.
How to change the Windows language to Russian? To do this, you need to download and install the Russian language package in the operating room to localize the system. After the installation of the language pack is completed, Windows will work in Russian.
Features of installing the Russian language in Windows
In this article we will look at the process of Russification of Windows 10. The process of downloading and installing the Russian language pack takes place directly from the system settings: using online and offline installation.
Russification of Windows 7 and Windows 8.1 takes place according to the following algorithm (in Windows 10 the procedure is similar):
- download the Russian language pack by starting the download from the system settings, or by following the link https://support.microsoft.com/ru-ru/help/14236/language-packs;
- install the Russian language pack;
- go into Windows settings, select Russian as the main language of the operating system;
- restart your computer.
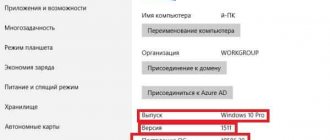
In this article I will tell you how to change the Windows 10 language to Russian in the Windows 10 LTSB operating system (Windows 10 Enterprise LTSB), which by default does not have a Russian interface language. In other editions of Windows 10, the Russification process is similar.
A note about the lock screen input language
The registry settings and policies discussed above apply to the login screen, but not the lock screen.
When a user locks an account, the default input language on the lock screen will be the language that was in use at the time of locking.
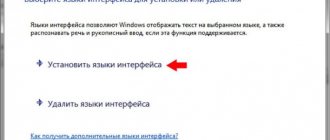
The behavior depends on whether the user has the Allow me to choose an input method for each application window setting enabled (the first picture in the article), which is disabled by default.
- If the setting is turned off
, the input language of the last active application is projected onto the lock screen. Let's say the user's default input language is Russian. He typed in Word in English, and then blocked the account (or the blocking policy worked). In this case, the lock screen will appear in English, not Russian. - If the setting is enabled
, the lock screen adopts the language of the shell - taskbar and Start menu. Therefore, on this screen the language will always be the one set by the user as the default input language.
I don't know of a way to force a specific language on the lock screen. If you know, please let me know and I will add it to the article. As a workaround, you should enable the setting and set the password in your preferred input language.
How to install Russian interface language in Windows 10 (1 method)
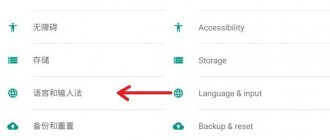
In the Windows 10 operating system, go to the Start menu, click on Settings. In the Settings window, select the Time & language section.
In the settings window, open "Region & language". In the "Languages" section, click on the "Add a language" button.
In the “Add a language” window, select the Russian language (Russian, Russian).
After this, Russian will appear in the list of added languages in second place. The Russian language has not yet been downloaded and installed on Windows.
Select “Russian” and three buttons will appear in the language area. Click on the "Options" button.
After this, the Russian language settings window will open. Here you can download the Russian language pack for Windows 10, enable full support for the letter “ё” (by default this feature is disabled in Russian builds of Windows), download the voice pack, and add a keyboard.
Click on the “Download” button to download and install the Russian language.
After this, the download and installation of the Russian language pack on your computer will begin. This process will take some time.
After the installation of the Russian language is completed, the message “Language pack installed” will appear in the language settings.
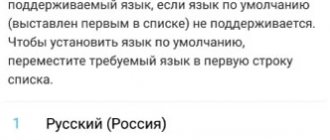
Enter “Region & language”, highlight “Russian”, click on the “Set as default” button.
After this, the Russian language will move to first place in the list of supported languages. This means that Russian will be used by default in the Windows 10 operating system.
Restart your computer. After launch, you will see that the Windows 10 interface works in Russian.
Next, if desired, change the time and other regional standards.
You may also be interested in:
- How to disable Windows automatic restart - 9 methods
- Game mode in Windows 10
How the default input language works on the login screen
Historically, input language preferences on the welcome screen are set for all users in the HKEY_USERS section (refresh your memory on HKU vs HKCU
my analysis from 2009 will help you).
[HKEY_USERS\.DEFAULT\Keyboard Layout\Preload] “1”=”00000409″;EN “2”=”00000419″;RU
However, starting with Windows 8, the behavior has changed and now takes into account the language preferences of each user, rather than forcing one language for everyone straightaway.
The default input language set in your account simultaneously determines its settings before and after
login.
When you explicitly specify a language in the advanced keyboard options, the change is expectedly written to the InputMethodOverride setting in the HKCU\Control Panel\International\User Profile section. However, the system also changes the values of the settings in the HKCU\Keyboard Layout\Preload registry key.
The changes to the HKCU section mean that the configuration of one account does not affect others. For example, there are two accounts in the system - the first has a default input language of English, and the second has Russian. If you select the first one on the login screen, it will be in English, and if the second one is Russian.
In this case, HKCU settings prevail over HKU!
Therefore, only by administrative copying (control intl.cpl,,1) or making changes to the HKU registry key (which is the same thing) you will not be able to set a single language
on the login screen
for all users
.
The same is true for trying to configure different languages for the same user.
Russification of Windows 10 (method 2)
For the second option of installing the Russian language in Windows 10, you will need a pre-downloaded Russian language pack. The localized language pack in the form of a file with the extension “.cab” must match the version and bitness of the operating system installed on the system computer.
- Go to the Start menu, run Command Prompt as an administrator.
- In the command line interpreter window, enter the command “lpksetup” (without quotes), press the “Enter” key.
- In the window that opens, click on the “Install display languages” button.
- In the next window, you need to select the path to the Russian language pack previously downloaded to your computer. Using the "Browse" button, select the file with the ".cab" extension, and then click on the "Next" button.
- Next, accept the terms of the license agreement.
- Then the process of installing the Russian language on your computer will begin.
- After completing the installation of the language pack, go to the system parameters, in the “Setting” window, in the “Region & language” option, in the “Languages” section, click on the “Add a language” button, and then select Russian in the window that opens.
- Return to the “Region & language” settings, under the Russian language item you will see the message “Language pack installed” (the language pack is installed).
- Highlight “Russian” and then click on the “Set as default” button that appears. Russian language will move to the beginning of the list of installed languages.
- Restart your computer.
- The Windows 10 operating system will boot in Russian.
What is a keyboard layout
Keyboard layout is an agreement on the correspondence of typographic characters (letters, numbers, punctuation marks, etc.) of a written language to the keys of a computer keyboard, typewriter, or other device with which text is entered.
Wikipedia
https://ru.wikipedia.org/wiki/Keyboard_layout
Simply put, a keyboard layout is the way the computer understands the commands that a user enters by pressing certain keys on the keyboard.
Almost every language has its own layouts created and adapted (corresponding keys with numbers, letters, symbols and hieroglyphs). In addition, when entering commands or text, the function keys Shift, Alt, Ctrl, CapsLok and others are often used. The Fn key has been added to built-in laptop keyboards for even greater functionality while reducing the number of keys.
The QWERTY layout first appeared in typewriters.
Windows language settings
Language settings in the OS play a significant role and are not limited to conveniently switching the language on the keyboard. They affect the format for representing time, digital values, temperature and other pleasant little things that we usually don’t pay attention to.
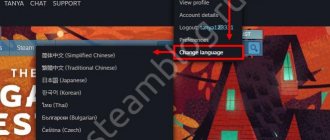
- The easiest way to get to the language settings is to use the system tray icon. By clicking on the icon indicating the current keyboard layout, we call up a small context menu. Select the marked item and go to the appropriate section of Windows settings.
- The area marked in the screenshot with the “+” symbol opens a menu for selecting additional languages.
- Using the text search field we find the desired localization. Click the link to activate the selected package on your computer. As a result, Ukrainian is added to the list of available text inputs.
- By clicking on any of the selected localizations, we open an additional menu. Here we have two main control options available to us. The above screenshot shows that despite the Russification of the interface, the selected language is not the main one in the system. The number “2” indicates a menu of additional options and will be available for any installed localization.
Let's look at the indicated parameters in more detail.
Main language
Let's open it with the current Microsoft Store settings. The screenshot shows that all dialogues and command menus in the store are displayed in English.
We see the same picture in the mail. To replace English with Russian in these applications, it must be made the main language.
The switch is performed without a general reboot. To change the locale used, just restart the selected application.
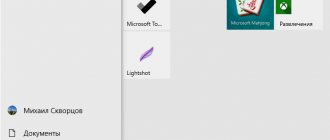
The language selected as the main one will be used, among other things, on the welcome page.
Language pack options
Additional language pack options let you customize the keyboard layout you use for input.
The pop-up menu contains various options, but in most cases, users do not need it. By default, Windows always sets the QWERTY layout, which is an international standard.
This item allows you to download a complete language pack, which can be used to radically change the interface.
If you select it as the main one after the installation is complete, the changes will affect not only mail and the application store. The OS will use the selected language in all dialogs. In other words, we get an English version of Windows.
Changes take effect when you log in again. You can restore the original settings in the multilingual Pro and Home versions by simply changing the primary locale.