Windows 10 comes with over 100 pre-installed fonts that you can use to control how text appears on your screen or in documents. Additionally, some applications, such as Microsoft Office, can automatically download additional fonts, expanding your options for styling text. However, sometimes you may need to install fonts for a specific language or increase variety for your designs or PPT projects. Luckily, Windows 10 lets you add your own fonts from thousands of downloadable fonts. In this post, we will tell you how to install and use custom fonts on Windows 10.
Related: How to Protect Your Windows 10?
Krakozyabry instead of Russian letters in Windows 10 - correcting the incorrect display of the Cyrillic alphabet
From time to time it happens that in the Windows operating environment, instead of Cyrillic characters, we see complete gibberish: a jumble of hieroglyphs and incomprehensible icons, devoid of any meaning. There may be several reasons for this: starting from the wrong choice of locale (parameters) in the regional settings to incorrect installation of the Russian language package to support the Cyrillic alphabet in the English-speaking environment. Be that as it may, this problem is completely solvable, and in this article we will tell you how to overcome it.
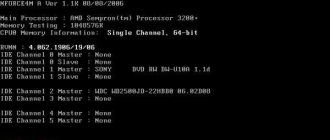
The most likely reason for the problem, why we see krakozyabry instead of Russian letters in Windows 10, is incorrect locale settings (in other words, regional settings). As a result of this, when the system tries to display Cyrillic fonts on the screen, we see complete confusion and chaos, and this is not observed with all Russian characters. As far as you can see from the screenshot below, not all symbols are displayed incorrectly. So, the names of programs and shortcuts on the desktop are written completely correctly, but when we try to call the installer with a description in Russian, our problem immediately comes to the fore, and we see crappy words instead of Russian letters.
In addition to incorrect locale installation, this may be caused by the fact that you initially installed the English version of the Windows distribution, “tailored” to the Latin alphabet. In this case, all we need to do is reinstall the system to the Russian version. But we will assume that you want to work specifically with an English-language environment, in which all Russian characters should be displayed correctly and without errors, regardless of what programs you use, English or Russian. How to make sure that krakozyabrs are not displayed instead of Russian letters in Windows 10 - read on.
The first thing we need to do to overcome this situation is to go to the control panel. This operation can be carried out using a number of methods, the most obvious of which is to right-click the mouse button on the start button, and then select the appropriate value from the list in the menu that appears.
In the control panel window that opens, select the “Clock, language and region” section. This is where all regional settings are concentrated: selecting a time zone, fractional and integer separators for floating-point numbers, currency symbols, grouping large numbers according to specified criteria. Select the section indicated above.
Having entered the previously described category, we give preference to the “Regional Standards” sector.
In addition to the locale, here you can also set settings for the number of decimal places, the measurement system (metric or American), and the format for numbers less than zero. But we are primarily interested in the regional locale for the correct representation of Cyrillic characters in the environment, so that krakozyabrs are not displayed instead of Russian letters in Windows 10. To set its parameters, let’s go to the “Advanced” tab.
In the category where the language of applications that do not support Unicode by default is set, click on the “Change system language” button. As a result, we will be taken to a form for customizing the operating environment locale, which is what we actually need.
In the mini-window that appears on the display, select “Russian (Russia)” as the current system language, thereby indicating that the default language used in the operating environment will be Russian, thereby explicitly setting the appropriate regional settings mode.
Next, the system will display a warning that changes have been made to the regional environment settings, which will require a system reboot to take effect. We agree with this, reboot, and check the results. As a result, krakozyabry instead of Russian letters in Windows 10 should no longer be displayed, which can be checked by once again running the same, previously problematic distribution kit for installation, or any other one, with the display of which there were previously problems.
As you can see, the difficulties that arose were successfully resolved, and now all fonts should be displayed correctly. The solution presented to your attention is suitable in most situations when krakozyabrs are displayed on the screen instead of Russian letters in Windows 10.
Another way to solve the described problem is to perform certain manipulations with the registry. But due to possible incorrect operation of the system as a result of their use, we will not present this method in our material, since in the event of any errors on the user side, this may result in the need to completely reinstall the operating system, and this is unacceptable for us.
So, we hope that the algorithm presented above will allow you to bypass all the pitfalls in solving the question of how to remove gibberish in Windows 10 when working in an environment with an English-language shell, and will also save you from the headache associated with displaying Russian-language fonts in the OS.
LiveLenta.com
WINDOWS 10 FONT
As we mentioned earlier, the font cache is located in a special folder along the following path:
%WinDir%ServiceProfilesLocalServiceAppDataLocalFontCache
which is protected. But, before working with it, we need to:
- use the Win+R key combination on your keyboard and call the “Run” system utility;
- enter “services.msc” in the appropriate field and click “OK” to launch the “Services” application;
- find “Windows Font Cache Service” and stop it;
- go to the above folder in Explorer and delete its contents;
- then delete the file called “FNTCACHE.DAT” from the “System32” folder;
- start the previously stopped service and restart the computer.
If after doing this, the fonts are still not displayed correctly, restore them to their default state. To do this you need to issue the following command:
sfc /scannow
in the Command Prompt with admin privileges and allow the system to restore the original files. You may also need to resort to DISM.
Find more computer tips in the Resource Map. We invite you to visit us on Facebook or Google+, which you can access using the image links at the top right!
- Fixing the problem with displaying Russian letters in Windows 10
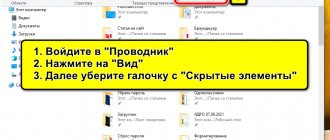
Installation via file
Right mouse button – install
The fastest way to install a font is through the Explorer menu by right-clicking on the file. This method allows you to install several fonts at once - select all files with .ttf or .otf extensions, right-click on the selected files, select “Install” or “Install for all users”.
Double click on the file
If you downloaded the font in a .zip or .rar archive, or you want to install the font only after previewing, then you can simply open the font file by double-clicking. A window will appear with example phrases, at the top of which there will be an “Install” button.
Note 1: if the font does not support Cyrillic, then in the preview only Latin characters and numbers will display the actual appearance of the font, Cyrillic characters will be written in the system's default font.
Note 2: files with .ttf and .otf extensions may be associated with other programs on your system, such as ACDSee, Paint, etc. To return to correct opening in the font viewer, right-click on the file and in the Explorer menu that opens, select “Open with - Select another application.” Next in the list you need to find “Font viewer”, check the box “Always use this application to open...” and click OK.
Using the registry if the method above does not help
Let's create a regular file in a text editor, but give it the .reg extension so that later we can apply all the settings stored in it. So, what should the contents of the reg file be?
Let's type into it with pens or copy the following values via the clipboard:
Windows Registry Editor Version 5.00
"ARIAL"=dword:00000000
“Arial,0″=”Arial,204” “Comic Sans MS,0″=”Comic Sans MS,204” “Courier,0″=”Courier New,204” “Courier,204″=”Courier New,204” “MS Sans Serif,0″=”MS Sans Serif,204” “Tahoma,0″=”Tahoma,204” “Times New Roman,0″=”Times New Roman,204” “Verdana,0″=”Verdana, 204"
When all the specified lines are in the reg file, run it, agree to making changes to the system, then reboot the PC and look at the results. The krakozyabrs must disappear.
Important Note:
before making changes to the registry, it is better to create a registry so that changes made subsequently do not lead to the crash of the operating system, and it does not have to be reinstalled from scratch. However, if you are sure that these actions are safe for your OS, you can skip this point.
October 6
Encoding problems in Windows are quite a big headache for many lovers and fans of this operating system. Sometimes you have to suffer and sweat a lot before you can solve an encoding problem. Find out the reason, often. even more difficult. but very few people bother here... the main thing is to fix the problem, and why it arose is a question of long-gone days)
The problem with encoding became especially urgent after the release of the new Windows 10. Microsoft has again done something too clever and as a result, in some applications, instead of language, there are only gibberish. But everything can be solved
In fact, there can be quite a lot of reasons for resetting or changing the encoding. But the main ones are:
— system update
- installing some kind of system patch
— effect of the virus
- update to windows 10
- crooked playful hands and excessive curiosity (the most common cause of all troubles in Windows)
Restoring encoding
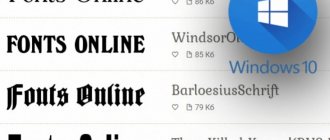
However, since this problem has arisen, it needs to be solved. Below are screenshots kindly provided by one person from one popular forum. You can look at them without risk and experiments on your own system, “what will happen if you change the encoding.” All fonts are presented as completely unreadable Arabic gibberish.
Despite all the seemingly wild horror of the situation, this problem is solved quite simply:
go to Control Panel -> Regional and Language -> “Advanced” tab -> Language of programs that do not support Unicode. We change the language from Russian to English, reboot the computer, change it again to Russian and reboot the computer again. Let's enjoy beautiful native fonts again!
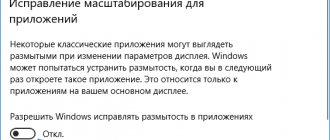
In Windows 10, the encoding is tied globally to the general system language. Therefore, if you have problems with displaying fonts, then you need to go to: Start -> Settings -> Time and Language -> Region and Language -> Additional date and time settings, regional settings -> and look at the settings in the items: Language and Regional Standards.
How to fix Windows 10 hieroglyphs by changing code pages
Code pages are tables in which certain bytes are mapped to certain characters, and the display of the Cyrillic alphabet as hieroglyphs in Windows 10 is usually due to the fact that the wrong code page is set by default and this can be corrected in several ways that can be useful when required Do not change the system language in the settings.
Using Registry Editor
The first way is to use Registry Editor. In my opinion, this is the most gentle method for the system, however, I recommend creating a restore point before starting. The advice about restore points applies to all subsequent methods in this guide.
- Press the Win+R keys on your keyboard, type regedit and press Enter, the Registry Editor will open.
- Go to the registry key HKEY_LOCAL_MACHINE\SYSTEM\CurrentControlSet\Control\Nls\CodePage and on the right side scroll through the values of this section to the end.
- Double-click on the ACP parameter, set the value to 1251 (code page for Cyrillic), click OK and close the registry editor.
- Restart your computer (reboot, not shutdown and start; in Windows 10 this can make a difference).
Usually, this fixes the problem with displaying Russian letters. A variation of the method using the registry editor (but less preferable) is to look at the current value of the ACP parameter (usually 1252 for native English-language systems), then in the same registry section find a parameter named 1252 and change its value from c_1252.nls to c_1251. nls.
Getting rid of scammers through computer settings
The first step that needs to be taken to correct errors in the display of the Russian language is to go to the control panel. This can be done in several ways. One of the simplest is to right-click on the “Start” button, and then select the “Control Panel” option from the list that appears.
In the form that opens, give preference to the “Region, language and clock” subsection. Select this option among other categories in the panel.
When entering the presented menu section, select the “Regional Standards” category.
Here you can configure time and date formats, numeric separators (fractional and integer parts, groups of digits), the number of fractional signs, the format of negative numbers, and the unit system (American or metric). Also in this menu item you can configure the layout for displaying monetary units, their designation, the separator for the fractional and integer parts of a monetary amount, as well as the separator for groups of digits. Moreover, this is where you can configure the regional locale for displaying characters in the operating system. To do this, let's go to the "Advanced" tab.
In the section of the current language of programs that do not support Unicode, click the “Change system language” control.
In the list that appears, select the “Russian (Russia)” option.
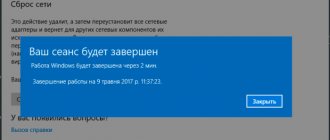
After the language selection is made, a warning appears indicating that the computer needs to be restarted.
Let's listen to this advice and reboot the computer, after which the krakozyabrs should be changed to correct Russian-language characters, which we can verify by launching one of the distribution programs in Russian.
This article, of course, does not solve all the problems with correcting the language to be readable. If the above method does not help, you will need to make some changes to the registry.