The range of printers, copiers and multifunction devices today is very large. And among them, a huge number support connecting to a computer wirelessly - via a WiFi router. Such models are available from all manufacturers. Unlike conventional printers, which can also be connected via a cable via a router’s USB port for use by several devices on a local network at once, wireless printers are not tied to the router’s location, which is much more convenient. In this article we will talk specifically about how to connect an HP (Hewlett Packard) printer to WiFi and configure it to work with a computer or laptop on Windows 10.
Installing drivers and HP Smart Install
The first step in setting up any hardware is installing drivers for Windows. In order to install them on a laptop or computer, just connect it to the printer via a USB cable and turn it on - the program will start automatically.
But if for some reason this does not happen, then you can download it from the official website. To do this, open the driver section in the browser.
Enter your model number in the search bar
And download the HP Smart Install software for Windows 10 (or MacOS for MacBook).
HP Smart Install is a driver package and a special program for connecting an HP printer to a laptop or computer via cable or WiFi.
After installing and launching this application, you will be taken to a step-by-step setup wizard. Here you will need to select the settings for the new printer and register with HP service. Then be sure to select “Wireless” to connect it via WiFi.
Next, we will be asked to specify the login and password for the router in order to connect to the local network
Once the installation is complete, the HP printer will be available for printing from those laptops or computers that are connected to the same router.
Also for some models there is another application available, which was intended specifically for my HP printer model and was also downloaded from the official website. It looks a little different and is combined with the installation of drivers on the computer.
- In the first step, you need to choose whether this is the first connection of the printer to a wifi network, or whether you need to restore the previously existing connection with the router
- Next, select the type of connection between the computer and the printer for further configuration. To be honest, I couldn’t do this over WiFi. Therefore, we take a USB cable and connect the printer to a laptop or PC. Subsequently, after establishing a connection with the router, we will disconnect it
- The next window will open a list of wireless networks in the detection area. Select WiFi from your router. Please note that the HP printer (like any other) does not see 5 GHz, only 2.4. Therefore, your router must be configured with a signal in this frequency range.
- Enter the password to connect
- You can now remove the USB cable from the printer
- All that remains is to install the printer drivers on the Windows laptop
- And print a test page on your computer
Now from any laptop, PC or smartphone that is connected to the router’s wifi network, you can print documents to this printer.
How to set up a printer for a wireless network in Windows
This section requires a network name and password. If this information is lost, you can find it on the router or in its documentation. If your search attempts are unsuccessful, you should ask for help from your Internet service provider, who should have provided the password when you subscribed to the Internet service. There is another way:
- You need to go to the “Network and Sharing Center”
- Go to "Change adapter settings"
- Right-click on the network name and go to the menu, then click on “Status”,
- Go to “Wireless Network Properties”
- Open "Security"
- Select the “Display entered characters” checkbox.
If everything is in order, then you need to do the following:
- Find out the network name and password,
- The USB cable must be connected,
- Go to “Download software and drivers” using the link and enter the device name in the field,
- Download the software and follow the instructions for successful installation and setup of the printer,
- Restart your computer to complete the download.
Connecting an HP printer to a WiFi network via WPS
It's even easier to connect your HP printer to your router's WiFi network using the WPS automatic information exchange feature, if supported by your model.
Very often, in such printers, after installing the drivers on the computer, a pop-up window appears asking you to enter a password. We won't need it, so we can close it.
What is your opinion: is WiFi harmful?
Yes
22.91%
No
77.09%
Voted: 36453
HP printer without control screen
On HP printers without a menu display, you must press and hold the WiFi button until the wireless signal appears on the information panel
Immediately after this, press the same button on the router case until the wireless connection light blinks.
HP Printer with Menu Display
If we are dealing with HP printers equipped with a touch screen with a menu, then select the item in it that is marked with an antenna icon
The screen will display information about the current state of the printer’s network, but we need to go to the settings - to do this, click on the “gear”
Select “Wi-Fi Protected Setup”, that is, the same WPS
Next “Push Button”
And finally, "Start"
Then press the “WPS” button on the WiFi router and wait for the connection to the printer. Once the connection between the devices is complete, a confirmation message will appear on the screen. Click “OK” to complete the process
WPS
This method is the easiest. To configure, the printer and router must support WPS (). You can see if your equipment works with this function in the instructions. If WPS is supported by both devices, then you need to enable this function in one of the following ways:
- programmatically (via the printer menu and via the router web interface);
- hardware (by pressing a special button on the printer and then on the router).
See the instructions for how to press. Sometimes you just need to press, but sometimes you need to press and not let go for 2-3 seconds. For a more complete understanding of connecting a printing device via Wi-Fi to a router, watch the video below.
We connect a computer or laptop to the printer via Wi-Fi Direct
Finally, there is another possibility of connecting the printer to a computer or laptop via WiFi - directly without the participation of a router. To do this, we will use a feature built into Windows 10 called “Wi-Fi Direct”.
- Turn on the printer with the button and then on your laptop or computer, type in the search bar “Printers and scanners” and go to this section
- Select here from the menu “Add a printer or scanner”
- After searching for wireless devices available for connection, click on the “Show all” link to display a list of detected ones
- We look for the HP printer among them that we want to connect to the laptop and click on its name with the mouse
- And then click on “Add”
- After which a window will open for entering a PIN code for a WPS connection to the printer. On HP models with a screen, it should appear on the display
- If your HP printer does not have a visual menu, then the PIN can be printed on paper. How to do this is already described in detail in the instructions at the link above. After entering it on Windows 10, an animation of recognizing and adding a device via Wi-Fi will appear
When complete, the HP printer will appear in the list and be available for printing
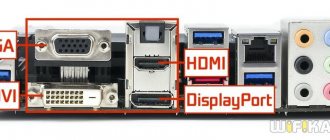
What is required to connect?
The answer to this question is in the topic of the article - you will need a router that allows you to create wireless access points, but equipped with a USB port for physically connecting the printer, or a regular Wi-Fi router, but with a Wi-Fi adapter directly in the printer.
Network printing
Previously, all offices had to connect via the network, where several employees worked and there was only one printer. Even today you won’t surprise anyone with something like this. The scheme is simple - the printer is connected to one computer, and the rest are configured on the same network along with additional devices. The work stopped periodically due to settings failures.
Device connection diagram
Now it’s more convenient to connect a Wi-Fi router. This is a special device that provides wireless use of the Internet, and also makes it possible to print documents remotely.
For your information! The presented method is considered trouble-free.
Advantages
The advantage of a wireless connection is that you can always use your printer. If network operation is restored, the devices are connected to a specific computer. To enable them, you need to start your PC. If the office employee working on the main PC is absent at this time, it will be difficult to get to the printer.
Using a router makes the task much easier. If you need to print a document, you only need to turn on the printer itself. Wireless settings are pre-set.
Print server
The disadvantage of this question is that it is necessary to connect a print server. Without it, it is impossible to print sheets. If the device has a USB port, it can be connected to a computer and used as standard over a network. If you want to use a wireless network, you should familiarize yourself with the technical characteristics of the selected printer model.
The print server is installed internally. Most models work in two directions - over the network and via Wi-Fi. Server-equipped models have a distinctive LAN port.
Note! If your printer does not have a server, you can purchase one separately. The server connects to the printer via a LAN port from the server and a patch cord from the printer.
Separate print server
Reset
If all of the above turned out to be useless, and the printing machine still does not connect, then you should proceed to resetting the settings. It will return the factory settings, i.e. those settings that were default from the very beginning of use. To do this, you need:
- Turn off the printer
- Then you need to hold 2 buttons: “Cancel” and the power button,
- After about 15 seconds, the LEDs should blink, which means you need to let go;
Note! You can check the operation of this procedure using the configuration sheet.
What to do if you can't connect
Any printer can be connected to the router. Even if it is not a wireless connection, the system is always available for use. In questions about why the device does not print, the following factors are distinguished:
- The address, password and other data were entered incorrectly. It is necessary to double-check the sequence of manual connection actions;
- The wireless system is not working, so the wires are connected, but there is no connection. It is necessary to check the integrity of the ports and the wires themselves;
- Devices were not synchronized. The indicators should light continuously.
Important! If all actions have been checked and there are no errors, it is better to contact a specialist. It is recommended to contact technical support for your router or printer model.
Printing via a router via Wi-Fi is interesting, simple and convenient. In addition, there are certain advantages of the process when working in an office. But the presented task requires certain settings. They should be done independently or contact a specialist.
Checking the connection
Before proceeding directly to setting up printing from a computer, you need to check whether the router sees the device itself. Essentially, at this stage, regardless of how the printer is physically connected to the router, via USB, Wi-Fi or LAN, the switch should show its presence on the network. To check, you need to go through the procedure of logging into the router settings, which classically occurs through a regular browser. Let's look at this process step by step:
- The browser opens.
- Enter the information listed in the router documentation or on the router label. Naturally, this is relevant if the settings have not been significantly changed by the user from those set at the factory. In the specified places you can find the device's network address, username and default password. For example, most routers use the path https://192.168.0.1. The standard password and username are “admin” and “admin”, typed without quotes and in small letters according to the request that opens after entering the address into the browser. For example, entering the settings of a TP-Link router will be done as follows, as shown in the figure below.
- After logging in, you will be interested in the “Network Map” item in the router menu. The user enters it either immediately after logging in, or a link there will be located on the first screen. On the page that opens, the connected printer will be displayed among other devices. However, there is one caveat here - when connected via USB, it may be listed as “Unknown device”. Don't let this fact confuse you. Connection to clients will still be made through the control programs of the printer itself, but here you only need to determine the fact of its presence on the network. The figure below shows the “Network Map” of an ASUS router with a Samsung ML-1250 printer connected via USB.
- For those cases when it is not displayed in the “network map”, it is worth focusing on the issued device address and the presence of a tight physical connection to the router in the case of using a USB cable.
- Another option is when the printer itself is connected via LAN (RJ-45) or Wi-Fi, but is not visible by the router, then you should look for it simply through the “Network Neighborhood” of the computer. It can show up there even without being defined in the “network map” list.
HP Laserjet printer P1102W does not allow t...
I had a lot of difficulty getting the P1102W to work wirelessly on a macbook pro with Mountain Lion, however I finally got it working after countless hours of troubleshooting. I was able to successfully connect the printer to my wireless network WITHOUT having to do a special wireless connection first, as HP suggests in their support forums.
Here are the steps as exactly as I can remember:
1) Turn off the printer
2) Long press the wireless and cancel button and then turn on the device
3) Hold the buttons until all the lights start flashing in unison, then release the buttons.
4) Connect the printer using a USB cable and turn on the power.
5) Check the app store for Apple software updates. It will find and install updates for HP printers
6) Download and install the full software from HP, including the firmware update. here: https://h20025.www1.hp.com/ewfrf/wc/softwareDownloadIndex?softwareitem=bi-80684-8 & cc = us & dlc = en & lc = en & os = 219 & product = 4110396 & sw_lang =
7) Open system settings in Mounatin Lion, select Print and Scan.
Make sure the P1102W printer is selected and open the print queue
9) Click Options, then click Utility, then Open Printer Utility
10) Select the configuration page. This will bring up Safari and display the printer settings where you can change the configuration.
From that point on, whenever I made changes to the netowrking configuration using Safari and clicked Apply, the changes would not save, no matter how many times I tried. So, I thought it might be an incompatibility with Safari, and sure enough it was. I loaded up the Google Chrome browser, pasted http://localhost:5050/SSI/Auth/ip_direct_print.htm into the address bar and clicked "Return" on the keyboard. The changes I made using Chrome were successfully applied and I connected to my home wireless network.
In particular:
11) Paste http://localhost:5050/SSI/Auth/ip_direct_print.htm into Chrome and press Return on your keyboard. This will load the printer configuration page.
12) You may already be in the “Set up Wireless Direct Connection” section. If not, select Network, then Set Up Wireless Direct.
13) Select your network name, use the button
14) For authentication, select what your network uses (possibly WPA2) and enter the password. Apply.
You will see the blue light on the top of the printer come on, blink, and then go off.
15) Disconnect the USB cable
You can now print wirelessly from your Mac, iPad or iPhone running IOS5 or 6.
I hope this helps make up for the lack of HP support with Mountain Lion.
.
Solved: Setting up p1102w wireless network with mac OS X 10.10 - HP Support Community
Hello @Jambol_Albion,
Welcome to the HP Support Forums!
I see that you are having trouble connecting your Laserjet P1102w printer to your wireless network using a Mac OSX 10.10 device. I can help you with this.
First, I'll note that it's easier to connect your printer to your network using a Windows PC. If you can't rent or use a Windows PC, follow these steps to connect your printer. If you can borrow a PC, let me know what version of Windows and I can provide a link to drivers that will do the steps below automatically.
Preparing the Printer
- Turn off the printer.
- With the printer turned off, press and hold both buttons on the top of the printer.
- While holding down the buttons on the top of the printer, turn it on.
- Keep the buttons pressed for another ten seconds.
Setting up the printer over a wireless network
- Make sure the printer is connected to your Mac using a USB cable.
- Click the Apple icon, System Preferences, and Printers and Scanners.
- Click the printer icon on the left.
- Click Open Print Queue, Printer Setup, Printer Utility, open Printer Utility and HTML Config.
- (If the above step causes an error, please change your default browser to Safari. Please let me know if you need help).
- In this new window, click the Network tab and then Wireless on the left.
- Under Communication Mode, select Infrastructure.
- Select your network from the list and then click the arrow button.
- Under Security Mode, select WPA/WPA 2. If you have an older router, you may have to select WEP.
- Enter your wireless network password in the field below.
- Click Apply.
Now wait a couple of minutes. Your printer should glow blue. If it doesn't, either the password was entered incorrectly, or there is a setting on the router that indicates the printer is fixing the problem. Please let me know if this is the case.
When you have a constant blue light:
- Disconnect the USB cable.
- Return to the Printers and Scanners window.
- While holding down the control key, click the printer icon on the left.
- Click Reset Printing System.
- Click the plus button in the lower left corner.
- In this window, select your printer from the list.
- Click the box next to Use and select your printer from the list.
- Click Add.
Please let me know if you can print the results after doing the above. If you can print, click "Make a Decision." If you appreciate my help, please click on the thumbs up icon. Both icons are below this post.
~ DocCottle I work on behalf of HP.
Click "Accept as Solution"
below the post that solves your problem to help others find a solution.
Up icon
below to say
“Thank you”
for your help!
.
If all else fails
Without seeing what is happening, we can only give general recommendations.
If you are one hundred percent sure that the equipment is working and the connection has been made, but Windows does not want to connect to the printer, then you need to check the device address. It may be on a different default network segment.
Again, look at the security settings of the router, and the operating system itself. You should check whether network port 515 is blocked for the printer, which may well be done by their built-in firewall. In extreme cases, it is recommended to reset both the printer and router settings to factory settings.
Firmware update
If even resetting the settings did not help, then you need to update the firmware. The website at https://www.support.hp.com/ru-ru/drivers/selfservice/hp-laserjet-pro-p1102-printer-series/4110394/model/4110306 will help with this.
As it turned out, setting up Wi-Fi for the HP printer model 1102w is quite simple. To do this, you just need to be careful and remember that even with the correct settings, the printing device may not work due to obstacles that interfere with the signal. These steps are slightly different when working with other series of printers, but the principle is the same.
Podgornov Ilya Vladimirovich All articles on our site are audited by a technical consultant. If you have any questions, you can always ask them on his page.