In this material, we will introduce our readers to fonts in the Windows 7 operating system. The Windows 7 operating system, after installation, has dozens of different fonts in its set. These fonts are used by installed operating system programs. For example, these fonts can be used in the built-in text editor WordPad, as well as in popular programs such as LibreOffice and Adobe Photoshop. After reading this material, you will learn how to install new fonts yourself, and will also be able to change the font in the Windows 7 windows themselves. In addition to the fonts in the seven, we will briefly describe them in Windows 10, and also remember the old XP.
Installing new fonts
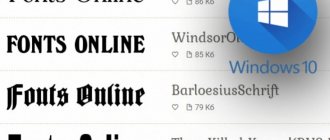
Let's consider installation on Windows 7. First of all, we need to find new fonts. The website www.1001fonts.com will help us out with this, where you can find dozens of free fonts. For our purpose, we will download a new symbol set called Metal Macabre .
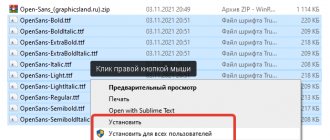
Now let's unpack the archive with Metal Macabre and open the file MetalMacabre.ttf. After this action, the file will open in a special utility for viewing alphanumeric characters.
In this utility you need to click the Install button. This action installs Metal Macabre on the system. You can view the installed Metal Macabre in the shared folder where all the fonts installed in the system are located. You can open this folder in the Control Panel, as well as using the Run and the fonts command
In this folder, in addition to viewing all installed character sets, you can also delete them. Essentially, in this folder we are deleting a regular file with the extension “.ttf”.
Now let's look at installing on Windows 10. For this example, let's take a new font from www.1001fonts.com called The Godfather .
After downloading and unpacking The Godfather archive, open the file TheGodfather-v2.ttf. After this action, an almost identical utility for installing The Godfather will open.
All further steps to install the new The Godfather character set are similar to installing Metal Macabre in Windows 7, so you can safely click the Install button. The only difference between the Windows 10 utility and Windows 7 is the new “ Use shortcut ” option. By checking this box when installing, for example, TheGodfather-v2.ttf in the folder with fonts, this file will not be copied, but a link to this file will be installed. That is, the file TheGodfather-v2.ttf, for example, located on the desktop will be The Godfather font in Windows 10. After deleting this file, The Godfather will disappear from Windows 10. It is also worth noting that you can delete fonts through the “Fonts ” panel .
Now let's look at the installation in the already quite old Windows XP OS. To do this, download the new Grinched symbol set.
Just like in the previous examples, let's launch a file called Grinched.ttf. After opening the file, a window with a program already familiar to us will appear.
In Windows XP, this utility has an old interface, but its operating principle is the same. Also, the Windows XP utility does not have an “Install” button. To install a new character set in Windows XP, you need to go to the Control Panel and open the Fonts . In the add-on that opens, you need to use the file menu to find the “ Install font ” item and open it. In the window that appears, you need to select our previously downloaded Grinched.ttf file.
You can also delete Grinched.ttf through this panel.
Advanced System Font Changer
Another program that allows you to change Windows 10 fonts is Advanced System Font Changer. The actions in it will be very similar:
- Click on the font name opposite one of the items.
- Select the font you need.
- Repeat as necessary for other elements.
- If necessary, on the Advanced tab, change the size of the elements: the width and height of icon labels, the height of the menu and window title, and the size of the scroll buttons.
- Click the Apply button to log out and apply the changes when you log back in.
You can change fonts for the following elements:
- Title bar — window title.
- Menu - menu items in programs.
- Message box - font in message boxes.
- Palette title - font for panel titles in windows.
- Tooltip—font of the status bar at the bottom of program windows.
In the future, if there is a need to reset the changes made, use the Default button in the program window.
You can download Advanced System Font Changer for free from the official website of the developer: https://www.wintools.info/index.php/advanced-system-font-changer
Changing system fonts in Windows 7 windows
In the seven, the default font for all Explorer windows and built-in utilities is Segoe UI . In Windows 7 itself, you can change the font and its color in the following eight elements:
- Tooltip;
- Selected menu item;
- Title of the active window;
- Inactive window title;
- Icon;
- Panel name;
- Message window;
- Menu bar.
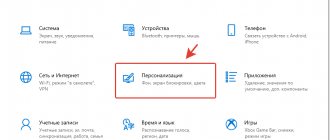
The change process itself is carried out in the “ Window Color ” window. You can access this window through the desktop context menu. To do this, right-click on the active desktop and go to the “ Personalization ” item, as shown in the image below.
As intended, this action will take us from the desktop to the personalization panel.
In this panel we are interested in the “ Window Color ” link, which opens the window we need with the same name. This window is shown below.
Segoe UI character set with Times New Roman in the Active Window Title . We also set Times New Roman to size 12 and made its color red. To check our changes, let's open a standard calculator.
The image above now shows the red " Calculator " heading, which uses Times New Roman. In the same way, you can make changes to all other elements from the list described above.
If you try to make such changes in the new Windows 10, you will not succeed. In Windows 10, instead of the Window Color , the user is taken to a panel where only the color of windows can be changed.
Change through additional design options
To change the font on your computer in Windows 7, you need to open the window appearance settings. In Windows 7 Starter and Home Basic editions, open the Control Panel, select large (small) icons in the view. Find the “screen” element and open it. From the left menu, select “change color scheme.”
In all editions of Windows 7 above, right-click on the desktop (where there are no icons), then click “personalization” in the menu. At the bottom of the window there are 4 elements, click the "window color" option, which is located next to the desktop background settings.
In the taskbar and window color settings window, click “advanced appearance options.” As a result, a window will pop up where you can change the Windows 7 font. In the “element” area, in the drop-down list, select what you want to change. Then, in the “font” field, specify the style (from the drop-down list). Reduce or increase the font size to suit your taste, set the color, as well as the style (bold, italic). Not all elements will be able to change the font.
Monitor the new style for a number of changed elements in test windows (see screenshot below). After selecting your style, click OK.
Fixing font related issues
The most common problem that users encounter on a Windows 7 computer is incorrect character encoding . For example, when the encoding is incorrect, strange hieroglyphs may appear instead of normal Russian-language menu items. Below is a Download Master with this problem.
Most often, this problem in Windows 7 occurs due to the installation of programs that change registry settings. This problem also occurs when installing the English version of Windows 7. The solution to this problem is quite simple. To do this, you need to go to the Control Panel and find the Regional and Language Options . After opening the add-on, you need to go to the “ Advanced ” tab.
In this tab, in the “ Language of programs that do not support Unicode ” block, you can see that the language is English. To solve our problem, just select the Russian language and restart the computer.
In Windows 10, this problem is solved in a similar way.
Another problem is the error message : “The Windows Font Cache Service service could not be started.”
This means that the FontCache has stopped or cannot start due to errors in the registry. This error usually appears when opening a program that uses system fonts, but most often in the Microsoft Office suite. To cure this problem, you need to restore the service startup settings to their original state. You can launch the services panel, where you can find the FontCache using the services.msc command in the Run . Below are windows with settings for the FontCache service.
By restoring the FontCache service settings, the error should disappear. If the problem does not disappear when you restore the service settings, then you need to use the example described below. For this example, you will need a registry file that restores the functionality of the FontCache service. You can download the registry file from the link FontCache.reg. After downloading the file, open it to update the registry settings.
Changing the font size in Windows 7
To change the size in all windows of the seven, you need to go to the control panel using the links “ Design and personalization ” - “ Screen ”. After following the links, the following window will open.
In this window you can see that we can increase the font size from 100 percent to 125. If a 25 percent increase is not enough for you, you can increase the size even more by clicking on the “ Change font size ” link located on the left side of the window. After the transition, the window shown below should appear.
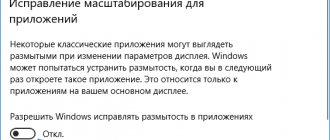
In this window, the user is given the opportunity to increase the font size from 100 percent to 200. This method of entrainment is especially convenient when the monitor is far away or the user has poor vision. The only downside to this increase in size is that some third party programs will not scale.
Easy way for current programs
This method is suitable when you need to adjust the font in a certain program. It is used for most applications: text documents, Excel spreadsheets, browser pages, email, images.
An easy way to change the font size:
- Open the desired program or page.
- Hold down the Ctrl key and press the key with the “+” icon. Each click increases the zoom by 10-15%.
- To reduce the size of letters, also hold down Ctrl and press the key with the “-” icon.
- A simple combination of the Ctrl and 0 keys will help you reset your settings.
An alternative option is to hold Ctrl and roll the mouse wheel. The scale changes depending on the direction. If you turn the wheel towards you, the font will decrease, and if you turn it towards you, it will increase.
It's actually the scale that changes, not the font itself. In many programs (browsers, Microsoft Word documents), changes made are saved even after closing the program. If the program does not respond to the hotkey combination, you will have to go to the settings and set the desired scale.