07/15/2016 windows
This instruction details what to do if you see blurry fonts in Windows 10 or individual programs and applications, which can happen both after changing the scaling in the screen settings, and without these actions.
We'll first talk about ways to fix screen resolution issues that are obvious to most users but may be overlooked by novice users, followed by other ways to fix blurry text in Windows 10.
Note: if the fonts have become blurry after recently changing the scaling parameters (125%, 150%) in the display settings (item “Change the size of text, applications, and other elements”), try simply restarting your computer first (even if this has already happened more than once before it was turned off and on, since turning off in 10 is not the same as rebooting).
Automatically remove blurred fonts in Windows 10 1803
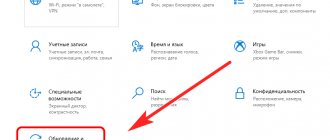
The Windows 10 1803 April Update introduced an additional option to fix blurry fonts for apps that don't support scaling (or do it incorrectly). You can find the option by going to Settings - System - Display - Advanced scaling options, "Allow Windows to correct blur in applications."
If it turns out that the setting is enabled and the problem persists, try, on the contrary, disabling it.
Checking screen resolution
This item is for those users who do not fully understand what the physical resolution of a monitor screen is and why the resolution set in the system should correspond to the physical one.
So, modern monitors have such a parameter as physical resolution, which is the number of horizontal and vertical pixels on the screen matrix, for example, 1920x1080. Moreover, if you have any resolution set on your system that is not much different from the physical one, you will see distortion and blurriness of the fonts.
Therefore: if you are not sure, make sure that the screen resolution set in Windows 10 matches the actual screen resolution (this may in some cases cause the font to appear too small, but this can be corrected by scaling options).
- To find out the physical resolution of your screen, you can simply search the technical specifications on the Internet by entering the make and model of your monitor.
- To set the screen resolution in Windows 10, right-click on any empty space on the desktop and select “Display Settings”, then click on “Advanced Display Settings” (bottom right) and set the desired resolution. If the required resolution is not in the list, then you probably need to install the official drivers for your video card; for an example, see Installing NVIDIA drivers in Windows 10 (the same will be true for AMD and Intel).
Read more on the topic: How to change screen resolution in Windows 10.
Note: if you use several monitors (or a monitor + TV) and the image is duplicated on them, then Windows, when duplicating, uses the same resolution on both screens, and for some of them it may not be “native”. There is only one solution here - change the operation mode of two monitors to “Expand screens” (by pressing the Win + P keys) and set the correct resolution for each monitor.
⇡#Performance, synthetic tests
3DMark 2011 (DirectX 11)
- The results of all four experimental configurations were unexpectedly good.
- A pair of Radeon HD 7850 managed to outperform the Radeon HD 7970 GHz Edition.
- And even the HD 7790 tandem performed faster than the HD 7950, almost at the same level as the HD 7970.
- Both pairs of NVIDIA video cards turned out to be more productive than their rivals from AMD.
- Two GTX 650 Ti BOOST are enough to beat the result of the GTX 680, and the GTX 660 tandem even managed the GTX 770 and is approaching the GTX 780!
3DMark (DirectX 11)
- In terms of Graphics Score, the pair of Radeon HD 7790 is not far behind the only Radeon HD 7970 GHz Edition, leaving behind the basic version of this card.
- The HD 7850 tandem repeated this result with a much larger lead over the HD 7970 GHz Edition.
- A system based on two 650 Ti BOOST demonstrated a slight advantage over a pair of HD 7790 despite twice the frame buffer size. But the GeForce GTX 680 confidently wins.
- The difference in results between a pair of GTX 660 and HD 7850 is also minimal, although in favor of the GTX 660. Once again, this configuration puts the single GTX 770 to shame, coming close to the GTX 780.
Unigine Heaven 2 (DirectX 11)
- The Unigine Heaven test added new achievements to the asset of “two-headed” systems. Two HD 7790 are no less fast than one HD 7970 GHz Edition.
- And a pair of HD 7850 is even faster, and much faster, on par with the GeForce GTX 770 (which beats AMD's flagship card here).
- NVIDIA video cards turned out to be even more effective than competitors from AMD. Two GTX 650 Ti BOOST outperformed the HD 7850-based system, as well as a single GeForce GTX 770.
- The GTX 660 tandem took a position between the GTX 770 and GTX 780.
Removing text blur when zooming
If the problem with blurry fonts occurred after changing the sizes of elements in “Right click on the desktop” - “Display settings” - “Change the size of text, applications and other elements” by 125% or more, and restarting the computer or laptop did not fix the problem, try next option.
- Press the Win+R keys and enter dpiscaling (or go to the control panel - screen).
- Click on "Set custom zoom level".
- Make sure it is set to 100%. If not, change it to 100, apply, and restart the computer.
And the second option of the same method:
- Right-click on the desktop - display options.
- Return the scaling to 100%.
- Go to Control Panel - Display, click "Set custom scaling level", and set the required Windows 10 scaling.
After applying the settings, you will be asked to log out, and after logging in you should see the changed sizes of fonts and elements, but without blurring (using this option applies a different scaling than in Windows 10 display options).
Additional Information
There is also a Windows 10 DPI Blurry Fix program available online to solve the problem of blurry fonts. The program, as far as I understand, uses the second method from this article, when instead of Windows 10 scaling, the “old” scaling is used.
To use it, just install “Use Windows 8.1 DPI scaling” in the program and configure the desired scaling level.
You can download the program from the developer’s website windows10_dpi_blurry_fix.xpexplorer.com - just don’t forget to check it on VirusTotal.com (at the moment it’s clean, but there are negative reviews, so be careful). Also keep in mind that the program must be launched every time you reboot (it will add itself to startup.
And finally, if all else fails, double-check whether you have the original latest drivers for your video card installed, not by clicking “update” in the device manager, but by manually downloading from the corresponding official sites (or using NVIDIA and AMD utilities) .
July 16, 2019
Windows 10 operating system displays screen blur when logging in or on the lock screen. The user clearly sees the login (account name), fields for entering a password or PIN code, and the rest of the background on the computer screen is blurred.
- Solving the blurry image problem in Windows 10
Starting with Windows 10 version 1903, Microsoft introduced a feature with acrylic background blur effects to focus users' attention on Microsoft account input fields. It is expected that this will make it more convenient for users to enter a password without being distracted by the background image displayed on the computer screen.
Setting up an account (Microsoft account or local account) that does not require a password to sign in also causes the background image to blur on the PC screen.
Not everyone likes this; the blurred background on the screen can be annoying. Therefore, some users have questions about how to remove screen blur so that the background image appears clearly when logging into Windows 10.
There are several ways to remove background blur from your lock screen. In the article you will find several instructions in which I will show you how to remove screen blur in Windows 10 in system settings, using the Local Group Policy Editor and the Registry Editor.
How to fix blurry fonts in programs
Not all Windows programs support correct scaling and, as a result, you may see blurry fonts in some applications, while the rest of the system does not experience such problems.
In this case, you can fix the problem as follows:
- Right-click on the program's shortcut or executable file and select "Properties".
- On the Compatibility tab, install o and apply the settings. In newer versions of Windows 10, click Change High DPI Settings, then o and select Application.
The next time you run the program, the problem with blurry fonts should not appear (however, they may appear small on high-resolution screens).
Respect for the post! Thanks for the work!
Want more posts? Find out technology news? Read reviews of gadgets? For all this, as well as for promoting the site, purchasing a new design and paying for hosting, I need help from you, loyal and grateful readers. Read more about donations on the special page.
At the moment, it is possible to become a patron to support the blog with a monthly donation, or use Yandex.Money, WebMoney, QIWI and PayPal:
Thank you! All funds raised will be used for the development of the site. Project support is a gift to the site owner.
Setting up ClearType on Windows 10 and earlier versions of Microsoft's OS allows you to improve the display of fonts on displays made to modern standards. On older monitors, it is not recommended to enable this option, as it only makes the image worse.
In this article, we’ll look at what ClearType is, who it’s suitable for, and how to enable it using Windows 10 as an example.
ClearType
In some cases (for example, due to incorrect operation of video card drivers), the problem with blurry text may be caused by incorrect operation of the ClearType font smoothing function, which is enabled by default in Windows 10 for LCD screens.
Try disabling or configuring this feature and check if the problem is resolved. To do this, type ClearType into the taskbar search and run “Adjust ClearType Text.”
After that, try both the option to configure the function and the option to disable it. Read more: Setting up ClearType in Windows 10.
Working with a master
The Font Smoothing Wizard is needed when the user finds it difficult to read text on the monitor—it appears blurry, has unusual shapes, or irritates the eyes. The reasons may vary. Sometimes this problem is due to an incorrectly set resolution or other features of the monitor.
How to turn it on and off
You can launch the “text smoother” in Windows 10 in the following ways:
1. The easiest and fastest way is to click on the magnifying glass, type clear in the search bar (the beginning of the word will be enough) and launch the corresponding application from the displayed results.
2. Or go through the “Control Panel” to “Fonts” and select the appropriate item in the list of options located on the left side of the window.
3. Turning on and off is done by checking or unchecking the corresponding item.
Settings
To configure font smoothing for yourself, in the same window where you check the “Enable” checkbox, click on the “Next” button, and then:
1. The next step, the system will prompt you to choose to carry out actions on all monitors at once or separately (it is better to configure them separately). If there is only one monitor, then this step will not occur.
2. First of all, the wizard will check that the basic resolution is set correctly, if everything is correct, then click “Next” (the same button must be clicked after completing the steps in the following paragraphs).
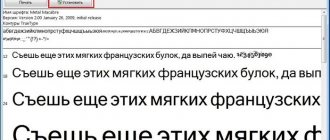
3. In the next five windows, the user will need to select the text writing option that is most pleasing to the eye (from two, from three or from five proposed options).
4. In the last window, the adjuster will inform you that the operation is completed. To close it, you will need to click on the “Done” button. If you click on the “Cancel” button in this window, the user’s settings will not be saved, and the text display will remain the same.
Finally, the user needs to turn ClearType off and then turn it back on, while comparing their own perception of the text. If, after turning on the wizard, the fonts are perceived more comfortably by the eyes, it means that the setting was carried out correctly.