In the text editor “MS OFFICE WORD” the spacing between paragraphs of the main text is increased “by default”. And the size of this distance is even greater for headings. In addition to this, the distance between the lines is also expanded. Moreover, the “Menu” and “Ribbon” lines occupy 116 points of the window’s height. Because of all this, when we open a document on a laptop with a screen resolution of 768x1376 (not to mention a tablet), we see in the window only the title, subtitle, and 3-4 lines of main text. This is not enough for comfortable work, especially when editing a large document. There is only one conclusion: it is necessary to reduce the line spacing and completely remove additional spaces between paragraphs. To separate the latter from each other, it is enough to indent the “Red” line.
Removing intervals
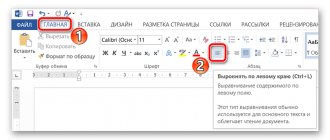
To remove a blank space after a paragraph, follow these steps: Select the desired piece of text by double-clicking or the entire text using the key combination “Ctrl+A”. Open the “Home” tab and find the “Spacing” button in the “Paragraph” area. Click on it and select the appropriate option “Remove space after paragraph”.
If you need to remove the empty space before a paragraph, you need to select “Remove space before paragraph”. Accordingly, initially highlighting the desired part of the text.
Space before and after a paragraph
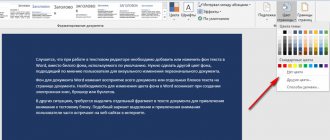
When the user needs to remove spaces, the easiest way is to resort to the built-in express styles. You can get rid of unnecessary spaces both in the entire document and in part of it (a text fragment). To do this, you need to select a section for formatting and change the parameters related to line spacing in the properties.
If the user has Word 2003 installed on his computer, then removing spaces between paragraphs is quite simple. The program does not automatically add an additional line in the middle of typed blocks of text. Almost all Word 2007 styles set double indentation from one section to another, while independently increasing the spacing that is located directly above the heading.
After the question regarding the choice of the optimal style has been resolved, you need to click once on its name.
Changing the distance between paragraphs
When the distance between paragraphs is large, you can easily reduce it, and vice versa, increase it. The “Paragraph” window will help you make the necessary settings. Select the text and open the “Paragraph” window by clicking on the arrow button in the “Paragraph” area in the main tab.
In the new window, in the “Interval” subsection, enter the required values in the “Before” and “After” fields. A small value in the “After” column will help reduce the indentation size if an indentation is necessary after the paragraph.
In the “Sample” subsection you can see the changes being made. By changing the values in the “Before” and “After” items, you can either increase or decrease the distance between paragraphs.
Note. You can open the “Paragraph” dialog box by right-clicking and selecting “Paragraph” from the list. Initially, select the required fragment in the text accordingly.
Distribution of text on the page
Text alignment is one of the main aspects of design. The manuals require information to be formatted according to the width of the sheet.
- Open a new document and select the Home tab. Here in the work panel, check the “Align to Sheet Width” tool.
- It is best to carry out formatting after writing the text, so it will be clearly visible where and what has changed.
Important!
If you want to return the previously set formatting settings for a Word document, in the Paragraph block settings dialog box, click the “Default” button.
Such settings can be made in any version of Microsoft Word starting from 2003, the only difference is a slight difference in the instructions.
Setting paragraph spacing
Thanks to more advanced settings, you can set breaks between paragraphs of different types and set specific values for indents. To do this, you need to repeat the following steps:
- Select the desired part of the text;
- Open the “Home” tab, click on the “Change Styles” button;
- In the drop-down window, hover your mouse over “Paragraph Spacing”;
- Smoothly navigate to the new Inline pop-up window and select the type of indentation you want.
Please note that each paragraph spacing option presented has built-in line spacing values.
For advanced settings, go to the “Custom paragraph spacing” line.
In the “Manage Styles” window, open the “Default” section, set the exact values in the “Spacing” and “Paragraph Position” subsections. Save the changes by clicking the “Ok” button.
Adjusting the indentation interval from the edge of the sheet along the perimeter
Let's start by creating a blank sheet of paper for formatting.
- Open a Word document and go to the “Layout” tab. In the “Paragraph” block on the work panel, you can apply left and right margin settings for indents. We set the required values (in accordance with the design requirements) in the “Left” and “Right” fields.
- Next, go to the “Fields” section, where at the bottom of the window select “Custom Fields”.
- In the window that opens, set the parameters that are specified for each specific indent. As a standard, “Bottom” and “Top” have an indentation of 2 cm.
In this window you can adjust the margin sizes and set the exact spacing for all pages of the document.
Good to know!
If the document has a ruler and a fixed indent from the left edge, it is recommended to leave the default “0 cm” in the “Left” field.
Result
Large spacing between paragraphs (more than between lines)
Normal spacing between paragraphs (same as between lines)
Thank you for your mark. If you want your name to be known to the author, log in to the site as a user and click Thank you again. Your name will appear on this page.
Have an opinion? Leave a comment
You can post an announcement of an article on your website with a link to its full text.
Error in the text? We are very sorry that we allowed her to do this. Please select it and press CTRL + ENTER on your keyboard.
| Excel template “Analyzer of Unified State Exam results in SOCIAL STUDIES + ESSAY - 2022, 2019” with automatic output of an analysis report |
| 2007-2019 “Pedagogical community of Ekaterina Pashkova - PEDSOVET.SU.” 12+ Certificate of registration of mass media: El No. FS77-41726 dated August 20, 2010. Issued by the Federal Service for Supervision of Communications, Information Technologies and Mass Communications. Editorial address: 603111, Nizhny Novgorod, st. Raevskogo 15-45 Founder address: 603111, Nizhny Novgorod, st. Raevsky 15-45 Founder, editor-in-chief: Pashkova Ekaterina Ivanovna Contacts: +7-920-0-777-397, Domain: https://pedsovet.su/ Copying site materials is strictly prohibited, is regularly monitored and prosecuted by law. By sending material to the site, the author, free of charge, without requiring royalties, transfers to the editors the rights to use the materials for commercial or non-commercial purposes, in particular, the right to reproduce, publicly display, translate and rework the work, making it available to the public - acc. with the Civil Code of the Russian Federation. (Article 1270, etc.). See also the Rules for publishing a specific type of material. Editorial opinion may be different from those of the authors. To confirm the authenticity of documents issued by the site, make a request to the editor. webinar service About working with the site We use cookies. By publishing materials on the site (comments, articles, developments, etc.), users take full responsibility for the content of the materials and resolution of any controversial issues with third parties. At the same time, the site’s editors are ready to provide all possible support both in publication and other matters. If you discover that materials are being used illegally on our website, please notify the administrator and the materials will be removed. |
Method 1: Remove Page Break
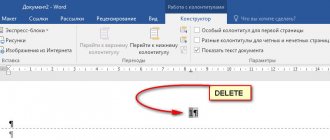
A page break creates empty space on the sheet where the cursor cannot be placed. Therefore, it becomes difficult to remove free space. To remove a page break, do the following:
- Go to the "Home" tab of the document.
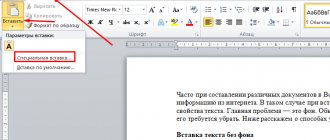
- In the third block on the left, “Paragraph,” activate the “Display all characters” button.
Paragraph marks, spaces, and other symbols will appear on the worksheet, including a dotted line before a blank box with the words “Page Break.” - Place the cursor in front of the “Page Break” sign that appears on the sheet.
- From your keyboard, press the Delete button.
The text from the next sheet will automatically fill in the empty space. If there are empty lines before the previous paragraph and the next, delete them by pressing Delete.
Hotkeys and keyboard shortcuts in Microsoft Word 2007
Home > Tables and reminders > For PC users on the monitor
Hot keys and possible keyboard shortcuts used in Microsoft Word 2007.
Hotkeys and keyboard shortcuts in Microsoft Office (General)
Hotkeys and keyboard shortcuts in Microsoft Excel 2007
Common tasks in Microsoft Office Word
| Action | Keyboard shortcut |
| Create a non-breaking space. | CTRL+SHIFT+SPACEBAR |
| Create a non-breaking hyphen. | CTRL+HYPHEN |
| Adding bold style. | CTRL+B |
| Adding italic style. | CTRL+I |
| Adding an underscore. | CTRL+U |
| Reduces the font size to the previous value. | CTRL+SHIFT+ |
| Increases the font size to the next value. | CTRL+SHIFT+> |
| Decrease font size by 1 point. | CTRL+[ |
| Increase font size by one point. | CTRL+] |
| Remove paragraph or character formatting. | CTRL+SPACEBAR |
| Copy selected text or object to the clipboard. | CTRL+C |
| Deletes selected text or object to the clipboard. | CTRL+X |
| Paste text or an object from the clipboard. | CTRL+V |
| Special insert. | CTRL+ALT+V |
| Paste formatting only. | CTRL+SHIFT+V |
| Undo the last action. | CTRL+Z |
| Repeat last action. | CTRL+Y |
| Opens the Statistics dialog box. | CTRL+SHIFT+G |
Working with documents and web pages
Create, view and save documents
| Action | Keyboard shortcut |
| Creates a new document of the same type as the current or last document. | CTRL+N |
| Opening a document. | CTRL+O |
| Closing the document. | CTRL+W |
| Split the document window. | ALT+CTRL+S |
| Unsplit the document window. | ALT+SHIFT+C |
| Saving the document. | CTRL+S |
Search, replace and transitions
| Action | Keyboard shortcut |
| Search for text, formatting and special characters. | CTRL+F |
| Repeat the search (after closing the Find and Replace window). | ALT+CTRL+Y |
| Replace text, formatting, and special characters. | CTRL+H |
| Jump to a page, bookmark, footnote, table, note, picture, or other document element. | CTRL+G |
| Jump between the last four change locations. | ALT+CTRL+Z |
| Open a list of search options. Use the arrow keys to select an option, then press Enter to begin searching the document. | ALT+CTRL+HOME |
| Go to the location of the previous change. | CTRL+PAGE UP |
| Move to the location of the next change. | CTRL+PAGE DOWN |
Changing viewing mode
| Action | Keyboard shortcut |
| Switch to markup mode view. | ALT+CTRL+P |
| Switches to outline mode view. | ALT+CTRL+O |
| Switch to draft view. | ALT+CTRL+N |
Structure mode
| Action | Keyboard shortcut |
| Move a paragraph to a higher level. | ALT+SHIFT+LEFT ARROW |
| Move a paragraph to a lower level. | ALT+SHIFT+RIGHT ARROW |
| Convert a paragraph to body text. | CTRL+SHIFT+N |
| Move selected paragraphs up. | ALT+SHIFT+UP ARROW |
| Move selected paragraphs down. | ALT+SHIFT+DOWN ARROW |
| Expand the text under the title. | ALT+SHIFT+PLUS SIGN |
| Collapsing text under the title. | ALT+SHIFT+MINUS SIGN |
| Expand or collapse all text or all headings. | ALT+SHIFT+A |
| Hide or show character formatting. | Slash (/) on the numeric keypad |
| Display the first line of body text or all of the body text. | ALT+SHIFT+L |
| Displays all headings in the Heading 1 style. | ALT+SHIFT+1 |
| Displays all headings up to the header, styled "Heading n ". | ALT+SHIFT+ n |
| Insert a tab character. | CTRL+TAB |
Printing and previewing documents
| Action | Keyboard shortcut |
| Printing a document | CTRL+P |
| Open or close the preview window. | ALT+CTRL+I |
| Move around the page with the image zoomed in. | Arrow keys |
| Move to the previous or next page when zooming out. | PAGE UP or PAGE DOWN |
| Moves to the first page when the image is zoomed out. | CTRL+HOME |
| Moves to the last page when the image is zoomed out. | CTRL+END |
Document review
| Action | Keyboard shortcut |
| Insert a note. | ALT+CTRL+M |
| Enable or disable patch recording mode. | CTRL+SHIFT+E |
| Closing the scan area (if it is open). | ALT+SHIFT+C |
Full screen reading mode
| Action | Hotkeys |
| Go to the beginning of the document. | HOME |
| Go to the end of the document. | END |
| Go to page number n . | n , ENTER |
| Exit reading mode. | ESC |
References, footnotes and endnotes
| Action | Keyboard shortcut |
| Marking a table of contents item. | ALT+SHIFT+O |
| Marking a link table element. | ALT+SHIFT+I |
| Marking an index item. | ALT+SHIFT+X |
| Insert a regular footnote. | ALT+CTRL+F |
| Insert an endnote. | ALT+CTRL+D |
Working with web pages
| Action | Keyboard shortcut |
| Inserting a hyperlink. | CTRL+K |
| Go back one page. | ALT+LEFT ARROW |
| Move forward one page. | ALT+RIGHT ARROW |
| Update. | F9 |
Editing and moving text and pictures
Deleting text and pictures
| Action | Keyboard shortcut |
| Deletes one character to the left of the cursor. | BACKSPACE |
| Deletes one word to the left of the cursor. | CTRL+BACKSPACE |
| Deletes one character to the right of the cursor. | DEL |
| Deletes one word to the right of the cursor. | CTRL+DEL |
| Deleting a selection to the Microsoft Office clipboard. | CTRL+X |
| Undo the last action. | CTRL+Z |
| Removal to the piggy bank. | CTRL+F3 |
Copy and move text and pictures
| Action | Keyboard shortcut |
| Microsoft Office Clipboard Panel Output | Press Alt+Z to go to the Home tab, and then press A, H. |
| Copy selected text or selected pictures to the Microsoft Office clipboard. | CTRL+C |
| Delete selected text or graphics from the Microsoft Office clipboard | CTRL+X |
| Paste the latest addition to the Microsoft Office clipboard. | CTRL+V |
| Move text or graphics once. | F2 (and then move the cursor and press ENTER) |
| Copy text or picture once. | SHIFT+F2 (then move the cursor and press ENTER) |
| Opens the Create New Building Block dialog box when text or an object is selected. | ALT+F3 |
| When a building block, such as a SmartArt graphic, is selected, display its associated context menu. | SHIFT+F10 |
| Removal to the piggy bank. | CTRL+F3 |
| Inserting the contents of a piggy bank. | CTRL+SHIFT+F3 |
| Copy a header or footer from a previous section of the document. | ALT+SHIFT+R |
Inserting special characters and elements
| Inserted character | Hotkeys |
| Field | CTRL+F9 |
| Line break | SHIFT+ENTER |
| Page break | CTRL+ENTER |
| Column break | CTRL+SHIFT+ENTER |
| Em dash | ALT+CTRL+minus sign |
| En dash | CTRL+minus sign |
| Soft transfer | CTRL+HYPHEN |
| Non-breaking hyphen | CTRL+SHIFT+HYPHEN |
| Non-breaking space | CTRL+SHIFT+SPACEBAR |
| Copyright sign | ALT+CTRL+C |
| Protected trademark | ALT+CTRL+R |
| Trademark | ALT+CTRL+T |
| Ellipsis | ALT+CTRL+PERT |
| Opening single quote | CTRL+`(single quote), `(single quote) |
| Closing single quote | CTRL+' (single quote), ' (single quote) |
| Double opening quotes | CTRL+` (single quote), SHIFT+' (single quote) |
| Double closing quotes | CTRL+' (single quote), SHIFT+' (single quote) |
| AutoText element | ENTER (after you type the first few characters of the AutoText item name and the tooltip appears) |
Inserting characters using character codes
| Action | Hotkeys |
| Inserts a Unicode character for the specified Unicode character code (hexadecimal number). For example, to insert the euro sign (), type 20AC and then press the X key while holding down the ALT key. | Sign code , ALT+X |
| Determining the Unicode character code for a selected character | ALT+X |
| Inserts an ANSI character for the specified ANSI character code (decimal). For example, to insert the euro sign, press 0128 on the numeric keypad while holding down the ALT key. | ALT+ character code (on the numeric keypad) |
Highlighting text and pictures
| Action | Keyboard shortcut |
| Enable selection mode. | F8 |
| Selecting the nearest character. | F8 and then press LEFT ARROW or RIGHT ARROW |
| Selection expansion. | F8 (press once to highlight a word, twice to highlight a sentence, etc.) |
| Reduce discharge. | SHIFT+F8 |
| Disable highlight mode. | ESC |
| Extends the selection one character to the right of the cursor. | SHIFT+RIGHT ARROW |
| Extends the selection one character to the left of the cursor. | SHIFT+LEFT ARROW |
| Extend the selection to the end of the word. | CTRL+SHIFT+RIGHT ARROW |
| Extending the selection to the beginning of the word. | CTRL+SHIFT+LEFT ARROW |
| Extends the selection to the end of the line. | SHIFT+END |
| Extends the selection to the beginning of the line. | SHIFT+HOME |
| Extends the selection down one line. | SHIFT+DOWN ARROW |
| Extends the selection one line up. | SHIFT+UP ARROW |
| Extend the selection to the end of the paragraph. | CTRL+SHIFT+DOWN ARROW |
| Extend the selection to the beginning of the paragraph. | CTRL+SHIFT+UP ARROW |
| Extend the selection one page down. | SHIFT+PAGE DOWN |
| Extend the selection one page up. | SHIFT+PAGE UP |
| Extends the selection to the beginning of the document. | CTRL+SHIFT+HOME |
| Extends the selection to the end of the document. | CTRL+SHIFT+END |
| Extends the selection to the end of the window. | ALT+CTRL+SHIFT+PAGE DOWN |
| Select the entire document. | CTRL+A |
| Selecting a vertical block of text. | CTRL+SHIFT+F8 and then use the cursor keys; To exit selection mode, press the ESC key |
| Extends a selection to a specific location in the document. | F8 and then use the cursor keys; To exit selection mode, press the ESC key |
Selecting text and pictures in a table
| Action | Keyboard shortcut |
| Selects the contents of the next cell. | TAB |
| Selects the contents of the previous cell. | SHIFT+TAB |
| Selecting several adjacent cells. | While holding down the SHIFT key, press the corresponding cursor key several times |
| Column selection. | Use the arrow keys to move to the top or bottom cell of a column, and then do one of the following:
|
| Expanding a selection (or block). | CTRL+SHIFT+F8 and then use the cursor keys; To exit selection mode, press the ESC key |
| Selecting the entire table. | ALT+5 on the numeric keypad (with the NUM LOCK indicator off) |
Navigate through a document
| Moving | Keyboard shortcut |
| One sign to the left | LEFT ARROW |
| One character to the right | RIGHT ARROW |
| One word to the left | CTRL+LEFT ARROW |
| One word to the right | CTRL+RIGHT ARROW |
| Up one paragraph | CTRL+UP ARROW |
| One paragraph down | CTRL+DOWN ARROW |
| One cell to the left (in a table) | SHIFT+TAB |
| One cell to the right (in a table) | TAB |
| To previous line | UP ARROW |
| To next line | ARROW TO DOWN |
| To the end of the line | END |
| To the beginning of the line | HOME |
| To the beginning of the screen | ALT+CTRL+PAGE UP |
| To the end of the screen | ALT+CTRL+PAGE DOWN |
| Up one screen | PAGE UP |
| One screen down | PAGE DOWN |
| To the beginning of the next page | CTRL+PAGE DOWN |
| To the beginning of the previous page | CTRL+PAGE UP |
| To the end of the document | CTRL+END |
| To the beginning of the document | CTRL+HOME |
| To previous correction | SHIFT+F5 |
| To the position where the cursor was the last time the document was closed (after the document was opened) | SHIFT+F5 |
Moving around the table
| Moving | Keyboard shortcut |
| To the next cell in the row | TAB |
| To the previous cell of the row | SHIFT+TAB |
| To the first cell of the row | ALT+HOME |
| To the last cell of the row | ALT+END |
| To the first cell of the column | ALT+PAGE UP |
| To the last cell of the column | ALT+PAGE DOWN |
| To previous line | UP ARROW |
| To the next line | ARROW TO DOWN |
| One line up | ALT+SHIFT+UP ARROW |
| One line down | ALT+SHIFT+DOWN ARROW |
Inserting paragraph and tab marks in a table
| Insert | Hotkeys |
| New paragraph | ENTER |
| Tab character | CTRL+TAB |
Formatting characters and paragraphs
Copy formatting
| Action | Keyboard shortcut |
| Copy formatting from text. | CTRL+SHIFT+C |
| Apply copied formatting to text. | CTRL+SHIFT+V |
Changing the font or text size
| Action | Hotkeys |
| Opens the Font dialog box to change the font. | CTRL+SHIFT+F |
| Increase font size. | CTRL+SHIFT+> |
| Reduce font size. | CTRL+SHIFT+ |
| Increase font size by one point. | CTRL+] |
| Decrease the font size by one point. | CTRL+[ |
Formatting characters
| Action | Keyboard shortcut |
| Opens the Font dialog box to change character formatting. | CTRL+D |
| Changing the case of letters. | SHIFT+F3 |
| Converts all letters to uppercase. | CTRL+SHIFT+A |
| Using bold style. | CTRL+B |
| Applying underscore. | CTRL+U |
| Underlining words (not spaces). | CTRL+SHIFT+W |
| Double underline text. | CTRL+SHIFT+D |
| Convert to hidden text. | CTRL+SHIFT+H |
| Using italic style. | CTRL+I |
| Convert all letters to small caps. | CTRL+SHIFT+K |
| Apply subscript formatting (automatic spacing). | CTRL+EQUAL SIGN |
| Apply superscript formatting (automatic spacing). | CTRL+SHIFT+PLUS SIGN |
| Removing additional formatting from selected characters. | CTRL+SPACEBAR |
| Design of selected characters in Symbol font. | CTRL+SHIFT+Q |
View and copy text formatting
| Action | Keyboard shortcut |
| Display non-printable characters. | CTRL+SHIFT+* (asterisk on the numeric keypad has no effect) |
| Displays text formatting information. | SHIFT+F1 (and then click the text of interest) |
| Copy formatting. | CTRL+SHIFT+C |
| Paste formatting. | CTRL+SHIFT+V |
Setting line spacing
| Action | Keyboard shortcut |
| Single line spacing. | CTRL+1 |
| Double line spacing. | CTRL+2 |
| One and a half line spacing. | CTRL+5 |
| Increase or decrease the space before the current paragraph by one line. | CTRL+0 (zero) |
Paragraph alignment
| Action | Keyboard shortcut |
| Switch the paragraph between center alignment and left alignment. | CTRL+E |
| Switch the paragraph between justified and left aligned. | CTRL+J |
| Switch the paragraph between right-align and left-align. | CTRL+R |
| Align the paragraph to the left. | CTRL+L |
| Adding left padding. | CTRL+M |
| Remove left indentation. | CTRL+SHIFT+M |
| Creating a ledge. | CTRL+T |
| Reducing protrusion. | CTRL+SHIFT+T |
| Remove additional formatting from selected paragraphs. | CTRL+Q |
Apply paragraph styles
| Action | Keyboard shortcut |
| Open the task pane Apply styles. | CTRL+SHIFT+S |
| Open the Styles task pane. | ALT+CTRL+SHIFT+S |
| Using AutoFormat. | ALT+CTRL+K |
| Applying the Normal style. | CTRL+SHIFT+N |
| Applying the Heading 1 style. | ALT+CTRL+1 |
| Applying the Heading 2 style. | ALT+CTRL+2 |
| Applying the Heading 3 style. | ALT+CTRL+3 |
Merge and fields
Performing a merge
| Action | Hotkeys |
| View merge. | ALT+SHIFT+K |
| Merging documents. | ALT+SHIFT+N |
| Print the merged document. | ALT+SHIFT+M |
| Change the merge data source. | ALT+SHIFT+E |
| Insert a merge field. | ALT+SHIFT+F |
Working with fields
| Action | Keyboard shortcut |
| Insert a DATE field. | ALT+SHIFT+D |
| Insert a LISTNUM field. | ALT+CTRL+L |
| Insert a PAGE field. | ALT+SHIFT+P |
| Insert a TIME field (current time). | ALT+SHIFT+T |
| Insert an empty field. | CTRL+F9 |
| Update linked data in the original Microsoft Office Word document. | CTRL+SHIFT+F7 |
| Update selected fields. | F9 |
| Breaking connection with the field. | CTRL+SHIFT+F9 |
| Switch between the selected field's code and its value. | SHIFT+F9 |
| Switch between the values of all fields and their codes. | ALT+F9 |
| Activating field codes GOTOBUTTON or MACROBUTTON in a value field. | ALT+SHIFT+F9 |
| Move to the next field. | F11 |
| Move to previous field. | SHIFT+F11 |
| Field blocking. | CTRL+F11 |
| Unblocking a field. | CTRL+SHIFT+F11 |
Language bar
Handwriting recognition
| Action | Keyboard shortcut |
| Switch between languages and keyboard layouts | Left ALT+SHIFT key |
| Displays a list of fix options. | +C |
| Turn handwriting input on or off. | +H |
| Enable or disable the Japanese Input Method Editor (IME) on a 101-key keyboard. | ALT+~ |
| Enable or disable the Korean Input Method Editor (IME) on a 101-key keyboard. | Right ALT key |
| Enable or disable the Chinese Input Method Editor (IME) on a 101-key keyboard. | CTRL+SPACEBAR |
Function Key Reference
Function keys
| Action | Keyboard shortcut |
| Get help or access the Microsoft Office Online website. | F1 |
| Move text or picture. | F2 |
| Repeat last action. | F4 |
| Selecting the Go command (Home tab). | F5 |
| Move to the next window area or frame | F6 |
| Selecting the Spelling command (Review tab). | F7 |
| Selection expansion. | F8 |
| Update selected fields. | F9 |
| Display a tooltip for keys. | F10 |
| Move to the next field. | F11 |
| Selecting the Save As command (Microsoft Office button). | F12 |
SHIFT+function key
| Action | Keyboard shortcut |
| Display context-sensitive help or formatting information. | SHIFT+F1 |
| Copying text. | SHIFT+F2 |
| Changing the case of letters. | SHIFT+F3 |
| Repeat the Find or Go action. | SHIFT+F4 |
| Go to last change. | SHIFT+F5 |
| Move to the previous window area or frame (after pressing F6). | SHIFT+F6 |
| Selecting the Thesaurus command (Review tab, Review group). | SHIFT+F7 |
| Reduce discharge. | SHIFT+F8 |
| Switch between field values and their codes. | SHIFT+F9 |
| Display the context menu. | SHIFT+F10 |
| Move to previous field. | SHIFT+F11 |
| Selecting the Save command (Microsoft Office Button). | SHIFT+F12 |
CTRL+function key
| Action | Keyboard shortcut |
| Selecting the Preview command (Microsoft Office Button). | CTRL+F2 |
| Removal to the piggy bank. | CTRL+F3 |
| Closing the window. | CTRL+F4 |
| Move to the next window. | CTRL+F6 |
| Insert an empty field. | CTRL+F9 |
| Maximize the document window. | CTRL+F10 |
| Field blocking. | CTRL+F11 |
| Selecting the Open command (Microsoft Office Button). | CTRL+F12 |
CTRL+SHIFT+function key
| Action | Keyboard shortcut |
| Inserting the contents of a piggy bank. | CTRL+SHIFT+F3 |
| Changing a bookmark. | CTRL+SHIFT+F5 |
| Go to the previous window. | CTRL+SHIFT+F6 |
| Update linked data in a source Office Word 2007 document. | CTRL+SHIFT+F7 |
| Expanding a selection (or block). | CTRL+SHIFT+F8 and then pressing the arrow key |
| Breaking connection with the field. | CTRL+SHIFT+F9 |
| Unblocking a field. | CTRL+SHIFT+F11 |
| Selecting the Print command (Microsoft Office Button). | CTRL+SHIFT+F12 |
ALT+function key
| Action | Keyboard shortcut |
| Move to the next field. | ALT+F1 |
| Creating a new building block. | ALT+F3 |
| Quit Office Word 2007. | ALT+F4 |
| Restoring the previous size of the program window. | ALT+F5 |
| Navigate from an open dialog box to the document (for dialog boxes such as Find and Replace that support this behavior). | ALT+F6 |
| Find the next spelling or grammatical error. | ALT+F7 |
| Running a macro. | ALT+F8 |
| Switch between the values of all fields and their codes. | ALT+F9 |
| Maximizing the program window. | ALT+F10 |
| Display Microsoft Visual Basic code. | ALT+F11 |
ALT+SHIFT+function key
| Action | Keyboard shortcut |
| Move to previous field. | ALT+SHIFT+F1 |
| Selecting the Save command (Microsoft Office Button). | ALT+SHIFT+F2 |
| Display the task pane Help. | ALT+SHIFT+F7 |
| Activating field codes GOTOBUTTON or MACROBUTTON in a value field. | ALT+SHIFT+F9 |
| Display a menu or smart tag message. | ALT+SHIFT+F10 |
CTRL+ALT+function key
| Action | Keyboard shortcut |
| Display information about the system. | CTRL+ALT+F1 |
| Selecting the Open command (Microsoft Office Button). | CTRL+ALT+F2 |
Source
Hotkeys and keyboard shortcuts in Microsoft Office (General)
Hotkeys and keyboard shortcuts in Microsoft Excel 2007
© 2007-2022