Not every user knows that there are router models that can be configured as repeaters, and they will perfectly perform such functions. Zyxel brand routers are especially popular. They are reliable, have sufficient power and advanced functionality. Zyxel Keenetic models can work as repeaters. You just need to activate the repeater mode. Connecting Keenetic as a repeater will not take much time, you just need to spend a few minutes on the device parameters. Today we will talk in detail about how to configure the repeater mode on Zyxel Keenetic models.
Zyxel Keenetic 4G repeater mode
Keenetic Lite manually setting up a repeater is extremely simple, and there should be no difficulties. This mode can be configured on devices whose firmware starts with NDMS V2.05. Keenetic Lite as a repeater and other Zyxel models can be configured correctly in just a few minutes. Before connecting the repeater mode, it’s worth first understanding the theoretical points. Not every user knows what amplifier mode is and why it may be needed. Everything is extremely simple: this is a special mode in which the router, working as a repeater, strengthens the network already existing in the house. Let's look at it in detail using an example.
Let's say you have one Wi-Fi router at home, for example, an Asus model. But you are not satisfied with the quality of wireless network coverage. Wi-Fi does not reach some rooms or the signal is very weak. To eliminate this problem, there are special devices called amplifiers, another name for them is repeaters, repeaters. Such devices “take” the Internet through a wireless Wi-Fi channel from the base router and forward it further. In other words, they strengthen signals and expand the Wi-Fi coverage area. Zyxel Keenetic routers are equipped with a similar function. This option is called "Amp Mode".
After activating this mode, the Keenetic router will connect to the existing network. There will be one Wi-Fi network, and you can connect to it using one access key. The range of the wireless network will expand significantly. Users often ask the question: is it possible to organize Internet in a village via a wire in repeater mode? For example, the Zyxel Keenetic Start model has such a function. Below we will look in detail at how two Asus routers (basic) and Zyxel Keenetic Start as a repeater will interact.
Port forwarding
This procedure on Zyxel Keenetic Start will look like this:
- Select the “Security” section (shield icon).
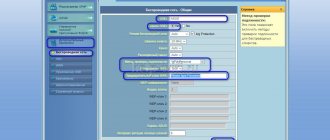
- On the “Network Address Translation (NAT)” tab, click on the “Add Rule” button. An additional window for setting up the rule will open: pay attention to the “Interface” parameter. The default is Broadband Connection. If your provider uses the connection type “Dynamic IP” or “Static IP”, then leave this value.
- If your provider uses the PPPoE protocol (for example, Rostelecom, TTK or Dom.ru), or a VPN tunnel (L2TP in the case of Beeline), then you need to select this external connection from the list.
Specify your connection type in the “Protocol” menu
Setting up Keenetic repeater
First, we need to get into the Zyxel control panel. Open any convenient browser and enter the IP in the address bar. In the window that opens, the system will prompt you to go through the authorization procedure. In the login and password fields you must specify admin. If the settings have been changed, enter new values.
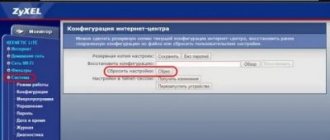
In the control panel, change the operating mode of the router to repeater. This is done as follows:
- In the main menu we find the System category.
- At the top you will see a Mode tab.
- Set the switch to Amplifier.
- Click Apply.
- The system will prompt you to reboot the router.
- Click “Now”.
When the repeater mode is activated, log into the device’s web interface at the standard address 192.168.1.1. It won't work anymore.
About setting up an Internet connection on Lite III
Open the document that you signed when connecting to the Internet (running a cable into the apartment). Find there a mention of the protocol - PPPoE, PPTP, L2TP, dynamic or static address. The configuration data must be indicated under the protocol.
- Setting up the ZyXEL Keenetic 4G 3 (III) router
If nothing is noted in the contract (which happens extremely rarely), contact the support service - they will dictate all the settings to you and, in principle, help you cope with debugging.
Static or dynamic IP address
Dynamic is used most often and is easier to configure:
- Go to the “Internet” section (marked with a globe below) and click on “Add interface” in the second IPoE menu.
- Set the IP settings to “Automatic”. Make sure that "Use interface to log out" is checked. The blue connector should also be highlighted with a bird.
- Click on “Apply”.
Specify automatic receipt of an IP address from your provider
If you have a static Internet address, set the same setting box to “Manual” in the “IP Settings” drop-down menu and enter all the data from the document (aka contract with the provider).
If you have a static address, write additionally the IP itself, gateway, mask and other data below
L2TP, PPTP or PPPoE
To debug these types, go to the third menu PPPoE/VPN:
- Add a connection to the menu.
Click on "Add connection" - We put the top two checkboxes. In the type we indicate one of three protocols: L2TP, PPTP or PPPoE. For the first two, enter the name, password and VPN server address. For PPPoE - only a name and password. All information is noted in the contract.
- We determine the IP type: automatic or manual (static).
You only need the latter if you have purchased a unique Internet address service from your provider. In this case, we enter combinations of numbers from the contract in the lines that come after the drop-down menu. Write your password, network login, and VPN server address
How to connect: setting up a connection
The last step is to connect the router in repeater mode to the base router. To do this, simultaneously hold down the Wi-Fi button on two devices. This is the button that activates the WPS mode. We press the button on Zyxel and on the base router. When the WAN indicator on the Keenetic device lights up, it means the connection is successful. Now we open the list of available networks, if only yours is displayed here and the signal is one hundred percent, then everything is fine, and the second router is expanding the wireless network. If one of the devices is turned off, the connection will be established automatically, and Zyxel will continue to expand the network.
Local LAN and DHCP
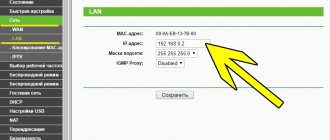
You can change the home network of the Lite III router to suit you in the third section (icon with monitors):
- We are interested here in the second menu “IP Settings”. We write, if necessary, the new Lite III address in the local area. This is necessary, for example, when the router “subordinates” to another device - a modem.
- In the second menu you need to activate the server. Set up a pool of local addresses (they will be distributed to devices when they log into Wi-Fi). Calculate a pool of the maximum number of gadgets that are on your network.
- Apply the settings using the button at the end of the page.
Setting up the local network takes place in the main section “IP Settings”
How to get into the control panel of the Zyxel “amplifier” when the standard address does not work
Once a connection is established between the two devices, it will no longer be possible to access the Zyxel web interface at the standard address 192.168.1.1. You will see that the web page will no longer be accessible. It will be impossible to get to it even if connected via a network cable. This happens because the base router automatically issues an IP to our repeater, but we simply don’t know it. For this reason, we first need to get into the parameters of the base router through its standard address, and look in its settings for the IP router that operates in repeater mode. In the main menu of the device you need to find a section dedicated to all connected devices. The list of connected devices will indicate the router operating as an amplifier and its IP address. If you click on it, you can immediately get to the settings of the repeater router.
Connecting the router to the computer - how to do it quickly and easily
We have the included cable in stock. Using it, we will set up a connection between the Lite III and the computer. It is better to set up via a cord rather than via Wi-Fi, as the connection will be more stable. But if the cable was not inside (for example, you bought the router second-hand), as a last resort, you can connect via Wi-Fi.
So, what do we do to connect two gadgets:
- We connect either end of the cable with a plastic plug to the yellow port on the Lite III (also to any). We connect the other end to the computer (the port will be the same shape as on the router). On a PC, look for the socket on the right, left or back (if you are working on a desktop).
- We insert the cable from the entrance or from the street into a single blue port.
You need to connect three cables to the router - We connect the router to the power supply (for this we take an adapter) and turn on the network gadget (the computer is already turned on). We are waiting for Lite III to load. A connection will, in principle, already exist between the two devices.
Typically, by default on computers, the network card is configured to automatically obtain DNS and IP from the router. But just in case, let's check the parameters:
- Open the “Network Sharing Center” through the “Control Panel”, then in it we look for the blue name of the network (opposite the word “Connections”).
Click on it and then on the “Properties” button. Expand the properties of your current connection - Another window will appear in front of you with a list and the ability to scroll: scroll it to the very end. Having selected the fourth version of the Internet protocol (IPv4), click on the properties button to open a new window.
- We set the selectors to automatically receive all parameters. We repeat the same for the sixth version of the protocol (IPv6).
How to exit from Keenetic amplifier mode to normal
It may be necessary to return the main function to the router only for standard Wi-Fi distribution. To do this, you just need to change the operating mode to standard. In the control panel, find the Mode section, select the router (or Internet center), save the changes and restart the device. There is an easier way - performing a reset. After resetting the settings, the settings page will be available at IP address 192.168.1.1.
ZyXEL Keenetic in repeater mode is extremely easy to configure. If done correctly, you can significantly expand the coverage area of your wireless network. If you know how to connect a second router to Keenetic Air, you can expand the network and use the Internet in any room of your house or apartment.
Alternative firmware
Review and configuration of the D-Link Dir-320 modem
The manufacturer Zyxel installs software modules responsible for certain functions on different models as standard. The purchased product sometimes does not provide repeater (amplifier) functions. The firmware can, however, be updated by downloading it from the Internet. If a different mode is required, for example, an adapter, it will require different device firmware.
With some risk of losing the warranty, an alternative third-party DD WRT firmware is installed on the router. It includes all the functions of Zyxel routers, including the repeater. Often, with universal firmware, the device works more stable than with Zyxel software.
Download DD WRT from the official website of the software developer as an archive, extract the file with the .bin extension from it, and save it on your computer.
On the start page of the Zyxel router interface, click “Settings” (gear symbol) in the bottom row and go to the “Files” (“Firmware”) tab.
In it, click on the “Browse” stencil, find the downloaded file and execute the “Replace” command. To continue, agree to the replacement by clicking the “Yes” button. The indicators on the front panel of the repeater will indicate the completion of the process.